ATTENTION!
WARNING!
ENGLISH
PCWS 4600
Weather Station with Radio Controlled
Projection Clock
Operating Instructions
Please read and observe the following information and keep the
operating manual nearby for future reference!
Safety information
Onlyusebatteriesofthesametype!
Always treat batteries with due care and attention and only use
batteries as described.
Never use standard and rechargeable batteries together. Never use
rechargeable batteries or standard batteries with different capacities or
charge statuses together. Never use standard or rechargeable batteries
which are damaged.
Riskofsuffocationthroughsmallobjects,packagingandprotectivefoil!
Keep children away from the product and its packaging!
Riskstohealthandtheenvironmentfrombatteries!
Never open, damage or swallow batteries or allow them to pollute the
environment. They could contain toxic and ecologically harmful heavy
metals.
Preventexposuretoenvironmentalinuences,e.g.smoke,dust,
vibration, chemicals, moisture, heat and direct sunlight.
Onlyallowrepairstobecompletedbyqualiedpersonnel.
PACKAGE CONTENTS
1Weatherstation,1Thermo-sensor,Operatingmanual
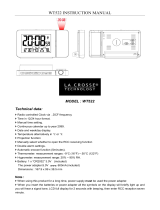
OPERATING ELEMENTS
1 PROJECTION
2 SNOOZE/LIGHT
3 PROJECT
4 MAX / MIN
5 PRESSURE
6 MODE(Presstoswitchbetweenalarmtime1/2andcurrenttime
7 +/°C/°F(Presstoswitchbetween°Cor°F)
8 -/RCC(Presstoswitchbetweentimezone+1,+2and-1)
9 CHANNEL(PressorslidetoswitchbetweenCH1,2and3)
10 Battery compartment
11 A/CJACKIN(Optional,PowerAdapternotincluded)
12 Hang hole
13 TX
14 Reset
During initial installation, the unit may take up to an hour or more to
acclimatise to current conditions. It is recommended to put the main
unit in the room where it will be used at least 1 hour prior to initial
installation.
STARTING UP
After inserting the batteries (First Thermo-sensor / Secondly Main unit),
the main unit will connect with the Thermo-sensor.
This process takes approx. 3 minutes. Then the display shows the
outdoor temperature. In case of failure of reception, please press and
hold “CHANNEL“ for approx. 2 sec. to receive again.
The weather station is capable of receiving up to 3 different channels.
Select the channel number (1, 2, or 3) by sliding the (9) switch.
The weather station will scan the 3 channels automatically.
Select the channel number (1, 2, or 3) by pressing the “CHANNEL”
on weather station.
TheautomaticreceptionoftheDCFradiosignal(DCF77,Timesignal
frequency77,5kHz)startsafter3minutesofoutdoorRFreception.
DuringthisDCFreceptionprocess,theashingsymbol(
) appears in
thetimedisplayarea.Thisprocesscantakeupto7minutes.
In case of failure of reception, pleases press “- / RCC“ aprox. 3 sec. to
receive again or stop anytime.
ATTENTION: During the reception process no other setting are possible!
Onceradiosignalreceptionissuccessful,thedisplayshowsthesymbol
“radio tower“ permanently. This clock will automatically synchronize with
theradiocontroltowersatthefollowingtime:02:03,03:03,04:03,05:03.
Pleaseobserveaminimaldistanceof2.5mtosourcesofinterference
such as televisions or computer screens.
MANUAL SET-UP
(The clock automatically changes from set-up mode to time display mode if
no key is pressed for approx. 30 seconds.)
Press and hold “PRESSURE“ for approx. 3 sec. until a beep sound is
heard.
Use “+ / °C / °F“ and “- / RCC“ to toggle between atmospheric pressure
units of Pascal (hPa) to inch of mercury (inHg)
Press “PRESSURE“toconrm.
Use “+ / °C / °F“ and “- / RCC“ to toggle between absolute / relative
atmospheric pressure
Press “PRESSURE“toconrm.
Use “+ / °C / °F“ and “- / RCC“ to set sea level closest to your location
Press “PRESSURE“toconrm.
Use “+ / °C / °F“ and “- / RCC“ to set current weather situation for your
location(SeeWEATHERFORECAST)
Press “PRESSURE“toconrmandexit.
While time is showing, press and hold “MODE“ for approx. 3 sec. until
displayisashing.
Use “+ / °C / °F“ and “- / RCC“ to change the language
(EN=English,GE=German,IT=Italian,FR=French,NE=Dutch,
ES=Spanish, DA=Danish)
Press “MODE“toconrm.
Use “+ / °C / °F“ and “- / RCC“ to set hour
Press “MODE“toconrm.
Use “+ / °C / °F“ and “- / RCC“ to set minute
Press “MODE“toconrm.
Use “+ / °C / °F“ and “- / RCC“ to set year
Press “MODE“toconrm.
Use “+ / °C / °F“ and “- / RCC“ to set month
Press “MODE“toconrm.
Use “+ / °C / °F“ and “- / RCC“ to set date
Press “MODE“toconrm.
Use “+ / °C / °F“ and “- / RCC“ to change between AM/PM and
24-hour clock
Press “SMODE“toconrm.
Press “MODE“toconrmandexit.Thedisplaystopsashing.
To see alarm time
Press “MODE“ to show alarm time A1
Press “MODE“ again to show alarm time A2
Press “MODE“ again to show normal time
Alarm set-up
Press “MODE“ to show alarm time A1
Press and hold key “MODE“forapprox.3sec.untillA1ashes
Use “+ / °C / °F“ and “- / RCC“ to set hour
Press “MODE“toconrm.
Use “+ / °C / °F“ and “- / RCC“ to set minute
Press “MODE“toconrm.
The same setting as for A2.
Alarm on/off
Press “MODE”, Alarm A1 is showing.
Press “+ / °C / °F”, A1 is activated (
)
Press again “+ / °C / °F”, A1 is disactivated
The same setting as for A2.
The alarm will sound for 2 minutes. Press any key to stop it.
Snooze function
Press the key “SNOOZE/LIGHT“, while the alarm sounds, to activate
the snooze function. If the snooze function is activated, Snooze alarm
symbolisshowing.Thealarmrepeatafter5minutes.Thesnooze
function can be stopped by pressing any key.
Projecting the current time
This clock is equipped with night time projection. The time can be projected
ontoaatsurfaceinaverydarkroom.
Press “SNOOZE / LIGHT” to activate the time projection.
The current time will be projected for approximately 9 seconds.
Turn the bottom knob clockwise or counterclockwise to adjust focus.
Press “PROJECT” to change projection display 180°
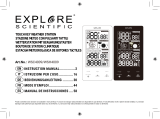
WEATHER FORECAST
Sunny Slightly Cloudy Cloudy Rainy Cloudburst
Max./ Min. for the indoor/outdoor temperature and humidity
Press “MAX / MIN” for displaying indoor/outdoor max./min. of
temperature and humidity
Press “MAX / MIN“formorethanapprox.5secondstoclearupthe
max./min.
Temperature trend
increasing trend, no change, decreasing trend.
The radio signal (DCF) covers a distance of up to 1500km to Frank-
furt/Main. If no RCC automatic time reception is possible, try again
later time, or follow the steps below to set the time manually.
Feature Value
PCWS4600
W x H x D 163x110x40mm
Weight
approx.
227g(withoutbattery)
Signal frequency 433 MHz
Power 2x1,5VAAA,notincluded
Temperature range 0~+50°C
Humidity range 20~95%
External sensors, max. 30 meters in open area
W x H x D 63x63x20mm
Weight
approx.
41 g (without battery)
Power 2x1,5VAAA,notincluded
Temperature range -20~+50°C
Humidity range 20~95%
To use for indoor and outdoor
Technical data (All rights reserved)
Thermo-sensor
Service hotline
In the case of technical problems, contact our Service hotline. Switzerland:
Tel.0900001675(nationalcharges,Swisscomattimeofgoingtoprint:
CHF2.60/min).Inthecaseofclaimsunderthetermsofguarantee,contact
your sales outlet.
Maintenance
Cleanthesurfaceofthehousingwithasoft,uff-freecloth.Donotuseany
cleaning agents or solvents.
Guarantee
Dexford equipment is produced and tested according to the latest produc-
tion methods. The implementation of carefully chosen materials and highly
developed technologies ensure trouble-free functioning and a long service
life. The terms of guarantee do not apply to the batteries or power packs
used in the products. The period of guarantee is 24 months from the date
ofpurchase.Alldecienciesrelatedtomaterialormanufacturingerrors
withintheperiodofguaranteewillberedressedfreeofcharge.Rightsto
claims under the terms of guarantee are annulled following tampering by
the purchaser or third parties. Damage caused as the result of improper
handling or operation, normal wear and tear, incorrect positioning or
storage, improper connection or installation or Acts of God and other
externalinuencesareexcludedfromthetermsofguarantee.Inthecase
of complaints, we reserve the right to repair defective parts, replace them
orreplacetheentiredevice.Replacedpartsordevicesbecomeourpro-
perty.Rightstocompensationinthecaseofdamageareexcludedwhere
there is no evidence of intent or gross negligence by the manufacturer. If
your device does show signs of a defect within the period of guarantee,
please contact the sales outlet where you purchased the Dexford device,
producing the purchase receipt as evidence. All claims under the terms
of guarantee in accordance with this agreement can only be asserted at
the sales outlet. No claims under the terms of guarantee can be asserted
after a period of two years from the date of purchase and hand-over of the
product.
Disposal
In order to dispose of your device, take it to a collection point
provided by your local public waste authorities (e.g. recycling
centre). According to the laws on the disposal of electronic and
electrical devices, owners are obliged to dispose of old electronic
and electrical devices in a separate waste container. The adjacent
symbol indicates that the device must not be disposed of in normal
domestic waste!
You are legally obliged to dispose of power packs and batteries
at the point of sale or in the corresponding containers provided at
collection points by local public waste authorities. Disposal is free of
charge. The symbols indicate that the batteries must not be disposed of in
normal domestic waste and that they must be brought to collection points
provided by local public waste authorities. Packaging materials must be
disposed of according to local regulations.
Declaration of Conformity
ThisdevicefullstherequirementsstipulatedintheDirective
1999/5/EConradioequipmentandtelecommunicationsterminal
equipmentandthemutualrecognitionoftheirconformity.Conformi-
tywiththeabovementioneddirectiveisconrmedbytheCEmarkonthe
device.ToviewthecompleteDeclarationofConformity,pleaserefertothe
free download available on our web site www.dexford.com.
3
4
6
10
7
2 1
11
5
9
8
A A A
A
A
A
14
10
9
13
12
AAA 1,5 V
AAA 1,5 V