ALTA WINDOW FASHIONS Honeycomb Shades User manual

Type
User manual

ALTA WINDOW FASHIONS Honeycomb Shades bring a unique blend of style and functionality to your windows. Designed for stationary fan-style arches, half circles, and quarter rounds, these shades offer a perfect fit for various window shapes. With their cellular construction, they provide excellent insulation, helping you save energy and maintain a comfortable indoor temperature. Installation is a breeze with the included brackets and arch support clips, ensuring a secure and precise fit.

ALTA WINDOW FASHIONS Honeycomb Shades bring a unique blend of style and functionality to your windows. Designed for stationary fan-style arches, half circles, and quarter rounds, these shades offer a perfect fit for various window shapes. With their cellular construction, they provide excellent insulation, helping you save energy and maintain a comfortable indoor temperature. Installation is a breeze with the included brackets and arch support clips, ensuring a secure and precise fit.

HONEYCOMB SHADES
Stationary Fan Style Arch | Half Circle & Quarter Round
INSTALLATION INSTRUCTIONS
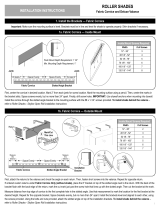
1a. Install the Brackets — Fan Style Arch 1b. Install the Brackets — Quarter Round
2. Shade Assembly — Fan Style Arch Only
3. Arch Support Clip Installation
Mount end brackets 3” from each side and space any remaining brackets
evenly. Make sure that all brackets are aligned and level.
For the best t on a non-perfect half circle in a deeply recessed window
opening, position the brackets so that the arch is installed close to the
original depth that the template was made.
Mount the brackets to the vertical and horizontal mounting surfaces.
Place brackets approximately 3” from the bottom and the top along the
vertical mounting surface. Then, place a bracket approximately 3” in from
both edges of the horizontal mounting surface.
NOTE: Not perfect half circles have a straight edge on one end of the fabric and the other has a trimmed (jagged) edge. Orient the fabric so that the trimmed
(jagged) edge, when fanned out, will become the outside edge of the arch. The straight side of the fabric stack will form the inner circle of the arch.
First, remove the end caps from the rail. Then, fan the fabric out and slide the free stiffened cell of the fabric into the rail so that the ends of fabric match up with
the ends of the bottom rail. Inside the center of the rail, mark where the stiffened fabric ends.
For perfect half circles only, cut the plastic stiffener provided to t the pivot opening. Then, peel the paper liner off the stiffener and adhere it to the bottom rail in
the inner circle of the arch.
Finally, install the endcaps back into place; the four circular dimples on the end caps should face down.
Position the clips so that the back of the clips are the same depth as the back of the installation brackets. First, place a clip at the top center of the window
opening and then, space remaining clips evenly apart. Screw the arch support clips to the mounting surface through the hole in the top of the clip (IB) or through
the slot in the back (OB).
IB
OB
Leave space
when mounting
Installation
Brackets
Hinge
Plastic Stiffener.
(Perfect half circle only)
3”
3”
IB
OB
3”
3”
OB IB
1
3”
3”
12
3
5
4
1
INSTALLATION INSTRUCTIONS
Child Safety
4a. Shade Installation 4b. Shade Removal — Only if necessary
5. Place Fabric Into Clips
First, nd the center of the fabric. Gently press on the fabric until you are able to get the back cell into the top center support clip. Then, go to the rst clip up from
the bottom of the arch and gently lift and fan out the fabric until the rst section ts the window opening. Gently press on the fabric until you are able to get the
back cell into the support clip. Repeat for remaining clips. Check the t of the arch shade. Reposition the fabric in the clips, if necessary.
2
1
2
1
Snap
2
3
Click 3
1
2
1a. Installez les supports - Arche de style éventail 1b. Installez les supports - quart de cercle rond
3. Installation du clip de support d’arche
STORES ALVÉOLÉS
Arche de style éventail stationnaire | Demi cercle et quart de cercle rond
INSTRUCTIONS D’INSTALLATION
2. Assemblage du store - Arche de style éventail seulement
Montez les supports d’extrémité à 3 po de chaque côté et espacez uniformé-
ment les supports restants. Assurez-vous que tous les supports sont alignés
et de niveau.
Pour un ajustement optimal sur un demi-cercle non parfait dans une ouver-
ture de fenêtre profondément encastrée, positionnez les supports de façon
à ce que l’arche soit installée à peu près à la profondeur originale à laquelle
le gabarit a été fait.
Montez les supports sur les surfaces de montage verticales et horizontales.
Placez les supports à environ 3 po du bas et du haut de la surface de mon-
tage verticale. Ensuite, placez un support à environ 3 po des deux bords de
la surface de montage horizontale.
REMARQUE : les demi-cercles imparfaits ont un bord droit à une extrémité du tissu et l’autre a un bord coupé (dentelé). Orientez le tissu de façon à ce que le
bord coupé (dentelé), une fois dispersé, devienne le bord extérieur de l’arche. Le côté droit de la pile de tissu formera le cercle intérieur de l’arche.
Retirez d’abord les capuchons d’extrémité de la traverse. Ensuite, dispersez le tissu et glissez la cellule rigide libre du tissu dans la traverse de façon à ce que
les extrémités du tissu correspondent aux extrémités de la traverse inférieure. Dans le centre de la traverse, marquez l’endroit où le tissu renforcé se termine.
Pour les demi-cercles parfaits seulement, coupez le raidisseur en plastique fourni pour l’adapter à l’ouverture du pivot. Ensuite, décollez la doublure en papier
du raidisseur et collez-la à la traverse inférieure dans le cercle intérieur de l’arc.
Enn, remettez les capuchons d’extrémité en place ; les quatre rides circulaires des capuchons d’extrémité doivent être orientées vers le bas.
Positionnez les pinces de manière à ce que l’arrière des pinces soit de la même profondeur que l’arrière des supports d’installation. Placez d’abord une pince
au centre supérieur de l’ouverture de la fenêtre, puis espacez uniformément les autres pinces. Vissez les pinces de support de l’arche à la surface de montage
par le trou situé sur le dessus de la pince (IB) ou par la fente située à l’arrière (OB).
IB
OB
Laissez de l’espace
lors du montage
Supports
d’installation
Charnière
Raidisseur en plastique.
(Demi-cercle parfait uniquement)
3 po
3 po
IB
OB
3 po
3 po
OB IB
3
3 po
1
2
3
4
1
3 po
5
INSTRUCTIONS D’INSTALLATION
Sécurité des enfants
4a. Installation du store 4b. Enlèvement du store - Seulement si nécessaire
5. Placez le tissu dans les pinces
Tout d’abord, trouvez le centre du tissu. Appuyez doucement sur le tissu jusqu’à ce que vous puissiez faire entrer la cellule arrière dans la pince de support cen-
tral supérieur. Ensuite, allez à la première pince en partant du bas de l’arche puis soulevez et dispersez doucement le tissu jusqu’à ce que la première section
s’adapte à l’ouverture de la fenêtre. Appuyez doucement sur le tissu jusqu’à ce que vous puissiez faire entrer la cellule arrière dans la pince de support. Répétez
l’opération pour les autres pinces. Vériez l’ajustement du store. Repositionnez le tissu dans les pinces, si nécessaire.
1023417 • rév 02/224
1
2
1
Snap
2
3
Clic 3
1
2
  • Page 1 1
  • Page 2 2
  • Page 3 3
  • Page 4 4

ALTA WINDOW FASHIONS Honeycomb Shades User manual

Type
User manual

ALTA WINDOW FASHIONS Honeycomb Shades bring a unique blend of style and functionality to your windows. Designed for stationary fan-style arches, half circles, and quarter rounds, these shades offer a perfect fit for various window shapes. With their cellular construction, they provide excellent insulation, helping you save energy and maintain a comfortable indoor temperature. Installation is a breeze with the included brackets and arch support clips, ensuring a secure and precise fit.

Ask a question and I''ll find the answer in the document

Finding information in a document is now easier with AI