Page is loading ...

ASSEMBLY INSTRUCTIONS
Keep these instructions for future use
TAYLOR
800.486.6554 | roomandboard.com 9/12/22
Recommended Tools and Materials
• Screwdriver or power drill
• Allen wrench (included)
• Studfinder
Note: We recommend assembling this product with two people.
Keep these instructions for future use. Units can
be disassembled and reconfigured as desired.
NOTE

4X
2X
800.486.6554 | roomandboard.com 9/12/22
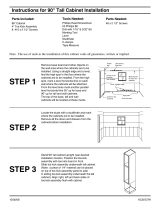
1Attach the base to the Taylor case piece that will be in the first (lowest) position. To do this, place
the case piece on its side or back and fasten the included Allen bolts through the base and
into the underside of the case piece. The wood base requires the addition of the included steel
counterweight. Install the counterweight before moving on to step 2.
2X
2X
Stand the assembled piece upright and place against the wall in its intended final location.
Next, use a level and the adjustable leveling feet on the underside of the base to ensure the
piece is perfectly level front-to-back and side-to-side. If you are assembling multiple pieces
positioned next to one another to form a wall unit, position and level all pieces at the same
time to ensure they are level with each other.
2

4X
If your piece has drawers or a wine insert, remove those components prior to adding additional
pieces. To add additional pieces, simply stack one on top of another to form a unit. Use the
included Allen bolts to fasten the pieces together from inside the lower piece by inserting the
bolts up through the top panel of the lower piece and into the corresponding threaded inserts in
the bottom of the piece above. Use the included Allen wrench to tighten the bolts completely.
3
800.486.6554 | roomandboard.com 9/12/22
Repeat steps 2-3 as needed to achieve your intended design
After installing the upper most pieces, the unit MUST be attached to the wall using the included
wall-mounting bracket system, regardless of overall height. Place the bracket on the top-most
piece so that its holes align with the bolt holes in the top of the piece. Multiple sets of holes
are provided on the bracket to accommodate diering baseboard and molding styles. Use a
studfinder to find two dierent attachment points that align with the holes in the bracket, and
secure the unit to these two places using screws. Drywall anchors are included if you are unable
to fasten directly to a stud. If attaching to a wall surface other than drywall, alternative hardware
may be required; contact a professional.
4
5
Pieces with drawers should never be positioned above 36 inches.
Drop-down desk pieces should only be placed in the lowest position.
CAUTION

800.486.6554 | roomandboard.com 9/12/22
Complete your assembly
by re-installing any drawers,
adjustable shelves or
insert components that you
removed in previous steps.
7
After the bracket is installed, place the finished wood top on top of the unit. Use the included
Allen bolts to fasten the lid through the upper most piece in the same way the cases below
were assembled. Your full unit should NEVER exceed 86” in total height (including base and lid
components).
6
4X
/