Page is loading ...

real wood.
engineered.
flooring.
14mm RUSTIC
HERRINGBONE ENGINEERED
WOOD FLOORING
General
Instructions
Congratulations with your new ‘Engineered Wood
Flooring’. Before starting with the installation, it is
critical that you read the following instructions
carefully. Failure to do so will inevitably result in
problems occurring and invalidate your warranty
"INSTALLATION IMPLIES ACCEPTANCE" NO
WARRANTY WILL BE OFFERED FOR APPEARANCE
RELATED CLAIMS ONCE THE PRODUCT IS
INSTALLED

Installer / Owner Responsibility
• To install Herringbone flooring correctly without issues requires
an appropriately trained and experienced installer with a high
technical ability
• This herringbone flooring is made up of single sided panels
with three groves to allow for multiple designs and save on
wastage
Engineered floors are a natural product and as such are subject to many
variances in both colour and character, this is to be expected at all times.
In order to establish a consistency of product a grading and waste
allowance of 10% has been set to allow for waste cuts and de-selection of
material if deemed unsuitable for the installation. This product is produced
with a manufacturing tolerance of + or - 0.5% on the dimensions of the
board, this should be considered on installation and where product is out
of tolerance that section dismissed as part of the cutting and waste
allowance.
The installer or owner assumes all responsibility for final inspection of the
product quality prior to installation. The installer or owner must determine
that the job site environment and the sub-surfaces involved meet or
exceed all requirements within these instructions; claims will not be
accepted if a fault was visibly noticeable or preventable prior to
installation. These conditions are noted further within
The installer or owner assumes all responsibility for final inspection of the
product quality prior to installation. The installer or owner must determine
that the job site environment and the sub-surfaces involved meet or
exceed all requirements within these instructions; claims will not be
accepted if a fault was visibly noticeable or preventable prior to
installation. These conditions are noted further within.
• All flooring must be stored in the correct conditions prior to installing.
• This product “must not” be stored on site until all sub – floors;
plastering, cement work; decorating and all other wet work is
completely dry.
• The nominated party “consumer or installer” that takes ownership
has final responsibility to ensure that they have received the correct
species and finish that was selected.
• The installer/owner must inspect each board and deselect pieces
with defects whatever the cause, under no circumstances should
these be installed.
• Engineered floors must not be installed below ground level, in
bathrooms or in potential wet / damp areas.
• It is normal practice to use stain, putty or filler stick for defect
correction or minor dimension differences. Always work from 3 to 4
packs at a time mixing boards to achieve the appearance you
require, taking into consideration the texture of the wood and the
natural change in colours.
• Each floor, even each board is an individual piece of nature, which is
guaranteed to make your home a place of beauty
Note: Keep a record of all your readings for later reference and warranty
enquires. We strongly recommend you keep a record of your moisture and
humidity readings prior to installation and in order to accurately determine
acclimatisation. These measurements “will be” required by the
manufacturer or supplier if there are any future problems.
Acclimatising & On-Going Environment Conditions
AS PART OF THE WARRANTY CONDITIONS OF YOUR ENGINEERED
FLOOR IT IS ESSENTIAL TO ACCLIMATISE THE PRODUCT FOR 48
HOURS PRIOR TO INSTALLATION
The aim of acclimatising wood flooring is to allow the temperature an
moisture content of the timber to adjust to the normal expected day to day
conditions within the building once it is occupied. Prior to installation, it is
the installer’s responsibility to ensure that the internal site conditions are
stable and are suitable for the installation of engineered flooring. A room
temperature of between 18 -20ºC and relative humidity of between 35-
65% must be maintained.
In winter, especially when the temperature is 0ºC or below, and the air is
dry outside, we recommend the use of a humidifier to stabilize site
conditions if the site readings are showing below 35% humidity.
The building should be fully enclosed including doors and windows and
heating should be operational.
Failure to do this could cause on-going behavioural problems with
the floor and will invalidate the warranty.
All wet work must have been completed otherwise the moisture will
transfer from walls floors and ceilings to the hardwood flooring
The delivered flooring must be left in the packaging with wrapping intact.
The flooring should be stacked horizontally no more than 2 to 3 packs high
or wide. Break up stacked cartons with battens to increase air circulation.
The use of gas or paraffin heaters should be avoided. Do not store next to
radiators. The flooring must be left in situ in the room it is to be installed
for 3-7 days before installation. Further checks must be undertaken by the
installer to confirm the wood flooring is in equilibrium with the site it to be
installed.
You can expect your Engineered flooring to be supplied at 8 % +/-
moisture content at the point of delivery. The correct moisture content for
installation within the UK & ROI climate is 10% +/-. Testing must be
carried to ensure the product is within this window. If the product has
moved beyond 12% action should be taken to reduce the moisture /
humidity readings within the area / product. A reputable installer will have
testing equipment such as “Tramex” to check relative humidity and the
moisture content of the subfloor / wood.
New build and renovation projects
A new installation site needs to dry out before wood flooring is delivered.
There is nearly always excessive moisture on either new construction
sites or major refurbishment contracts. In these instances, the wood will
absorb the excess moisture, resulting in stress issues such as cupping,
delaminating, expanding and later contraction. Always protect against
excessive moisture ingression, where it helps use dehumidification
equipment to stabilise the site conditions.
‘’Explanation of why the flooring should be one of the last jobs to be
undertaken on site; Other trades can damage an excellent installation if
care is not taken to safeguard against moisture ingression in hard wood
floors. In new building projects moisture is introduced into the fabric
throughout the construction process. Example; Under BS882 a concrete
mix of (1:2:4) one cubic metre of concrete will contain 187 litres of water.
This will have to dry out to below 4% moisture content (impediance) 75%
Rh before your flooring is installed. Therefore, you must always take a
new moisture reading of the concrete sub floor before proceeding with the
installation.
If the subfloor is between 4% Mc and 6.5% Mc then a 2 part Epoxy DPM
must be applied to the subfloor and if bonded direct the flooring secured
with a flexible adhesive such as trade / trowel flex.
Sub base:
When fitting to a sub base other than battens (Screed, ply, chipboard) the
sub base must conform to BS 8204: Part 1 1987, which states that it must
not deviate by more than + or - 3mm under a 2m straight edge in any one
direction. Uneven subfloors will cause movement and joint / floor failure.
Wooden sub structures must be sound and securely fixed. They must be a
minimum of 18mm in depth in order to be supportive. (This applies to Ply
or Chipboard also)
Always show a preference for Ply to be used as opposed to Chipboard.
Ply will offer a better fix, there is potential that the adhesive will not have a
secure connection to chipboard. Furthermore, chipboard when damp will
become less resilient if moisture is introduced. Screed / Concrete
subfloors must be solid, stable, clean, free of wax, paint and old adhesive
residue. The moisture content using Tramex / Other none destructive
moisture meter should be under 4% (2.5% CM test / Din Standard), above
this will cause excessive dimensional change in the wood flooring
resulting in problems such as cupping / delaminating not covered by the
guarantee. Floor boards need to be overlaid with a minimum of 6mm
Plywood securely fixed as per BS 8201:2011 and is, sound, flat, and
under 12% moisture content. Prior to overlaying with plywood a bitumen
paper barrier confirming to BS 1521 must be installed directly on top of the
wooden suspended sub floor. Always check the airbricks are clear and to
allow appropriate air flow within the sub floor void.
Expansion
All Engineered floors will react to changes in the presence of moisture
within the boards. In the winter months when central heating is present,
moisture leaves the wood causing the floor to contract which will leave
slight gaps between each plank. In the summer months when the humidity
is higher the wood will expand and the gaps will disappear. This needs to
be allowed for during the fitting process. Therefore, it is important when
installing an Engineered floor to leave the proper expansion area around
the perimeter and to ensure the flooring is fully acclimatised prior to
installation. An expansion gap of 10mm must be in place around the
“FULL” perimeter of the room. Flooring must “NOT” be run through
doorways in to other rooms, instead it should be broken in the doorway

again allowing 10mm; this gap is covered by a profile that is not fixed to
the new flooring. No fixed objects are to be installed on the flooring – there
is no exception!
Please note with a large area (lengths in excess of 13 m) the floor must be
divided with an expansion gap provided on both length and width. On
completion, this gap is again covered by a profile that is not fixed to the
new flooring.
Under-floor heating: Embedded Systems Only, Matting Systems are
not Suitable
This product is suitable for use with under-floor heating systems subject to
the manufacturer’s recommended installation guidelines with timber
flooring. When laying a floor where under floor heating has been installed
it is important to follow these guidelines:
1. The heating has been started up at least 3 weeks before laying the floor
to achieve an ambient living environment.
2. Make sure that there is no water leaking from the pipes.
3. If the subfloor is concrete, make sure the concrete is dry. This means
not more than 2.5% moisture, full depth of screed (WHEN THE FLOOR IS
COLD).
4. The subfloor has to meet all the requirements for under floor heating.
5. The surface temperature of the ground (below the engineered flooring)
MUST NOT EXCEED +27°C.
6. The heating has to be turned off 48 hours before laying the floor.
7. 2 days after laying the floor, the heating should be turned on gradually,
increasing 2-3°C every 24 hours.
8. A minimum temperature of 18 °C must be maintained.
9. Do not cover the floor with rugs etc when the UFH heating is operating
Always check the heating manufacturer’s detailed instructions to ensure
compatibility.
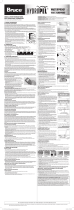
Some possible designs
Installation of Herringbone Floor - Full Coverage Glue Down
Installation Only:
On completion of the preceding tasks the following steps should be
followed for Installation.
1. You must use a water-free, MS, or Polyurethane glue, specially
formulated for use with wood flooring.
2. Installation must be full coverage with the traditional trowel
method, in all cases follow the instructions of the adhesive
manufacturer. With this method, you adhere direct to the sub
floor and you do not need to apply glue to the tongue and
groove.
3. Concrete / screed floors should be primed with a Polyurethane
Primer “only” – other primers such as PVA should never be
used.
4. Any surplus glue that may seep out on to the surface of the
wood must be removed immediately with suitable wipes.
5. Generally you will want the flooring to run the longest length of
the room towards a natural source of light for aesthetic
reasons.
6. Under cut the bottom of door frames, wardrobes, etc. to allow
for the flooring and underlay to fit under it.
7. Open a number of packs and “shuffle” the boards to ensure an
even distribution of colour and character.
8. If you discover a defective piece DO NOT LAY IT. You are the
final judge of acceptable quality.
9. Unilin Distribution or its dealers will not be responsible for costs
associated with installing, finishing and/or replacing flooring
installed with obvious defects.
10. SETTING OUT, ACCURACY AND MARKING PROCEDURES
ARE VITAL TO ENSURE THERE IS NO RUN OUT /
GAPPING ISSUES.
11. Regularly check the floor alignment during installation.
12. Mark a straight line down the centre of the room then measure
the width from the centre line to the wall to ensure the final
board cuts that will be installed are of suitable length either side
of the room. If required relocate the initial centre line to suit as
shown in diagram 1a.
13. Mark line 2 & 3 either side of the centre line at a distance equal
to the corner points of the flooring to be installed when
connected as diagram 2a.
14. Create a template larger in size than the length of flooring
boards, this template must be exactly square to support the
rows installed. This should be rotated with its upper and lower
points aligned with the right hand side marker line shown in
diagram 3a.
15. Spread the adhesive in front of the template up to the initial
number of rows to be installed. The instructions of the adhesive
16. manufacturers must be followed including notch size and type
of trowel.
17. Lay the first boards as in diagram 4a ensuring the corners are
aligned with the centre and parallel lines and square to the
plywood template.
18. Subsequent rows should be installed in the same manner, so
the intended pattern is formed.
19. Continue the same process left and right of the starter boards.
20. Further lines parallel to the first set to use as board corner
marker points as the installation progresses outwards.
21. Progress the installation of the first rows until they reach full
room width
22. The perimeter and all fixed objects must be fitted ensuring a
10mm expansion gap.
23. If required a tapping block should be used to tap boards
together, direct contact of hammer or mallet on the board edge
is not recommended.
24. All perimeter gaps should be covered with skirting or Scotia
using cover strips at thresholds.
Wood floor care guide:
Wood floors are a lifetime investment, and decisions concerning them
should not be taken lightly. Routine maintenance should include protecting
the surface finish from moisture and heavy wear which creates scratches.
Consumer Expectations:
Wood floors are NOT impervious to the day to day impact of grit, food,
spills, and water. Preventive maintenance like area rugs, floor protectors
(on ALL furniture on your wood floors), and routine maintenance with
proper hardwood floor cleaner should always be exercised (improper
products can contribute to additional wear, may VOID your warranty, and
cause failure when recoating).
Good practice:
Keep this as a regularly scheduled event. Always perform this process
before and after a major event that involves a high volume of traffic on the
floor.
• Do: Place Protector pads on ALL furniture legs resting on your
wood floor.
• Do: In high traffic areas use added protection to prolong the
surface life of your floor.
• Do: Place walk off mats and area rugs in high traffic areas
(make sure they stay dry and are cleaned underneath on a
regular basis).
• Do: Perform routine maintenance; this should include
sweeping, vacuuming and/or dust mopping to remove dirt and
grit.
• Do not: Wear high heel shoes as this will cause indentations in
the wood, keep your pets nails trimmed on a regular basis.
• Do not: Use WET or STEAM mops.
• Do not: Use ammonia.
• Do not: Use dust cleaning substances.
• Do not: Track dirt over the surface of the floor, clean
immediately.
• Do not: Use other general floor cleaning products, only
specialised Elka cleaning products should be considered.
• Do not wax a Polyurethane or oiled finish.

Checklist of Critical Guidelines
The following checklist must be completed before the Installation of wood
floor products.
The information on the checklist MUST be followed in every way. If any of
these requirements are NOT completed, you WILL be jeopardizing your
wood floor performance and/or warranties and guarantees. Allowing any
items to be overlooked, could cause the installation to fail in the short or
long term. Once this information is secured, a signed copy should be kept
in a safe place in case future concerns arise.
UNTIL THE FOLLOWING GUIDELINES
HAVE BEEN MET, THE JOBSITE IS NOT
READY FOR WOOD FLOOR INSTALLATION!
EXTERIOR CONDITIONS:
• GUTTERS AND DOWN PIPES ARE PROPERLY PLACED TO
DRAIN WATER AWAY FROM STRUCTURE: YES / NO
INTERIOR CONDITIONS:
• ALL WET TRADES (TILE, PAINT, PLASTER, ETC.) HAVE
COMPLETED WORK ON SITE: YES / NO
• THE BUILDING IS ENCLOSED; WEATHER TIGHT, INCLUDING
DOORS AND WINDOWS: YES / NO
• HVAC (HEAT VENTILATION, AIR CONDITIONING) ARE IN PLACE
AND OPERATING PROPERLY: (3-5 days prior to delivery of wood
floor products) YES / NO
• THE TEMPERATURE AND RELATIVE HUMIDITY WITHIN THE
STRUCTURE ARE AT "NORMAL LIVING CONDITIONS" (TEMP-
BETWEEN 18 -20ºC AND RELATIVE HUMIDITY BETWEEN 45 –
65%) YES / NO
CONCRETE SLAB CONDITIONS
• DPM HAS BEEN INSTALLED UNDER THE SLAB: YES / NO
• CONCRETE HAS A MOISTURE CONTENT OF UNDER 4%
IMPEDIANCE (2.5% CM Test / Din Standard / 75% Rh): YES / NO
• SLAB, IT IS FLAT AND TO SPECIFICATIONS: YES / NO
• IF APPLICABLE ALL AIRBRICKS CLEAR FROM OBSTRUCTION
YES / NO
• IF APPLICABLE TAR SATURATED CRAFT PAPER INSTALLED
OVER FLOORS WITH A CRAWL SPACE BELOW YES / NO
DELIVERY AND WORKING CONDITIONS:
• THE FLOORING WILL NOT BE INSTALLED BELOW GROUND
LEVEL: YES / NO
MOISTURE CONDITIONS
• MOISTURE CONTENT OF THE WOOD SUBFLOOR IS NO MORE
THAN 2 PERCENTAGE POINTS ABOVE OR BELOW THE FINISH
FLOORING AND IS WITHIN REGIONAL MOISTURE CONTENT
GUIDELINES. YES / NO
• MOISTURE TESTING OF CONCRETE BEGAN NO SOONER
THAN 30 DAYS AFTER THE SLAB WAS POURED. TEST
RESULTS (BELOW 4%) INDICATED THAT IT IS SAFE FOR
WOOD FLOORING INSTALLATION TO BEGIN, AND ALL
READINGS HAVE BEEN DOCUMENTED: YES / NO
FOR YOUR OWN BENEFIT IT IS VERY IMPORTANT THESE
GUIDELINES ARE MET, AND FOLLOWED TO THE LETTER.
IF NOT, SOMEONE [BUILDER, OWNER, WOOD
FLOOR CONTRACTOR, or ALL] NEEDS TO SIGN OFF THAT
THESE ITEMS HAVE NOT BEEN FOLLOWED.
THAT PERSON COULD ULTIMATELY TAKE SOME,
IF NOT ALL, RESPONSIBILITY
For further technical information on this product visit:
www.elkaflooring.com
Important: Elka Warranty. Please review your Elka flooring warranty at
www.elkaflooring.co.uk
Elka flooring is brand registered & imported by Unilin Distribution Ltd.
Elka Unit 4, "The Furrows" Barton Dock Rd. Trafford Park,
Manchester M32 0SZ
/