Page is loading ...

Wood Flooring
Installation Guide
Fired Earth, Twyford Mill, Oxford Road, Adderbury, OX17 3SX
Tel: 01295 812088 Fax: 01295 810832 www.firedearth.com
© Aga Consumer Products Limited trading as Fired Earth. August 2008
www.firedearth.com

The purpose of this booklet is to outline the basic principles
of installing Fired Earth wood floors. Space does not allow
for an exhaustive coverage of the subject, however an
attempt has been made to present the basic information on
installation techniques. It is hoped that this booklet will
prove a useful guide for both the complete novice and the
seasoned professional.
As we have no control of the storage and handling of the
timber on site, site conditions or the quality of the
workmanship (unless you are using our Installation Service),
we strongly recommend that you employ the services of an
experienced and competent wood fitter.
Remember to read very carefully the instructions on the
packaging of adhesives, sealants, maintenance products etc,
and above all else remember the golden rule of fitting – keep
everything meticulously clean and orderly as work progresses.
Wood Flooring
Installation Guide
Contents
General Characteristics 4
Planning 7
Substrates 8
Fixing 9
Stage 1 - Preparation 9
Stage 2 - Installation 11
Sealing 14
Underfloor Heating 16
Cleaning and Maintenance 17
Classic Oak Flooring -
Solid board 18
Classic Oak Flooring -
Engineered board 19
Hardwood Flooring
Selection - Solid board 20
Product Selector 22
Important Notes 24
Glossary 25
Important Notes
All wood is hygroscopic (it will react to the
moisture around and in contact with it) and
as a result will expand or contract
accordingly. All sources of damp must be
rectified prior to the installation of the floor
and moisture levels in rooms fitted with
wood should be maintained at a stable level,
commensurate with normal living conditions.
The suitability of the environment of a
particular room/s for a real wood floor can
only be assessed by the use of good quality
testing equipment.
The delivered packs will contain differing
square meterage. The sum of the packs will
equate to the quantity ordered. Wood orders
containing random widths will have equal
square metres of each width which means
there will be more narrow than wide planks
which should be carefully distributed
throughout the floor for best effect.
No complaints regarding the appearance of the
product will be accepted by the company once
the wood has been installed.
Fired Earth is a trading name of Aga Consumer
Products Limited. Registered in England and Wales
under Registered Number 3872754. Registered Office
Address - 4 Arleston Way, Shirley, Solihull B90 4LH.

not arrange delivery until all wet works e.g.
plaster, screeds etc. have completely dried.
Moisture and Humidity
Wood floors are subject to movement due
to seasonal and atmospheric changes. A
damp atmosphere will cause the wood to
expand and dry conditions will cause the
wood to shrink.
Shrinkage will create gaps between boards,
which is characteristic of wood floors.
Excessive variation in humidity can lead to
boards distorting in shape and possibly
lifting. It is imperative that site conditions
are of a consistent moisture content for
wood flooring on an ongoing basis.
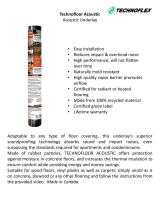
The table below demonstrates the correct
conditions for laying wood flooring. The
area highlighted shows the relative
humidity should be between 50 and 65%
and the room temperature should be
between 15 and 25ºC. These measurements
CAN ONLY be confirmed with the correct
testing equipment. Do not use existing or
previously laid floors as a guide to the
suitability for laying a new wood floor. Failing
to carry out the correct checks and
preventative actions at this stage leads to the
vast majority of wood flooring problems.
Sapwood
Sapwood can appear as either lighter or
darker patches in a wood floor. A small
quantity of sapwood will be apparent in
select grade timber whereas it will be more
obvious in rustic grades. This wood is not of
an inferior quality but can, if preferred, be
removed by the wood fitter.
Grade
The wood floor industry offers a variety of
grades to allow accurate assessment of
product quality. Fired Earth floors are
available in various grades; Select, Nature,
Rustic and Character. Select as the name
suggests means the wood is carefully
chosen to maintain the natural beauty of
the wood but to remove the majority of the
knots and other natural characteristics. At
the opposite end of the scale, Character
grade uses as much of the tree as possible,
so knots, shakes, checking, grain, colour,
sapwood etc. provide a varied and
interesting floor and a true representation
of the timber.
Knots/Checking
The amount of knots and checking will vary
greatly between Select and Rustic grades.
Wood flooring can be used internally in
most rooms except those which are likely
to get excessively wet. It is possible to use
them in kitchens and bathrooms with care,
but any spillages must be wiped up
immediately. Bath mats etc. should not be
left on the floor if they are damp.
Wood should only be used in conservatories
which share the same conditions as those
found in the house. Conservatories which
are closed off from the house and do not
maintain a consistent temperature or
humidity are not suitable for wood flooring.
Engineered boards are recommended for
use in suitable conservatories.
Fixing Instructions
This booklet provides useful information on
planning, installation and maintenance, and
explains how we recommend our wood
floors are fitted. Please ensure your
nominated contractor has read this carefully.
In particular, site conditions relating to
humidity MUST be checked thoroughly
before taking delivery of a wood floor.
Failure to check moisture levels may result
in a wood floor gaping excessively,
distorting in shape and in some
circumstances cupping, bowing or lifting.
Appearance
Wood is a natural material hewn from
individual trees and as such varies from
batch to batch and pack to pack. A single
sample should not therefore be taken as an
accurate indication of the colour of a
subsequent batch. Our sales team can
advise you on the choices of grades
available and how this effects the character
of the boards.
Our woods are supplied both presealed with
oil and unsealed, in a solid hardwood or
engineered board. Coloured oils are
available for individual treatment of
unsealed floors. Samples are available to
give an indication of the final colour and
finish of all our range including coloured
oils. As with any natural product, direct
sunlight may alter the colour of the
flooring. Hardwood cherry is particularly
susceptible to colour change. Areas of the
surface that are covered (for example by
furniture and rugs), being out of the
sunlight, may not change colour to the
same extent. If possible, these items should
be moved regularly.
Acclimatisation
Most wood floors should be placed in the
room in which they are to be fitted at least
48 hours prior to installation. Site conditions
may dictate a longer period of
acclimatisation. Please use the chart on page
5 to confirm conditions on site are correct
for the delivery of your wood. Individual
packs do not need to be opened. Please do
54
General Characteristics
Relative
Humidity
Moisture Content
Equilibrium
85% 18,1 18,0 18,0 17,9 17,5 17,1
80% 16,2 16,0 16,0 15,8 15,5 15,1
75% 14,7 14,5 14,3 14,0 13,9 13,5
70% 13,2 13,1 13,0 12,8 12,4 12,1
65% 12,0
12,0 11,8 11,5 11,2 11,0
60% 11,0
10,9 10,8 10,5 10,3 10,0
55% 10,1
10,0 9,9 9,7 9,4 9,1
50% 9,4
9,2 9,0 8,9 8,6 8,4
45% 8,6 8,4 8,3 8,1 7,9 7,5
40% 7,8 7,7 7,5 7,3 7,0 6,6
35% 7,0 6,9 6,7 6,4 6,2 5,8
30% 6,2 6,1 5,9 5,6 5,3 5,0
Temp. (
o
c) 10 15 20 25 30 35

Select will have very few and no filling,
whereas Rustic will have reasonable numbers
and some may be filled. All our wood floors
are carefully selected to offer a range of the
naturally occurring characteristics of the tree.
Knots will vary in size and filling will be with
an appropriate colour of filler.
Shakes
Kiln checking and ‘heart shakes’ will be
present on some boards. These are uneven
cracks running in the direction of the grain
and are characteristic of the wood.
Sealing
Oiled presealed floors all require finishing
with one light coat of Maintenance Oil.
Unsealed boards will require sealing and
finishing with Master Oil or one of
the 6 Coloured Oils.
Sanding
None of our boards require further sanding
if correctly installed.
Specification
Due to the nature of wood, some variation
in size and thickness may occur. The
dimensions listed may be subject to minor
inaccuracies and are given as a guide only.
All wood flooring is supplied to the nearest
whole square metre (always rounding up).
External Use
Fired Earth wood flooring is not suitable
for external use.
Solid Wood Board
Traditionalists will be unanimous in their
appreciation of our solid wood boards. In
the pursuit of the purest design dream,
laying these, the most traditional of boards,
will profoundly resonate all that is sought
after by using such a splendid natural
product. As anyone who owns a solid,
hardwood floor will testify, the boards
mature and improve with age.
Unsealed and brushed boards are produced
to give a more ‘rustic’ finish to the surface
of the board which adds further character.
Only 128mm solid wood floors are suitable
for the CLIP SYSTEM.
Engineered Board
The engineered board is a product of the
modern age. With the traditional look and
aesthetic characteristics of a solid board, it
provides more versatile fitting options for a
number of projects where solid boards are
unsuitable.
The eleven layers of ply and 5.5mm surface
layer of solid oak provide a stable
construction for floating floors and can
be used with some underfloor heating.
The strong construction of the board
prohibits extensive movement to reduce
the risk of warping.
76
Wood floors should be installed at a final
stage, prior to decoration. Generally
speaking, the boards should be laid
lengthways towards the main incoming
light source and, where possible, down the
length of the room. Consider at this stage
how the edges of the floor will be finished.
Whenever possible the skirting boards are
best fitted after installation of the wood
floor as they can disguise the 15mm gap
required for expansion around the
perimeters. A 15mm gap on each opposite
wall is sufficient for a maximum width of
flooring of 6.0 linear metres between those
walls. If the width of the floor to be
installed is over 6.0 linear metres, or if the
environment of the installation is going to
have a higher than normal moisture
content or relative humidity, consideration
should be given to using shims between
each row of boards. This ensures a specified
narrow gap is left between each board,
allowing independent expansion (seek fitter
advice if required).
Fired Earth can supply a range of skirting
boards, quadrants, pipe ferrules etc. to suit
your chosen timber. These will provide you
with the most appropriate product for the
finishing touch to your floor. Alternatively
cork fillets or can be used. At doorways and
thresholds finishing trims should be used to
provide grading for height changes,
protection for the edges of the floor and an
aesthetic finish. Prevent grit and dirt
damaging your floor by using good quality
entrance mats. Always have large good
quality mats both inside and outside
external doors. These must be cleaned
regularly to minimise the ingress of grit and
moisture onto the floor. Our non reducer
sections can be used to form a ‘well’ within
the floor which holds the mat in place and
can help where door clearance is limited.
The wood boards should be placed in the
room in which they are to be fitted to
acclimatise (minimum 48 hours but varying
on site conditions) and should be stacked
carefully to allow air to circulate, see chart
on page 5. The room should be at its
normal living temperature (minimum 15ºC
and maximum 25ºC and humidity 50% –
65%) during the acclimatisation process.
The heating should be switched on (if
required to provide normal living conditions)
at least 10 days prior to installing the wood.
It is not always necessary to acclimatise
engineered boards but if in any doubt a
period of acclimatisation is advisable
(see Underfloor Heating, page 15).
Calculating Quantities
Calculate the total square meterage of
the room/s and add 10% for cutting
and wastage. Small, complicated or
difficult areas may require more material
for wastage.
Planning

98
Substrates
All substrates must be structurally sound,
flat, clean and dry. The normal tolerances
are +/- 3mm over a 2.0m straight edge.
Uneven floors should be levelled with Fired
Earth Universal Levelling Compound or
battens and packers depending on the
fixing system to be used. The surface
should be free of all contaminants and
loose material. All possibilities of damp e.g.
walls, drains, damp proof courses,
plumbing, fridges, washing machines etc.
MUST be thoroughly checked and repaired
if found to be leaking.
In particular all construction dampness
must have completely dried and the house
should be at the temperature and humidity
expected during occupation.
Sand and Cement Screed/Concrete
Existing screeds/concrete must be checked
for moisture. This can easily be carried out
using a moisture meter. If moisture is
present, i.e. over 5% (equivalent to 60% RH
with a hygrometer), wood floors must not
be fitted until the problem has been
rectified. Please seek specialist advice.
Existing Timber Base
e.g. Joists, tongue and grooved
floorboards and floating floors.
a. Solid Boards
Can be fixed directly over sound and secure
joists, or directly onto prepared floorboards.
If the existing floorboards are sufficiently
flat, the new boards can be laid directly on
to them at 90 degrees. If the existing floor
is not suitably flat then it must be made
flat and level by overlaying with WBP
(water and boil proof) plywood. Loose
boards must be secured or the new floor
may squeak. Please note: If nails/screws are
being used, care must be taken not to
damage pipes or electrical cables beneath.
b. Engineered Boards or CLIP SYSTEM
This cannot be fitted directly onto joists.
Existing wooden floors must be made flat
and level prior to installation of the overlay
boards. Plywood of a minimum depth of
12mm, should be firmly screwed down to
level uneven timber bases.
Floating Floor
All Fired Earth timber floors can be fitted
onto floating floors, which must be sound,
flat, firm and free of any deflection. When
the boards are to be installed by secret
nailing, a minimum 12mm depth wbp
plywood must be screw fixed to the
chipboard at 300mm centres.
Other Floor Finishes
Most other floor finishes e.g. lino, carpet
etc. should be removed prior to installation
of a new wood floor. Please ask for
further advice.
Fixing
There are a number of methods for fixing
wood floors. Fired Earth recommends that
solid boards are ‘secret nailed’, using the
Porta Nail system, fully bonded using
Sika
T54
or floated on our CLIP SYSTEM.
Engineered boards are floated onto a
suitable underlay. Where floor height is
critical, engineered boards can be fitted
over an underlay which minimises height
gain, solid wood can be glued down,
128mm boards can be fitted with the CLIP
SYSTEM or, floorboards can be removed to
allow for nailing solid boards directly to
the joists.
Prior to installing the wood, it should be
thoroughly checked to ensure that the
colour is correct and the boards are
straight and undamaged. Any damaged
boards should be put to one side and used
for cuts or in less obvious areas. Ensure the
various shades, grades and widths where
applicable of wood are randomly
distributed throughout the floor. The wood
fitter must assess each board as it is being
laid for suitability. If you are in any doubt,
please consult your Fired Earth Showroom
prior to installing.
A final moisture check should be conducted
immediately prior to installation. The wood
to be installed should be within +/- 2%
moisture of the surface onto which it is to
be fitted.
The exception to this is a subfloor with a
surface DPM applied, which should not
require checking and must not be damaged
during installation of the floor. Fired Earth
recommend Protimeter’s MMS test
equipment for measuring moisture content,
relative humidity and temperature.
Sand and cement screeds/concrete
a. Solid Boards
Secret Nailing - Lay a suitable polythene
250mu sheet (Visqueen) vapour barrier
onto the substrate, overlap any seams by at
least 20cm and securely tape to provide a
suitable seal. The polythene should be
returned up the walls by 50mm, excess can
be cut off once the floor is laid. Lay 18-
24mm WBP plywood across the floor in the
opposite direction to the length of the new
boards, to provide a material into which
the nails can fix. The plywood sheets
should be butted together allowing a
perimeter gap for expansion. Alternatively,
kiln dried and treated timber battens 50 x
25mm, may be laid on to the floor at a
maximum of 400mm centres, see diagram
on next page.
Stage 1 - Preparation

1110
Fully Bonded System – Solid wood and
engineered boards can be fully bonded on
to flat and level screeds (see Substrates,
page 8). It is imperative however that the
screed is sufficiently dry. If the screed has a
relative humidity reading of over 60%, a
wood floor must not be laid over it without
the application of a surface damp proof
membrane such as Sika Primer MB. Follow
the manufacturer’s instructions rigidly to
ensure the membrane is fully effective.
Fired Earth recommends that at least one
coat of Sika Primer MB is applied to a
screed even if the screed is believed to be
60% RH or below.
CLIP SYSTEM – Boards being laid using the
CLIP SYSTEM should be fitted directly onto
the polythene membrane which has been
overlaid with Fired Earth Wood Underlay.
b. Engineered Boards
The subfloor should be level prior to
installation of a wood floor. Fired Earth
Universal Levelling Compound can be
used on screeded floors up to a maximum
depth of 5mm to level the substrate
when necessary.
Fired Earth Wood Underlay should be fitted to
cushion the floor after laying a suitable
polythene 250mu sheet (Visqueen) to provide
a DPM. Lay the Fired Earth Wood Underlay
so joins run in the opposite direction to
the timber floor.
Existing Timber Base
A new wood floor should be laid at a 90
degree angle to the existing boards. If the
new boards are to be laid in the same
direction as the old, plywood sheets
(minimum depth 6mm) should be nailed or
screwed to cover the existing floor, allowing
a 15mm perimeter gap for expansion. Loose
boards etc. should be firmly fixed to reduce
the risk of squeaking in the new floor.
a. Solid Boards
When laying suitable new wood boards
directly onto existing joists, noggins may be
required to support the end joins.
Suspended ground floors must have
sufficient cross ventilation to prevent
condensation occurring on the underside of
the flooring. It is advisable to lay a suitable
membrane over the joists to help protect
the undersides of the new boards from
moisture. Fix the boards by secret nailing.
b. Engineered Boards and Solid Wood
using the CLIP SYSTEM (128MM WIDE
SOLID WOOD BOARDS ONLY).
The subfloor must be flat to ensure the
boards are fully supported. Use WBP plywood
of a suitable depth to level the floor prior to
fitting the underlay and wood if required.
Sound and Impact Reductions
In order to reduce sound impact noise in
solid wood floors when fitting onto
concrete floors, Sika AcouBond system can
be used. The synthetic foam mat is laid
onto the subfloor. Sika T52 adhesive is then
applied into the preset channels within the
underlay. This system also ensures that a
high bond strength is achieved and is
slightly ‘forgiving’ in uneven subfloors.
Stage 2 - Installation
Setting out
Allow ample time to study the room and to
plan your work. After consultation between
client and fitter and selection of a starting
point, mark out a straight line parallel to
the chosen wall, allowing a 15mm gap for
expansion. Check for straightness with
other walls and in adjoining rooms if the
boards are to continue into them. It may be
necessary to scribe the first row of boards
to achieve correct alignment throughout
the area(s) to be fitted. All end joints should
have a minimum overlap of 300mm from
the board ends on either side, and be
staggered throughout the floor to achieve
a random effect and strength particularly
when fitted onto battens or joists.
a. Solid Boards
Secret Nailing - Square the first run of
boards to the marked line and top nail and
countersink through the boards as near to
the wall as possible (see diagram below).
Top nail at 25-30cm intervals or onto every
joist, and where possible within 7.5cm of
the end of each board. Care must be taken
with presealed boards, not to damage the
surface. Remember to thoroughly mix
boards for colour, texture, grain, width etc.
as the floor is fitted.
Using the same spacing of 25-30cm, secret
nail at 45 degrees and countersink through
the tongue, it will not be possible to use
the Porta Nailer on the first and possibly
second row of boards, nearest to the
starting and finishing walls. Therefore a
pilot hole should be drilled and nails
hammered home and countersunk).
Fit the next run of boards groove to tongue
and secret nail. Continue to fit the boards
from left to right remembering to stagger
the joints by a minimum of 300mm. Trim
the last boards to fit, allowing 15mm for
expansion, use offcuts to start the next
row of boards where possible. Check the
straightness of your work as you progress.
Top nail and countersink the last run of
15mm expansion gap
Secret nail
Top nail countersunk
Skirting

13
12
CLIP SYSTEM – Suitable for
128mm wide solid wood boards only
Overlay your flat, level subfloor with
Visqueen 250mu DPM followed by
Fired Earth Wood Underlay.
Push the clips together to form a chain
before placing the first row 100mm from the
end walls and 700mm centres across the
floor for domestic installations (500mm for
commercial applications). The raised profile
of the clip must locate into the special
groove machined in the back of the board
just behind the tongue.
As the boards are laid with the groove
against the wall, the clips must be laid on
the floor so that the profile is away from the
wall and will locate into the groove in the
board correctly.
Cut the first clip of each chain to
approximately half its length. Scribe the
first row of boards if necessary and insert
wedges to ensure the correct expansion
gap is maintained.
The end tongue and groove joints of each
board must be glued with Fired Earth
Wood Glue. Do not glue the tongues and
grooves along the lengths of the boards.
Continue laying the rest of the boards by
placing the groove of the next board over
the tongue of those already laid. Each row
of boards should be end glued and
positioned groove over tongue of those
already laid, allowing the boards to rest on
the raised profile of the clips. Using a
knocking block to protect the tongue,
lightly tap the joint up tight with a
hammer. Ensure the groove on the
underside of the board is in line with the
raised profile of the clips, then push firmly
into place with the flat of your hand.
It is important to ensure that the clip is fully
located into the groove on the underside of
the board. A metal trowel or similar,
temporarily placed under the metal clip, may
help to ensure the clip is firmly in place. The
last row of boards should be scribed to the
shape of the wall allowing the correct
amount for an expansion allowance.
Direction of movement
boards to finish. All pipes, pillars, frames
etc. must be cut around to provide suitable
expansion gaps. Due to natural distortion,
in some instances it may be necessary to
clamp or strap the boards in a suitable
position, prior to secret nailing.
Fully Bonded System -Scribe the first row
of boards to the wall allowing for the
correct expansion gap. Remove the boards
and following the manufacturers
recommendations, apply the correct
amount of adhesive to the subfloor for a
maximum of 3 rows of boards. Place the
previously scribed boards into the correct
position in the adhesive followed by a
further 2 rows. Insert suitable wedges and
adjust to allow for the correct expansion
joint. Use floor straps if necessary to
remove any gaps in the boards and keep
them tight until the glue has gone off. It is
important to make sure that the boards are
installed in a straight line. Do not apply any
adhesive to the tongues or grooves.
Continue laying the rest of the boards by
applying sufficient adhesive for a few rows
at a time. Scribe the last row of boards to
the wall allowing for the correct expansion
gap. Use a jemmy bar to ensure a tight
joint is achieved and insert wedges.
Remove the wedges as soon as the glue
has dried.
b. Engineered Boards
Floating Floor - Square the first run of
boards to the marked line. Insert spacers to
provide the correct expansion gap on all
walls. Use Fired Earth’s waterproof PVA
wood glue for the joints. Apply the glue in
a bead along the lower side of the grooves
to prevent glue being squeezed up onto the
top surface.
Wipe off any surplus glue with a damp
cloth. Cut the last board in the row to
length and use the offcut to start the next
row provided it is of a suitable length.
Apply glue to side and end grooves and fit
the next board.
Tap the boards snugly into place using a
‘tapping block’. Stagger all joints by at least
300mm. Trim the last boards to fit and glue
in place ensuring a correct expansion gap is
allowed for. After the glue has completely
set remove the spacers before proceeding
with the final stages.
Please note - It is advisable to minimise
gaps between boards by using floor straps
where necessary. Floor straps can
effectively pull boards together reducing
the woods natural instinct to bend.

1514
Prior to installation, the boards should be
glued along their length to the tongues
of the previous boards. Use a jemmy bar
to ensure a tight joint is achieved and
insert wedges.
All wedges should be removed once
installation of the wood is complete
and glue has dried.
Important finishing touches!
Once the floor is finished, skirting boards or
Scotia’s/quadrants can be fitted to cover
the expansion gap. This can be painted or
oiled depending on your preference. Pipe
ferrules can be fitted around radiator pipes,
thresholds in door ways to overcome steps
created by the new flooring or to protect
the edges of other flooring.
worked into the wood and no residues of
the oil remain on the surface of the floor
(approximately 15 minutes). Shake bottles
of coloured oil regularly to ensure the
colour pigments remain well mixed. Any
excess oil must be removed immediately
with cloths or paper or moved to the next
section of flooring which requires sealing
if applicable.
The oiled floor should be slightly hardened
within 6 hours but it will take a full 72 hours
before it should receive normal traffic. Cover
walking areas with corrugated cardboard if
access is required within this time.
Finishing – Presealed Boards
Although presealed, all Fired Earth oil
finished boards need finishing with
Maintenance Oil in Natural.
WARNING – OIL IMPREGNATED CLOTHS
AND OTHER COMBUSTIBLE MATERIALS
MAY SPONTANEOUSLY COMBUST –
DISPOSE OF BY BURNING OR BURYING.
Preparing the floor - Sweep the floor to
remove all loose dust etc. and carefully
inspect for loose boards and protruding
nails. Correct where necessary. Once
correctly installed, clean and dry, the boards
are ready to apply a finishing coat.
Maintenance Oil is poured onto the floor
and spread evenly and uniformly along the
grain of the wood working it into the
timber. As the wood is already sealed is
does not need to absorb large quantities so
keep the application light and work it well
into the grain so it quickly appears silky
matt. Shiny or wet looking areas indicate
excess oil which should be removed
immediately with a fluff free cloth.
Polishing the floor with a floor polisher
hardens the oil more quickly so immediate
foot traffic is possible. Otherwise do not
get any water onto the floor for 24 hours
and keep traffic as light as possible.
Presealed floors must not have extra oils
applied to them, only Maintenance Oil.
For more detailed technical
information refer to British Standard
BS 8201 Code of practice for flooring
of timber, timber products and wood
based panel products.
Unsealed Boards
Preparing the floor - Sweep the floor to
remove all loose dust etc. and carefully
inspect for loose boards and protruding
nails. Correct where necessary. Once
correctly installed, clean and dry, the boards
are ready to seal.
Fired Earth supply Coloured Oils, which
will colour and seal in one operation.
WARNING – OIL IMPREGNATED CLOTHS
AND OTHER COMBUSTIBLE MATERIALS
MAY SPONTANEOUSLY COMBUST –
DISPOSE OF BY BURNING OR BURYING.
Thoroughly shake all containers prior to use.
Apply the oil evenly onto the floor with soft
fluff free cloth. Work the oil along and into
the grain of the wood as you progress
making sure that all the wood is covered. At
least 2 applications should be applied to
ensure good coverage and proper protection.
1 litre of oil is sufficient for sealing, colouring
and finishing approximately 12m
2
of oak and
15m
2
of our other species. Do not cover more
than this area at a time. The oil should be left
to absorb into the floor for about 20 minutes
before working any excess oil into the wood
with a floor polisher fitted with polishing
pads. Alternatively the oil can be polished in
manually. Polish the floor until all the oil is
Sealing
The success of timber over underfloor
heating is largely down to site conditions
once the wood is fitted. Although the
correct fitting system is imperative,
problems associated with natural timber
and underfloor heating are normally the
result of inappropriate use of the heating.
As a result Fired Earth will not recommend
any of it’s natural timber products with
underfloor heating, but for those who are
determined to use it, we have included our
best advice below.
a. Solid Boards
While it is possible to fit solid wood boards
Underfloor Heating (in screed systems only)

over underfloor heating, solid wood boards
will be subject to higher levels on movement
than engineered boards. The wider the board,
the higher the potential movement will be.
Underfloor heating dries the boards and
this can cause shrinkage. Conversely the
dry boards can absorb moisture when the
heating is turned off which can cause the
boards to swell. As the risk of movement
is so high in these boards, we do not
recommend the use of Fired Earth solid
wood boards with underfloor heating
systems.
b. Engineered Boards
Being a laminated, multilayered and cross
grained product, engineered boards are the
least sensitive to the affects of moisture
change, and therefore the drying effect of
the underfloor heating.
If, once the risks have been considered and
engineered boards are to be fitted at your
own risk over underfloor heating, the
following fully bonded installation system
is advised.
1. Screeds must be fully cured and
suitably dry.
2. The heating should be fully commissioned
and have run continually at its normal
working temperature for a minimum of
4 weeks. The temperature should then be
reduced to approximately 15ºC prior to
fitting the boards.
3. Boards should be acclimatised.
4. Apply Sika Primer MB as instructed by
the manufacturers.
5. Using Sika T54 fully bond the
engineered boards to the prepared floor.
DO NOT glue the tongues and grooves.
Allow the adhesive to dry/cure thoroughly.
6. Once fully cured the heating should be
turned up slowly increasing the
temperature of the heating by no more
than 5
o
C in 24 hours until the normal
operating temperature is reached. The
floor temperature should not exceed 26ºC.
16 17
Timber Floor
Concrete
SikaBond T54
Trowel size
Normal Cleaning
Brush or vacuum all dust or dirt off the
surface. Individual marks and spillages
should be wiped off immediately using
a damp cloth. Do not allow moisture
to remain on the floor.
The floor should be cleaned with a Fired
Earth Mop dampened with a dilution of
Fired Earth Soap and water. Dilute 250ml of
Fired Earth Soap with 10 litres of warm
water. Use a second bucket for rinsing out
the dirty mop and change the water
regularly. This will prevent mopping dirty
water across the floor and avoid
unnecessarily wasting the Fired Earth Soap.
Thorough Cleaning
If the floor is particularly dirty or stained,
use Fired Earth Wood Cleaner. The product
should be applied with a mop dampened
with a dilution of Fired Earth Wood Cleaner
and water. Dilute 1:20 of Fired Earth Wood
Cleaner with warm water. Use a second
bucket for rinsing out the dirty mop and
change the water regularly. This will prevent
mopping dirty water across the floor and
avoid unnecessarily wasting the Fired Earth
Wood Cleaner. Allow the solution to stand
on the floor (do not soak the floor) for
about 5 minutes so it can soften the dirt. If
necessary scrub the floor to remove the dirt.
Mop up the emulsified dirt drying the floor
with the Fired Earth Mop as you progress.
Maintenance Cleaning
As a guide oiled floors need maintenance
once a year in domestic situations. Kitchens,
bathrooms commercial applications etc will
probably be more often. All oils will degrade
with washing, spillages, grit, dirt, UV light
and general wear and tear. Therefore it is
necessary to replenish the seal/finish to
maintain the protective and aesthetic
qualities of the floor.
First, the floor must be cleaned with Fired
Earth Wood Cleaner. Once the floor is
clean, leave to dry for 4–8 hours.
Maintenance Oil is then poured onto the
floor and spread evenly and uniformly
along the grain of the wood working it into
the timber. As the wood is already sealed it
does not need to absorb large quantities so
keep the application light and work it well
into the grain so it quickly appears silky
matt. Shiny or wet looking areas indicate
excess oil which should be removed
immediately with a fluff free cloth.
Polishing the floor with a Fired Earth Floor
Polisher hardens the oil more quickly so
immediate foot traffic is possible.
Otherwise do not get any water onto the
floor for 24 hours and keep traffic as light
as possible.
WARNING - OIL IMPREGNATED CLOTHS
AND OTHER COMBUSTIBLE MATERIALS
MAY SPONTANEOUSLY COMBUST -
DISPOSE OF BY BURNING OR BURYING.
Cleaning and Maintenance
Notch size?
Choose a suitable
trowel depth for subfloor
Sika Full Bond Application

1918
Board type Character Oak Rustic Oak Nature Oak Select Oak
Technical
Width 110mm
128, 168, 208mm
or random widths
128, 168, 208mm
or random widths
128, 168, 208mm
or random widths
Thickness 18mm 21mm 21mm 21mm
Length range
Random
300-1500mm
Random
1160-2360mm
Random
1160-2360mm
Random
1160-2360mm
Finish Presealed
Presealed or
Unsealed/Brushed
Presealed or
Unsealed/Brushed
Presealed or
Unsealed/Brushed
Tongue and groove
Micro bevelled
edge - sides and ends
End matched
Filled knots
Length and width
of filled knots
Up to 40mm Up to 40mm Up to 30mm
Unfilled knots
Size of unfilled knots Pin head Pin head Pin head Pin head
Visable sapwood
Sapwood max. size
Up to 25%
of the board
Up to 25%
of the board
Up to 15%
of the board
Minimal
Shakes
Shakes detail Occasional Occasional Occasional Occasional
On site acclimatisation Min. 48 hours Min. 48 hours Min. 48 hours Min. 48 hours
Subfloor
With DPM
and 24mm
batons or
plywood
Fully
bonded
With DPM
and 24mm
batons or
plywood
Fully
bonded
With DPM
and 24mm
batons or
plywood
Fully
bonded
With DPM
and 24mm
batons or
plywood
Fully
bonded
Smooth level concrete
Total increase
in floor height
42mm 20mm 45mm 23mm 45mm 23mm 45mm 23mm
Smooth level
floorboards/laid at
90 degrees to existing
Total increase
in floor height
18mm n/a 21mm n/a 21mm n/a 21mm n/a
Joists
Total increase
in floor height
0mm n/a 0mm n/a 0mm n/a 0mm n/a
Fixing Method
Secret Nail
Glue end tongue to
groove: Floating floor
128mm Clip
system only
128mm Clip
system only
128mm Clip
system only
Fully bonded
Clip system
With 128mm
wide board only
With 128mm
wide board only
With 128mm
wide board only
Classic Oak Flooring - Solid board Classic Oak Flooring - Engineered board
Board type Rustic Oak Nature Oak Select Oak
Technical
Width 180mm 180mm 180mm
Thickness 20mm 20mm 20mm
Length range From 1200-2400mm From 1200-2400mm From 1200-2400mm
Finish
Presealed or
Unsealed/Brushed
Presealed or
Unsealed/Brushed
Presealed or
Unsealed/Brushed
Tongue and groove
Micro bevelled
edge - sides and ends
End matched
Filled knots
Length and width
of filled knots
Up to 40mm Up to 30mm
Unfilled knots
Size of unfilled knots Pin head Pin head Pin head
Visable sapwood
Sapwood max. size
Up to 25%
of the board
Up to 15%
of the board
Minimal
Shakes
Shakes detail Occasional Occasional Occasional
On site acclimatisation Min. 24 hours Min. 24 hours Min. 24 hours
Subfloor
Smooth level concrete
Total increase
in floor height
23mm
inc. 3mm underlay
23mm
inc. 3mm underlay
23mm
inc. 3mm underlay
Smooth level
floorboards/laid at
90 degrees to existing
Total increase
in floor height
23mm
inc. 3mm underlay
23mm
inc. 3mm underlay
23mm
inc. 3mm underlay
Joists
Total increase
in floor height
n/a n/a n/a
Fixing Method
Secret Nail
Glue end tongues to
grooves: Floating floor
Fully bonded
With underfloor heating
only, refer to guide
With underfloor heating
only, refer to guide
With underfloor heating
only, refer to guide
Clip system

Hardwood Flooring Selection - Solid board
Board type Nature Walnut Select Walnut Nature Cherry
Technical
Width 128mm 128mm 128mm
Thickness 21mm 21mm 21mm
Length range
Random
1160-2360mm
Random
1160-2360mm
Random
1160-2360mm
Presealed
Tongue and groove
Micro bevelled
edge - sides and ends
End matched
Filled knots
Length and width
of filled knots
Up to 30mm
Up to 30mm
Unfilled knots
Size of unfilled knots Up to 3mm Up to 2mm Pin head
Visable sapwood
Sapwood max. size
Up to 25%
of the board
Minimal
Up to 25%
of the board
Shakes
Shakes detail Occasional Occasional Occasional
On site acclimatisation Min. 48 hours Min. 48 hours Min. 48 hours
Subfloor
With DPM
and 24mm
batons or
plywood
Fully
bonded
With DPM
and 24mm
batons or
plywood
Fully
bonded
With DPM
and 24mm
batons or
plywood
Fully
bonded
Smooth level concrete
Total increase
in floor height
45mm 23mm 45mm 23mm 45mm 23mm
Smooth level
floorboards/laid at
90 degrees to existing
Total increase
in floor height
21mm n/a 21mm n/a 21mm n/a
Joists
Total increase
in floor height
0mm n/a 0mm n/a 0mm n/a
Fixing Method
Secret Nail
Glue end tongue to
groove: Floating floor
Clip system only Clip system only Clip system only
Fully bonded
Clip system
Board type Select Cherry Nature Maple Select Maple
Technical
Width 128mm 128mm 128mm
Thickness 21mm 21mm 21mm
Length range
Random
1160-2360mm
Random
1160-2360mm
Random
1160-2360mm
Presealed
Tongue and groove
Micro bevelled
edge - sides and ends
End matched
Filled knots
Length and width
of filled knots
Up to 30mm
Unfilled knots
Size of unfilled knots Pin head Pin head Pin head
Visable sapwood
Sapwood max. size Minimal
Shakes
Shakes detail Occasional Occasional Occasional
On site acclimatisation Min. 48 hours Min. 48 hours Min. 48 hours
Subfloor
With DPM
and 24mm
batons or
plywood
Fully bonded
With DPM
and 24mm
batons or
plywood
Fully bonded
With DPM
and 24mm
batons or
plywood
Fully bonded
Smooth level concrete
Total increase
in floor height
45mm 23mm 45mm 23mm 45mm 23mm
Smooth level
floorboards/laid at
90 degrees to existing
Total increase
in floor height
21mm n/a 21mm n/a 21mm n/a
Joists
Total increase
in floor height
0mm n/a 0mm n/a 0mm n/a
Fixing Method
Secret Nail
Glue end tongue to
groove: Floating floor
Clip system only Clip system only Clip system only
Fully bonded
Clip system
2120

Soild Wood Boards Engineered Boards
Presealed
Character Oak
Presealed
Classic Oak
Unsealed/Brushed
Classic Oak
Presealed
Walnut, Cherry
and Maple
All 128mm
Wide Boards
Presealed
Classic Oak
Unsealed/Brushed
Classic Oak
Concrete Substrate Products - Fixing Products
Smooth Level Concrete
with DPM and 24mm
batons or WBP plywood
DPM sheet DPM sheet DPM sheet DPM sheet DPM sheet n/a n/a
Fully bonded
Sika Primer MB*
and Sika T54
Sika Primer MB*
and Sika T54
Sika Primer MB*
and Sika T54
Sika Primer MB*
and Sika T54
Sika Primer MB*
and Sika T54
Sika T54** Sika T54**
AcouBond System
(reduces noise)
Sika Primer MB*,
Sika T52, Sika Silent
Layer Underlay
Sika Primer MB*,
Sika T52, Sika Silent
Layer Underlay*
Sika Primer MB*,
Sika T52, Sika Silent
Layer Underlay*
Sika Primer MB*,
Sika T52, Sika Silent
Layer Underlay*
Sika Primer MB*,
Sika T52, Sika Silent
Layer Underlay
n/a n/a
Floating floor
over flat screed
n/a n/a n/a n/a
Wood underlay,
clips, wood glue
DPM sheet, wood
underlay and wood glue
DPM sheet, wood
underlay and wood glue
Timber Substrate
Smooth level floor boards
laid at 90 degrees to existing
n/a n/a n/a n/a
Wood underlay,
clips, wood glue
DPM sheet, wood
underlay and wood glue
DPM sheet, wood
underlay and wood glue
Joists
n/a n/a n/a n/a n/a n/a n/a
Sealing and Maintenance Products
Presealed
Unsealed/
Brushed
Master or Coloured oils
n/a n/a
n/a n/a
n/a
Maintenance Oil
***
***
n/a
***
***
n/a
***
n/a
Maintenance kit
Mop
19mm unsealed
Quadrant and Scotia
19mm or 21mm unsealed
T-section, Non Reducer and
Threshold
Unsealed Radiator Ferrule
Unsealed Skirting
* Sika Primer MB is only required on concrete subfloors where damp may be present - seek advice.
** Used when Engineered boards are fitted onto Underfloor Heating System.
*** Maintenance Oil is only required on floors over 25m
2
when the Maintenance Kit is purchased.
2322
Product Selector

1. Fired Earth floors contain varying
quantities of natural characteristics.
Knots and sapwood will be common
in some boards as will kiln checking
and shakes.
2. The mixture of board lengths within
orders is unspecified but will be within
stated range. No guarantee will be
offered for proportion of lengths with
in each order.
3. Sapwood may be present in differing
amounts. Wood must be checked prior to
laying to ensure customer is satisfied
with appearance of floor.
4. Open knots will be evident in some
presealed products or may be filled with
a reasonably like-coloured filler. Quantity
and dimension of knots is unspecified.
5. All plaster and concrete must be
thoroughly dry prior to taking delivery of
boards. If in any doubt please contact
your local store or the Fired Earth
Technical Department.
6. Wood must not be laid into a house
where the moisture content in any
permanent fixture exceeds 11%. This
may indicate a leak of some nature and
must be investigated prior to delivery
of wood flooring.
General after care advice
Felt pads and caster cups should be used to
prevent damage by furniture etc. Sharp
heels, particularly stilettos will dent and/or
scratch wooden floors.
Bathrooms - Never leave damp towels or
bath mats on the floor following use.
Always wipe up splashes or puddles and
never leave them to dry on the floor. Ensure
the bathroom is well ventilated. Regularly
clean mat wells of excess dust, dirt, grit
and moisture.
Important Notes
For more detailed technical
information refer to British Standard
BS 8201 Code of practice for flooring
of timber, timber products and wood
based panel products.
Acclimatisation – Storing the timber in the
area/s where it is to be used in order to allow
it to absorb or lose moisture depending on
room conditions. This will allow the wood to
‘settle’ prior to being installed. Individual
packs do not need to be opened.
Acoubond system – Sika Silent Layer Mat
and Sika T52 adhesive filling system.
Architraves – Decorative mouldings used to
cover unsightly expansion joints. Decorative
mouldings used around doorways which
normally requires undercutting to allow the
wood floor to fit under it.
Atmospheric Relative Humidity – Moisture
content in the air of the room.
Bevel – The edge of the board is planed off
which helps avoid edges and lips in the
finished floor when laying presealed boards.
Checking – Cracks or splits seen across
the rings of annual growth caused by
seasoning of the wood.
Clip System – A chain of metal straps are
clipped together so 128mm solid wood
boards can be attached to them via a groove
in the back of each board. Solid wood
boards can then be laid as a floating system.
Construction Dampness – Moisture
contained within finished structures in
excess of acceptable levels, caused by
normal building procedures. Time must be
allowed for moisture levels to fall within
acceptable parameters.
Cork Fillets – Cork strips fitted in to
expansion joints which allow movement
of the timber whilst providing an
aesthetic finish.
Damp Proof Membrane (DMP) –
A layer of impervious material installed
to prevent rising damp. Can be polythene
or liquid applied.
End Joins – Where two planks join at the
end lengths of the boards.
End Matched – Factory finished boards
with tongues or grooves on the ends of
each board, therefore allowing the boards
to start and finish without the need to be
placed over a joist for support.
Engineered Boards – A floorboard made
of 11 layers, the top surface being
hardwood to provide a floor that appears
exactly like a solid wood floor but it’s
cross grained construction with plywood
increases it’s stability.
Expansion Gap – A suitable gap must be
left around all perimeters and abutments
etc. so a wood floor can expand and
contract if temperature and humidity
changes in the room.
Filling – The process of using a suitable
resin/sawdust or filler to fill in gaps, holes
etc. in the wood.
Glossary
24 25

Shakes - During the growth cycle and
sometimes during kiln drying, stress is
applied to the tree or boards, this can result
in splits known as Shakes developing.
Sika Primer MB – A liquid applied damp
proof membrane suitable for use with
Sika T54.
Sika Silent Layer Mat – 3mm deep
underlay mat with pre-determined slots for
ease of application of Sika T52 adhesive.
Also used for sound reducing properties.
Sika T52 – Supplied in a ‘sausage’ for
application by ‘caulking gun’ - bonding
glue for use with Sika Silent Layer Mat.
Sika T54 – A trowel applied elastic
adhesive specifically suitable for gluing
down timber floors.
Shrinkage – In timber boards, shrinkage
may be experienced when the moisture
content of a board drops. Shrinkage occurs
in the width of the board, not it’s length.
Spontaneous Combustion – When
exposed to air, oil soaked rags etc. may
smoulder and ignite!
Substrates – The surface on to which the
wood is being fitted.
Tongue and Groove – Floorboards are
carefully machined to provide a tongue
and a groove in each, so that the tongue of
one board can fit snugly in to the groove
of the previously laid board. In solid timber
joins of this type are considered
structurally sound.
Underfloor Heating – Wet or electric forms
of heating which are buried in a floor
screed and which must not be operated
above 26ºC.
Unsealed Wood – Sanded and brushed
but with no sealers applied. No sanding
required when fitted.
Visqueen – A polythene sheet used as a
control for moisture.
WBP Plywood – Minimum 12mm used for
subfloor preparation. Dimensionally stable
and water and boil proof.
26
Useful Numbers
UK Sales 0845 366 0400
Export Sales +44 (0)1295 814316
Installations 01295 814310
Technical 01295 814271
Home Deliveries 01295 814313
Customer Care 01295 814396
Disclaimer
The specifications and technical information
given in this publication are intended for
guidance and although they are to the best
of our knowledge correct, they are given
without warranty.
We cannot accept any responsibility for reliance
placed upon the advice contained herein since
practical expertise and site conditions are
outside of our control. Neither do we accept
liability for the performance of the product
arising from such use. This does not affect
your statutory rights.
Finishing Trims – A timber strip or quadrant
which is fixed to the skirting board and
used to mask the expansion joints, or a
variety of boards shaped specifically to
cover gaps or make up height variances.
Floating Floor – Flooring which is not fixed
to the structural floor surface.
Fully Bonded System – The wood boards
are fixed down onto a combed out bed
of adhesive.
Grades – Wood from a tree is hand sorted
to produce floors which show natural
characteristics of the growing tree. Fired
Earth Select uses the cleanest of the
wood followed by Nature then Rustic
which has many more knots etc. and
Character which uses all structurally
sound timber with minimum waste from
the tree. There are no accepted standards
within the industry so understand fully
the system used by the company from
which you are buying the wood.
Hardwood – Hardwearing wood from
broadleaved trees.
Hygrometer - An instrument for
measuring humidity.
Hygroscopic – The ability / tendency to
absorb or lose moisture into the air.
Knots – A natural figure in the grain of the
wood as a result of a growing branch.
Mineral Streaks – Olive or greyish markings
caused by environmental factors such as
trace elements in the water or soil.
Moisture Content - A means of identifying
the amount of moisture within a material –
a vital check prior to the installation of a
wood floor.
Moisture Meter – An instrument used to
measure the amount of moisture (water)
in a material. Fired Earth recommends
Protimeter’s MMS meter.
Normal Living Temperature and Humidity –
The normal temperature and humidity
expected in the room/s during normal
occupation.
Porta Nailer – A specific tool used for
secret nailing. Added advantage of pushing
boards together to provide a closer fit.
Relative Humidity – The amount of
moisture contained in the air.
Sand and Cement Screed – A structural
surface made from a mix of sand and
cement. Most screeds contain an amount
of moisture so a DPM is normally advisable
when fitting timber over these substrates.
Sapwood and Heartwood - The centre of
the tree is known as heartwood and the
outside is known as sapwood.
Sealing – Applying an appropriate oil based
material to the wood to provide protection
and colour.
Secret Nail – Driving a nail at 45 degrees
through the board into the substrate just
above the tongue of the board. The nail
head is hidden when the next board is fitted.
/