
Projection Television
TOSHIBA CORPORATION, 1999
TE50T11
TE55T11
OWNER'S MANUAL
Owner's Record
The model number and serial number are on the back
of your TV. Record these numbers in the spaces below.
Refer to these numbers whenever you communicate
with your Toshiba dealer about this TV.
Model number:
Serial number:
Reference
Introduction
Connecting
your TV
Using the
Remote Control
Setting up
your TV
Using the TV’s
Features
Appendix
Index

2
Important Information
WARNING
TO REDUCE THE RISK OF FIRE OR ELECTRIC SHOCK,
DO NOT EXPOSE THIS APPLIANCE TO RAIN OR
MOISTURE.
The lightning symbol in the triangle tells you that the
voltage inside this product may be strong enough to
cause an electric shock. DO NOT TRY TO SERVICE
THIS PRODUCT YOURSELF.
The exclamation mark in the triangle tells you that
important operating and maintenance instructions
follow this symbol.
CAUTION
TO PREVENT ELECTRIC SHOCK, DO NOT USE THIS
POLARIZED PLUG WITH AN EXTENSION CORD
RECEPTACLE OR OTHER OUTLET UNLESS THE
PRONGS CAN BE FULLY INSERTED INTO THE
OUTLET TO PREVENT ANY EXPOSURE OF THE
PRONGS ON THE POLARIZED PLUG.
ATTENTION
POUR PRÉVENIR LES CHOCS ÉLECTRIQUES NE PAS
UTILISER CETTE FICHE POLARISÉE AVEC UN
PROLONGATEUR, UNE PRISE DE COURANT OU UNE
AUTRE SORTIE DE COURANT, SAUF SI LES LAMES
PEUVENT ÊTRE INSÉRÉS À FOND SANS EN LAISSER
AUCUNE PARTIE À DÉCOUVERT.
CAUTION
The plug has one prong wider than the other and will fit only
one way into a standard
electrical outlet (120 volt AC,
60 Hz). If the plug does not
fit into the outlet, try turning
it around. If the plug still does
not fit, the outlet is probably
non-standard and must be
replaced by a qualified electrician. Do not tamper with the plug
or try to force it into a non-standard outlet.
Note to CATV system installers in the USA
This reminder is provided to call the CATV system installer’s
attention to Article 820-40 of the NEC, which provides
guidelines for proper grounding, and, in particular, specifies that
the cable ground shall be connected to the grounding system of
the building, as close to the point of cable entry as practical.
Precautions
Installing your TV
• Place the TV on the floor or on a sturdy platform. The
mounting surface should be flat and steady. If you install the
TV on a soft floor, make sure that the floor is not damaged
by the weight of the TV.
• Place the TV far enough away from the walls to allow proper
ventilation. This will prevent the TV from overheating and
avoid possible damage to the TV. Avoid dusty places too.
• Damage may occur if you leave the TV in direct sunlight or
near a heater. Avoid places subject to extremely high
temperatures or humidity, and temperatures of 41˚F(5˚C) or
lower.
Using your TV
• Do not stand or climb on the TV.
• Do not put any heavy object on top of the TV.
• Do not place containers with liquids such as drinks or
cosmetics on the TV. If any foreign material or water leaks
into the TV, unplug the AC cord and contact your dealer.
• If the room temperature suddenly rises, condensation may
occur on the lenses resulting in picture distortion or color
fading. In such a case, simply wait a while (with the power
on) and the condensation will evaporate.
• Avoid displaying stationary images on your TV screen for
extended periods of time. Stationary patterns generated by a
picture-in-picture (PIP) display, computer displays, video
games, stock market reports, etc., can become permanently
engrained on the picture tube. This damage is not protected
by your warranty because it is the result of misuse. If you wish
to use your TV to display still images, reduce brightness and
contrast settings. Never leave a PIP, computer, or video game
display unattended.
• Sit approximately 10-25 feet away from the TV. Sitting too
far to the left or right of the screen will cause the picture to
appear dull as will direct sunlight and room lights. Turn the
TV off to check for reflections on the screen. Then remove
the source of any reflections while viewing.
Cleaning your TV
• Clean the TV with a soft dry cloth. Never use strong solvents
such as thinner or benzine which might damage the finish of
the cabinet. If the cabinet is very dirty. Use a damp cloth to
wipe the cabinet clean, then finish with a dry cloth.
wide prong

3
Introduction................................................................ 4
Welcome to Toshiba......................................................... 4
Exploring your new TV ................................................... 4
Connecting your TV .................................................. 5
Connecting a VCR .......................................................... 5
Connecting a cable converter box .................................... 6
Connecting a cable converter box and a VCR .................. 6
Connecting a DVD/satellite receiver and a VCR.............. 7
Connecting a DVD with ColorStream™ and a VCR ...... 7
Connecting two VCRs ..................................................... 8
Connecting an audio system ............................................ 9
Using the remote control ...................................... 10
Preparing the remote control for use .............................. 10
Installing the remote control batteries ............................ 10
Using the remote control with a VCR or
a cable TV converter ...................................................... 10
Programming the remote control for use with a VCR or
a cable TV converter ...................................................... 11
VCR code table ...................................................... 12
Cable TV converter code table ................................ 13
Learning about the remote control ................................. 14
Setting up your TV .................................................. 15
Changing the on-screen display language ....................... 16
Adding channels to the TV’s memory ............................ 17
Programming channels automatically ...................... 17
Adding and erasing channels manually.................... 18
Changing channels ........................................................ 18
Adjusting the color convergence..................................... 18
Using the TV’s features.......................................... 20
Adjusting the channel settings........................................ 20
Switching between two channels ............................. 20
Programming your favorite channels ....................... 20
Labeling channels ................................................... 21
Watching picture-in-picture (PIP).................................. 23
Switching the main and small pictures .................... 24
Changing the position of the small picture.............. 24
Freezing the small picture ....................................... 24
Using V-CHIP control................................................... 25
Selecting the V-CHIP menu ................................... 25
Adjusting the V-CHIP menu ......................................... 26
ENABLE BLOCKING .......................................... 26
SET RATING (Setting the movie or TV ratings
for your choice) ...................................................... 26
About Rating .......................................................... 26
BLOCKING OPTION.......................................... 27
NEW PIN CODE .................................................. 27
Unblocking programs temporarily .......................... 28
Blocking channels ................................................... 28
Adjusting the picture ..................................................... 30
Adjusting the picture quality ................................... 30
Selecting the color temperature ............................... 30
Adjusting the picture preferences ............................ 31
Using the flesh tone feature ..................................... 31
Using the noise reduction feature ............................ 31
Resetting your adjustments to the factory settings ... 32
Watching video input .................................................... 32
Displaying on-screen information .................................. 32
Auto power off ............................................................... 33
Displaying XDS information ......................................... 33
Using the closed caption feature ..................................... 34
Setting the off-timer ...................................................... 35
Setting the clock ............................................................ 35
Adjusting the sound ....................................................... 36
Muting the sound ................................................... 36
Selecting stereo/SAP broadcasts .............................. 36
Adjusting the sound quality .................................... 37
Using the surround sound feature ........................... 37
Using the Sub-Bass System (SBS)............................ 38
Turning off the built-in speakers ............................. 38
Viewing the demonstration mode .................................. 38
Understanding the last mode memory feature ................ 38
Appendix................................................................... 39
Specifications ................................................................. 39
Troubleshooting ............................................................. 40
Limited United States Warranty ..................................... 41
Index .......................................................................... 42

4
Reference
Introduction
Connecting
your TV
Using the
Remote Control
Setting up
your TV
Using the TV’s
Features
Appendix
Index
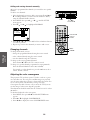
Introduction
Welcome to Toshiba
Congratulations! You have purchased one of the finest projection TV’s
on the market. The goal of this manual is to guide you through setting
up and operating your Toshiba TV as quickly as possible.
This manual applies to models TE50T11 and TE55T11.
Before you start reading, check your model number by looking at the
rear of the TV.
The TE55T11 is the model used for illustration purposes.
Instructions in this manual are based on using the remote control. You
can also use the controls on the TV if they have the same name as
those on the remote control.
Please read all the safety and operating instructions carefully, and keep
the manual for future reference.
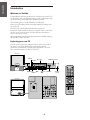
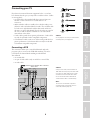
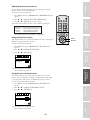
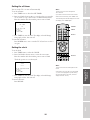
Exploring your new TV
You can operate your TV by using the buttons on the front panel or
the remote control. The back panel provides all the terminal
connections you will need to connect other equipment to your TV.
The ColorStream inputs are only for TE55T11.
DEMO
ENTER
TV/VIDEO
VOLUME CHANNEL
MENU
POWER
OUT
RL
VAR
AUDIO
OUT
VIDEO
L/
MONO
AUDIO
R
IN
DVD IN
L
R
C
R
C
B
Y
L/
MONO
AUDIO
S-VIDEO
VIDEO
R
ANT
(
75
)
VIDEO-1 VIDEO-2
COLOR
STREAM
INPUT
AUDIO
CH RTN
ADV
ADV
MUTE RECALL
TV/VIDEO SURROUND
REC
TV/VCR
REW
FF
STILL
LOCATE
SWAP
STOP SOURCE
PLAY PIP
+
FAV
C
.
C
A
P
T
R
E
S
E
T
X
D
S
E
X
I
T
-
FAV
VOL
CH
ENTER
1
4
7
2
5
8
3
6
9
0
100
TV
VCR
MENU/
TIMER
POWER
ENT
CABLE
MTS
TV front
TV rear
DEMO Remote
sensor
ENTER
Channel
▼▲
POWERTV/
VIDEO
MENU
POWER indicator
Volume
▼▲

5
Reference
Introduction
Connecting
your TV
Using the
Remote Control
Setting up
your TV
Using the TV’s
Features
Appendix
Index
Connecting your TV
If you haven’t connected electronic equipment before, or you have
been frustrated in the past, you may wish to read this section. (Cables
are not supplied.)
• A coaxial cable is the standard cable that comes in from your
antenna or cable converter box. Coaxial cables use “F”
connectors.
• Audio and video cables are usually color coded according to use:
yellow for video and red and white for audio. The red audio cable
is for the stereo right channel, and the white audio cable is for
the stereo (or mono) left channel. If you look at the rear panel of
the TV, you will see that the terminals are color coded in the
same manner as the cables.
• S-video cables provide better picture performance. S-video cables
can only be used with S-video compatible components.
• ColorStream™ cables come in sets of three and provide the best
picture performance. ColorStream cables can only be used with
ColorStream compatible components.
Connecting a VCR
This connection allows you to watch local channels and video
programs, play or record on the VCR while watching TV, and to
record from one channel while watching another channel.
You will need:
• one coaxial cable
• one pair of audio cables (only one cable for a mono VCR)
• one video cable
IN from ANT
VIDEO AUDIO
OUT to TV
CH 3
LR
CH 4
OUT
RL
VAR
AUDIO
OUT
VIDEO
L/
MONO
AUDIO
R
IN
DVD IN
L
R
C
R
C
B
Y
L/
MONO
AUDIO
S-VIDEO
VIDEO
R
VIDEO-1 VIDEO-2
COLOR
STREAM
INPUT
AUDIO
IN
OUT
ANT
(
75
)
Caution:
Do not plug the TV in until you have finished
connecting all of your equipment.
Caution:
If using a mono VCR, connect L/Mono to
VCR Audio OUT using only one audio cable.
If you have a S-VHS VCR, use the S-video
connections and remove the video cable.
Do not connect the video cable and the
S-video cable to Video-1 simultaneously.
ANTENNA
Coaxial Cable
AUDIO
Cables
VIDEO
Cable
S-VIDEO
Cable
Color Stream
Cable
Note:
You can also use the Video-2 inputs for
connecting video components such as a
camcorder, laserdisc player etc.
Cable lead-in from Cable Box or Antenna
Stereo VCR
TV

6
Reference
Introduction
Connecting
your TV
Using the
Remote Control
Setting up
your TV
Using the TV’s
Features
Appendix
Index
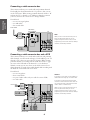
Connecting a cable converter box
This connection allows you to watch cable and premium channels.
You should place the A/B switch in the “A”position so that you can
use the TV features. When viewing premium channels, switch to “B”
and tune the TV to channel 3 or 4 (whichever channel is vacant in
your area), then use the converter box to change channels.
You will need:
• one two-way signal splitter
• one A/B switch
• four coaxial cables
OUT
RL
VAR
AUDIO
OUT
VIDEO
L/
MONO
AUDIO
R
IN
DVD IN
L
R
C
R
C
B
Y
L/
MONO
AUDIO
S-VIDEO
VIDEO
R
VIDEO-1 VIDEO-2
COLOR
STREAM
INPUT
AUDIO
ANT
(
75
)
2-way
signal
splitter
OUT
A
IN
B
IN OUT
Cable converter box
Connecting a cable converter box and a VCR
This connection allows you to watch and record basic and premium
cable channels, as well as watch videotapes. You should keep your TV
selected to TV so that you can use the TV’s features. When viewing
premium channels or recording with the VCR, select Video 1 (page
32), turn on the VCR and set the channel to 3 or 4 (whichever
channel is vacant in your area), then use the cable converter box to
change channels. To watch a basic cable channel while recording with
the VCR, the TV should be left in TV mode.
You will need:
• one two-way splitter
• three coaxial cables
• one pair of audio cables (only one cable for a mono VCR)
• one video cable
Cable converter box
OUT
IN
IN from ANT OUT to TV
CH 3
CH 4
VIDEO
AUDIO
LR
IN
OUT
OUT
RL
VAR
AUDIO
OUT
VIDEO
L/
MONO
AUDIO
R
IN
DVD IN
L
R
C
R
C
B
Y
L/
MONO
AUDIO
S-VIDEO
VIDEO
R
VIDEO-1 VIDEO-2
COLOR
STREAM
INPUT
AUDIO
ANT
(
75
)
2-way
signal
splitter
Note:
When you use a converter box with your TV,
there may be features that you can not
program using the remote control, such as
programming your favorite channels, labeling
channels, and blocking channels.
Caution:
If you have a mono VCR, connect L/Mono to
VCR Audio OUT using only one audio cable.
If you have a S-VHS VCR, use the S-video
connections and remove the video cable. Do
not connect the video cable and the S-video
cable to Video-1 simultaneously.
When you use a converter box with your TV,
there may be features that you can not
program using the remote control, such as
programming your favorite channels, labeling
channels, and blocking channels.
From Cable
(Not supplied)
Stereo VCR
A/B switch
(Not supplied)
From Cable
(Not supplied)
TV
TV

7
Reference
Introduction
Connecting
your TV
Using the
Remote Control
Setting up
your TV
Using the TV’s
Features
Appendix
Index
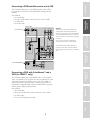
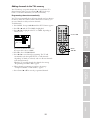
Connecting a DVD/satellite receiver and a VCR
This connection allows you to watch DVD/satellite, video and TV
programs. You can record one TV channel while watching another
channel.
You will need:
• one coaxial cable
• two pairs of audio cables (only one cable for a mono VCR)
• one video cable
• one S-video cable
OUT
RL
VAR
AUDIO
OUT
VIDEO
L/
MONO
AUDIO
R
IN
DVD IN
L
R
CR
CB
Y
L/
MONO
AUDIO
S-VIDEO
VIDEO
R
VIDEO-1 VIDEO-2
COLOR
STREAM
INPUT
AUDIO
ANT
(
75
)
IN from ANT
VIDEO AUDIO
OUT to TV
CH 3
LR
CH 4
IN
OUT
IN from ANT
VIDEO
OUTOUT
S-VIDEO
AUDIO
OUT
L
R
Connecting a DVD with ColorStream™ and a
VCR (for TE55T11 only)
This connection allows you to watch DVD, video or TV programs
and to record DVD or TV programs. You can record from one source
and watch a program from another source. Your TV is capable of
using ColorStream (component video). Connecting your TV to a
ColorStream compatible DVD, such as a Toshiba DVD, can greatly
enhance picture quality and performance.
You will need:
• one coaxial cable
• three pairs of audio cables (only one cable for a mono VCR)
• two video cables
• one set of ColorStream video cables
Caution:
You can use a video cable instead of the
S-video cable, but the picture quality will
decrease. If you use a S-video cable between
the TV and DVD/satellite receiver, make the
audio connections only and remove the video
connection.
Do not connect the video cable and the
S-video cable to Video-1 simultaneously.
The unauthorized recording of television
programs, video tapes and other materials
may infringe upon the provisions of copyright
laws.
From Antenna
Stereo VCR
From Satellite Dish
DVD/Satellite Receiver
TV

8
Reference
Introduction
Connecting
your TV
Using the
Remote Control
Setting up
your TV
Using the TV’s
Features
Appendix
Index
IN from ANT OUT to TV
CH 3
CH 4
Satelite IN
VIDEO
OUT
S-VIDEO
AUDIO
COLOR STREAM
OUT
L
R
L
R
Cr
CbY
VIDEO AUDIO
LR
IN
OUT
OUT
RL
VAR
AUDIO
OUT
VIDEO
L/
MONO
AUDIO
R
IN
DVD IN
L
R
C
R
C
B
Y
L/
MONO
AUDIO
S-VIDEO
VIDEO
R
VIDEO-1 VIDEO-2
COLOR
STREAM
INPUT
AUDIO
ANT
(
75
)
Connecting two VCRs
This connection allows you to record (dub/edit) from one VCR to
another VCR while watching a video program. You will also be able to
record from one TV channel while watching another channel.
You will need:
• one coaxial cable
• two pairs of audio cables (only two cables for mono VCRs)
• two video cables
VIDEO AUDIO
CH 3
LR
CH 4
IN
OUT
VIDEO AUDIO
CH 3
LR
CH 4
IN from ANT OUT to TV
IN
OUT
OUT
RL
VAR
AUDIO
OUT
VIDEO
L/
MONO
AUDIO
R
IN
DVD IN
L
R
C
R
C
B
Y
L/
MONO
AUDIO
S-VIDEO
VIDEO
R
VIDEO-1 VIDEO-2
COLOR
STREAM
INPUT
AUDIO
ANT
(
75
)
Caution:
To play from the DVD, the DVD and TV must
use ColorStream connections. To record from
the DVD, the DVD and TV must select Video.
The unauthorized recording of television
programs, video tapes and other materials
may infringe upon the provisions of copyright
laws.
Caution:
Do not connect one VCR to the output and
input jacks on the TV at the same time. If you
are using a S-VHS VCR, use the S-video
connections and remove the video cable. Do
not connect the video cable and the S-video
cable to Video-1 simultaneously.
The unauthorized recording of television
programs, video tapes and other materials
may infringe upon the provisions of copyright
laws.
Note:
To dub or edit VCR 2 must select Line IN,
and the TV must select Video-1.
From Antenna
Stereo VCR
DVD Player With ColorStream™
From Antenna
VCR 1
VCR 2
TV
TV

9
Reference
Introduction
Connecting
your TV
Using the
Remote Control
Setting up
your TV
Using the TV’s
Features
Appendix
Index
Connecting an audio system
This connection allows you to use an audio amplifier to adjust the
audio level. This also allows you to use external speakers.
To control the audio, turn on the TV and the stereo amplifier, then
turn off the built-in speakers. (See“ Turning off the built-in speakers”
on page 38.)
You will need one pair of audio cables.
LINE IN
LR
OUT
RL
VAR
AUDIO
OUT
VIDEO
L/
MONO
AUDIO
R
IN
DVD IN
L
R
CR
CB
Y
L/
MONO
AUDIO
S-VIDEO
VIDEO
R
VIDEO-1 VIDEO-2
COLOR
STREAM
INPUT
AUDIO
ANT
(
75
)
Amplifier
From Cable, Cable Box
or Antenna
TV

10
Reference
Introduction
Connecting
your TV
Using the
Remote Control
Setting up
your TV
Using the TV’s
Features
Appendix
Index
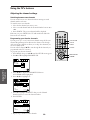
Using the remote control
Preparing the remote control for use
With the remote control, you can operate your TV, most VCR
models, and cable TV converters together, even if they are different
brands. If you will be using your TV with a Toshiba VCR, your
remote control is already programmed and ready to use. If you own
different brands of VCRs and/or converters, you first have to program
your remote control. (See “Programming the remote control for use
with a VCR or a cable TV converter” on page 11.)
Installing the remote control batteries
To install the batteries:
1. Slide the battery cover off of the back of the remote control.
2. Install two “AA” size batteries. Match the + and - signs on the
batteries to the signs on the battery compartment.
3. Slide the battery cover back on to the remote control until the
lock snaps.
Using the remote control with a VCR or a cable
TV converter
To control a Toshiba VCR:
Press the VCR button until it blinks. The shaded buttons shown
on the right will then control the VCR. The rest of the buttons
will operate the TV as usual.
If you own different brands of VCRs, program the remote control
to recognize the brand of your VCR. (See “Programming the
remote control for use with a VCR or a cable TV converter” on
page 11.)
Note:
This remote control’s functions may or may
not operate your VCR or cable TV converter.
Refer to the owner’s manuals supplied with
the equipment to see which features are
available. In addition, the original controllers
may have features not available on this remote
control. If you would like to continue to use
these features, you may want to use the
original remote control.
Caution:
• Dispose of your batteries in a designated
disposal area. Do not throw your batteries
into a fire.
• Do not mix battery types or combine used
batteries with new ones.
• Remove dead batteries immediately to
prevent battery acid from leaking into the
battery compartment.
• If you do not intend to use the remote
control for a long time, remove the
batteries.
CH RTN
ADV
ADV
MUTE RECALL
TV/VIDEO SURROUND
REC
TV/VCR
REW
FF
STILL
LOCATE
SWAP
STOP SOURCE
PLAY PIP
+
FAV
C
.
C
A
P
T
R
E
S
E
T
X
D
S
E
X
I
T
-
FAV
VOL
CH
ENTER
1
4
7
2
5
8
3
6
9
0
100
TV
VCR
MENU/
TIMER
POWER
ENT
CABLE
MTS
POWER
Channel
Number
ENT
Record
STOP
TV/VCR
Rewind
Fast Forward
PLAY
VCR
Channel ▲▼

11
Reference
Introduction
Connecting
your TV
Using the
Remote Control
Setting up
your TV
Using the TV’s
Features
Appendix
Index
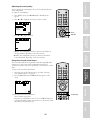
To control a cable TV converter:
Program the remote control to recognize the brand of your
converter. The shaded buttons shown on the right will control the
cable TV converter.
Press the CABLE button whenever you control the cable TV
converter.
Programming the remote control for use with a
VCR or a cable TV converter
This remote control is pre-programmed to operate Toshiba VCRs. To
use VCRs or cable converters other than Toshiba models, you must
follow the steps below before you operate your remote control.
1. Refer to the “VCR code table” or “Cable TV converter code
table” on pages 12-13 to find the number that corresponds to the
brand name of your VCR or converter.
If more than one number is listed, try each one separately until
you find the one that works.
2. Turn on the device (VCR or converter) you wish to program the
code.
3. Press the matching device button “VCR” (or “CABLE”) and
ENT at the same time. The device button will be illuminated by
the back-light to indicate that it is in the program mode. Perform
the following steps while the back-light is on (about 20 seconds).
4. Point the remote control toward the VCR (or converter) and
press the Number buttons to enter the three digit code number
for your brand of VCR (or converter).
• If the right number was entered, the VCR (or the converter)
should turn off.
• If the VCR (or the converter) does not respond to the remote
control, repeat steps 1 to 4 with another code number until
the device turns off.
The back-light will blink to confirm the storage.
5. Press the device button (CABLE or VCR) to release the program.
6. Press TV to control the TV.
For future reference, write down the code numbers you used:
VCR code _____________________
Cable code _____________________
Note:
• Each time you replace the batteries, you
must reprogram the remote control.
• Some newer VCRs are capable of working
on either of two remote codes. These VCRs
have a switch labeled “VCR1/VCR2.”
If your VCR has this kind of switch, it may
not respond to any of the code numbers for
your VCR brand name. In this case, set the
switch to the other position (VCR1 or
VCR2) and reprogram the remote control.
CH RTN
ADV
ADV
MUTE RECALL
TV/VIDEO SURROUND
+
FAV
C
.
C
A
P
T
R
E
S
E
T
X
D
S
E
X
I
T
-
FAV
VOL
CH
ENTER
1
4
7
2
5
8
3
6
9
0
100
TV
VCR
MENU/
TIMER
POWER
ENT
CABLE
MTS
POWER
Channel
Number
Channel ▲▼
Device buttons
ENT

12
Reference
Introduction
Connecting
your TV
Using the
Remote Control
Setting up
your TV
Using the TV’s
Features
Appendix
Index
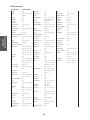
VCR code table
Brand name Code number
AIWA 034
AKAI 146, 043, 046, 124,
142, 016
ALBA 202
AMPRO 072
ANAM 031
AUDIO
DYNAMICS 012, 023, 043
BRANDT 204
BROKSONIC 035, 037, 129, 203
CANON 031
CRAIG 003, 040
CURTIS MATHES031, 041
DAEWOO 010, 110, 111, 112,
017
DBX 012, 023, 043
DYNATECH 034, 053
ELECTROHOME 059
EMERSON 006, 029, 035, 025,
034, 036, 037, 046,
101, 129, 131, 138,
017, 031, 202, 203
FISHER 003, 008, 009, 010
FUNAI 034
GE 031, 072, 144, 147,
063, 107, 109, 205,
206, 207, 208
GO VIDEO 132, 136
GOLDSTAR 012, 013, 020, 101,
123
HARMAN
KARDON 012, 045
HITACHI 004, 026, 034, 043,
063, 047, 013
INSTANTREPLAY031
JCL 031
JCPENNY 012, 013, 040, 101,
031
JENSEN 043
JVC 048, 043, 130, 152,
055, 060, 012, 031,
047
KENWOOD 014, 048, 043
LLOYD 034
LXI 003, 009, 017, 034,
101, 013, 014
MAGIN 040
MAGNAVOX 067, 031, 034, 041
MARANTZ 031, 067, 012
MARTA 101
MATSUI 202
MEI 031
MEMOREX 101, 003, 010, 014,
031, 034, 053, 072
MGA 045, 046, 059
MINOLTA 013, 020
MITSUBISHI 059, 061, 046, 051,
142, 013, 020, 045
MTC 034, 040
MULTITECH 024, 034
NEC 012, 023, 043, 048
NORDMENDE 043
OPTONICA 053, 054
ORION 202
PANASONIC 070, 140, 201, 031
PENTAX 013, 020, 031, 063
PHILCO 031, 034, 067
PHILIPS 031, 067, 034, 101,
054
PILOT 101
PIONEER 021, 048, 013
PULSAR 072
QUARTZ 014
QUASAR 031
RCA 013, 020, 034, 041,
040, 107, 109, 140,
144, 147, 031, 205,
206, 207, 208
REALISTIC 003, 008, 010, 014,
031, 034, 040, 053,
054, 101
RICOH 058
RUNCO 072
SALORA 014
SAMSUNG 040, 107, 109, 112,
017, 205, 206
SANSUI 043, 048
SANYO 003, 010, 014
SCOTT 017, 037, 129, 112,
131
SEARS 003, 008, 010, 013,
014, 017, 101, 009,
031
SHARP 031, 054, 053
SHINTOM 024
SONY 056, 057, 058, 003,
052, 031
SOUNDESIGN 034
STS 013
SYLVANIA 031, 034, 067
SYMPHONIC 034
TANDY 010, 034
TATUNG 043
TEAC 034, 043
TECHNICS 031, 070
TEKNIKA 031, 019, 034, 101
TELEFUNKEN 204
THOMAS 034
TMK 006
TOSHIBA 001, 112, 131, 008,
047, 059, 082, 013,
017
TOTEVISION 040, 101
UNITECH 040
VECTOR
RESEARCH 012
VIDEO
CONCEPTS 012, 046, 034, 141
VIDEOSONIC 040
WARDS 013, 024, 031, 034,
040, 053, 054, 003,
017, 131
YAMAHA 012, 043, 034
ZENITH 072, 080, 056, 048,
034, 101, 058

13
Reference
Introduction
Connecting
your TV
Using the
Remote Control
Setting up
your TV
Using the TV’s
Features
Appendix
Index
Cable TV converter
code table
Brand name Code number
ABC 001, 004, 039, 045,
053, 003, 042
ANTRONIK 014
ARCHER 005, 007, 014, 024
CABLE STAR 026
CENTURY 007
CITIZEN 007
COLOUR VOICE 065, 090
COMBANO 080, 081
COMTRONICS 019, 030, 202
DIAMOND 023
EAGLE 020, 030, 040
EASTERN 057, 062, 066
ELECTRICORD 032
GE 072
GEMINI 008, 022, 025, 054
GI 001, 074
GOLDEN
CHANNEL 030
HAML IN 049, 050, 055, 204,
207
HITACHI 001, 055
HOSPITALITY 070, 077
JERROLD 002, 003, 004, 010,
001, 008, 009, 069,
074, 201
M-NET 037
MACOM 033
MAGNAVOX 012, 079, 010, 064
MEMOREX 052
MOVIE TIME 028, 032
NSC 071, 073, 015, 028,
038
OAK 016, 031, 037, 053
PANASONIC 044, 047
PARAGON 052
PHILIPS 020, 065, 006, 012,
013, 085, 090, 202
PIONEER 034, 051, 001, 063,
076
POPULAR
MECHANICS 206
POST NEWS
WEEK 016
PRUCER 059
PTS 011, 048, 071, 072,
073, 074
PULSAR 052
RCA 047
REGAL 049, 050
REGENCY 057
REMBRANT 025
RK 091
SAMSUNG 030, 068
SCIENTIFIC
ATLANTA 003, 011, 041, 042,
043, 045, 046
SHERITECH 022
SIGNAL 030
SIGNATURE 001
SL MARX 030
SPRUCER 047, 078
STANDARD
COMPONENTS 203
STARCOM 002, 004, 008, 009
STARGATE 008, 030
SYLVANIA 067
TADIRAN 030
TANDY 017
TELECAPATION 021
TEXSCAN 029, 067
TOCOM 039, 040, 056
TOSHIBA 052
UNIKA 007, 014, 024
UNITED CABLE 004, 053
UNIVERSAL 007, 024, 027, 035,
005, 014, 026, 032
VIEWSTAR 086, 087, 088, 089,
012, 015, 018, 202,
205
ZENITH 052, 060, 093

14
Reference
Introduction
Connecting
your TV
Using the
Remote Control
Setting up
your TV
Using the TV’s
Features
Appendix
Index
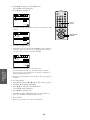
Learning about the remote control
MTS press to select STEREO, SAP or MONO audio sound
TV press to control the TV
CABLE press to control the cable TV converter (page 11)
VCR press to control the VCR (page 10)
POWER turns the TV on and off (pages 11 and 35)
Channel yz cycles through programmed channels (page 18)
Channel Numbers [0-9,100] allow direct access to channels (page 18)
Volume yz adjusts the volume level
CH RTN returns to the last viewed channel (page 20)
XDS displays the extended data service information (page 33)
C. CAPT selects the closed caption mode (page 34)
RESET
resets audio and picture adjustments to the factory settings (page 32)
EXIT exits programming menus (page 15)
MENU allows access to programming menus (page 15)
ENTER sets programmed menu information (pages 15, 19-22)
yz x • selects or adjusts programming menus (page 15)
FAV zy cycles through favorite channels (page 20)
MUTE mutes the sound (page 36)
RECALL displays screen information (page 32)
TV/VIDEO selects video input source (page 32)
SURROUND turns the surround sound on and off (page 37)
PIP Functions allow access to PIP functions (pages 23, 24)
PIP press to turn on or off the PIP
SOURCE press to select the input source
STILL press to freeze the PIP
LOCATE press to change the position of the PIP
SWAP press to switch the main and small pictures
VCR Functions allow access to VCR functions (page 10)
PLAY press to play a videotape
STOP press to stop a videotape
REC press to start recording a videotape
TV/VCR toggles between TV and VCR
when viewing while recording
REW press to rewind a videotape
FF press to fast forward a videotape
CH RTN
ADV
ADV
MUTE RECALL
TV/VIDEO SURROUND
REC
TV/VCR
REW
FF
STILL
LOCATE
SWAP
STOP SOURCE
PLAY PIP
+
FAV
C
.
C
A
P
T
R
E
S
E
T
X
D
S
E
X
I
T
-
FAV
VOL
CH
ENTER
1
4
7
2
5
8
3
6
9
0
100
TV
VCR
MENU/
TIMER
POWER
ENT
CABLE
MTS

15
Reference
Introduction
Connecting
your TV
Using the
Remote Control
Setting up
your TV
Using the TV’s
Features
Appendix
Index
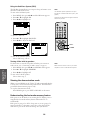
Setting up your TV
After you’ve installed the batteries and programmed the remote
control, you need to set some preferences on the TV using the menu.
You can access the menu with the buttons on your TV or by using the
remote control.
1. Press MENU to display menu.
2. Press x (
) or • ( ) to select menu.
3. Press y (
) or z ( ) select an item.
4. Press x (
) or • ( ) to select or adjust a setting.
COLOR
TINT
SHARPNESS
BR I GHTNESS
SET UP C.CAPTIONAUDIO PREMIUM SBS
To end push EXIT
PICTURE
CONTRAST
PREFERENCE
SET UP C.CAPTIONAUDIO PREMIUM SBS
To end push EXIT
PICTURE PREFERENCE
On Off
NO I SE REDUCT I ON
CONVERGENCE
START
PUSH
FLESH TONE
On
TREBLE
BAL ANCE
SPEAKERS
BASS
SET UP C.CAPTIONAUDIO PREMIUM SBS
To end push EXIT
PICTURE
MTS
PREFERENCE
STR
On
CH PROGRAM
ADD /ERASE
TV / CABLE
SET UP C.CAPTIONAUDIO PREMIUM SBS
To end push EXIT
PICTURE
L ANGUAGE
PREFERENCE
English
TV
START
PUSH
Add
T IMER / CLOCK
START
PUSH
CH L ABEL
FAVOR I TE CH
SET UP C.CAPTIONAUDIO PREMIUM SBS
To end push EXIT
PICTURE PREFERENCE
START
PUSH
START
PUSH
START
PUSH
V–CH I P
RESET
START
PUSH
SET UP C.CAPTIONSBSPICTURE PREFERENCE
To end push EXIT
AUDIO
PREMIUM
SURROUND
On
SBS LEVEL
SET UP C.CAPTIONAUDIO PREMIUM SBS
To end push EXIT
PICTURE
SBS
PREFERENCE
Off
P I CTURE
PREFERENCE
TEMPERATURE
Cool
Normal
SET UP C.CAPTIONAUDIO PREMIUM SBS
To end push EXIT
PICTURE
COLOR
PREFERENCE
SET UP C.CAPTIONAUDIO PREMIUM SBS
To end push EXIT
PICTURE
XDS
PREFERENCE
CAPT I ON
CLOSED
Off
START
PUSH
• Use the ENTER button to activate the function settings in the
SET UP menu.
• The main menu display will disappear automatically if you do not
make a selection within 15 seconds, and the other displays will
disappear within 6 seconds.
• If you want to close all the on-screen displays instantly, press
EXIT.
DEMO
ENTER
TV/VIDEO
VOLUME CHANNEL
MENU
CH RTN
ADV
ADV
MUTE RECALL
TV/VIDEO SURROUND
+
FAV
C
.
C
A
P
T
R
E
S
E
T
X
D
S
E
X
I
T
-
FAV
VOL
CH
ENTER
1
4
7
2
5
8
3
6
9
0
100
TV
VCR
MENU/
TIMER
POWER
ENT
CABLE
MTS
MENU/ENTER
EXIT
y z x •
MENU
ENTER

16
Reference
Introduction
Connecting
your TV
Using the
Remote Control
Setting up
your TV
Using the TV’s
Features
Appendix
Index
Changing the on-screen display language
You can choose from three different languages (English, French and
Spanish) for the on-screen displays. Adjustment menus and messages
will appear in the language of your choice.
To select a language:
1. Press MENU, then press x (
) or • ( ) until the SET UP
menu appears.
START
PUSH
CH PROGRAM
ADD /ERASE
TV / CABLE
SET UP C.CAPTIONAUDIO PREMIUM SBS
To end push EXIT
PICTURE
L ANGUAGE
PREFERENCE
English
TV
START
PUSH
Add
T IMER / CLOCK
2. Press z ( ) or y ( ) to highlight LANGUAGE.
CH PROGRAM
ADD /ERASE
TV / CABLE
SET UP C.CAPTIONAUDIO PREMIUM SBSPICTURE
L ANGUAGE
PREFERENCE
English
TV
START
PUSH
Francais
Espanol
To end push EXIT
T IMER / CLOCK
START
PUSH
Add
3. Press x ( ) or • ( ) to highlight your desired language.
PROG CAN
ADD / EFF
TV / CABLE
REGLAGE S.TITRAGEAUDIO PREMIUM SBSIMAGE
L ANGUE
PREFERENCE
Cable
SUIVANT
APPDYEZ
To end push EXIT
English
Francais
Espanol
T IMER / CLOCK
START
PUSH
AddCan
DEMO
ENTER
TV/VIDEO
VOLUME CHANNEL
MENU
CH RTN
ADV
ADV
MUTE RECALL
TV/VIDEO SURROUND
+
FAV
C
.
C
A
P
T
R
E
S
E
T
X
D
S
E
X
I
T
-
FAV
VOL
CH
ENTER
1
4
7
2
5
8
3
6
9
0
100
TV
VCR
MENU/
TIMER
POWER
ENT
CABLE
MTS
MENU
MENU
y z x •

17
Reference
Introduction
Connecting
your TV
Using the
Remote Control
Setting up
your TV
Using the TV’s
Features
Appendix
Index
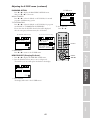
Adding channels to the TV’s memory
Your TV will stop on specific channels that are stored in the TV’s
channel memory when you press Channel y or z. Use the steps
below to set all active channels in your area automatically.
Programming channels automatically
Your TV can automatically detect all active channels and store them in
its memory. After the TV has stored the channels in its memory, you
can erase channels or add your favorite channels.
To add channels:
1. Press MENU, then press x or • until the SET UP menu appears.
2. Press z or y until the TV/CABLE is highlighted.
3. Press x or • to highlight either TV or CABLE, depending on
which you use.
START
PUSH
CH PROGRAM
ADD /ERASE
TV / CABLE
SET UP C.CAPTIONAUDIO PREMIUM SBS
To end push EXIT
PICTURE
L ANGUAGE
PREFERENCE
English
TV
START
PUSH
Add
Cable
T IMER / CLOCK
If you use an antenna, choose TV.
If you use cable, choose CABLE.
4. Press z to select CH PROGRAM.
5. Press x or • to start channel programming. The TV will
automatically cycle through all the TV or Cable channels
(depending on which you selected), and store all active channels
in the channel memory.
While the TV is cycling through the channels, the message
“Programming Now Please Wait” appears.
6. When channel programming is complete, the message
“Completed (channel or cable number)” appears.
7. Press Channel y or z to view the programmed channels.
CH RTN
ADV
ADV
MUTE RECALL
TV/VIDEO SURROUND
+
FAV
C
.
C
A
P
T
R
E
S
E
T
X
D
S
E
X
I
T
-
FAV
VOL
CH
ENTER
1
4
7
2
5
8
3
6
9
0
100
TV
VCR
MENU/
TIMER
POWER
ENT
CABLE
MTS
Channel y z
y z x •
MENU

18
Reference
Introduction
Connecting
your TV
Using the
Remote Control
Setting up
your TV
Using the TV’s
Features
Appendix
Index
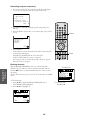
Adding and erasing channels manually
After you’ve programmed the channels, you can add or erase specific
channels.
To add or erase channels:
1. Select the channel you want to add or erase using Channel y or
z. If adding channels, you must select the channel to add by
using the Channel Number buttons.
2. Press MENU, then press x (
) or • ( ) until the SET UP
menu appears.
3. Press z (
) or y ( ) to highlight ADD/ERASE.
START
PUSH
CH PROGRAM
ADD /ERASE
TV / CABLE
SET UP C.CAPTIONAUDIO PREMIUM SBS
To end push EXIT
PICTURE
L ANGUAGE
PREFERENCE
English
Cable
START
PUSH
Add Erase
T IMER / CLOCK
4. Press x ( ) or • ( ) to select Add or Erase, whichever function
you want to perform.
5. Repeat steps 1-4 for other channels you want to add or erase.
Changing channels
To change the channel, you can:
• change the programmed channels using the remote control
• select a channel directly using the remote control
• scan the channels using the TV buttons
To change to the next programmed channel:
Press Channel y or z on the TV or remote control.
To change to a specific channel (programmed or unprogrammed):
Press the Channel Number buttons (0-9 and 100).
For example, to select channel 125, press the 100 button, the 2
button, and the 5 button.
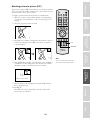
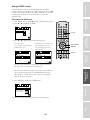
Adjusting the color convergence
This projection TV uses three separate TV tubes: a red one, a green
one, and a blue one. The red, green, and blue images are projected
onto the screen where they converge to form a full color picture. You
can see a clear picture only when they converge correctly.
Convergence may drift over time or if you move the TV. If you can
see clear images on the screen, skip this procedure.
This adjustment should be made after the TV has been on for at least
30 minutes.
To check and adjust the color convergence:
1. Press MENU, then press x or • until the PICTURE menu
appears.
2. Press y or z to highlight CONVERGENCE.
3. Press x or • to display the center CONVERGENCE menu.
DEMO
ENTER
TV/VIDEO
VOLUME CHANNEL
MENU
CH RTN
ADV
ADV
MUTE RECALL
TV/VIDEO SURROUND
+
FAV
C
.
C
A
P
T
R
E
S
E
T
X
D
S
E
X
I
T
-
FAV
VOL
CH
ENTER
1
4
7
2
5
8
3
6
9
0
100
TV
VCR
MENU/
TIMER
POWER
ENT
CABLE
MTS
MENU
Channel z y
Channel
Number
Channel y z
y z x •
MENU

19
Reference
Introduction
Connecting
your TV
Using the
Remote Control
Setting up
your TV
Using the TV’s
Features
Appendix
Index
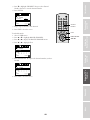
SET UP C.CAPTIONAUDIO PREMIUM SBS
To end push EXIT
PICTURE PREFERENCE
On
On
NO I SE REDUCT I ON
FLESH TONE
CONVERGENCE
START
PUSH
OTHER PLACE PUSH EXIT
PUSH ENTER
TO SELECT COLOR
RED BLUE
If you see separate colored lines, you have to adjust the
convergence.
4. Press ENTER to highlight RED or BLUE.
PUSH EX
PUSH ENTER
TO SELECT COLOR
RED BLUE
IT
TO SELECT POS
ITION
PUSH EX
PUSH ENTER
TO SELECT COLOR
RED BLUE
IT
TO SELECT POS
ITION
5. Press y (up), z (down), x (left), or • (right) to converge the red
or blue line into the green line. When color convergence is
correctly adjusted, you will see two single white lines.
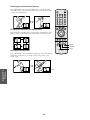
6. Press EXIT to display the circumference CONVERGENCE
menu.
7. Press the corresponding Number button (1-9) to select the place
you want to adjust.
PUSH 1–9
1 2 3
4 6
7 8 9
PUSH EX
PUSH ENTER
TO SELECT COLOR
RED BLUE
IT
TO SELECT POS
ITION
8. Press ENTER to highlight RED or BLUE.
9. Press yzx • to converge the red or blue line into the green line.
Repeat steps 8 and 9 until you see two single white lines.
10. Press EXIT once to select any other place you want to adjust,
then repeat steps 7 through 9.
11. Press EXIT twice to close the CONVERGENCE menu.
CH RTN
ADV
ADV
MUTE RECALL
TV/VIDEO SURROUND
+
FAV
C
.
C
A
P
T
R
E
S
E
T
X
D
S
E
X
I
T
-
FAV
VOL
CH
ENTER
1
4
7
2
5
8
3
6
9
0
100
TV
VCR
MENU/
TIMER
POWER
ENT
CABLE
MTS
EXIT
Number
y z x •
ENTER

20
Reference
Introduction
Connecting
your TV
Using the
Remote Control
Setting up
your TV
Using the TV’s
Features
Appendix
Index
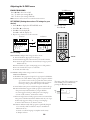
Using the TV’s features
Adjusting the channel settings
Switching between two channels
You can switch between two channels without entering an actual
channel number each time.
To switch between two channels:
1. Select the first channel you want to view.
2. Select a second channel with the Channel Number buttons (0-9,
100).
3. Press CH RTN. The previous channel will be displayed.
Each time you press CH RTN, the TV will switch back and forth
between the two channels.
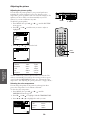
Programming your favorite channels
You can preset up to 12 of your favorite channels using the Favorite
Channel Programming feature. Because this feature scans through
only your favorite channels, it allows you to skip other channels you
do not normally watch.
You can still use Channel y z to scan through all the channels you
programmed in the TV’s memory.
To program your favorite channels:
1. Press MENU, then press x or • until the SET UP menu appears.
2. Press y or z to highlight FAVORITE CH.
FAVORITE CH
V–CH I P
SET UP C.CAPTIONAUDIO PREMIUM SBS
To end push EXIT
PICTURE PREFERENCE
CH L ABEL
START
PUSH
START
PUSH
START
PUSH
RESET
START
PUSH
3. Press x or • to display the FAVORITE CH menu.
SET/CLEAR will be highlighted.
4. Press x or • to highlight Set.
SET UP C.CAPTIONAUDIO PREMIUM SBSPICTURE PREFERENCE
CH
Set Clear
CH INPUT
FAVOR I TE CH
SET / CLEAR
SET UP
CH0000
0000
0000
TV
CABLE
To enter push 0-9
To set push ENTER
To end push EXIT
5. Press z to highlight CH INPUT, then press the Channel
Number buttons to enter the channel number.
6. Press ENTER.
TV
CABLE
SET UP C.CAPTIONAUDIO PREMIUM SBSPICTURE PREFERENCE
Set Clear
CH INPUT
FAVOR I TE CH
SET / CLEAR
SET UP
CH0000
0000
7000
07CH
To enter push 0-9
To set push ENTER
To end push EXIT
7. Repeat steps 5 and 6 for other channels.
CH RTN
ADV
ADV
MUTE RECALL
TV/VIDEO SURROUND
+
FAV
C
.
C
A
P
T
R
E
S
E
T
X
D
S
E
X
I
T
-
FAV
VOL
CH
ENTER
1
4
7
2
5
8
3
6
9
0
100
TV
VCR
MENU/
TIMER
POWER
ENT
CABLE
MTS
MENU/ENTER
y z x •
Channel
Number
CH RTN
Channel y z
Page is loading ...
Page is loading ...
Page is loading ...
Page is loading ...
Page is loading ...
Page is loading ...
Page is loading ...
Page is loading ...
Page is loading ...
Page is loading ...
Page is loading ...
Page is loading ...
Page is loading ...
Page is loading ...
Page is loading ...
Page is loading ...
Page is loading ...
Page is loading ...
Page is loading ...
Page is loading ...
Page is loading ...
Page is loading ...
Page is loading ...
Page is loading ...
-
 1
1
-
 2
2
-
 3
3
-
 4
4
-
 5
5
-
 6
6
-
 7
7
-
 8
8
-
 9
9
-
 10
10
-
 11
11
-
 12
12
-
 13
13
-
 14
14
-
 15
15
-
 16
16
-
 17
17
-
 18
18
-
 19
19
-
 20
20
-
 21
21
-
 22
22
-
 23
23
-
 24
24
-
 25
25
-
 26
26
-
 27
27
-
 28
28
-
 29
29
-
 30
30
-
 31
31
-
 32
32
-
 33
33
-
 34
34
-
 35
35
-
 36
36
-
 37
37
-
 38
38
-
 39
39
-
 40
40
-
 41
41
-
 42
42
-
 43
43
-
 44
44


Ask a question and I''ll find the answer in the document
Finding information in a document is now easier with AI


