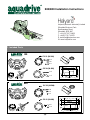
Aquadrive B20 Installation guide

Type
Installation guide

Aquadrive B20

The Aquadrive B20 is a robust and versatile marine propulsion system designed for a wide range of applications. With its powerful motor and efficient transmission, the B20 delivers exceptional performance and reliability. Whether you're cruising through calm waters or navigating challenging conditions, the B20 provides a smooth and responsive driving experience.

Key features of the Aquadrive B20 include:

  1. Durability: Constructed from high-quality materials and components, the B20 is built to withstand the harsh marine environment. Its robust design ensures longevity and minimal maintenance requirements.
1(4)
B20/B30 Installation Instructions
x 6
x 6
x 6
x 3
x 2
x 6
x 6
x 6
x 6
x 6
B20
B30
CV 21 (20 300)
CV 30 (20 400)
CV 32 (20 500)
CV 42 (20 600)
1.
Includ
ed Parts
Halyard (Marine & Industrial) Limited
Whaddon Business Park
Southampton Road
Whaddon, SP5 3HF
T: +44 (0)1722 710922
F: +44(0)1722 710975
W: www.halyard.eu.com
2.
To
ols Required
3.
Installation
2(4)
3(4)
> 1 mm (3/64")
< 3 mm (1/8")
11.
12.
187 Nm
138 lb.ft
4(4)
A. Installatie
Draai de bouten licht aan en plaats de klembus over de klemnaaf. Zet de
bouten kruislings vast in twee of drie stappen tot de beschreven Swaarde in
de instructie is berikt. Controleer het aandraaimoment nogmaals door alle
bouten te controleren.
B. Verwijderen
Verwijder de bouten en schroef deze in de draadgaten welke de ring
moeten losdrukken, deze zitten in de voorste ring. Deze drukken op de
achterste ring en haalt zo de druk van de klemnaaf. (fig.B)Haal de bouten
uit de gaten op het moment dat de klembus verwijdert uit de behuizing.
A. Installation
Commencer à serrer les vis lentement en alignant le moyeu. Serrer les vis
en croix pour les amener au couple précis en procédant en, deux ou trois
passes. Contrôler le serrage au couple en passant en revue toutes les vis.
B. Demontage
Retirer les vis de serrage et les placer dans les trous taraudés d'extraction
prévus à cet effet sur l'avant de la bague. Appauyer pour sortir la bague
arrière et la bague d'appui (B). Retirer les vis seulement après avoir sorti la
bague d'appui du moyeu conique.
A. Montaggio
Avvitate moderatamente le viti ed allineate il mozzo. Serrate ordinatamente
le viti poste sui diametri del calettatore. Questa operazione deve essere
eseguita in due o tre fasi fino al raggiungimento del valore di coppia di
serragio indicato nella tabella riportata. Ad operazione conclusa, verificate
con la chiave dinamometrica che il valore della coppia di serraggio corrisponda
effettivamente a quello indicato.
B. Smontaggio
Rimuovete le viti ed avvitatele nei fori filettati di smontaggio, posizionati in
testa al calettatore, facendo fuoriuscire l'anello posteriore ed estraendo il
corpo conico (fig B).
Togliete le viti dai fori di smontaggio solo dopo che il corpo conico è stato
rimosso dal mozzo.
A. Installation
Thighten screws lightly and align hub. Tighten screws in diametrically opposite
sequence in two or three stages up to prescribed settings tabled in these
instructions. Re-check tightening torque by applaying it to all the screws.
B. Removal
Remove the screws and screw them into the releaset hreads of the front ring,
pressing off the rear ring and releasing taper sleeve (fig B). Remove the
screws from the release threads only after taper sleeve has been taken out
of the hub.
A. Installation
Ziehen Sie die Schrauben leicht an und richten Sie die Nabe aus. Ziehen Sie
die Schrauben in diametral gegenüberliegender Reihenfolge in zwei bis drei
Schritten an bis zu dem Anzugsmoment, das in einer Tabelle in diesen
Instruktionen für jeden Schraubentyp angegeben ist. Überprüfen Sie das
Anzugsmoment, ziehen Sie alle Schrauben danach fest.
B. Schrauben entfernen
Lösen und entfernen Sie die Schrauben und Schrauben Sie sie in die
Freigewinde des Vorderrings, drücken Sie dabei den hinteren Ring heraus
undsen Sie die Kegelhülse (Abbildungen B).
Entfernen Sie die Schrauben aus dem Freigewinde erst, nachdem die
Kegelhülse aus der Nabe herausgenommen wurde.
A. Instalación
Posicionar los tornillos apretándolos ligeramente y alinear el cubo. Apretar
los tornillos, de dos en dos diametralmente opuestos y de forma progresiva,
hasta conseguir el par de apriete indicado en estas instrucciones. Controlar
que cada tornillo esté correctamente apretado.
B. Desmontaje
Aflojar los tornillos y atornillarlos en los agujeros roscados de extracción del
anillo frontal, empujando el anillo trasero y liberando el casquillo cónico
(pos B). Quitar los tornillos de los agujeros de extracciónlo después de
haber retirado el casquillo cónico del cubo.
A. Installation
Fäst skruvarna så att frontringen precis greppar och rikta upp enheten.
Dra därefter åt skruvarna korsvis i två, tre eller flera steg till det angivna
åtdragningsmomentet. Slutkontrollera installationen genom att dra samtliga
skruvar med angivet åtdragningsmoment en sistang.
SE
FR
IT
GB
NL
ES
DE
SE
FR
IT
GB
NL
ES
DE
B. Demontering
Gänga först ur samtliga skruvar och fäst dem sedan i frontringens
gängade hål. Dra åt skruvarna korsvis och pressa ur frontringen tills
den koniska hylsan släpper (Fig. B). Efter att frontringen tagits loss kan
skruvarna åter sättas tillbaka i de ursprungliga hålen.
A+B+C+D
4
=
L
L
14.
15.
A.
B.
B20 42 Nm / 31 lb.ft
B30 85 Nm / 62 lb.ft
13.
  • Page 1 1
  • Page 2 2
  • Page 3 3
  • Page 4 4

Aquadrive B20 Installation guide

Type
Installation guide

Aquadrive B20

The Aquadrive B20 is a robust and versatile marine propulsion system designed for a wide range of applications. With its powerful motor and efficient transmission, the B20 delivers exceptional performance and reliability. Whether you're cruising through calm waters or navigating challenging conditions, the B20 provides a smooth and responsive driving experience.

Key features of the Aquadrive B20 include:

  1. Durability: Constructed from high-quality materials and components, the B20 is built to withstand the harsh marine environment. Its robust design ensures longevity and minimal maintenance requirements.

Ask a question and I''ll find the answer in the document

Finding information in a document is now easier with AI