Page is loading ...

OWNER'S MANUAL
MODEL M1048
10" X 18" METAL CUTTING
BANDSAW
Phone: (360) 734-3482 • Online Technical Support: [email protected]
COPYRIGHT © JULY, 2006 BY WOODSTOCK INTERNATIONAL, INC. REVISED AUGUST, 2007 (TR)
WARNING: NO PORTION OF THIS MANUAL MAY BE REPRODUCED IN ANY SHAPE OR FORM WITHOUT
THE WRITTEN APPROVAL OF WOODSTOCK INTERNATIONAL, INC. Printed in Taiwan
#8373PC


SETUPELECTRICAL MAINTENANCE SERVICE PARTS
OPERATIONSSAFETYINTRODUCTION
USE THE QUICK GUIDE PAGE LABELS TO SEARCH OUT INFORMATION FAST!
Contents
INTRODUCTION ..................................................................................................3
Woodstock Technical Support ............................................................................ 3
Specifications ............................................................................................... 3
Control Panel ............................................................................................... 5
SAFETY ............................................................................................................6
Standard Safety Instructions ............................................................................. 6
Additional Safety Instructions for Bandsaws ........................................................... 8
ELECTRICAL ......................................................................................................9
220V Operation ............................................................................................. 9
Extension Cords ............................................................................................ 9
Grounding ................................................................................................... 9
SETUP ........................................................................................................... 10
Unpacking ..................................................................................................10
Inventory ...................................................................................................10
Machine Placement .......................................................................................11
Cleaning Machine .........................................................................................11
Mounting to Shop Floor ..................................................................................12
Moving & Placing Unit ....................................................................................13
Shipping Bracket ..........................................................................................13
Workstop ...................................................................................................13
Chip Tray ...................................................................................................14
Feed Stop ...................................................................................................14
Recommended Adjustments .............................................................................14
Test Run ....................................................................................................15
OPERATIONS ................................................................................................... 16
General .....................................................................................................16
Vise ..........................................................................................................16
Blade Guide Arms .........................................................................................18
Blade Selection ............................................................................................19
Blade Speed ................................................................................................20
Feed Rate ..................................................................................................20
Coolant System ............................................................................................21
Cutting Fluid ...............................................................................................22
Operation Tips .............................................................................................23
Bandsaw Accessories .....................................................................................23

USE THE QUICK GUIDE PAGE LABELS TO SEARCH OUT INFORMATION FAST!
SETUP ELECTRICAL
MAINTENANCE
SERVICE
PARTS OPERATIONS SAFETY INTRODUCTION
MAINTENANCE ................................................................................................. 24
General .....................................................................................................24
Cleaning ....................................................................................................24
Lubrication .................................................................................................24
SERVICE ......................................................................................................... 26
Troubleshooting ...........................................................................................26
Blade Change ..............................................................................................28
Blade Tension & Tracking ................................................................................29
Blade Guide Bearings .....................................................................................30
Squaring Blade to Table ..................................................................................31
Electrical Components ...................................................................................32
Model M1048 220V Wiring Diagram .....................................................................33
Blade Guides Parts Breakdown ..........................................................................34
Blade Guides Parts List ...................................................................................35
Drive Wheel Parts Breakdown ...........................................................................36
Drive Wheel Parts List ....................................................................................37
Main Parts Breakdown ....................................................................................38
Main Parts List .............................................................................................39
Main Parts List .............................................................................................40
Label Placement ..........................................................................................41

-3-
M1048 10" x 18" Metal Cutting Bandsaw
INTRODUCTION
Woodstock Technical Support
Your new SHOP FOX® 10" x 18" Metal Cutting Bandsaw has been specially designed to provide many
years of trouble-free service. Close attention to detail, ruggedly built parts and a rigid quality control
program assure safe and reliable operation.
Woodstock International, Inc. is committed to customer satisfaction. Our intent with this manual is to
include the basic information for safety, setup, operation, maintenance, and service of this product.
We stand behind our machines! In the event that questions arise about your machine, please contact
Woodstock International Technical Support at (360) 734-3482 or send e-mail to: tech-support@shopfox.
biz. Our knowledgeable staff will help you troubleshoot problems and process warranty claims.
INTRODUCTION
If you need the latest edition of this manual, you can download it from http://www.shopfox.biz.
If you have comments about this manual, please contact us at:
Woodstock International, Inc.
Attn: Technical Documentation Manager
P.O. Box 2309
Bellingham, WA 98227
Specifications
Bandsaw Motor Size ..................................................
2HP, 15A, 220V, Single-Phase
Motor Speed .....................................................................................
1,725 RPM
Power Transfer ............................................... V-Belt Drive and Worm-Gear Reduction
Angle Cuts ............................................................................................. 45-90°
Rear Vise Jaw Size ........................................................................... 121⁄2"W x 5"H
Maximum Rectangular Height Capacity .......................................................5" at 90°
Maximum Rectangular Width Capacity ................................................... 183⁄8" at 90°
Maximum Rectangular Height Capacity .......................................................7" at 45°
Maximum Rectangular Width Capacity .................................................... 93⁄8" at 45°
Maximum Round Capacity ..................................................................... 10" at 90°
Maximum Round Capacity ...................................................................... 6" at 45°
Table Size ............................................................................................ 22" x 8"
Floor To Cutting Height ..................................................................................23"
Coolant Capacity ................................................................................. 2-1⁄2 gal.
Footprint ............................................................................................47" x 19"
Overall Dimensions ..............................................................68" L x 24" W x 411⁄2" H
Blade Speeds ......................................................................114, 196, 288, 377 FPM
Blade Size ....................................................................................1293⁄8" x 11⁄16"
Bearings ......................................................... Permanently-Lubricated Ball Bearings
Power Control .............................................................. Push Button ON/OFF Switch
Net Weight .....................................................................................770 lbs.

-4-
M1048 10" x 18" Metal Cutting Bandsaw
INTRODUCTION
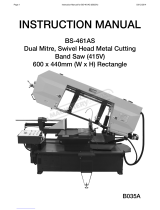
Controls and Features
Figure 1. M1048 Machine Identification.
A. Blade Tension Handwheel
B. Lift Handle
C. Vise Handwheel
D. Coolant Drip Pan
E. Work Stop
F. Pulley Cover
G. Control Panel
H. Blade Guide Scale
I. Blade Guide Knob
J. Coolant Valve Control
K. Bow
L. Blade Guides
M. Wheel Covers
B
D
E
I
C
G
H
K
J
L
A
F
M
M

-5-
M1048 10" x 18" Metal Cutting Bandsaw
INTRODUCTION
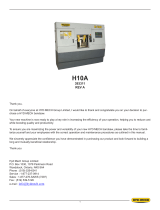
Control Panel
A. Coolant Pump Switch: Turns the coolant
pump ON.
B. EMERGENCY STOP/OFF Button: Interrupts
power to the system and turns the motor
OFF
. Twist the button until it pops out to
re-energize the system. Also works as a stan-
dard OFF button.
Note: The bandsaw has an automatic shut-
off (limit switch) that turns the motor and
coolant pump OFF at the bottom of the
cut.
C. START Button: Turns the motor ON and
begins the sawing action.
D. Power Light: When lit, indicates that system
is energized and machine is ready to oper-
ate.
E. Feed Rate Dial: Fine tunes the feed rate by
controlling the hydraulic valve. Range is from
0 being slowest to 9 being fastest.
F. Feed Control Knob: Turning the knob to
the left lowers the bow at the feed rate you
have set. Turning the knob to the right locks
the bow in position.
Figure 2. M1048 control panel.
ABCDE
F

-6-
M1048 10" x 18" Metal Cutting Bandsaw
SAFETY
SAFETY
READ MANUAL BEFORE OPERATING MACHINE.
FAILURE TO FOLLOW INSTRUCTIONS BELOW WILL
RESULT IN PERSONAL INJURY.
Standard Safety Instructions
1. READ THROUGH THE ENTIRE MANUAL BEFORE STARTING MACHINERY. Machinery presents serious
injury hazards to untrained users.
2. ALWAYS USE ANSI APPROVED SAFETY GLASSES WHEN OPERATING MACHINERY. Everyday eye-
glasses only have impact resistant lenses—they are NOT safety glasses.
3. ALWAYS WEAR AN NIOSH APPROVED RESPIRATOR WHEN OPERATING MACHINERY THAT PRODUCES
DUST. Wood dust is a carcinogen and can cause cancer and severe respiratory illnesses.
4. ALWAYS USE HEARING PROTECTION WHEN OPERATING MACHINERY. Machinery noise can cause
permanent hearing damage.
5. WEAR PROPER APPAREL. DO NOT wear loose clothing, gloves, neckties, rings, or jewelry which may
get caught in moving parts. Wear protective hair covering to contain long hair and wear non-slip
footwear.
6. NEVER OPERATE MACHINERY WHEN TIRED, OR UNDER THE INFLUENCE OF DRUGS OR ALCOHOL.
Be mentally alert at all times when running machinery.
7. ONLY ALLOW TRAINED AND PROPERLY SUPERVISED PERSONNEL TO OPERATE MACHINERY. Make
sure operation instructions are safe and clearly understood.
8. KEEP CHILDREN AND VISITORS AWAY. Keep all children and visitors a safe distance from the work
area.
9. MAKE WORKSHOP CHILD PROOF. Use padlocks, master switches, and remove start switch keys.
Indicates an imminently hazardous situation which, if not avoided, WILL
result in death or serious injury.
Indicates a potentially hazardous situation which, if not avoided, COULD
result in death or serious injury.
Indicates a potentially hazardous situation which, if not avoided, MAY
result in minor or moderate injury.
This symbol is used to alert the user to useful information about proper
operation of the equipment, and/or a situation that may cause damage
to the machinery.
NOTICE

-7-
M1048 10" x 18" Metal Cutting Bandsaw
SAFETY
10. NEVER LEAVE WHEN MACHINE IS RUNNING. Turn power off and allow all moving parts to come to
a complete stop before leaving machine unattended.
11. DO NOT USE IN DANGEROUS ENVIRONMENTS. DO NOT use machinery in damp, wet locations, or
where any flammable or noxious fumes may exist.
12. KEEP WORK AREA CLEAN AND WELL LIT. Clutter and dark shadows may cause accidents.
13. USE A GROUNDED EXTENSION CORD RATED FOR THE MACHINE AMPERAGE. Undersized cords over-
heat and lose power. Replace extension cords if they become damaged. DO NOT use extension cords
for 220V machinery.
14. ALWAYS DISCONNECT FROM POWER SOURCE BEFORE SERVICING MACHINERY. Make sure switch is
in OFF position before reconnecting.
15. MAINTAIN MACHINERY WITH CARE. Keep blades sharp and clean for best and safest performance.
Follow instructions for lubricating and changing accessories.
16. MAKE SURE GUARDS ARE IN PLACE AND WORK CORRECTLY BEFORE USING MACHINERY.
17. REMOVE ADJUSTING KEYS AND WRENCHES. Make a habit of checking for keys and adjusting
wrenches before turning machinery ON.
18. CHECK FOR DAMAGED PARTS BEFORE USING MACHINERY. Check for binding and alignment of
parts, broken parts, part mounting, loose bolts, and any other conditions that may affect machine
operation. Repair or replace damaged parts.
19. USE RECOMMENDED ACCESSORIES. Refer to the instruction manual for recommended accessories.
The use of improper accessories may cause risk of injury.
20. DO NOT FORCE MACHINERY. Work at the speed for which the machine or accessory was designed.
21. SECURE WORKPIECE. Use clamps or a vise to hold the workpiece when practical. A secured
workpiece protects your hands and frees both hands to operate the machine.
22. DO NOT OVERREACH. Keep proper footing and balance at all times.
23. MANY MACHINES WILL EJECT THE WORKPIECE TOWARD THE OPERATOR. Know and avoid condi-
tions that cause the workpiece to "kickback."
24. ALWAYS LOCK MOBILE BASES (IF USED) BEFORE OPERATING MACHINERY.
25. BE AWARE THAT CERTAIN DUST MAY BE HAZARDOUS to the respiratory systems of people and
animals, especially fine dust. Make sure you know the hazards associated with the type of dust you
will be exposed to and always wear a respirator approved for that type of dust.

-8-
M1048 10" x 18" Metal Cutting Bandsaw
SAFETY
Additional Safety Instructions for Bandsaws
USE this and other machinery with caution
and respect. Always consider safety first,
as it applies to your individual working
conditions. No list of safety guidelines can
be complete—every shop environment is
different. Failure to follow guidelines could
result in serious personal injury, damage
to equipment or poor work results.
READ and understand this
entire instruction manual
before using this machine.
Serious personal injury
may occur if safety and
operational information is
not understood and fol-
lowed. DO NOT risk your
safety by not reading!
1. BLADE CONDITION. Do not operate with dull, cracked or badly worn blade. Inspect blades for cracks
and missing teeth before each use.
2. HAND PLACEMENT. Never position fingers or thumbs in line with the cut. Hands could be crushed
by falling machine components or cut by the blade.
3. ENTANGLEMENT HAZARDS. Do not operate this bandsaw without blade guard in place. Otherwise,
loose clothing, jewelry, long hair and work gloves can be drawn into working parts.
4. BLADE REPLACEMENT. When replacing blades, make sure teeth face toward the workpiece. Wear
gloves to protect hands and safety glasses to protect eyes, and always disconnect from power.
5. WORKPIECE HANDLING. Always support the workpiece with table, vise, or other support fixture.
Flag long pieces to avoid a tripping hazard. Never hold the workpiece with your hands during a
cut.
6. LOSS OF STABILITY. Unsupported workpieces may jeopardize machine stability and cause the
machine to tip and fall, which could cause serious injury.
7. POWER INTERRUPTION. Unplug machine after power interruption. Machines without magnetic
switches can start up after power is restored.
8. FIRE HAZARD. Use EXTREME CAUTION if cutting magnesium. Using the wrong cutting fluid will lead
to chip fire and possible explosion.
9. CUTTING FLUID SAFETY. Always follow manufacturer’s cutting fluid safety instructions. Pay par-
ticular attention to contact, contamination, inhalation, storage and disposal warnings. Spilled cut-
ting fluid is a slipping hazard and a toxicity hazard.
10. ATTENTION TO WORK AREA. Never leave a machine running and unattended. Pay attention to the
actions of others in the area to avoid unintended accidents.
11. HEARING PROTECTION & HAZARDS. Noise generated by blade and workpiece vibration, material
handling, and power transmission can cause permanent hearing loss over time and interfere with
communication and audible signals. Always wear hearing protection.
12. HOT SURFACES. Due to friction, the workpiece, chips, and some machine components can be hot
enough to burn you.

-9-
M1048 10" x 18" Metal Cutting Bandsaw
ELECTRICAL
Operating Voltage Amp Draw Min. Circuit Size Plug/Receptacle Extension Cord
220V Operation 15 Amps 20A NEMA 6-20 12 Gauge
ELECTRICAL
We do not recommend using an extension cord for 220V
operation. When it is necessary to use an extension cord,
use the following guidelines:
• Use cords rated for Standard Service
• Never exceed a length of 50 feet
• Ensure cord has a ground wire and pin
• Do not use cords in need of repair
Extension Cords
Grounding
This machine must be grounded! Verify that any exist-
ing electrical outlet and circuit you intend to plug into
is actually grounded. If it is not, it will be necessary to
run a separate copper grounding wire, of the appropri-
ate size, from the outlet to a known ground. Under no
circumstances should you connect your machine to an
ungrounded power source or electrocution or severe
shock could occur.
220V Operation
The Model M1048 is wired for 220V operation. Always
connect this machine to a dedicated circuit (wire, break-
er, plug, receptacle) with a verified ground, using the
recommended circuit size and plug/receptacle listed at
the bottom of this page.
Never replace a circuit breaker with one of higher amper-
age without consulting a qualified electrician to ensure
compliance with wiring codes. If you are unsure about
the wiring codes in your area or plan to connect your
machine to a shared circuit, you may create a fire haz-
ard—consult a qualified electrician to reduce this risk.
Electrocution or severe shock could
occur if machine is not grounded.
Figure 3. Plug & receptacle examples.
Replacing an existing circuit breaker
with one rated for higher amperage
may result in a fire. Get help from an
electrician if your circuit is too small
for the machine.
6-20P 6-20R

-10-
M1048 10" x 18" Metal Cutting Bandsaw
SETUP
The SHOP FOX® Model M1048 has been carefully pack-
aged for safe transporting. If you notice the machine has
been damaged, please contact your authorized SHOP
FOX® dealer immediately.
UNPLUG-power cord before you do
any assembly or adjustment tasks!
Otherwise, serious personal injury to
you or others may occur!
Unpacking
SETUP
The following is a description of the main components
shipped with the SHOP FOX® Model M1048. Lay the com-
ponents out to inventory them.
Note: Some parts and hardware may already be installed
on the machine. Make sure to check the machine when
you use this inventory list.
Box Inventory (Figure 4) Qty
A. Model M1048 Metal Cutting Bandsaw ...................1
Hardware and Tools (Not Shown)
—Chip Tray .................................................1
—Triagle Screw 5⁄16-18 x 3⁄4" .............................1
—Flat Washer 5⁄16 ..........................................1
—Hex Nut 5⁄16-18 ...........................................1
—Hex Bolts M12-1.75 x 50 (Leveling) ...................4
—Hex Nuts M12-1.75 (Leveling) .........................4
—Handwheel ................................................1
—Knob .......................................................1
Inventory
Figure 4. Model M1048 inventory.
If any parts are missing, examine the pack-
aging for the missing parts. For any missing
parts, find the part number in the back
of this manual and contact Woodstock
International, Inc. at (360) 734-3482 or at
SUFFOCATION HAZARD!
Immediately discard all
plastic bags and pack-
ing materials to elimi-
nate choking/suffocation
hazards for children and
animals.

-11-
M1048 10" x 18" Metal Cutting Bandsaw
SETUP
• Floor Load: This machine distributes a
heavy load in a small footprint. Some
residential floors may require additional
bracing to support both machine and
operator.
• Working Clearances: Consider existing and
anticipated needs, size of material to be
processed through the machine, and space
for auxiliary stands, work tables or other
machinery when establishing a location for
your bandsaw.
• Lighting: Lighting should be bright enough
to eliminate shadow and prevent eye strain.
MAKE your shop “child
safe.” Ensure that your
workplace is inaccessible
to youngsters by closing
and locking all entrances
when you are away. NEVER
allow untrained visitors in
your shop when assem-
bling, adjusting or operat-
ing equipment.
Cleaning Machine
The table and other unpainted parts of your
Bandsaw are coated with a waxy grease that
protects them from corrosion during shipment.
Clean this grease off with a solvent cleaner or
citrus-based degreaser. DO NOT use chlorine-
based solvents such as brake parts cleaner or
acetone—if you happen to splash some onto a
painted surface, you will ruin the finish.
Machine Placement
USE helpers and power
lifting equipment to
lift this 10" x 18" Metal
Cutting Bandsaw.
Otherwise, serious per-
sonal injury may occur.
NEVER use gasoline or
other petroleum-based
solvents to clean with.
Most have low flash
points, which make them
extremely flammable.
A risk of explosion and
burning exists if these
products are used. Serious
personal injury may occur
if this warning is ignored!
ALWAYS work in well-
ventilated areas far from
possible ignition sources
when using solvents to
clean machinery. Many
solvents are toxic when
inhaled or ingested. Use
care when disposing
of waste rags and
towels to be sure they
DO NOT create fire or
environmental hazards.

-12-
M1048 10" x 18" Metal Cutting Bandsaw
SETUP
Although not required, we recommend that you mount
your new machine to the floor. Because this is an
optional step and floor materials may vary, floor mount-
ing hardware is not included. Generally, you can either
bolt your machine to the floor or mount it on machine
mounts. Both options are described below. Whichever
option you choose, it will be necessary to use a precision
level to level your machine.
Bolting to Concrete Floors
Lag shield anchors with lag bolts (Figure 5) and anchor
studs (Figure 6) are two popular methods for anchoring
an object to a concrete floor. We suggest you research
the many options and methods for mounting your
machine and choose the best that fits your specific appli-
cation.
Mounting to Shop Floor
Figure 5. Typical lag shield anchor and lag
bolt.
Figure 6. Typical anchor stud.
NOTICE
Anchor studs are stronger and more permanent alter-
natives to lag shield anchors; however, they will stick
out of the floor, which may cause a tripping hazard if
you decide to move your machine at a later point.
Figure 7. Machine mount example.
Using Machine Mounts
Using machine mounts, shown in Figure 7, gives the
advantage of fast leveling and vibration reduction. The
large size of the foot pads distributes the weight of the
machine to reduce strain on the floor.

-13-
M1048 10" x 18" Metal Cutting Bandsaw
SETUP
Moving & Placing Unit
The Model M1048 comes with lifting brackets installed on
the base. Use a forklift and straps rated for the machine
weight to lift the machine off the pallet and onto a suit-
able location (see Figure 8). The lifting brackets can be
removed and saved for future use.
Figure 8. M1048 lifting points.
The Model M1048 is
an extremely heavy
machine. Serious per-
sonal injury may occur if
safe moving methods are
not followed. To be safe,
you will need assistance
and power equipment
when moving the ship-
ping crate and removing
the machine from the
crate.
Shipping Bracket
Figure 9. Shipping bracket.
The bracket in Figure 9 has been installed to keep the
saw in alignment during shipping. Remove it before using
your saw. Store it for safe keeping, in the event you move
your saw to a different location.
To remove the shipping bracket, do these steps:
1. Remove the upper and lower hex bolts with a 12mm
wrench.
Workstop
Figure 10. Workstop assembly.
Hex Bolt & Stop Nut
Arm
Workstop Rod
The workstop is used when many cuts of the same length
are needed (see Figure 10).
To setup the workstop do these steps:
1. Position the workstop rod the desired distance from
the blade and tighten the cap screw to hold it in
place.
2. Fine tune the measurement by adjusting the hex bolt
and stop nut.
3. Swing the workstop arm down and out of the way
when not in use.
Cap screw

-14-
M1048 10" x 18" Metal Cutting Bandsaw
SETUP
Chip Tray
The chip tray fits over the lip of the base as illustrated in
Figure 11.
Figure 11. Chip tray installation.
Figure 12. Feed stop.
Jam Nut
Feed Stop
Feed Stop
Depending on how the Model M1048 was shipped, it may
be necessary to adjust the feed stop before the test run.
The blade should not make contact with any part of the
vise assembly.
To adjust the feed stop bolt, do these steps:
1. Adjust the feed stop bolt and jam nut (Figure 12),
so the bandsaw blade teeth are 1⁄16" below the vise
table surface.
The adjustments listed below have been performed at
the factory. However, because of the many variables
involved with shipping, we recommend that you at least
verify the following adjustments to ensure accurate cut-
ting results.
Step-by-step instructions on verifying these adjustments
can be found in the SERVICE section.
Factory adjustments that should be verified:
1. Blade Tracking (Page 29).
2. Blade Guide Bearings (Page 30).
Recommended
Adjustments

-15-
M1048 10" x 18" Metal Cutting Bandsaw
SETUP
Projectiles thrown from the machine
could cause serious eye injury. Wear
safety glasses during assembly and
operation.
Loose hair and clothing could get
caught in machinery and cause serious
personal injury. Keep loose clothing
rolled up and long hair tied up and
away from machinery.
Complete this process once you have familiarized yourself
with all instructions in this manual.
To test run the bandsaw, do these steps:
1. Read the entire instruction manual.
2. Make sure all tools and foreign objects have been
removed from the machine.
3. Put on safety glasses and secure loose clothing or
long hair.
4. Connect the bandsaw to power.
5. Raise the bandsaw and close the feed control knob
to keep the saw in place.
6. Start the bandsaw while keeping your finger near
the EMERGENCY STOP/OFF button (Figure 13) at all
times during the test run. The bandsaw should run
smoothly with little or no vibration.
Note: If the EMERGENCY STOP/OFF button is
pressed, it needs to be twisted until it pops out or
the bandsaw will not start.
— Immediately turn the bandsaw OFF if you sus-
pect any problems, and refer to Page 26 to
troubleshoot/fix any problems before starting the
bandsaw again.
— If the source of an unusual noise or vibration is
not readily apparent, contact our technical sup-
port for help at (360) 734-3482 or contact us
online at [email protected].
7. Push the emergency stop button to test safety shut-
off.
Test Run
Figure 13. Control panel.
E-STOP/OFF Button
ON
Feed control knobs

-16-
M1048 10" x 18" Metal Cutting Bandsaw
OPERATIONS
OPERATIONS
General
The Model M1048 will perform many types of operations
that are beyond the scope of this manual. Many of these
operations can be dangerous or deadly if performed
incorrectly.
The instructions in this section are written with the
understanding that the operator has the necessary knowl-
edge and skills to operate this machine. If at any time
you are experiencing difficulties performing any opera-
tion, stop using the machine!
If you are an inexperienced operator, we strongly recom-
mend that you read books, trade articles, or seek training
from an experienced bandsaw operator before performing
any unfamiliar operations. Above all, your safety should
come first!
READ and understand this entire instruc-
tion manual before using this machine.
Serious personal injury may occur if
safety and operational information is not
understood and followed. DO NOT risk
your safety by not reading!
Always turn the saw OFF and allow the blade to come
to a complete stop before using the vice! Failure to
follow this caution may lead to injury.
Figure 14. Workholding options by
material shape.
Vise
The vise has a quick release feature that allows jaw width
to be quickly adjusted when changing from one sized mate-
rial to another.
To rapidly change the vise jaw gap, do these steps:
1. Turn the handwheel counterclockwise to relieve any
pressure on the vise jaw.
2. Pull or push the jaw in the desired direction.
3. Finish tightening the jaw against the workpiece with
the handwheel.
Note: Figure 14 shows correct methods of holding
different workpiece shapes.

-17-
M1048 10" x 18" Metal Cutting Bandsaw
OPERATIONS
The vise can be adjusted to cut any angle from a straight
90 degree cut-off, to a 45 degree angle by loosening the
two vise lock handles. Positive stops at 90° and 45° allow
you to quickly return the rear jaw to either angle. Angles
between 90° and 45° can be read using the scale on the
side of the vise table. Use a combination square or bevel
protractor if higher precision is required when finding
these angles.
To adjust the positive stops, do these steps:
1. Check the current vise jaw-to-blade angle with a
machinist square (see Figure 15).
2. If the angle is not 90°, loosen the vise lock handle
then adjust the set screw as needed to set the posi-
tive stop to 90° (see Figure 16).
3. With the rear vise jaw making contact with the posi-
tive stop, tighten the rear vise jaw and re-check the
angle.
4. Loosen the rear vise lock handle and swing the rear
jaw until it reaches the 45° positive stop.
5. Tighten the rear jaw and check the angle.
6. If the angle is not at 45°, loosen the vise jaw and
adjust the set screw as needed to set the positive
stop to 45°.
7. With the rear vise jaw making contact with the posi-
tive stop, tighten the rear vise jaw and re-check the
angle.
8. After the final angle has been chosen, loosen the
lock handle in Figure 17 on the opposite jaw so the
jaw can float, and match the angle of the workpiece
and rear jaw.
9. Tighten the vise against the workpiece then tighten
the jaw lock handle.
Figure 16. Positive stop adjustments.
Figure 15. Squaring vise to blade.
Vise Lock Handle
90° Stop
Figure 17. Front vise jaw lock handle.
Vise Lock Handle
45° Stop
Rear Vise Jaw

-18-
M1048 10" x 18" Metal Cutting Bandsaw
OPERATIONS
Blade Guide Arms
The blade guide bearings are mounted on the front and
rear arms. The rear arm is adjustable and should be set as
close to the workpiece as possible. This will help ensure
straight cuts by keeping the blade from twisting and drift-
ing off of the cut line.
To adjust the rear blade guide arm:
Loosen the knob shown in Figure 18 and slide the rear
blade guide as close to the workpiece as possible, then
tighten the knob.
The front blade guide arm has a self-adjusting wire brush
that makes contact with the blade to help clear away chips
and extend blade life (see Figure 19). Figure 18. Blade guides.
Blade Guides
Knob
Figure 19. Blade brush.
Blade Brush
/