Page is loading ...

WARNING!!
·Remove hardware from box and sort by size.
·Please check to see that hardware and parts are
present prior start of assembly.
·Please follow attached instruction in the same
sequence numbered to ensure fast and
easy assembly.
·Do not use this bed if any part is broken,torn
or missing.
·The assembly of this product requires two
people.
·Do not use any power tools as this may damage
the frame and will invalidate any claim.
PART LIST
HARDWARE LIST
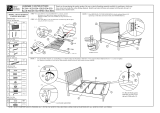
Attach the side rail (P3) to the
headboard panel (P1) and
footboard panel (P2) .After that,
attach the corner block (P4) to
the headboard panel (P1)
,footboard panel (P2) and side
rail (P3) . You will need to use
hardware:
1.
Fix the adjuster (K) to the
support leg (P8)
using hardware :
K = 2pcs
ALLEN KEY M4
M4 X 25MM SCREW (Q)
2.
3.
P1
P2
P3
P4
Headboard Panel
Side Rail
Footboard Panel
Corner Block
C
E
B = 16pcs E = 1pcs
L = 4pcs F = 1pcs
D = 4pcs J = 1pcs
= 1pcs
= 1pcs
= 2pcs
= 4pcs
= 1pcs
A
= 1pcs
D
M6 X 50MM JCBC
B
M8 X 35MM JCBB
= 2pcs
= 4pcs
= 16pcs
SW 8219 - F/Q
SW 8120 Q / K
P5
P6
Post
Headboard
= 4pcs
= 1pcs
Lay the slats (P10) between the
side rail (P3) using hardware
G = 8pcs
4.
P7 Headboard Stand = 2pcs
P8 Support Leg = 2pcs
P9 Center Rail = 1pcs
P10 Slat (F/Q) = 2sets
P11 Middle Slat (Q) = 1pcs
ALLEN KEY M5
M8 X 16MM JCBB = 4pcs
F
G
H
I
FLAT WASHER 5/16 = 8pcs
= 12pcs
WRENCH = 1pcs
J
ADJUSTER = 2pcs
E
B
I
D
L
G
K
G
AE
F
F
C
Attach the headboard stand
(P7) to the headboard panel
(P1) and then attach the
headboard(P6) to the
headboard stand (P7) ,
according to your desired
height using hardware :
C = 4pcs
F = 1pcs
H = 8pcs
I = 4pcs
J = 1pcs
Attach the post (P5)
to the corner block (P4).
You will need to use
hardware:
M6 X 30MM JCBC = 16pcs
K
H
I = 8pcs J =1pcs
M4 X 25MM SCREW (F) = 14pcs
FOR Q
SIZE ONLY
P11
Attach the support legs (P8) to
the center rail (P9)
using hardware :
A = 2pcs
Attach the center rail (P9) to the
headboard panel (P1) and
footboard panel (P2)
using hardware :
G = 2pcs
G
For Q size bed :Lay the middle
slats (P11) between the bed
slats (P10) using hardware
G = 2pcs
Attach the slats (P10) to the
center rail (P9) using hardware
G = 4pcs
J
J
I
H
L
LHEX COM 5 / 16 X 50MM = 4pcs
J
**Apply pressure with your knee
to the side rails whilst attaching
the slats to ensure that the slats
are flush against the inside of
side rails.**
HEX NUT 5/16
/


