Page is loading ...

*NOTE: Please contact your distributor or our website for the
applicable Specification Sheets referred to in this manual.
RECOGNIZE THIS SYMBOL AS A SAFETY PRECAUTION.
These installation instructions cover the outdoor installation of self
contained package air conditioners and heating units. See the
Specification Sheets applicable to your model for information
regarding accessories.
Goodman Company, L.P.
5151 San Felipe, Suite 500, Houston, TX 77056
www.goodmanmfg.com or www.amana-hac.com
© 2010-2015, 2018 Goodman Company, L.P.
I
NSTALLATION
I
NSTRUCTIONS
F
OR
S
ELF
-C
ONTAINED
P
ACKAGE
A
IR
C
ONDITIONERS
AND
H
EAT
P
UMP
U
NITS
*PC/*PH 14 SEER “M” SERIES
W
ITH
R-410A
IOG-3007B
3/2018
is a registered trademark of Maytag Corporation or its related companies and is used under license to Goodman
Company, L.P., Houston, TX, USA. All rights reserved.
O
NLY
PERSONNEL
THAT
HAVE
BEEN
TRAINED
TO
INSTALL
,
ADJUST
,
SERVICE
OR
REPAIR
(
HEREINAFTER
, “
SERVICE
”)
THE
EQUIPMENT
SPECIFIED
IN
THIS
MANUAL
SHOULD
SERVICE
THE
EQUIPMENT
. T
HE
MANUFACTURER
WILL
NOT
BE
RESPONSIBLE
FOR
ANY
INJURY
OR
PROPERTY
DAMAGE
ARISING
FROM
IMPROPER
SERVICE
OR
SERVICE
PROCEDURES
. I
F
YOU
SERVICE
THIS
UNIT
,
YOU
ASSUME
RESPONSIBILITY
FOR
ANY
INJURY
OR
PROPERTY
DAMAGE
WHICH
MAY
RESULT
. I
N
ADDITION
,
IN
JURISDICTIONS
THAT
REQUIRE
ONE
OR
MORE
LICENSES
TO
SERVICE
THE
EQUIPMENT
SPECIFIED
IN
THIS
MANUAL
,
ONLY
LICENSED
PERSONNEL
SHOULD
SERVICE
THE
EQUIPMENT
. I
MPROPER
INSTALLATION
,
ADJUSTMENT
,
SERVICING
OR
REPAIR
OF
THE
EQUIPMENT
SPECIFIED
IN
THIS
MANUAL
,
OR
ATTEMPTING
TO
INSTALL
,
ADJUST
,
SERVICE
OR
REPAIR
THE
EQUIPMENT
SPECIFIED
IN
THIS
MANUAL
WITHOUT
PROPER
TRAINING
MAY
RESULT
IN
PRODUCT
DAMAGE
,
PROPERTY
DAMAGE
,
PERSONAL
INJURY
OR
DEATH
.

2
TO THE INSTALLER
Carefully read all instructions for the installation prior to installing unit.
Make sure each step or procedure is understood and any special con-
siderations are taken into account before starting installation. Assemble
all tools, hardware and supplies needed to complete the installation.
Some items may need to be purchased locally. After deciding where
to install unit, closely look the location over - both the inside and out-
side of home. Note any potential obstacles or problems that might be
encountered as noted in this manual. Choose a more suitable loca-
tion if necessary.
IMPORTANT NOTE: If a crankcase heater is used, the unit
should be energized 24 hours prior to compressor start up to
ensure crankcase heater has sufficiently warmed the compres-
sor. Compressor damage may occur if this step is not fol-
lowed.
Before using this manual, check the serial plate for proper
model identification.
The installation and servicing of this equipment must be
performed by qualified, experienced technicians only.
SHIPPING INSPECTION
Upon receiving the unit, inspect it for damage from shipment. Claims
for damage, either shipping or concealed, should be filed immediately
with the shipping company. Check the unit model number, specifica-
tions, electrical characteristics and accessories to determine if
they are correct. In the event an incorrect unit is shipped, it must be
returned to the supplier and must NOT be installed. The manufac-
turer assumes no responsibility for installation of incorrectly
shipped units.
INDEX
TO THE INSTALLER ....................................................... 2
SHIPPING INSPECTION ................................................... 2
REPLACEMENT PARTS.................................................... 3
ORDERING PARTS ........................................................ 3
SAFETY INSTRUCTIONS .................................................. 3
CODES AND REGULATIONS ............................................ 3
EPA REGULATIONS ...................................................... 3
NATIONAL CODES ......................................................... 3
MAJOR COMPONENTS .................................................... 4
PRE-INSTALLATION CHECKS .......................................... 4
CLEARANCES AND ACCESSIBILITY .................................... 4
UNIT LOCATION ............................................................ 4
GROUND LEVEL PRE-INSTALLATION DETAILS ...................... 4
ROOF TOP PRE-INSTALLATION DETAILS ............................. 4
ROOF CURB INSTALLATIONS ONLY ................................... 4
RIGGING DETAILS ......................................................... 5
CIRCULATING AIR AND FILTERS .................................... 5
AIRFLOW CONVERSION ................................................. 5
DUCT WORK ............................................................... 5
FILTERS ..................................................................... 6
PIPING .............................................................................. 6
CONDENSATE DRAIN...................................................... 6
WIRING ............................................................................. 6
HIGH VOLTAGE WIRING ................................................. 7
LOW VOLTAGE WIRING ................................................. 7
INTERNAL WIRING ........................................................ 7
STARTUP, ADJUSTMENTS, AND CHECKS ...................... 7
START-UP PROCEDURE AND CHECKLIST ........................... 7
HEAT PUMP START-UP PROCEDURE ................................. 7
FINAL SYSTEM CHECKS ................................................. 8
COMPONENTS ................................................................. 8
CRANKCASE HEATER ..................................................... 8
CONDENSER MOTOR .................................................... 8
COMPRESSOR .............................................................. 8
CONTACTOR RELAY ....................................................... 8
DEFROST CONTROL ...................................................... 8
OUTDOOR THERMOSTAT ................................................. 8
REVERSING VALVE COIL ................................................ 8
INDOOR BLOWER MOTOR .............................................. 8
BLOWER INTERLOCK RELAY ........................................... 8
HEAT PUMP OPERATION ................................................. 9
COOLING CYCLE .......................................................... 8
HEATING CYCLE ........................................................... 9
DEFROST CONTROL ...................................................... 9
SUGGESTED FIELD TESTING/TROUBLE SHOOTING .............. 9
AIRFLOW MEASUREMENT AND ADJUSTMENT .................... 10
REFRIGERANT CHARGE CHECKS ................................... 12
EXPANSION VALVE (TXV) SYSTEM ................................. 13
SYSTEM CHARGING HEATING MODE ............................... 13
ELECTRICAL ADJUSTMENTS ........................................ 13
MAINTENANCE ............................................................... 13
SERVICE .................................................................. 14
INADEQUATE AIR VOLUME THROUGH INDOOR COIL ......... 14
OUTSIDE AIR INTO RETURN DUCT ............................... 14
UNDERCHARGE ......................................................... 14
POOR “TERMINATING” SENSOR CONTACT...................... 14
MALFUNCTIONING REVERSING VALVE -
THIS MAY BE DUE TO: ............................................. 14
TROUBLESHOOTING CHART ........................................ 15
APPENDIX ...................................................................... 16
UNIT DIMENSIONS ......................................................... 16
MINIMUM CLEARANCES ................................................ 17
RECOMMENDED FILTER SIZES ..................................... 17
START-UP CHECKLIST................................................... 19

3
REPLACEMENT PARTS
ORDERING PARTS
When reporting shortages or damages, or ordering repair parts, give
the complete unit model and serial numbers as stamped on the unit’s
nameplate.
Replacement parts for this appliance are available through your
contractor or local distributor. For the location of your nearest
distributor, consult the white business pages, the yellow page section
of the local telephone book or contact:
CONSUMER AFFAIRS
GOODMAN MANUFACTURING COMPANY, L.P.
7401 SECURITY WAY
HOUSTON, TEXAS 77040
877-254-4729
SAFETY INSTRUCTIONS
The following symbols and labels are used throughout this manual to
indicate immediate or potential safety hazards. It is the owner’s and
installer’s responsibility to read and comply with all safety information
and instructions accompanying these symbols. Failure to heed safety
information increases the risk of personal injury, property damage,
and/or product damage.
WARNING
DO NOT CONNECT TO OR USE ANY DEVICE THAT IS NOT DESIGN-CERTIFIED
BY GOODMAN FOR USE WITH THIS UNIT. SERIOUS PROPERTY DAMAGE,
PERSONAL INJURY, REDUCED UNIT PERFORMANCE AND/OR HAZARDOUS
CONDITIONS MAY RESULT FROM THE USE OF SUCH NON-APPROVED DEVICES.
WARNING
HIGH VOLTAGE!
DISCONNECT ALL POWER BEFORE SERVICING OR INSTALLING
THIS UNIT. MULTIPLE POWER SOURCES MAY BE PRESENT. FAILURE
TO DO SO MAY CAUSE PROPERTY DAMAGE, PERSONAL INJURY OR
DEATH.
WARNING
CONNECTING UNIT DUCT WORK TO UNAUTHORIZED HEAT PRODUCING DEVICES
SUCH AS A FIREPLACE INSERT, STOVE, ETC. MAY RESULT IN PROPERTY
DAMAGE, FIRE, CARBON MONOXIDE POISONING, EXPLOSION, PERSONAL
INJURY OR DEATH.
WARNING
THIS PRODUCT CONTAINS OR PRODUCES A CHEMICAL OR CHEMICALS WHICH
MAY CAUSE SERIOUS ILLNESS OR DEATH AND WHICH ARE KNOWN TO THE
STATE OF CALIFORNIA TO CAUSE CANCER, BIRTH DEFECTS OR OTHER
REPRODUCTIVE HARM.
WARNING
TO AVOID PROPERTY DAMAGE, PERSONAL INJURY OR DEATH, DO NOT USE
THIS UNIT IF ANY PART HAS BEEN UNDER WATER. IMMEDIATELY CALL A
QUALIFIED SERVICE TECHNICIAN TO INSPECT THE FURNACE AND TO REPLACE
ANY PART OF THE CONTROL SYSTEM AND ANY GAS CONTROL HAVING BEEN
UNDER WATER.
WARNING
TO PREVENT THE RISK OF PROPERTY DAMAGE, PERSONAL INJURY, OR DEATH,
DO NOT STORE COMBUSTIBLE MATERIALS OR USE GASOLINE OR OTHER
FLAMMABLE LIQUIDS OR VAPORS IN THE VICINITY OF THIS APPLIANCE.
CODES AND REGULATIONS
The *PC/*PH M-series air conditioners and heat pumps are designed
for OUTDOOR USE ONLY. *PH M-Series is available in cooling ca-
pacities of 2, 2-1/2, 3, 3-1/2, 4 and 5 nominal tons of cooling. *PC M-
Series is available in cooling capacities of 2,
2-1/2, 3, 3-1/2, 4 and 5 nominal tons of cooling. Optional field
installed heat kits are available in 5, 8, 10, 15 and 20 kW. The units
can be easily installed in manufactured or modular homes with
existing high-static duct work. The units can also be easily con-
verted to accommodate a plenum for normal or low-static applica-
tions. The *PC/*PH M-series are self contained packaged units so
the only connections needed for installation are the supply and
return ducts, the line and low voltage wiring and drain connection.
Rated performance is achieved after 72 hours of operation. Rated
performance is delivered at the specified airflow. See outdoor
unit specification sheet for split system models or product speci-
fication sheet for packaged and light commercial models. Speci-
fication sheets can be found at www.goodmanmfg.com for
Goodman® brand products or www.amana-hac.com for Amana®
brand products. Within either website, please select the residen-
tial or commercial products menu and then select the submenu
for the type of product to be installed, such as air conditioners or
heat pumps, to access a list of product pages that each contain
links to that model’s specification sheet.
The information on the rating plate is in compliance with the FTC &
DOE rating for single phase units. The efficiency ratings of these
units are a product of thermal efficiency determined under continu-
ous operating conditions independent of any installed system.
EPA REGULATIONS
IMPORTANT: THE UNITED STATES ENVIRONMENTAL PROTECTION
AGENCY (EPA) HAS ISSUED VARIOUS REGULATIONS REGARDING THE
INTRODUCTION AND DISPOSAL OF REFRIGERANTS IN THIS UNIT.
FAILURE TO FOLLOW THESE REGULATIONS MAY HARM THE
ENVIRONMENT AND CAN LEAD TO THE IMPOSITION OF SUBSTANTIAL
FINES. BECAUSE REGULATIONS MAY VARY DUE TO PASSAGE OF NEW
LAWS, WE SUGGEST A CERTIFIED TECHNICIAN PERFORM ANY WORK
DONE ON THIS UNIT. SHOULD YOU HAVE ANY QUESTIONS PLEASE
CONTACT THE LOCAL OFFICE OF THE EPA.
NATIONAL C ODES
This product is designed and manufactured to permit installation
in accordance with National Codes. It is the installer’s responsi-
bility to install the product in accordance with National Codes and/
or prevailing local codes and regulations.

4
MAJOR COMPONENTS
The unit includes a hermetically sealed refrigerating system (consisting
of a compressor, condenser coil, evaporator coil with flowrator), an in-
door blower, a condenser fan and all necessary internal electrical wir-
ing. The heat pump also includes a reversing valve, solenoid, defrost
thermostat and control and loss of charge protection. The system is
factory-evacuated, charged and performance tested. Refrigerant amount
and type are indicated on rating plate.
PRE-INSTALLATION CHECKS
Before attempting any installation, the following points should be con-
sidered:
• Structural strength of supporting members
• Clearances and provision for servicing
• Power supply and wiring
• Air duct connections
• Drain facilities and connections
• Location may be on any four sides of a home,
manufactured or modular, to minimize noise
CLEARANCES AND ACCESSIBILITY
The unit is designed to be located outside the building with unob-
structed condenser air inlet and discharge. Additionally, the unit
must be situated to permit access for service and installation. Con-
denser air enters from three sides. Air discharges upward from the
top of the unit. Refrigerant gauge connections are made on the right
side of the unit as you face the compressor compartment. Electrical
connections can be made either on the right, bottom or duct panel
side of the unit. The best and most common application is for the
unit to be located 10” from wall (4” minimum) with the connection
side facing the wall. This “close to the wall” application minimizes
exposed wiring.
Close to the wall application assures free, unobstructed air to the
other two sides. In more confined application spaces, such as
corners provide a minimum 12” clearance on all air inlet sides.
Allow 36” minimum for service access to the compressor com-
partment and controls. The top of the unit should be completely
unobstructed. If units are to be located under an overhang, there
should be a minimum of 48” clearance and provisions made to
deflect the warm discharge air out from the overhang.
UNIT LOCATION
Consider the affect of outdoor fan noise on conditioned space and
any adjacent occupied space. It is recommended that the unit be
placed so that condenser air discharge does not blow toward
windows less than 25 feet away. Consideration should also be
given to shade and unit appearance.
Heat pumps require special location consideration in areas of
heavy snow accumulation and/or areas with prolonged continu-
ous subfreezing temperatures. Heat pump unit bases have holes
under the outdoor coil to permit drainage of defrost water accumu-
lation. The unit must be situated to permit free unobstructed drain-
age of the defrost water and ice. A minimum 2" clearance under the
outdoor coil is required in the milder climates.
GROUND L EVEL P RE-INSTALLATION D ETAILS
The unit should be set on a solid, level foundation - preferably a
concrete slab at least 4 inches thick. The slab should be above ground
level and surrounded by a graveled area for good drainage. Any slab
used as a unit’s foundation should not adjoin the building as it is
possible that sound and vibration may be transmitted to the structure.
Ground Level Installation
ROOF TOP PRE-INSTALLATION DETAILS
Ensure that the roof is weather tight and allows proper drainage of
condensation. Use steel or treated wood beams as unit support
for load distribution.
NOTE: To ensure proper condensate drainage, unit must be in-
stalled in a level position.
•To avoid possible property damage or personal injury, the
roof must have sufficient structural strength to carry the
weight of the unit(s) and snow or water loads as required
by local codes. Consult a structural engineer to determine
the weight capabilities of the roof.
•The unit may be installed directly on wood floors or on
Class A, Class B, or Class C roof covering material.
•To avoid possible personal injury, a safe, flat surface for
service personnel should be provided.
Rooftop Installation
ROOF CURB INSTALLATIONS ONLY
NOTE: Sufficient structural support must be determined prior to
locating and mounting the curb and package unit.
Curb insulation, cant strips, flashing and general roofing material
are furnished by the contractor.
Curbing must be installed in compliance with the National Roof-
ing Contractors Association Manual. Construct duct work using
current industry guidelines. The duct work must be placed into the
roof curb before mounting the package unit.

5
Roof Curb Installation
RIGGING DETAILS
WARNING
TO PREVENT PROPERTY DAMAGE, THE UNIT SHOULD REMAIN IN AN UPRIGHT
POSITION DURING ALL RIGGING AND MOVING OPERATIONS. TO FACILITATE
LIFTING AND MOVING WHEN A CRANE IS USED, PLACE THE UNIT IN AN
ADEQUATE CABLE SLING.
WARNING
TO AVOID POSSIBLE PROPERTY DAMAGE, PERSONAL INJURY OR DEATH,
ENSURE THE ROOF HAS SUFFICIENT STRUCTURAL STRENGTH TO CARRY THE
WEIGHT OF THE UNIT(S), ROOF CURB, SNOW LOADS, AND WATER LOADS AS
REQUIRED BY LOCAL CODES. CONSULT A STRUCTURAL ENGINEER TO
DETERMINE THE WEIGHT CAPABILITIES OF THE ROOF.
CAUTION
TO AVOID POSSIBLE PERSONAL INJURY, A SAFE, FLAT SURFACE FOR SERVICE
PERSONNEL SHOULD BE PROVIDED.
IMPORTANT: If using bottom discharge with roof curb, duct work
should be attached to the curb prior to installing the unit.
Lower unit carefully onto roof mounting curb. While rigging unit,
center of gravity will cause condenser end to be lower than supply
air end.
Rigging
CIRCULATING AIR AND FILTERS
AIRFLOW CONVERSION
Units can easily be converted from horizontal to down-discharge air-
flow delivery. In down-discharge or high static installations, the installer
should measure the total external static and review the blower perfor-
mance charts before performing the installation. In some installations
it will be necessary to change the blower speed to provide proper air
flow.
Horizontal Air Flow
Single phase models are shipped without horizontal duct covers.
If needed, these kits may be ordered through Goodman’s Service
Parts department.
Remove these covers
for horizontal duct
applications
Remove these panels
for downflow duct
applications
Supply
Return
Duct Cover Installation
Down Discharge Applications
Cut insulation around bottom openings and remove panels from the
bottom of the unit, saving the screws holding the panels in place.
NOTE: Single phase models require installation of horizontal duct kit
#20464501PDGK (medium chassis) and #20464502PDGK (large
chassis).
DUCT WORK
Duct systems and register sizes must be properly designed for the
C.F.M. and external static pressure rating of the unit. Duct work should
be designed in accordance with the recommended methods of Air
Conditioning Contractors of America Manual D (Residential) or Manual
Q (Commercial). All ductwork exposed to the outdoors must include a
weatherproof barrier and adequate insulation.
A duct system should be installed in accordance with Standards of
the National Board of Fire Underwriters for the Installation of Air Condi-

6
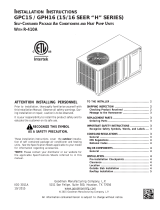
CONDENSATE D RAIN
The condensate drain connection of the evaporator is a half cou-
pling of ¾” N.P.T. A trap must be provided to have Proper conden-
sate drainage. 2" Minimum
3" Minimum
A Positive Liquid Seal
Is Required
Flexible
Tubing-Hose
Or Pipe
Drain
Connection
Unit
Install condensate drain trap as shown. Use ¾ “ drain connection
size or larger. Do not operate without trap. Unit must be level or
slightly inclined toward drain.
WIRING
NOTE: All wiring should be made in accordance with the National
Electrical Code.
Consult your local Power Company to determine the availability of
sufficient power to operate the unit. Check the voltage, frequency,
and phase at the power supply to ensure it corresponds to the
unit’s RATED VOLTAGE REQUIREMENT.
In accordance with the N.E.C. or local codes, install a branch cir-
cuit fused disconnect near the unit. Determine wire sizes and
overcurrent protection from the unit nameplate ampacity and in
accordance with the Branch Circuit Ampacity table on the next page
or the N.E.C. The wiring should never be sized smaller than is
recommended by either of these two sources.
Fuses smaller than that recommended on the rating plate could
result in unnecessary fuse failure or service calls. The use of
protective devices of larger size than indicated could result in ex-
tensive damage to the equipment. The manufacturer bears no
responsibility for damage caused to equipment as result of the
use of larger than is recommended size protective devices.
All units have undergone a run test prior to packaging for ship-
ment. This equipment has been started at minimum rated voltage
and checked for satisfactory operation. Do not attempt to operate
this unit if the voltage is not within the minimum and maximum
voltages shown on nameplate.
All exterior wiring must be within approved weatherproof conduit.
The unit must be permanently grounded in accordance with local
codes, or in absence of local codes, with N.E.C ANSI/ NFPA NO.
70-1984 or latest edition by using ground lug in the control box.
Fuses or HACR type circuit breakers may be used where codes
permit.
CONTACTOR
RW
G
GRW
FOR INTERNAL WIRING SEE WIRING LABEL ATTACHED TO UNIT
24 VOLT CONTROL WIRING
See
*NOTE
*NOTE:
LOW VOLTAGE CONNECTORS do not apply to heat pumps with
electric heat. LOW VOLTAGE CONNECTORS apply ONLY to *PC units
with electric heat.
IMPORTANT NOTE: Some single phase units are equipped with a
tioning, Warm Air Heating and Ventilating Systems, Pamphlets No.
90A and 90B.
The supply duct from the unit through a wall may be installed
without clearance. However, minimum unit clearances as shown
in the appendix must be maintained. The supply duct should be
provided with an access panel large enough to inspect the air
chamber downstream of the heat exchanger. A cover should be
tightly attached to prevent air leaks.
For duct flange dimensions on the unit refer to the Unit Dimension
illustration in the appendix.
For down-discharge applications, the ductwork should be attached
to the roof curb prior to installing the unit. Duct work dimensions
are shown in the roof curb installation manual.
If desired, supply and return duct connections to the unit may be
made with flexible connections to reduce possible unit operating
sound transmission.
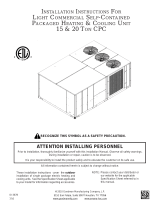
FILTERS
CAUTION
TO PREVENT PROPERTY DAMAGE DUE TO FIRE AND LOSS OF
EQUIPMENT EFFICIENCY OR EQUIPMENT DAMAGE DUE TO DUST AND LINT
BUILD UP ON INTERNAL PARTS, NEVER OPERATE UNIT WITHOUT AN AIR
FILTER INSTALLED IN THE RETURN AIR SYSTEM.
Filters are not provided with unit and must be supplied and exter-
nally installed in the return duct system by the installer. An optional
factory approved internal filter rack may also be used. A field-in-
stalled filter grille is recommended for easy and convenient ac-
cess to the filters for periodic inspection and cleaning. When
installing filters, ensure the air flow arrows on the filter are pointing
toward the circulator blower.
Refer to the unit filter size chart below for filter size information.
NOMINAL SIZE (INCHES) NOMINAL AREA (SQ. FT.)
10x20 1.4
14x20 1.9
14x25 2.4
15x20 2.1
16x20 2.2
16x25 2.8
20x20 2.8
20x25 3.5
25x25 4.3
MINIMUM FILTER SIZE
NOTE: Filters must have adequate face area for the rated quantity
of the unit. See the air delivery table below for recommended filter
size. Size the filters in accordance with their manufacturer recom-
mendations. Throwaway filters must be sized for a maximum face
velocity of 300 feet per minute.
500 1000 1500 2000 2500 3000 3500
7
6
5
4
3
2
DISPOSABLE FILTER
PERMANENT FILTER
Airflow - SCFM
Nominal Filter Area
Square Feet
PIPING

7
single-pole contactor. Exercise caution when servicing as only one
leg of the power supply is broken with the contractor.
To wire the unit, make the following high and low voltage connec-
tions.
HIGH V OLTAGE W IRING
• Single Phase- Two leads should be connected to terminals
L1 & L2 in the electrical control section, using wire sizes
specified in wiring table.
LOW V OLTAGE W IRING
• Air Conditioners- Connect 24V wires from the thermostat
to the corresponding wires in the control box using No. 18
AWG as follows:
LEAD THERMOSTAT
Red R (24V)
Green G (Fan)
Yellow Y (Cool)
White W1 (Heat)*
Brown W2 (Heat)*
Blue C (Common)
*Optional field installed heat connections
• Heat Pumps- Connect 24V wires from the thermostat to
the corresponding wires in the control box using No. 18
AWG as follows:
TERMINAL THERMOSTAT
Red R (24V)
Green G (Fan)
Orange O (Rev. Valve)
White W1 (Heat, 2nd)*
Brown W2 (Heat 3rd)*
Yellow Y (Cool)
Blue C (Common)
*Optional field installed heat connections
INTERNAL WIRING
A diagram detailing the internal wiring of this unit is located on the
electrical box cover. If any of the original wire supplied with the
appliance must be replaced, the wire gauge and insulation must
be the same as the original wiring.
Transformer is wired for 230 volts on the 208/230 models. See
wiring diagram for 208 volt wiring.
1. For branch circuit wiring (main power supply to unit
disconnect), the minimum wire size for the length of run
can be determined using the circuit ampacity found on the
unit rating plate and the table below. From the unit
disconnect to unit, the smallest wire size allowable may
be used for the ampacity, as the Disconnect must be in
sight of the unit.
BRANCH CIRCUIT AMPACITY 15 20 25 30 35 40 45 50
SUPPLY WIRE LENGTH -
FEET
200 64443322
150 86644433
100 108866644
50 141210108866
2. Wire size based on 60° C rated wire insulation and 30° C
Ambient Temperature (86° F).
3. For more than 3 conductors in a raceway or cable, see the
N.E.C. for derating the ampacity of each conductor.
STARTUP, ADJUSTMENTS, AND CHECKS
WARNING
HIGH VOLTAGE!
DISCONNECT ALL POWER BEFORE SERVICING OR INSTALLING
THIS UNIT. MULTIPLE POWER SOURCES MAY BE PRESENT. FAILURE
TO DO SO MAY CAUSE PROPERTY DAMAGE, PERSONAL INJURY OR
DEATH.
START-UP P ROCEDURE AND C HECKLIST
With power turned off at all disconnects:
1. Turn thermostat system switch to “COOL” and fan switch
to “AUTO”. Next, turn the temperature setting as high as it
will go.
2. Inspect all registers and set them to the normal open
position.
3. Turn on the electrical supply at the disconnect.
4. Turn the fan switch to the “ON” position. The blower should
operate after a 7-second delay (10 seconds for models
with EEM motors).
5. Turn the fan switch to “AUTO” position. The blower should
stop after a 65-second delay (60 seconds for models with
EEM motors).
6. Slowly lower the cooling temperature until the unit starts.
The compressor, blower and fan should now be operating.
Allow the unit to run 10 minutes, make sure cool air is
being supplied by the unit.
7. Turn the temperature setting to the highest position,
stopping the unit. The indoor blower will continue to run
for 65-seconds (60 seconds for models with EEM motors).
8. Turn the thermostat system switch to “OFF” and disconnect
all power when servicing the unit.

8
HEAT PUMP START-UP PROCEDURE
1. Check the cooling mode for the heat pump in the same
manner as above. The reversing valve is energized when
the thermostat is placed in the cooling position. A clicking
sound should be noticeable from the reversing valve. By
lowering the temperature setting to call for cooling, the
contactor is energized. The compressor, blower and fan
should then be running. After the cooling mode is checked
out, turn the thermostat system switch to “OFF”.
2. Turn the thermostat system switch to “HEAT” and fan switch
to “AUTO”.
3. Slowly raise the heating temperature setting. When the
heating first stage makes contact, stop raising the
temperature setting. The compressor, blower and fan
should now be running with the reversing valve in the de-
energized (heating) position. After giving the unit time to
settle out, make sure the unit is supplying heated air.
4. If the outdoor ambient is above 80°F, the unit may trip on
its high pressure cut out when in heating. The compressor
should stop. The heating cycle must be thoroughly
checked, so postpone the test to another day when
conditions are more suitable. DO NOT FAIL TO TEST.
5. If the outdoor ambient is low and the unit operates properly
in the heating cycle, you may check the pressure cutout
operation by blocking off the indoor return air until the unit
trips.
6. If unit operates properly in the heating cycle, raise the
temperature setting until the heating second stage makes
contact. Supplemental resistance heat, if installed should
now come on. Make sure it operates properly.
NOTE: If outdoor thermostats are installed, the outdoor
ambient must be below the set point of these thermostats
for the heaters to operate. It may be necessary to jumper
these thermostats to check heater operation if outdoor
ambient is mild.
7. For thermostats with emergency heat switch, return to step
6. The emergency heat switch is located at the bottom of
the thermostat. Move the switch to emergency heat. The
heat pump will stop, the blower will continue to run, all
heaters will come on and the thermostat emergency heat
indicator will come on.
8. If checking the unit in the wintertime, when the outdoor coil
is cold enough to actuate the defrost control, observe at
least one defrost cycle to make sure the unit defrosts
completely.
FINAL SYSTEM CHECKS
1. Check to see if all supply and return air grilles are adjusted
and the air distribution system is balanced for the best
compromise between heating and cooling.
2. Check for air leaks in the ductwork.
3. See Sections on Air Flow Measurement and Adjustment
and Checking Charge.
4. Make sure the unit is free of “rattles”, and the tubing in the
unit is free from excessive vibration. Also make sure tubes
or lines are not rubbing against each other or sheet metal
surfaces or edges. If so, correct the trouble.
5. Set the thermostat at the appropriate setting for cooling
and heating or automatic changeover for normal use.
6. Be sure the Owner is instructed on the unit operation, filter,
servicing, correct thermostat operation, etc.
The foregoing “Start-up Procedure and Check List” is recommended to
serve as an indication that the unit will operate normally.
COMPONENTS
Crankcase Heater
This item is “ON” whenever power is supplied to the unit and the
crankcase heater thermostat is closed. Crankcase heater
thermostat closes at 67° and opens at 85°. It warms the compressor
crankcase thereby preventing liquid migration and subsequent
compressor damage. The insert type heater is self regulating. It is
connected electrically to the contactor L1 and L2 terminals.
Condenser Motor
This item is activated by the contactor during heating and cooling,
except during defrost and emergency heat operation.
Compressor
This item is activated by the contactor for heating and cooling,
except during emergency heat. It is protected by an internal over-
load.
Contactor Relay
This control is activated by the thermostat (24V coil) and supplies
power to the compressor and condenser fan motor.
Defrost Control
The Defrost control provides time/temperature initiation and termi-
nation of the defrost cycle. When a Defrost cycle is initiated, the
defrost control shifts the reversing valve to “COOLING” mode, stops
the outdoor fan and brings on supplemental heat. Normally, a
Defrost cycle will take only 2-3 minutes unless system is low on
charge or outdoor conditions are severe. (windy and cold). The
defrost control also provides for a 3 minute off cycle compressor
delay.
Outdoor Thermostat
These optional controls are used to prevent full electric heater
operation at varying outdoor ambient (0° F-to 45° F). They are nor-
mally open above their set points and closed below to permit stag-
ing of indoor supplement heater operation. If the outdoor ambient
temperature is below 0° F (-18° C) with 50% or higher RH, an
outdoor thermostat (OT) must be installed and set at (0°) on the
dial. Failure to comply with this requirement may result in damage
to the product which may not be covered by the manufacturer’s
warranty.
Reversing Valve Coil
This coil is activated by the thermostat, in the cooling mode and
during defrost. It positions the reversing valve pilot valve for cooling
operation.
Indoor Blower Motor
This is activated by the room thermostat by COOLING or FAN ON
position. The motor is energized through the EBTDR for PSC mo-
tors and directly by the room thermostat for EEM motors. EEM
motors are constant torque motors with very low power consump-
tion. This motor is energized by a 24V signal from the thermostat.
(See Air Flow Measurement and Adjustment for speed adjustment
instructions).
Blower Interlock Relay
This relay is used to energize the blower during the electric heat
operation. Some room thermostats do not energize the motor dur-
ing electric heat. This relay insures blower operation when the
room thermostat energizes heat. This relay has a 240 volt coil and
an 8 amp contact relay. This relay is energized by the electric heat
kit sequencer.

9
HEAT PUMP OPERATION
COOLING CYCLE
When the heat pump is in the cooling cycle, it operates exactly as a
Summer Air Conditioner unit. In this mode, all the charts and data for
service that apply to summer air conditioning apply to the heat pump.
Most apply on the heating cycle except that “condenser” becomes
“evaporator”, “evaporator” becomes “condenser”, “cooling” becomes
“heating”.
HEATING C YCLE
The heat pump operates in the heating cycle by redirecting refrigerant
flow through the refrigerant circuit external to the compressor. This is
accomplished with the reversing valve. Hot discharge vapor from the
compressor is directed to the indoor coil (evaporator in the cooling
cycle) where the heat is removed, and the vapor condenses to liquid.
It then goes through the expansion device to the outdoor coil (con-
denser in the cooling cycle) where the liquid is evaporated, and the
vapor goes to the compressor.
EVAPORATOR
COOLING
SERVICE VALVE
SERVICE PORT REVERSING VALVE
CONDENSER
SERVICE PORT
COMPRESSOR
SERVICE PORT
ACCUMULATOR
EXPANSION DEVICE
CHECK VALVE
ORIFICE
SERVICE
VALVE
CHECK VALVE
ORIFICE
INDO OR
COIL
DISTRIBUTOR
OUTDOOR
COIL
EVAPORATOR
HEATING
SERVICE VALVE
SERVICE PORT REVERSING VALVE
CONDENSER
COMPRESSOR
SERVICE PORT
ACCUMULATOR
CHECK VALVE
ORIFICE
SERVICE
VALVE
CHECK VALVE
ORIFICE
INDOOR
COIL
DISTRIBUTOR
OUTDOOR
COIL
DISTRIBUTOR
When the solenoid valve coil is operated either from heating to cooling
or vice versa, the piston in the reversing valve to the low pressure
(high pressure) reverse positions in the reversing valve.
The following figures show a schematic of a heat pump in the
cooling cycle and the heating cycle. In addition to a reversing valve,
a heat pump is equipped with an expansion device and check
valve for the indoor coil, and similar equipment for the outdoor coil.
It is also provided with a defrost control system.
The expansion devices are flowrator distributors and perform the
same function in the heating cycle as in the cooling cycle. The
flowrator distributors also act as check valves to allow for the re-
verse of refrigerant flow.
When the heat pump is in the heating cycle, the outdoor coil is func-
tioning as an evaporator. The temperature of the refrigerant in the
outdoor coil must be below the temperature of the outdoor air in order
to extract heat from the air. Thus, the greater the difference in the
outdoor temperature and the outdoor coil temperature, the greater the
heating capacity of the heat pump. This phenomenon is a character-
istic of a heat pump. It is a good practice to provide supplementary
heat for all heat pump installations in areas where the temperature
drops below 45° F. It is also a good practice to provide sufficient
supplementary heat to handle the entire heating requirement should
there be a component failure of the heat pump, such as a compres-
sor, or refrigerant leak, etc.
Since the temperature of the refrigerant in the outdoor coil on the
heating cycle is generally below freezing point, frost forms on the
surfaces of the outdoor coil under certain weather conditions of
temperature and relative humidity. Therefore, it is necessary to
reverse the flow of the refrigerant to provide hot gas in the outdoor
coil to melt the frost accumulation. This is accomplished by re-
versing the heat pump to the cooling cycle. At the same time, the
outdoor fan stops to hasten the temperature rise of the outdoor
coil and lessen the time required for defrosting. The indoor blower
continues to run and the supplementary heaters are energized.
DEFROST C ONTROL
During operation the power to the circuit board is controlled by a
temperature sensor, which is clamped to a feeder tube entering
the outdoor coil. Defrost timing periods of 30, 60 and 90 minutes
may be selected by setting the circuit board jumper to 30, 60 and
90 respectively. Accumulation of time for the timing period selected
starts when the sensor closes (approximately 31° F), and when
the wall thermostat calls for heat. At the end of the timing period,
the unit’s defrost cycle will be initiated provided the sensor re-
mains closed. When the sensor opens (approximately 75° F), the
defrost cycle is terminated and the timing period is reset. If the
defrost cycle is not terminated due to the sensor temperature, a
twelve minute override interrupts the unit’s defrost period.
SUGGESTED FIELD TESTING/TROUBLE SHOOTING
1. Run unit in the heating mode (room thermostat calling for
heat).
2. Check unit for proper charge. Note: Bands of frost on the
condenser coil indicate low refrigerant charge.
3. Shut off power to unit.
4. Disconnect outdoor fan by removing the outdoor fan motor
wire from “DF2” on defrost control.
5. Restart unit and allow frost to accumulate.
6. After a few minutes of operation, the unit’s defrost
thermostat should close. To verify this, check for 24 volts
between “DFT” and “C” on board. If the temperature at the
thermostat is less than 28° F and the thermostat is open,
replace the unit’s defrost thermostat, as it is defective.
7. When the unit’s defrost thermostat has closed, short the
test pins on the defrost board until the reversing valve
shifts, indicating defrost. This should take up to 22
seconds depending on what timing period the control is
set on. After defrost initiation, the short must instantly be
removed or the unit’s defrost period will only last 3
seconds.

10
8. The control is shipped from the factory with the compressor
delay option selected. This will de-energize the
compressor contactor for 30 seconds on defrost initiation
and defrost termination. If the jumper is set to Normal, the
compressor will continue to run during defrost initiation
and defrost termination. The control will also ignore the
low pressure switch connected to R-PS1 and PS2 for 5
minutes upon defrost initiation and 5 minutes after defrost
termination.
9. After the unit’s defrost thermostat has terminated, check the
defrost thermostat for 24 volts between “DFT” and “C”. The
reading should indicate 0 volts (open sensor).
10.Shut off power to unit.
11. Replace outdoor fan motor lead to terminal “DF2” on defrost
board and turn on power.
AIRFLOW M EASUREMENT AND A DJUSTMENT
After reviewing Duct Work section, proceed with airflow measure-
ments and adjustments. The unit blower curves (see Specifica-
tion Sheets) are based on external static pressure (ESP per in/wc).
0.1 0.2 0.3 0.4 0.5 0.6 0.7 0.8 0.9
CFM 580 505 445 390 320
WATTS 36 46 54 60 65
CFM 900 850 800 740 655 605 555 490 420
WATTS 92 101 110 119 126 135 140 145 153
CFM 1230 1190 1140 1095 1040 990 920 850 785
WATTS 202 212 220 233 235 243 249 262 265
CFM - 550 475 415 340 270 - - -
WATTS - 5059667477 - - -
CFM 1070 1030 985 935 875 770 705 660 -
WATTS 144 153 160 169 178 184 188 200 -
CFM 1345 1305 1260 1220 1180 1125 1080 975 900
WATTS 258 273 272 283 292 298 306 310 320
CFM 1070 1030 980 935 870 775 720 665 -
WATTS 145 161 165 173 181 190 198 202 -
CFM 1285 1245 1205 1165 1110 1060 1005 910 860
WATTS 238 246 258 264 263 282 288 296 296
CFM 1505 1465 1420 1385 1335 1300 1250 1205 1150
WATTS 359 371 384 383 393 398 406 416 422
CFM 1035 995 945 895 845 790 695 630 580
WATTS 132 144 152 157 168 176 183 189 196
CFM 1410 1365 1330 1290 1250 1205 1155 1110 1065
WATTS 301 312 316 322 331 339 347 356 365
CFM 1545 1500 1465 1425 1385 1345 1310 1270 1225
WATTS 390 396 413 417 421 431 435 443 453
CFM 1355 1300 1250 1210 1155 1110 1045 965 905
WATTS 212 228 230 246 248 261 273 282 289
CFM 1655 1610 1575 1530 1485 1440 1395 1340 1285
WATTS 365 370 383 396 410 417 416 423 434
CFM 1895 1855 1805 1770 1730 1685 1640 1600 1565
WATTS 558 558 578 584 590 594 602 612 615
CFM 1360 1300 1260 1215 1175 1125 1085 1030 960
WATTS 213 221 233 244 255 264 273 293 304
CFM 1665 1630 1595 1555 1505 1475 1425 1380 1360
WATTS 385 405 410 409 429 441 448 454 471
CFM 2000 1960 1925 1875 1835 1800 1760 1725 1680
WATTS 642 651 660 651 672 683 691 699 695
Volts
230
230
230
230
230
230
E.S.P (In. of H2O)
*PC1424M41*
T1
T2/T3
T4/T5 230
230
230
Model Speed
*PC1430M41*
T1
T2/T3
T4/T5
*PC1436M41*
T1
T2/T3
T4/T5
*PC1460M41*
T1 230
T2/T3 230
T4/T5 230
*PC1448M41*
T1 230
T2/T3 230
T4/T5 230
*PC1442M41*
T1 230
T2/T3 230
T4/T5 230
NOTES:
•Data shown is dry coil. Wet coil pressure drop is approximately: 0.1” H20, for two-row indoor coil; 0.2” H2O, for three-row indoor coil; and 0.3” H20, for four-row indoor coil.
• Data shown does not include filter pressure drop, approx. 0.08” H20.
• Reduce airflow by 2% for 208-volt operation.

11
NOTES:
•Data shown is dry coil. Wet coil pressure drop is approximately: 0.1” H20, for two-row indoor coil; 0.2” H2O, for three-row indoor coil; and 0.3” H20, for four-row indoor coil.
• Data shown does not include filter pressure drop, approx. 0.08” H20.
• Reduce airflow by 2% for 208-volt operation.
Horizontal E.S.P. (In. of H2O)
Model 0.1 0.2 0.3 0.4 0.5 0.6 0.7 0.8 0.9
T1 230 CFM 782 709 652 561
Watts 71 78 86 100
T2/T3 230 CFM 941 872 777 746 614
Watts 105 112 113 128 138
T4/T5 230 CFM 1347 1315 1256 1194 1152 1096 1051 972 891
Watts 239 256 265 271 282 286 293 297 305
Horizontal E.S.P. (In. of H2O)
Model 0.1 0.2 0.3 0.4 0.5 0.6 0.7 0.8 0.9
T1 230 CFM 851 803 712 635 575 506 460
Watts 79 88 91 100 114 116 120
T2/T3 230 CFM 1146 1098 1044 991 934 817 764 698 653
Watts 157 170 176 186 194 201 210 215 215
T4/T5 230 CFM 1440 1418 1364 1307 1265 1219 1168 1094 1049
Watts 290 306 312 321 326 332 348 353 360
Horizontal E.S.P. (In. of H2O)
Model 0.1 0.2 0.3 0.4 0.5 0.6 0.7 0.8 0.9
T1 230 CFM 846 762 716 585 519
Watts 74 83 94 98 108
T2/T3 230 CFM 1278 1214 1182 1129 1072 1013 950 853 788
Watts 221 218 232 245 253 264 265 275 272
T4/T5 230 CFM 1604 1560 1507 1468 1415 1364 1321 1276 1218
Watts 396 402 408 424 426 423 444 454 454
Horizontal E.S.P. (In. of H2O)
Model 0.1 0.2 0.3 0.4 0.5 0.6 0.7 0.8 0.9
T1 230 CFM 1030 955 908 826 761 678 633 563 504
Watts 130 126 139 143 154 168 171 181 185
T2/T3 230 CFM 1419 1387 1327 1274 1219 1171 1111 1041 986
Watts 273 281 287 298 309 315 318 326 336
T4/T5 230 CFM 1750 1710 1673 1611 1556 1499 1443 1399 1353
Watts 470 475 488 493 502 502 501 514 520
Horizontal E.S.P. (In. of H2O)
Model 0.1 0.2 0.3 0.4 0.5 0.6 0.7 0.8 0.9
T1 230 CFM 1167 1101 1045 992 939 870 802 732 681
Watts 139 144 156 165 177 193 203 217 223
T2/T3 230 CFM 1723 1637 1598 1554 1509 1467 1420 1361 1295
Watts 372 370 381 390 404 411 420 427 441
T4/T5 230 CFM 2012 1965 1912 1871 1809 1770 1741 1691 1635
Watts 578 593 599 606 610 627 626 634 638
Horizontal E.S.P. (In. of H2O)
Model 0.1 0.2 0.3 0.4 0.5 0.6 0.7 0.8 0.9
T1 230 CFM 1427 1370 1317 1273 1204 1165 1111 1058 1003
Watts 222 229 237 256 256 276 291 299 320
T2/T3 230 CFM 1935 1885 1848 1809 1755 1705 1659 1616 1567
Watts 498 512 515 520 541 549 559 567 569
T4/T5 230 CFM 2232 2188 2144 2087 2035 2017 1963 1926 1869
Watts 805 795 790 827 830 842 864 864 848
Speed Volts
*PH1460M41*
Speed Volts
*PH1448M41*
Speed Volts
*PH1442M41*
Speed Volts
*PH1436M41*
Speed Volts
*PH1430M41*
Speed Volts
*PH1424M41*
Downshot E.S.P. (In. of H2O)
Model 0.1 0.2 0.3 0.4 0.5 0.6 0.7 0.8 0.9
T1 230 CFM 790 710 634 566 506
Watts 82 86 96 103 108
T2/T3 230 CFM 919 855 782 695 631 578 523
Watts 108 117 121 132 143 144 149
T4/T5 230 CFM 1312 1275 1216 1153 1096 1028 943 869 816
Watts 260 269 274 285 295 300 304 310 316
Downshot E.S.P. (In. of H2O)
Model 0.1 0.2 0.3 0.4 0.5 0.6 0.7 0.8 0.9
T1 230 CFM 848 761 646 578 511
Watts 84 94 98 111 113
T2/T3 230 CFM 1103 1038 978 922 806 731 676 622 564
Watts 162 168 179 188 199 205 208 214 219
T4/T5 230 CFM 1401 1357 1305 1244 1179 1118 1046 934 884
Watts 311 326 318 334 341 349 353 352 357
Downshot E.S.P. (In. of H2O)
Model 0.1 0.2 0.3 0.4 0.5 0.6 0.7 0.8 0.9
T1 230 CFM 809 730 623 542 485 441
Watts 73 85 92 98 107 112
T2/T3 230 CFM 1284 1223 1175 1097 1031 974 871 804 761
Watts 220 227 241 247 255 262 272 277 285
T4/T5 230 CFM 1578 1539 1498 1452 1396 1332 1279 1224 1161
Watts 401 409 421 425 438 439 452 453 455
Downshot E.S.P. (In. of H2O)
Model 0.1 0.2 0.3 0.4 0.5 0.6 0.7 0.8 0.9
T1 230 CFM 1001 936 852 810 700 643 579 526 491
Watts 125 133 136 154 160 166 172 177 185
T2/T3 230 CFM 1411 1361 1299 1240 1173 1112 1048 955 887
Watts 281 294 301 309 312 320 327 335 339
T4/T5 230 CFM 1734 1678 1613 1558 1509 1449 1383 1341 1279
Watts 475 485 496 504 509 505 519 514 520
Downshot E.S.P. (In. of H2O)
Model 0.1 0.2 0.3 0.4 0.5 0.6 0.7 0.8 0.9
T1 230 CFM 1155 1074 1023 969 896 805 755 667 626
Watts 153 156 169 180 195 205 216 226 230
T2/T3 230 CFM 1670 1596 1558 1484 1467 1383 1339 1259 1168
Watts 383 392 399 408 419 434 436 447 449
T4/T5 230 CFM 1949 1881 1853 1792 1753 1699 1621 1561 1522
Watts 603 607 608 616 622 626 648 650 645
Downshot E.S.P. (In. of H2O)
Model 0.1 0.2 0.3 0.4 0.5 0.6 0.7 0.8 0.9
T1 230 CFM 1347 1293 1236 1184 1117 1054 996 934 871
Watts 242 251 268 276 290 305 321 330 348
T2/T3 230 CFM 1827 1780 1739 1683 1633 1588 1518 1462 1404
Watts 529 538 548 557 557 576 578 604 601
T4/T5 230 CFM 2111 2057 2030 1979 1947 1957 1922 1868 1818
Watts 835 843 846 852 870 959 956 960 966
Speed Volts
*PH1460M41*
Speed Volts
*PH1448M41*
Speed Volts
*PH1442M41*
Speed Volts
*PH1436M41*
Speed Volts
*PH1430M41*
Speed Volts
*PH1424M41*
The duct openings on the unit are considered internal static pressure.
As long as ESP is maintained, the unit will deliver the proper air up to
the maximum static pressure listed for the CFM required by the appli-
cation (i.e. home, building, etc.)
In general, 400 CFM per ton of cooling capacity is a rule of thumb.
Some applications depending on the sensible and latent capacity
requirements may need only 350 CFM or up to 425 CFM per ton.
Check condition space load requirements (from load calculations)
and equipment expanded ratings data to match CFM and capacity.
After unit is set and duct work completed, verify the ESP with a
1-inch inclined manometer with pitot tubes or a Magnahelic gauge
and confirm CFM to blower curves in the Specification Sheets. All
units have three-speed blower motors. If low speed is not utilized,
the speed tap can be changed to medium or high speed.
NOTE: Never run CFM below 350 CFM per ton, evaporator freezing
or poor unit performance is possible.

12
EEM Motor
Adjust the CFM by changing the 24V low voltage lead at the speed
terminal block on the motor. (T1-Low Speed, T2 and T3-Medium
Speed, T4 and T5-High Speed).
REFRIGERANT CHARGE C HECKS
After completing airflow measurements and adjustments, the unit’s
refrigerant charge must be checked. All package units are charged
to the superheat method at the compressor suction line (for fixed
orifice devices). After superheat is adjusted it is recommended to
check unit sub-cooling at the condenser coil liquid line out. For
charge adjustments, see superheat and subcooling charts shown
for each model.
SUPERHEAT CAN BE DETERMINED AS FOLLOWS:
1. Read suction pressure. Determine Saturated Suction
Temperature from tables or pressure gauge saturated
temperature scale (R-410A).
2. Read suction line temperature.
3. Use the following formula:
SUPERHEAT = SUCTION LINE TEMP - SAT. SUCTION TEMP
SUCTION PRESSURE SATURATED SUCTION
TEMPERATURE ºF
PSIG R-410A
50 1
52 3
54 4
56 6
58 7
60 8
62 10
64 11
66 13
68 14
70 15
72 16
74 17
76 19
78 20
80 21
85 24
90 26
95 29
100 31
110 36
120 41
130 45
140 49
150 53
160 56
170 60
SATURATED SUCTION PRESSURE
TEMPERATURE CHART
Suction Pressure Temperature (R-410A)
SUBCOOLING = SAT. LIQUID TEMP. - LIQUID LINE TEMP.
LIQUID PRESSURE SATURATED LIQUID
TEMPERATURE ºF
PSIG R-410A
200 70
210 73
220 76
225 78
235 80
245 83
255 85
265 88
275 90
285 92
295 95
305 97
325 101
355 108
375 112
405 118
415 119
425 121
435 123
445 125
475 130
500 134
525 138
550 142
575 145
600 149
625 152
SATURATED LIQUID PRESSURE
TEMPERATURE CHART
Liquid Pressure Temperature (R-410A)
Models # Superheat ± 2°F Subcooling ± 2°F
*PC1424M41 10 ---
*PC1430M41 10 ---
*PC1436M41 3 ---
*PC1442M41 6 ---
*PC1448M41 2 ---
*PC1460M41 12 14
*PH1424M41 7 10
*PH1430M41 7 11
*PH1436M41 10 9
*PH1442M41 10 12
*PH1448M41 7 11
*PH1460M41 12 11
DESIGN SUPERHEAT / SUBCOOLING
@ 95°F OUTDOOR AMBIENT TEMPERATURE

13
EXPANSION VALVE (TXV) SYSTEM
Two Speed Application (*PH1460)
Run the unit on low stage cooling for 10 minutes until
refrigerant pressures stabilize. Follow the guidelines and
methods below to check unit operation and ensure that the
refrigerant charge is within limits. Charge the unit on low
stage.
1. Purge gauge lines. Connect service gauge manifold to
access fittings. Run system at least 10 minutes to allow
pressure to stabilize.
2. Temporarily install thermometer on liquid (small) line near
liquid line access fitting with adequate contact and insulate
for best possible reading.
3. Check subcooling and superheat. Two stage systems
running on low stage with TXV application should have a
subcooling and superheat within the range listed on the
chart.
a. If subcooling and superheat are low, adjust TXV
superheat, then check subcooling.
NOTE: To adjust superheat, turn the valve stem
clockwise to increase and counter clockwise to
decrease.
b. If subcooling is low and superheat is high, add charge
to raise subcooling then check superheat.
c. If subcooling and superheat are high, adjust TXV valve
superheat, then check subcooling.
d. If subcooling is high and superheat is low, adjust TXV
valve superheat and remove charge to lower the
subcooling.
NOTE: Do NOT adjust the charge based on suction
pressure unless there is a gross undercharge.
4. Disconnect manifold set, installation is complete.
SYSTEM CHARGING HEATING MODE
The proper method of charging a heat pump in the heat mode
is by weighing the charge according to the total charge listed
on the rating plate.
Measure the hot gas discharge at the compressor to ensure
proper TXV setting. To ensure optimum system performance
in heat mode, the TXV may require adjustment.
1. Allow the system to operate for at least 20 minutes.
2. Attach and insulate an electronic thermometer to the hot
gas discharge line mid-way between the compressor and
the reversing valve.
NOTE: The thermometer must be well insulated to prevent
ambient influences.
3. Allow the compressor to operate for about 10 additional
minutes and measure the hot gas discharge temperature.
4. Using an additional electronic thermometer, measure the
ambient temperature.
5. Adjust the TXV until the hot gas temperature equals 100°F
+ ambient temperature (+ or - 3°F). Close TXV to increase
the temperature.
NOTE: When adjusting the TXV, allow the compressor to
operate for about 10 minutes before taking readings. Do
not adjust TXV more than 1/4 of a turn between readings.
ELECTRICAL ADJUSTMENTS
This series of electric cooling and, heat pump package equipment is
designed to accept a field installed electric heat kit. The unit is equipped
to easily install the HKP or HKR Series single phase Electric Heat
Kits. Full Installation Instructions are included in this kit. Please use
this document for guidance in field equipping the package unit with
electric heat.
Choose the heat kit that fits the application for the specific installa-
tion. Permanently mark the unit’s nameplate with the model being
installed. High and low voltage connections are detailed in the
heat kit instructions.
Indoor Blower motor speed tap selection may need to be modified
to accommodate normal continuous operation to prevent a nui-
sance trip. See following table.
Unit Model Number 5 8 10 15 20
*PH/*PC1424M41** M(F) M(F) M(F) HNA
*PH/*PC1430M41** M(F) M(F) M(F) HNA
*PH/*PC1436M41** MMH
(F) H(F) NA
*PH/*PC1442M41** MMH
(F) H(F) NA
*PH/*PC1448M41** 3(F) 3(F) 3(F) 3(F) 3(F)
*PH/*PC1460M41** 3(F) 3(F) 3(F) 3(F) 3(F)
*(F) - Factory Setting
3 speed (H)igh/(M)edium/(L)ow : PSC motor
4 speed (H)igh/(ML)Medium Low / (MH) Medium High/(L)ow : PSC motor
1/2/3/4/5: EEM motor
Electric Heat KW
Speed Taps Description: H / 4, 5 - High; M / 2, 3 - Medium; L / 1 - Low
MAINTENANCE
WARNING
HIGH VOLTAGE!
DISCONNECT ALL POWER BEFORE SERVICING OR INSTALLING
THIS UNIT. MULTIPLE POWER SOURCES MAY BE PRESENT. FAILURE
TO DO SO MAY CAUSE PROPERTY DAMAGE, PERSONAL INJURY OR
DEATH.
The Self Contained Package Air Conditioner and Heat Pump should
operate for many years without excessive service calls if the unit is
installed properly. However it is recommended that the homeowner
inspect the unit before a seasonal start up. The coils should be
free of debris so adequate airflow is achieved. The return and
supply registers should be free of any obstructions. The filters
should be cleaned or replaced. These few steps will help to keep
the product up time to a maximum. The Troubleshooting Chart (on
page 14) should help in identifying problems if the unit does not
operate properly.

14
SERVICE
THE FOLLOWING INFORMATION IS FOR USE BY QUALIFIED SER-
VICE AGENCY ONLY: OTHERS SHOULD NOT ATTEMPT TO SER-
VICE THIS EQUIPMENT.
Common Causes of Unsatisfactory Operation of Heat Pump in
the Heating Cycle.
INADEQUATE AIR VOLUME THROUGH INDOOR COIL
When a heat pump is in the heating cycle, the indoor coil is func-
tioning as a condenser. The return air filter must always be clean,
and sufficient air volume must pass through the indoor coil to
prevent excessive discharge pressure, and high pressure cut out.
OUTSIDE AIR INTO RETURN DUCT
Do not introduce cold outside air into the return duct of a heat
pump installation. Do not allow air entering the indoor coil to drop
below 65° F. Air below this temperature will cause low discharge
pressure, thus low suction pressure, and excessive defrost cy-
cling resulting in low heating output. It may also cause false
defrosting.
UNDERCHARGE
An undercharged heat pump on the heating cycle will cause low
discharge pressure resulting in low suction pressure and frost
accumulation on the outdoor coil.
POOR “TERMINATING” SENSOR CONTACT
The unit’s defrost terminating sensor must make good thermal con-
tact with the outdoor coil tubing. Poor contact may not terminate the
unit’s defrost cycle quickly enough to prevent the unit from cutting out
on high discharge pressure.
MALFUNCTIONING REVERSING VALVE - THIS MAY BE DUE TO:
1. Solenoid not energized - In order to determine if the
solenoid is energized, touch the nut that holds the solenoid
cover in place with a screwdriver. If the nut magnetically
holds the screwdriver, the solenoid is energized and the
unit is in the cooling cycle.
2. No voltage at unit’s solenoid - Check unit voltage. If no
voltage, check wiring circuit.
3. Valve will not shift:
a. Undercharged - check for leaks;
b. Valve Body Damaged - Replace valve;
c. Unit Properly Charged - If it is in the heating cycle, raise
the discharge pressure by restricting airflow through
the indoor coil. If the valve does not shift, tap it lightly on
both ends with a screwdriver handle. DO NOT TAP THE
VALVE BODY. If the unit is in the cooling cycle, raise the
discharge pressure by restricting airflow through the
outdoor coil. If the valve does not shift after the above
attempts, cut the unit off and wait until the discharge
and suction pressure equalize, and repeat above steps.
If the valve does not shift, replace it.

15
TROUBLESHOOTING CHART
SYMPTOM
High head - low suction a. Restriction in liquid line or flowrator a. Remove or replace with proper size flowrator.
High head - high or normal suction a. Dirty condenser coil a. Clean coil.
b. Overchar
g
ed b. Correct S
y
stem char
g
e.
c. Condenser fan not runnin
g
c. Re
p
air or Re
p
lace.
a. Incorrect flowrator a. Re
p
lace with correct flowrator.
b. Defective com
p
ressor valves b. Re
p
lace com
p
ressor.
c. Flowrator not seating properly c. Check for debris under flowrator or deformed
flowrator. Remove debris or replace flowrator.
d. Defective reversing valve d. Replace reversing valve.
a. Power off or loose electrical connection a. Check for unit voltage at contactor in unit.
b. Thermostat out of calibration set too hi
g
h b. Reset.
c. Defective contactor c. Check for 24 volts at contactor coil replace if
contacts are open.
d. Blown fuses or tripped breaker d. Replace fuse or reset breaker.
e. Transformer defective e. Check wiring - replace transformer.
f. High or low pressure control open
(Optional) f. Reset high pressure control or check unit charge.
High pressure control opens at 610 psig.
Low
p
ressure control o
p
ens at 22
p
si
g
.
g. Compressor overload contacts open g. Replace compressor.
NOTE: Wait at least 2 hours for overload to reset.
Condenser fan runs,
compressor doesn't a. Loose connection a. Check for unit voltage at compressor check &
tighten all connections.
b. Compressor stuck, grounded or open
winding open internal overload b. Wait at least 2 hours for overload to reset If still
open, replace the compressor.
c. Low voltage connection c. At compressor terminals, voltage must be within
10 % of nameplate volts when unit is operating.
d. Capacitor weak, open, or shorted d. Check capacitor. If defective, replace.
Low suction - cool compressor a. a.
Iced evaporator coil a. Defective overload protector a. Replace - check for correct voltage.
b. Unit cycling on low pressure control b. Check refrigerant charge and / or airflow.
a. a. Increase s
p
eed of blower or reduce restriction
re
p
lace air filters.
a. Excessive load a. Recheck load calculation.
b. Defective com
p
ressor b. Re
p
lace.
c. Reversin
g
valve not seatin
g
p
ro
p
erl
y
.c.Re
p
lace.
a. Im
p
ro
p
erl
y
sized unit a. Recalculate load.
b. Improper airflow b. Check - should be approximately 400 CFM per
ton.
c. Incorrect refrigerant charge. c. Charge per procedure attached to unit service
panel.
d. Incorrect voltage d. At compressor terminals, voltage must be within
10% of nameplate volts when unit is operating.
Increase speed of blower or reduce restriction -
replace air filters.
Insufficient cooling
High suction pressure
REMEDYPOSSIBLE CAUSE
Compressor short cycles
Registers sweat Low airflow
Low head - high suction
Unit will not run
Low indoor airflow

16
APPENDIX
UNIT DIMENSIONS
MEDIUM CHASSIS
*P*1424M4**
*P*1430M4**
*P*1436M4**
*P*1442M4**
LARGE CHASSIS
*P*1448M4**
*P*1460M4**
BLOWER
A
CCESS PANEL
?
?
2 34
51
47
SUPPLY
1 3/8
A
RETURN
POWER
WIRE
ENTRANCE
4 1/8
2 1/8
6 ½
16
16
5 ½
B
B
CONTROL
WIRE
ENTRANCE
CONDENSATE
DRAIN
CONNECTION
3/4” NPT FEMALE
18 7/8
3
8
BLOWER
A
CCESS PANEL
?
2 34
51
47
SUPPLY
A
RETURN
16
5 ½
B
CONTROL
WIRE
ENTRANCE
CONDENSATE
DRAIN
CONNECTION
3/4” NPT FEMALE
18 7/8
SUCTION/LIQUID
PRESSURE PORT
BEHIND PANEL
?
1 3/8
POWER
WIRE
ENTRANCE
4 1/8
2 1/8
6 ½ 16
B
3
8

17
MINIMUM CLEARANCES
RECOMMENDED FILTER SIZES
UNIT 2 ton 2-1/2 ton 3 ton 3-1/2 ton 4 ton 5 ton
Min. Filter Size (1) 25x25x1 (1) 25x25x1 (1) 25x25x1 (1) 25x25x1 (2) 20x20x1 (2) 20x20x1
4”
MIN
12” MIN 36” MIN
(FOR SERVICE)
.
48” MIN
12” MIN
36” MIN
(FOR
SERVICE)
NOTE: Roof overhang should be no more than 36”

18
PACKAGE UNITS - HEAT PUMP AND AC UNITS
HOMEOWNER’S ROUTINE MAINTENANCE RECOMMENDATIONS
An alternate cleaning method is to use one of the products listed in
the technical publication TP-109 (shipped in the literature bag
with the unit) to clean the coils. The cleaners listed are the only
agents deemed safe and approved for use to clean round tube
aluminum coils. TP-109 is available on the web site in Partner
Link > Service Toolkit.
NOTE: Ensure coils are rinsed well after use of any chemical clean-
ers.
ANNUAL INSPECTION (QUALIFIED SERVICER ONLY)
Your package unit should be inspected by a qualified installer,
or service agency at least twice every year. This check should be
performed before the heating and cooling seasons begin. This
will ensure that the system is performing properly and safely.
Repair as necessary.
• Check physical support of the unit. Ensure it is sound
without any sagging, cracks, or gaps, around the base.
• Check for obvious signs of deterioration of the unit.
• Check both condenser and evaporator coil to make sure
each are clean.
•Return Air Connection. Check for physical soundness
and ensure that the connection is firmly sealed to the
package unit casing.
•Wiring. Check wires for damage. Check electrical
connections for tightness and/or corrosion.
•Filters. Check that filters are clean and in the proper
placement in the unit or duct system.
•Louvers. Inspect air inlet louvers inside the heat
exchanger compartments. Ensure the area is clean and
free of dirt and debris.
BEFORE CALLING YOUR SERVICER
•Check the thermostat to confirm that it is properly set.
•Check the disconnect switch near the unit to confirm that
it is closed.
•Check the electrical panel for tripped circuit breakers or
failed fuses . Reset the circuit breakers or replace fuses
as necessary.
•Check for blockage of the indoor air inlets and outlets.
Confirm that they are open and have not been blocked by
objects (rugs, curtains or furniture).
•Check for obstructions on the unit . Confirm that it has
not been covered on the sides or the top. Remove any
obstruction that can be safely removed. If the unit is
covered with dirt or debris, call a qualified servicer to
clean it.
•Check the filter. If it is dirty, clean or replace it.
We strongly recommend a bi-annual maintenance checkup be performed by a qualified service agency before the heating and cooling seasons begin.
REPLACE OR CLEAN FILTER
IMPORTANT NOTE: Never operate unit without a filter installed as
dust and lint will build up on internal parts resulting in loss of
efficiency, equipment damage and possible fire.
A return air filter is not supplied with this unit; however, there must
be a means of filtering the return air. An indoor air filter must be
used with your comfort system. A properly maintained filter will
keep the indoor coil of your comfort system clean. A dirty coil could
cause poor operation and/or severe equipment damage.
The installer of your unit can tell you where your filter(s) are and
how to clean or replace them.
Check your return filter(s) at least once every two months. When
they are dirty, replace or clean as required. Disposable type
filters should be replaced. Reusable type filters may be cleaned.
NOTE: Reusable type filters should be washed with warm water,
dried completely and sprayed with an adhesive according to the
manufacturers recommendations.
You may want to ask your dealer about high efficiency filters. High
efficiency filters are available in both electronic and non-electronic
types. These filters can do a better job of catching small airborne
particles.
Improper filter maintenance is the most common cause of inad-
equate heating or cooling performance. Filters should be cleaned
(permanent) or replaced (disposable) every two months or as re-
quired. When replacing a filter, it must be replaced with a filter of
the same type and size and always make certain the air flow
arrows on the filter point in the proper direction.
CONDENSER AND EVAPORATOR MOTORS
The bearings on the air circulating blower motor and condenser
motor are permanently lubricated and require no further lubrica-
tion.
COMPRESSOR
The compressor motor is hermetically sealed and does not re-
quire additional oiling.
ALUMINUM INDOOR COIL CLEANING (QUALIFIED SERVICER ONLY)
This unit is equipped with an aluminum tube evaporator coil. The
safest way to clean the evaporator coil is to simply flush the coil
with water. This cleaning practice remains as the recommended
cleaning method for both copper tube and aluminum tube resi-
dential cooling coils.

19
Start-up Checklist
*Store in job file
Pre Start-Up
(Check each item as completed)
Verify all packaging material has been removed.
Remove all shipping brackets per installation instructions.
Verify the job site voltage agrees with the unit serial plate.
Verify condensate connection is installed per installation instructions.
Verify proper clearance around the unit for safety, service, maintenance and proper unit operation.
Verify proper weatherproofing of all ductwork, roof curbs and electrical connections.
Check that the flue screen is in place.
Check gas piping for leaks.
Verify gas pressure to the unit is within the range specified on the serial plate.
Check to ensure that all fans, pulleys and wheels are secure.
Check for proper belt tension and alignment per installation instructions.
Check refrigerant piping for rubbing and leaks. Repair if necessary.
Check unit wiring to ensure it is not in contact with refrigerant piping or sharp metal edges.
Check all electrical connections and terminals. Tighten as needed.
Verify that the crankcase heaters have been energized for 24 hours.
Verify the scroll compressor(s) are rotating in the right direction.
Verify all accessories are installed and operating correctly.
Check filters and replace if necessary.
Verify the installation of the thermostat.
9/2014
Date: ___________________________________
Model Number: ___________________________________
Serial Number: ___________________________________
Technician: ___________________________________
Location: __________________________________________
__________________________________________
__________________________________________
Unit #: __________________________________________
Air Conditioning & Heating

20
Start-up Checklist
L1 - L2 L2 - L3 L3 - L1
L1 L2 L3
L1 L2 L3
L1 L2 L3
Fan 1Fan 2Fan 3
IN. W.C.
IN. W.C.
IN. W.C.
RPM
DB WB
DB WB
DB WB
DB
IN. W.C.
IN. W.C. (Low Fire) IN. W.C. (High Fire)
PSIG °F
°F
PSIG °F
°F
PSIG °F
°F
PSIG °F
°F
PSIG °F
PSIG °F
PSIG °F
PSIG °F
BLOWER EXTERNAL STATIC PRESSURE
Return Air Static Pressure
Supply Air Static Pressure
Supply Voltage
Circuit 1 Compressor Amps
Circuit 2 Compressor Amps
Blower Amps
Condenser Fan Amps
ELECTRICA
L
Total External Static Pressure
Blower Wheel RPM
TEMPERATURES
Outdoor Air Temperature
Return Air Temperature
Cooling Supply Air Temperature
Discharge Circuit 1
Heating Supply Air Temperature
PRESSURES
Gas Inlet Pressure
Gas Manifold Pressure
Suction Circuit 1
Suction Circuit 2
Discharge Circuit 2
Superheat (Orifice System)
Superheat (Orifice System)
Subcooling (TXV System)
Subcooling (TXV System)
Discharge Circuit 1
Discharge Circuit 2
(HEAT PUMP ONLY)
Suction Circuit 1
Suction Circuit 2
Start-Up
(Insert the values as each item is completed.)
Air Conditioning & Heating
/