Page is loading ...

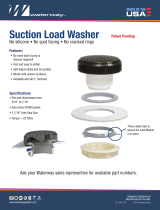
FRONT ACCESS SKIM FILTER & SKIMMER
INSTALLATION INSTRUCTIONS
NOTE: Model Shown here is a Skim Filter. Installation instructions are
identical for any size of Skim Filter or Skimmer. To insure the correct
installation, please take the time to read the instructions.
IMPORTANT: Wide Mouth Adapter kit must be installed before the entire
assembly is mounted to the wall. Please see next page for more info.
1. Find a flat surface, at least 8" x 8", along the pool wall where at
least 4" of the Skim Filter/Skimmer Lid is not in an accessible area. It
is advised to glue it in place using ABS glue.
2. Using a jig saw, cut a hole through the wall 6" wide x 5 ½" high so
that the back of the Front Mounting Plate will fit through the wall.
3. Using the Front Mounting Plate as a template, indicate the 10 holes
using a marker, then drill holes using a ¼" drill bit (make sure the
drill is held perpendicular to the wall).
4. Apply silicone to all mounting surfaces and gaskets, if desired.
5. After installing vinyl, hold Skim Filter/Skimmer in place and insert
(2) screws through pool wall into center right side. Then place the
Front Mounting Plate on the wall.
6. Screw the remaining (10) self-threading No. 12 machine screws
through the front plate, if desired. Make sure not to over tighten.
7. Clean off excess silicone if used.
8. Use either an ABS Trim Plate or a Stainless Steel Trim Plate, if
desired. ABS Trim Plates snap over the mounting plate; Stainless
Steel Trim Plates have a self-adhesive backing.
Weir Door
519-3060
Stainless Steel
Trim Plate (optional)
216-1000
ABS Trim Plate
519-3090
Pool Wall
Front Mounting Plate
519-3180
Spacer (optional)
519-3110
Gasket (optional)
806-1040
Skim Filter Body
515-1050
Filter Body Support
519-3190
Gasket
806-1040
Gasket (optional)
806-1040
No. 12 1 ¼" Machine
Screws (Self-Threading) (12)
819-6940 No. 12 1 ¼" Machine
Screws (Self-Threading) (12)
819-6940
Winterizing Plate
(not included)
519-3020
Filter Body Support
Extensions (2 qty)
519-3170 FIGURE 1
1. Drain the pool approximately 2" below the Skim Filter/Skimmer
opening. Remove and store the Basket and Weir indoors.
2. Disconnect all hoses from the Skim Filter/Skimmer to ensure that
all water is kept free from the Skim Filter/Skimmer bodies. This
helps prevent formation of ice inside, which will crack the Skim
Filter/Skimmer Bodies. Warranty does not include ice formation
damage.
3. The Winterizing Plate (not included) screws securely in place, using
the same (10) No. 12 self-threading machine screws provided with
the assembly.
WINTERIZING
810-0031-LB.0618
©2018 Waterway Plastics
2200 East Sturgis Road, Oxnard CA 93030 • Phone 805.981.0262 • Fax 805.981.9403
www.waterwayplastics.com • waterway@waterwayplastics.com
Designed,
Engineered &
Manufactured
in the USA.
WARRANTY
For product registration visit: www.waterwayplastics.com.
For Warranty questions or claims please contact point of purchase.

WIDE MOUTH ADAPTER KIT INSTALLATION
1. Attach Weir Door on inside of Wide
Mouth Adapter Body using included tabs.
4. Align Wide Mouth Front Mounting
Plate to screw holes in wall.
5. Attach Wide Mouth Front Mounting
Plate to wall using provided screws.
2. Attach standard mouth gasket to rear
of Wide Mouth Adapter Body. Attach Wide
Mouth Adapter Body to Skim Filter Body.
3. Align wide mouth gasket to screw
holes. At this point, Wide Mouth Adapter
Body and Skim Filter Body should be
installed to wall.
810-0031-LB.0618
©2018 Waterway Plastics

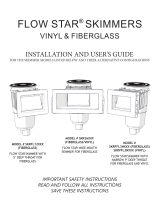
FRONT ACCESS SKIM FILTER & SKIMMER REPLACEMENT PARTS
FIGURE 2
WIDE MOUTH KIT
550-4100
SKIM FILTER
510-2010 - 25 sq. ft.
510-2030 - 50 sq. ft. DIVERTER ADJUSTMENT PLATES
SKIMMERS
HOLE PATTERN DIMENSIONS
4.00"
8.00"
14.00"
510-1020S - Short Throat 510-2070S - Long Throat
Basket
Weir
Door
20 or 50 sq. ft. Filter
Filter Body Support
Diverter Plates
SKIM FILTER SIDE VIEW
2.95"
5.08"
.833"
7.19"
1.84"
4.21"
6.59"
7.52"
5.83"
8.42"
Water Levels
Water level should be at
midpoint of wall opening.
FIGURE 3
NOTE: To adjust diverter plates,
remove basket and turn diverter
plates in opposite directions to
increase or decrease flow.
810-0031-LB.0618
©2018 Waterway Plastics
/