Baumatic BOD890-SS/BL User manual

Category
Cookers
Type
User manual

This manual is also suitable for

Baumatic BOD890-SS/BL is a 90 cm built-in multifunction electric double oven with a range of cooking functions and features to assist you in creating delicious meals. It has a main oven with 9 functions, including fan cooking, grilling, and baking, and a top oven with 4 functions, including static cooking and grilling. Both ovens have thermostatically controlled grills and triple-glazed removable doors for easy cleaning. The oven also features a full LED programmer with a digital display, allowing you to set cooking times, temperatures, and functions with ease.

Baumatic BOD890-SS/BL is a 90 cm built-in multifunction electric double oven with a range of cooking functions and features to assist you in creating delicious meals. It has a main oven with 9 functions, including fan cooking, grilling, and baking, and a top oven with 4 functions, including static cooking and grilling. Both ovens have thermostatically controlled grills and triple-glazed removable doors for easy cleaning. The oven also features a full LED programmer with a digital display, allowing you to set cooking times, temperatures, and functions with ease.

1
BOD890-SS/BL
90 cm Built-in
multifunction electric
double oven.
User Manual for your Baumatic
BOD890-SS/BL
90 cm Built-in multifunction
electric double oven
NOTE: This User Instruction Manual contains important
information, including safety & installation points, which will
enable you to get the most out of your appliance. Please keep it
in a safe place so that it is easily available for future reference; for
you or any person not familiar with the operation of the appliance.
GS 20/05/13
2
3
Contents
Environmental note 4
Important safety information 5 – 7
Specifications 8 – 11
Product and aperture dimensions 8
Cooling fans 9
Product specifications 9
Standard accessories 9
Electrical details 9
Control panel 10
Oven programmer / timer display 10
Initial set-up of your oven 11 – 12
Setting the time of day 11
Before first use 11 12
Timer functions 12 - 17
The minute minder function (main oven and lower oven) 12
The duration function (main oven only) 13
The end cook function (main oven only) 14
The start and end time function (main oven only) 15 – 16
Cancelling a timer function 16
Adjusting the audible signal 16
Changing the time of day 17
Selecting a cooking function and temperature 17 – 22
Selecting a main oven function 17 - 18
Main oven thermostat control knob 18
Selecting a top oven function 19
Top oven thermostat control knob 19
Oven operating lights (main and lower oven) 20
Cooking guidelines 20 - 21
Warnings 21
Shelf positions 22
Cleaning and maintenance 23 - 27
General cleaning instructions 23
Replacing the oven bulb 24
Removing the oven door for cleaning 25
Removing the oven door glass for cleaning 26
Removing the side racks 27
Installation 28 – 32
Electrical connection 28
Connecting the mains supply cable 29
Replacing the mains supply cable 30
Installing the oven into the kitchen cabinet 31
Positioning the appliance 31
Ventilation requirements 32
My appliance isn’t working correctly 33 – 35
Cooking Tables 36 – 37
Baumatic consumables 38
Contact details 39
Environmental note
o The packaging materials that Baumatic uses are environmentally
friendly and can be recycled.
all packaging material with due regard for the
environment.
o Please discard
4
5
IMPORTANT SAFETY INFORMATION
Your safety is of the utmost importance to Baumatic.
Please make sure that you read this instruction booklet
before attempting to install or use the appliance. If you
are unsure of any of the information contained in this
ooklet, please contact the Baumatic Advice Line.
eneral Information
se and can be
the ambient temperature of the room it
r discolouration at temperatures below the
than 4mm to the appliance, will be the
ent of Baumatic Ltd. will
uarantee. The foregoing does not affect your
statutory rights.
umatic service
arning and safety instructions
will be
come hot
b
G
This appliance is designed for domestic household uo
built into a standard kitchen cabinet or housing unit.
o IMPORTANT: The adjacent furniture or housing and all materials
used in the installation must be able to withstand a minimum
temperature of 85°C above
is located in, whilst in use.
o Certain types of vinyl or laminate kitchen furniture are particularly
prone to heat damage o
guidelines given above.
o Any damage caused by the appliance being installed in
contravention of this temperature limit, or by placing adjacent
cabinet materials closer
liability of the owner.
o The use of this appliance for any other purpose or in any other
environment without the express agreem
invalidate any warranty or liability claim.
o Your new appliance is guaranteed against electrical or mechanical
defects, subject to certain exclusions that are noted in Baumatic’s
Conditions Of G
Repairs may only be carried out by Bao
engineers or their authorised service agent.
W
o This appliance complies with all current European safety legislation.
Baumatic do wish to emphasise that this compliance does not
remove the fact that the appliance surfaces
during use and retain heat after operation.
6
nsory or mental capabilities, or
lack of experience and knowledge, unless they have been given
or instruction concerning use of the appliance by a
person responsible for their safety.
Baumatic
strongly recommend that babies and young children are
If it is necessary for younger family members to be in the kitchen,
be supervised to ensure that they do not play with
the appliance.
Do not place heavy objects on the oven door or lean on the oven
oor
hinges.
nded, as this is a fire risk.
he appliance that get hot.
dry
clothing.
Do not attempt to lift or move cooking appliances by using the
oven door or handle, as this may cause damage to the appliance or
result in injury to the person lifting the appliance.
o This appliance is not intended for use by persons (including
children) with reduced physical, se
supervision
Child Safety
o
prevented from being near to the appliance and not allowed to
touch the appliance at any time.
o
please ensure that they are kept under close supervision at all
times.
o Children should
General Safety
o
door when it is open, as this can cause damage to the oven d
o Do not leave heated oil or fat unatte
o Do not place pans or baking trays directly on the base of the oven
cavity, or line it with aluminium foil.
o Do not allow electrical fittings or cables to come into contact with
areas on t
o Do not use the appliance to heat the room it is located in or to
o Do not install the appliance next to curtains or soft furnishings.
o
7
leaning
ried out on a regular basis.
T: The appliance must be disconnected from the mains
owing the cleaning procedure.
his appliance must be correctly installed by a
uitably qualified person, strictly in accordance
he manufacturer’s instructions.
Baumatic Ltd. declines any responsibility for injury or
take care to avoid injury and ensure that the room is
adequately ventilated. If the appliance is going to be used for
ualified installer if you are in any doubt
about the amount of ventilation that you will require.
eclaration of conformity.
ves:
5/EC regarding “low voltage”
2004/108/EC regarding “electromagnetic disturbances”
food”
uilt using certified
materials and requires the appliance to be installed in accordance
ith the standards currently in force. This appliance must be used
by a trained person for domestic purposes only.
C
o Cleaning of the oven should be car
o Great care should be taken whilst using this appliance and when
following the cleaning procedure.
o IMPORTAN
before foll
Installation
T
s
with t
o
damage, to person or property, as a result of improper use
or installation of this appliance.
o Heat, steam and moisture will be created during use of the
appliance,
prolonged periods of time, then additional ventilation may be
required.
o Please consult with your q
D
This appliance complies with the following European Directi
- 2006/9
-
- Regulation (EC) N° 1935/2004 regarding “materials in contact with
o The above directives comply with 93/68/EEC regarding CE marking.
o The manufacturer declares that the oven is b
w
Specifications
8
Product Dimensions
Height: 885 mm
W : 59
mm
idth 5 mm
Depth: 562 mm
nsions
565 mm
565 mm
t
n oven
nd grill
o Gross capacity: 36 litres
es
Apature Dime
875-878
Product specifications:
o Energy efficiency class: A/A
LED full programmer o
o 2 x Cooling fans
o Thermostatically controlled grills
o Triple-glazed removable doors
o Removable inner door glass
Mechanically controllable thermostao
o Main oven: multifunctio
o 9 functions
o Gross capacity: 60 litres
Net capacity: 46 litres o
o Top oven: static oven a
o 4 functions
o Net capacity: 25 litr
9
o 3 x Safety shelves
d baking tray with handle
za Stone
iance, to
make the internal temperature of the oven stable and the
time afterwards.
The length of time will depend on how long the oven has been
switched on for and at how high a temperature.
Rated Voltage:
bl pole switched fused
)
:
ains Supply Lead: 3 x 4.0 mm² (not supplied)
ven Light Bulb: 25 W 300°C screw type pygmy
e. The rating plate for your oven can be
cated by opening the bottom oven door and looking on the front
ate of Purchase ……………………………….
Standard accessories:
o Removable side racks
o 1 x Enamelle
Optional Extras:
o BPS2 Piz
Cooling fans
o Two tangential cooling fans are fitted inside of this appl
external surface temperature lower.
o After you have finished cooking and switched off the oven, the
cooling fan will continue to run for a period of
Electrical details:
220-240 Vac 50 Hz
Supply Connection: 25A (dou e
outlet with 3mm contact gap
Max Rated Inputs 5.60 kW
M
O
For future reference please record the following information which can
be found on the rating plate and the date of purchase which can be
found on your sales invoic
lo
frame of the oven chassis.
Model Number ……………………………….
Serial Number ……………………………….
D
10
ontC rol Panel
1) Top oven thermostat knob
2) Top oven operating light
3) Top oven function selection knob
4) Top oven power indicator light
7 below)
light
nob
) Main oven operating light
) Decimal point symbol
7) Minute minder symbol
5) LED full programmer (see 11 – 1
6) LED display
7) Main oven power indicator
8) Main oven function selection k
9
10) Main oven thermostat knob
Oven programmer / timer display
11) Minus button
12) Programme button
13) Plus button
14) Auto cooking symbol
15) Oven in use symbol
16
1
11
oven Initial set-up of your
Setting the time of day
After your appliance is connected to your mains supply for the first
time, you must set the time of day before you can use the oven.
When the oven is connected to your mains suo pply for the first
rogramme button (12) for a couple of
e the plus and minus buttons and wait a few seconds. The
hing and the oven is ready to
oven and the conventional oven
, they should then be cleaned
with warm soapy water, using either a sponge or soft cloth. No
abrasive cleaners should be used.
time (or after a power cut), the digits on the LED display and
the automatic cooking symbol (14) will flash.
o Press and hold down the p
seconds. The automatic cooking symbol will go out and the
digits will remain steady.
o Whilst the decimal point symbol (16) is flashing, use the minus
(11) and plus (13) buttons to set the correct time of day.
o When the correct time of day is shown on the LED display,
releas
decimal point symbol will stop flas
use.
Before first use
o To remove any residue from the oven cavities that may have
been left from the manufacturing process, you should select the
fan oven function for the main
function for the top oven. Separately set each oven to its
maximum temperature setting.
o It is perfectly normal for a smell to be produced during this
process.
o You should make sure that any windows in the room are left
open during this process.
o It is advisable for you not to remain in the room whilst the
burning off process is taking place.
o You should leave each oven on maximum setting for 30 – 40
minutes.
o IMPORTANT: You should not burn off both ovens
simultaneously.
o After the oven cavities have cooled
12
o Outer parts of the oven should be cleaned with warm soapy
water, using either a sponge or soft cloth. No abrasive cleaners
should be used.
o We would recommend that an appropriate stainless steel cleaner
and polish is regularly used on the stainless steel surfaces of this
appliance (BOD890SS only).
Timer functions
The minute minder function (main and secondary ovens)
The minute minder function is a countdown time that can be set on the
oven programmer/timer. When the countdown time has finished, an
audible signal will sound.
o Press and hold down the programme button (12) until the
decimal point starts to flash to enter programming mode.
o Use the minus (11) and plus (13) buttons to set the countdown
time that you require.
o The maximum countdown time that can be set is 23 hours and
59 minutes.
o When the correct countdown time appears on the LED display,
release the plus and minus buttons and the countdown will start
immediately.
o The oven in use symbol (15) will appear on the LED display to
show that a countdown time is in progress.
o After a few seconds the LED display will return to showing the
time of day.
o At the end of the countdown time, an audible signal will sound
and the oven in use symbol will go out. The audible signal will
sound for 7 minutes before switching off or you can silence it by
pressing any of the oven programmer/timer buttons.
o IMPORTANT: If the oven is in use whilst using the minute
minder function, the oven WILL NOT switch off at the end of the
countdown time. YOU MUST turn the oven function selector
knob and the thermostat control knob to their OFF positions.
13
The duration cooking function (main oven only)
This function will allow you to set a countdown time similar to the
minute minder function, however the oven will switch off at the end of
the cooking time.
o Place the food that you want to cook inside of the oven and
close the door.
o Select an oven function and cooking temperature using the
relevant control knobs.
o Press and hold down the programme button (12) until the
decimal point starts to flash to enter programming mode, the
oven in use symbol (15) will appear on the LED display.
o Release the programme button and then press it again. The
automatic cooking symbol (14) will flash and “dur” will appear
briefly on the LED display before showing “0.00”.
o Use the minus (11) and plus (13) buttons to set the cooking
time that you require.
o The maximum countdown time that can be set is 10 hours.
o When the correct countdown time appears on the LED display,
release the plus and minus buttons. Cooking will begin
immediately, after a few seconds the countdown time will start.
o The automatic cooking symbol and the oven in use symbol (15)
will appear on the LED display.
o At the end of the cooking time, an audible signal will sound and
the automatic cooking symbol will flash on the LED display.
o To reset the oven and cancel the audible alarm, press the
programme button until the oven in use symbol appears on the
LED display and the automatic cooking symbol goes out.
o IMPORTANT: If you have not turned the oven function selector
knob and thermostat control knob to their OFF positions, when
you reset the oven it will continue to heat.
14
The end of cooking function (main oven only)
This function is similar to the semi-automatic function, however
instead of setting a countdown time, you select the time of day that
you want the oven to switch off at.
o Place the food that you want to cook inside of the oven and
close the door.
o Select an oven function and cooking temperature using the
relevant control knobs.
o Press and hold down the programme button (12) until the
decimal point starts to flash to enter programming mode, the
minute minder symbol (17) will appear on the LED display.
o Release the programme button and then press it again. The
automatic cooking symbol (14) will flash and “dur” will appear
on the LED display.
o Release the programme button and then press it for a third
time, “end” will appear briefly on the LED display before
showing the current time of day.
o Use the minus (11) and plus (13) buttons to set the time of
day that you want the oven to switch off at.
o The maximum countdown time that can be set is 10 hours.
o When the correct time of day appears on the LED display,
release the plus and minus buttons. Cooking will begin
immediately, after a few seconds the countdown time will start.
o The automatic cooking symbol and the oven in use symbol (15)
will appear on the LED display.
o At the end of the cooking time, an audible signal will sound and
the automatic cooking symbol will flash on the LED display.
o To reset the oven and cancel the audible alarm, press the
programme button until the oven in use symbol appears on the
LED display and the automatic cooking symbol goes out.
o IMPORTANT: If you have not turned the oven function selector
knob and thermostat control knob to their OFF positions, when
you reset the oven it will continue to heat.
15
The start and end time function (main oven only)
This function will allow you to set the time of day that you want the
oven to switch off at and how long you want the oven to cook for.
o Place the food that you want to cook inside of the oven and
close the door.
o Select an oven function and cooking temperature using the
relevant control knobs.
o Press and hold down the programme button (12) until the
decimal point starts to flash to enter programming mode, the
minute minder symbol (17) will appear on the LED display.
o Release the programme button and then press it again. The
automatic cooking symbol (14) will flash and “dur” will appear
briefly on the LED display before showing “0.00”.
o Use the minus (11) and plus (13) buttons to set the cooking
time that you require.
o The maximum countdown time that can be set is 10 hours.
o When the correct countdown time appears on the LED display,
release the plus and minus buttons.
o IMMEDIATELY press the programme button, “end” will appear
briefly on the LED display before showing an estimated end of
cooking time..
o Use the minus (11) and plus (13) buttons to set the time of
day that you want the oven to switch off at.
o The automatic cooking symbol and the time of day will appear
on the LED display.
o The appliance will automatically calculate what time of day it
needs to switch the oven on at, so that it runs for the cooking
time that you set.
o When the oven switches on, the oven in use symbol (15) will
appear on the LED display, as well as the automatic cooking
symbol.
o At the end of the cooking time, an audible signal will sound and
the automatic cooking symbol will flash on the LED display.
16
o To reset the oven and cancel the audible alarm, press the
programme button until the oven in use symbol appears on the
LED display and the automatic cooking symbol goes out.
o IMPORTANT: If you have not turned the oven function selector
knob and thermostat control knob to their OFF positions, when
you reset the oven it will continue to heat.
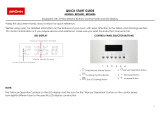
Cancelling the semi-automatic and automatic function
o Press and hold down the minus (11) and plus (13) button
simultaneously, until the automatic cooking symbol (14) goes
out and the oven in use symbol (15) is lit.
o IMPORTANT: If you do not turn the oven function selector
knob and thermostat control knob to their OFF positions, when
you reset the timer function, it will continue to heat.
Cancelling the minute minder function
o Press and hold down the programme button (12) until the
decimal point starts to flash to enter programming mode.
o Press and hold down the minus (11) and plus (13) buttons
simultaneously.
o The minute minder symbol (17) will go out.
o IMPORTANT: If you do not turn the oven function selector
knob and thermostat control knob to their OFF positions, when
you reset the timer function, it will continue to heat.
Adjusting the volume of the audible signal
The volume of the audible signal has 3 levels, low, medium and high.
To adjust the volume, you should proceed as follows:-
o IMPORTANT: The oven timer/programmer must not be in any
form of countdown mode and the oven in use symbol (15) must
be lit.
o Press and hold down the minus (11) and plus (13) buttons
simultaneously until the decimal point starts to flash.
o Press the programme button (12) and the LED display will show
“n” follow
ed by a number. 1 is the loudest volume, 2 is the
middle volume and 3 is the quietest volume.
o Use the minus button to select the volume level that you desire.
Changing the time of day
o IMPORTANT: The oven timer/programmer must not be in any
form of countdown mode, and the oven in use symbol (15)
must be lit.
o Press and hold down the minus (11) and plus (13) buttons
simultaneously until the decimal point starts to flash.
o Release these buttons and then use the minus and plus buttons
to alter the time of day.
Selecting a cooking function and temperature
Selecting a main oven function
17
o The main oven function selection knob
should be used to select the particular
mode of cooking that you require.
o The appliance will utilise different
elements within the oven cavity,
depending on the oven function that
you select.
o When a function is selected, the main
oven power indicator light will come
on.
Main oven functions
DEFROST MODE: The fan runs without heat to reduce the
defrosting time of frozen foods. The time required to defrost
the food will depend on the room temperature, the quantity
and type of food. Always check food packaging for the
defrosting instructions.
CONVENTIONAL OVEN (top and lower element): This
method of cooking provides traditional cooking, with heat
from the top and lower elements. This function is suitable for
roasting and baking on one shelf only.
FAN OVEN: This method of cooking uses the circular element
while the heat is distributed by the fan. This results in a faster
and more economical cooking process. The fan oven allows
food to be cooked simultaneously on different shelves,
preventing the transmission of smells and tastes from one
dish onto another.
HALF GRILL: This method of cooking utilises the inner part of
the top element only, which directs heat downwards onto the
food. This function is suitable for grilling small portions of
bacon, toast and meat etc…
FULL GRILL: This method of cooking utilises the inner and
outer parts of the top element, which directs heat downwards
onto the food. This function is suitable for grilling medium or
large portions of sausages, bacon, steaks, fish etc.
FAN AND GRILL: This method of cooking utilises the top
element in conjunction with the fan, which helps to provide a
quick circulation of heat. This function is suitable where quick
browning is required and “sealing” the juices in, such as
steaks, hamburgers, some vegetables etc.
FAN AND LOWER ELEMENT: This method of cooking utilises
the bottom element in conjunction with the fan, which helps
to circulate the heat. This function is suitable for delicate
dishes and heating pre-cooked food. It is also suitable for
sterilising and preserving jars.
CONVECTION OVEN AND FAN: This method of cooking
provides traditional cooking with heat from the top and the
lower element, it also utilises the circulation fan.
This ensures a fast and even distribution of the heat. Suitable
for light and delicate baking, such as pastries.
PIZZA FUNCTION: This method of cooking uses the lower
and circular elements while the heat is distributed by the fan.
It reproduces the same conditions of traditional clay wood-fire
stoves.
Main oven thermostat control knob
o The oven thermostat control
knob sets the required
temperature of the oven.
o It is possible to regulate the
temperature within a range of
50 - 250°C.
o The control knob should be
turned clockwise.
18
Selecting a top oven function
o The top oven function selection
knob should be used to select the
particular mode of cooking that
you require.
o The appliance will utilise different
elements within the oven cavity,
depending on the oven function
that you select.
o When a function is selected, the
top oven power indicator light will come on.
Top oven functions
OVEN LIGHT: Separate light control which allows the light to
be switched on, even when the oven not cooking.
LOWER ELEMENT: This method of cooking uses the lower
element to direct heat upward to the food. For slow-cooking
recipes or for warming up meals.
CONVENTIONAL OVEN (top and lower element): This
method of cooking provides traditional cooking, with heat
from the top and lower elements. This function is suitable for
roasting and baking on one shelf only.
HALF GRILL: This method of cooking utilises the inner part of
the top element only, which directs heat downwards onto the
food. This function is suitable for grilling small portions of
bacon, toast and meat etc…
Top oven thermostat control knob
o The oven thermostat control
knob sets the required
temperature of the oven.
o It is possible to regulate the
temperature within a range of
50 - 250°C.
o The control knob should be
turned clockwise.
19
Oven operating lights (main and top oven)
o These lights will come on to indicate that the oven’s heating
elements are in operation.
o The lights will switch off when the temperature set on the
thermostat control knob has been reached.
o They will cycle on and off throughout the cooking time.
You should not place food inside the cavity, until the correct
cooking temperature has been reached.
Cooking guidelines
o Please refer to the information given on food packaging for
guidance on cooking temperatures and times. Once familiar with
the performance of your appliance, temperatures and times can be
varied to suit personal preference.
o If you are using the fan oven function, then you should follow the
information given on the food packaging for this particular mode of
cooking.
o You should pre-heat the oven and not place food inside of it until
the oven operating light has gone off. You can choose not to pre-
heat when using the fan oven mode; however you should extend
the cooking time given on the food packaging by at least ten
minutes.
o IMPORTANT: You should pre-heat the oven if you are baking,
regardless of whether you are using the main or secondary oven.
o If there is no guidance given on the food packaging specifically for
cooking in fan oven mode, you can generally reduce the cooking
time and temperature by 10% from the information given for
conventional oven cooking.
20
  • Page 1 1
  • Page 2 2
  • Page 3 3
  • Page 4 4
  • Page 5 5
  • Page 6 6
  • Page 7 7
  • Page 8 8
  • Page 9 9
  • Page 10 10
  • Page 11 11
  • Page 12 12
  • Page 13 13
  • Page 14 14
  • Page 15 15
  • Page 16 16
  • Page 17 17
  • Page 18 18
  • Page 19 19
  • Page 20 20
  • Page 21 21
  • Page 22 22
  • Page 23 23
  • Page 24 24
  • Page 25 25
  • Page 26 26
  • Page 27 27
  • Page 28 28
  • Page 29 29
  • Page 30 30
  • Page 31 31
  • Page 32 32
  • Page 33 33
  • Page 34 34
  • Page 35 35
  • Page 36 36
  • Page 37 37
  • Page 38 38
  • Page 39 39
  • Page 40 40

Baumatic BOD890-SS/BL User manual

Category
Cookers
Type
User manual
This manual is also suitable for

Baumatic BOD890-SS/BL is a 90 cm built-in multifunction electric double oven with a range of cooking functions and features to assist you in creating delicious meals. It has a main oven with 9 functions, including fan cooking, grilling, and baking, and a top oven with 4 functions, including static cooking and grilling. Both ovens have thermostatically controlled grills and triple-glazed removable doors for easy cleaning. The oven also features a full LED programmer with a digital display, allowing you to set cooking times, temperatures, and functions with ease.

Ask a question and I''ll find the answer in the document

Finding information in a document is now easier with AI