Visual Comfort Studio S 5022HAB-WG Installation guide
- Type
- Installation guide

1. Carefully remove all parts from the box.
2. Remove the mounting plate (B) from the canopy (E) by loosening the canopy screws (D).
3. Install the mounting plate (B) to junction box and secure with the mounting screws (C).
4. Feed the wires through the rods (I), (H), (G) and canopy (E).
5. Thread the rod (I) into the connector (J), then thread the rod (H) to the rod (I) and thread rod
(G) to rod (H).
6. Hang the hanging loop (F) to the bottom of canopy (E).
7. Measure the wires then cut, be certain to leave enough length to connect to the wires
in the junction box.
8. Strip the insulation on the fixture wires about 5/8".
9. Wrap the fixture ground wire to the green ground screw on the mounting plate (B) and
secure, then connect to the ground wire in the junction box using the wire nut (A).
IT IS IMPERATIVE THAT THIS FIXTURE BE GROUNDED.
10. Connect the fixture ribbed wire (no markings) to the neutral wire in the junction box using
the wire nut (A).
11. Connect the fixture smooth wire (with markings) to the hot wire in the junction box using
the wire nut (A).
DO NOT REVERSE THE HOT AND NEUTRAL CONNECTIONS OTHERWISE SAFETY
WILL BE COMPROMISED.
12. Carefully tuck the wire connections into the junction box.
13. Install the canopy (E) to the mounting plate (B) and secure with the canopy screws (D)
14. Insert bulbs (not included) into sockets.
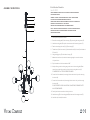
Bistro Medium Chandelier
Item# S 5022
WE RECOMMEND INSTALLATION OF THIS LIGHTING FIXTURE BE DONE BY A
LICENSED ELECTRICIAN.
WARNING***SWITCH OFF THE MAIN ELECTRICAL SUPPLY FROM THE MAIN
FUSE BOX/CIRCUIT BREAKER BEFORE INSTALLATION.
INSPECT ITEM CAREFULLY BEFORE ATTEMPTING TO INSTALL. IF THERE IS ANY
DAMAGE OR OBVIOUS DEFECT. DO NOT INSTALL.
ITEM MAY NOT BE RETURNED ONCE IT HAS BEEN INSTALLED.
NOTE: CAREFULLY UNPACK EACH PIECE IN TOP LAYER OF PACKING PRIOR TO
REMOVING. RETAIN ALL PACKING MATERIAL UNTIL INSPECTION AND
INSTALLATION ARE FINAL.
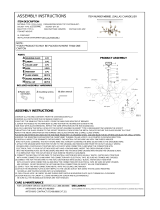
ASSEMBLY INSTRUCTIONS
A
B
C
D
E
F
G
H
I
J
M
K
L
US
L
I
D
S
E
T
M
DAMP

15. Unscrew the thumbscrews (L), then attach the shade (M) to the shade holders (K) and
secure with the thumbscrews (L).
16. Installation is complete, turn on power at fuse or circuit breaker.
***Clean with a dry, soft cloth only. Use no harsh abrasives or chemical agents.
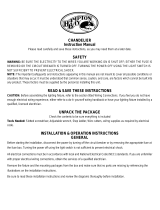
Bistro Medium Chandelier
Item# S 5022
WE RECOMMEND INSTALLATION OF THIS LIGHTING FIXTURE BE DONE BY A
LICENSED ELECTRICIAN.
WARNING***SWITCH OFF THE MAIN ELECTRICAL SUPPLY FROM THE MAIN
FUSE BOX/CIRCUIT BREAKER BEFORE INSTALLATION.
INSPECT ITEM CAREFULLY BEFORE ATTEMPTING TO INSTALL. IF THERE IS ANY
DAMAGE OR OBVIOUS DEFECT. DO NOT INSTALL.
ITEM MAY NOT BE RETURNED ONCE IT HAS BEEN INSTALLED.
NOTE: CAREFULLY UNPACK EACH PIECE IN TOP LAYER OF PACKING PRIOR TO
REMOVING. RETAIN ALL PACKING MATERIAL UNTIL INSPECTION AND
INSTALLATION ARE FINAL.
ASSEMBLY INSTRUCTIONS
A
B
C
D
E
F
G
H
I
J
M
K
L
US
L
I
D
S
E
T
M
DAMP
-
 1
1
-
 2
2


Visual Comfort Studio S 5022HAB-WG Installation guide
- Type
- Installation guide
Ask a question and I''ll find the answer in the document
Finding information in a document is now easier with AI
Related papers
-
Visual Comfort Studio CHC 5373GI Installation guide
-
-
-
-
-
Other documents
-
Visual Comfort & Co ARN 5105PN-CG Installation guide
-
Ralph Lauren IG RL5470NBWG Installation guide
-
 Hampton Bay 21392-016 Installation guide
-
circa LIGHTING PB 5151 Installation guide
-
 Arteriors 89981 User guide
-
 Hampton Bay ES0515BN User guide
-
-
Design House 567198 Operating instructions
-
Eurofase 32696-HBUD Operating instructions
-
 Hampton Bay ES0521BN Installation guide


