Page is loading ...

Thank you for your purchase of the PROMASTER DUAL SHOE MOUNT FLASH TRIGGER. The ProMaster Dual
Shoe Mount Flash Trigger is an indispensable accessory for the avid photographer. This 8 channel, 2.4ghz trigger is
engineered to reduce interference providing the maximum reliability both indoors and out.
FEATURES
- Dual hot shoe design; Uses 1 or 2 flashes
- Flash sync speeds up to 1/250th second (determined by flash/camera combination)
- Operates on 2.4ghz frequency to minimize RF interference
- 8 operating channels helps achieve the most reliable operation and allows for the use of multiple triggers in the same
shooting set up
- Mounts to any standard light stand
- Built-in umbrella holder
- Trigger uses hot shoe or PC cord for maximum compatibility
OPERATION
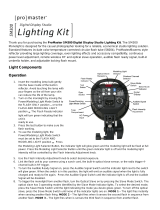
1. Hot Shoe
2. Signal Indicator Light
3. Receiver Channel Selection Switch
4. Power Switch
5. Umbrella Holder
6. Tilt Lock Knob
7. Stand Lock Knob
8. Battery Cover
9. Test Button
10. Transmit Indicator Light
11. PC Synch Cord Jack
12. Transmitter Channel Selection Switch
13. Hot Shoe
14. Umbrella Locking Knob
15. PC Synch
Cord
1. Open the battery cover of the receiver. Insert two AAA batteries. Be sure to observe the correct polarity. Replace
the cover. Open the cover of the transmitter. Insert one CR2 battery. Be sure to observe the correct polarity. Replace
the cover on the transmitter.
2. Select a channel by setting switches on the receiver using the Receiver Channel Selection Switch (3). Set the
transmitter switches to the same position using the Transmitter Channel Selection Switch (12). Turn on the power
to the receiver using the Power Switch (4). The Signal Indicator Light will blink. Test your connection by pressing and
holding the Test Button (9). The Signal Indicator Light (2) should remain lit while you are holding down the test
button confirming the connection.
If the Signal Indicator Light does not remain lit while holding down the Test Button, check to insure that the Channel
Selection Switches on both the Transmitter and Receiver are set to the same position. If during use you encounter
misfires, it may be due to interference from other electrical objects. Change your unit to a different channel by
selecting a different combination on the Receiver and Transmitter Channel Selection Switch.

3. Mount your shoe mount flash to the Hot Shoe on the receiver (1). Be sure that it is correctly inserted and you have
used the locking mechanism on your flash to keep it in place.
4. Mount the receiver to a light stand. Tighten the Stand Lock Knob (7) to firmly affix the receiver to the stand.
5. Adjust the flash/receiver combination to the desired angle and lock into place using the Tilt Lock Knob (6).
6. Insert the transmitter into the hot shoe on your camera. If your camera does not have a hot shoe, you can connect
the transmitter to your camera using the PC Synch Cord.
7. Turn on the receiver and your flash. Press the Test Button on the transmitter to confirm operation.
Important Notes
• Be sure to use fresh batteries. Weak batteries will reduce the effective operating range of the trigger.
• Do not leave or store in temperatures that exceed 40ºC. This could adversely affect the internal structure or
performance of the unit. Remove the battery pack and store it separately if you do not intend to use the trigger
for a long period of time.
• This unit is not water-resistant. Rain and humid weather may cause irreparable damage.
• This unit is composed of very delicate electronic parts. Be sure to protect it against shock, impact or other
improper handling.
• Do not try to open the housing or repair the unit. There are no user serviceable parts and improper handling
could cause serious injury.
• Do not clean the surface of the light with any petroleum solvent, detergent solution or other strong solvents.
These solvents may cause damage to the light.
SPECIFICATIONS
• Transmitter Power Source: 12V 23A
• Receiver Power Source: AAA x2
• Outdoor operating distance (open area): >100 ft/30 m
• Indoor operating distance: > 32 ft/10 m
• Available Operating Channels: 8
• Operating Frequency: FM 2.4Ghz
• Maximum Synch Speed: 1/250
th
second depending on flash/camera combination
ONE YEAR UNCONDITIONAL GUARANTEE
If for any reason, this ProMaster product fails within ONE YEAR of the date of purchase, return this product to your
ProMaster dealer and it will be exchanged for you at no charge.
ProMaster products are guaranteed for ONE FULL YEAR against defects in workmanship and materials. If at any time
after one year, your ProMaster product fails under normal use, we invite you to return it to ProMaster for evaluation.
Code 9532
Made in China
www.promaster.com
Fairfield, CT 06825
/