Page is loading ...

Installation And Safety Instructions
Line art shown may not exactly match the fixture enclosed. However, the installation instructions do apply to
this fixture. Fill in Item Number on Carton and File This Sheet For Future Reference. ITEM#_______________
HC-958
1
02908
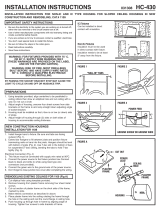
1) INSTALLING FIXTURE TO CEILING
Joist type ceiling: Extend bar hangers to fit between joists.
Position fixture temporarily by hammering nail-in tabs into joists
(see Drawing B), then secure permanently with nails. Hangers
should be level with bottom of joists.
(2) ELECTRICAL CONNECTION
Junction box contains two wires, a black (hot) and white (neutral)
which must be spliced to the house wires. MAKE SURE
T
O
SPLICE WHITE TO WHITE AND COLORED OR BLACK TO
BLACK.
After splicing has been completed, insert wires carefully
into junction box. Connect green ground wire to green grounding
pigtail in junction box (see Drawing B). Replace cover
.
(3) CUTTING A HOLE
Locate the center of proposed opening on your tile or ceiling
material and mark it. Use the template provided to draw a 6 3/8"
dia. circle around the center point.Cut along the circular line. (see
Drawing C).
(4) FOR INSTALLATION FROM BELOW IN A FINISHED CEILING
(IF APPLICABLE)
Cut hole as in Step 3 (see above). Bring power to hole from
above and pull flex or Romex through ceiling. Remove bar
hangers and discard. Remove housing from plaster frame by
removing four sheet metal screws. Using strong pliers, break out
section of plaster frame on the short side of plaster frame. Make
electrical connection to outlet box. Holding plaster frame on edge,
pass edge of ceiling through breakout slot, rotate frame, and
pass housing into ceiling opening. Re-install housing into the
plaster frame and set in ceiling hole.
(5) FOR INSTALLATION IN SUSPENDED CEILING
Cut a 6 3/8" diameter circle in ceiling tile. Extend bar hangers so
notches in bar hanger will fit over T bar grid. See step 2 to make
electrical connections. Secure bar hanger to
T
-bar with wires or
screws (not provided.)
CAUTION: SEE WARNING INSTRUCTIONS ON BACK BEFORE
PROCEEDING
WARNING: FOR FIXTURES PROVIDED WITH 75° C. OR 90° C. SUPPLY
WIRE WARNING ONLY (THESE WARNINGS ARE PROVIDED ON THE
LABEL AND ON THE FIXTURE CARTON).
WARNING: RISK OF FIRE. MOST DWELLINGS BUILT BEFORE 1985
HAVE SUPPLY WIRE RATED 60° C. CONSULT A QUALIFIED
ELECTRICIAN BEFORE INSTALLING.
1119 AND 11019 AIRTIGHT SHALLOW IC HOUSING.
FOR DIRECT CONTACT WITH INSULATION
ALLOW
1/2" SPACE
2" X 8"
1/2" TO 1" THICK
CEILING MATERIAL
BREAK OUT
THIS SECTION
(IF APPLICABLE)
PLASTER
FRAME
7 1/2"
JOIST
BAR HANGER
POWER LEAD
GROUND
TAB
A
B
C
THE 1119 AND 11019 HOUSING IS ENGINEERED FOR SHALLOW
APPLICATIONS, WHERE 2" X 6" JOISTS AND INSULATION ARE
E
NCLOSED BOTH TOP AND BOTTOM, ALLOWING FOR A MAX. OF
1/2" UNCOMPRESSED INSULATION. BY PASSING THE SOCKET
BRACKET STOP MAY CAUSE THE LIGHT TO CYCLE ON AND OFF OR
NUISANCE TRIP.
T
itle 24 - This recesses can complies with California Title 24 zero
clearance insulation cover and airtight requirements when installed with
one of the manufacturer’s certified airtight (AT) shallow housing trims and
installed per the manufaturer’s safety instructions and national and local
codes. This recessed can is rated for direct insulation cover (IC) by
Underwriters Laboratory; it has been certified airtight in accordance with
ASTM E283, and it is High Efficacy in accordance with Section 150(k) 1 of
the California 2005 Building Energy Efficiency Standards. Depending
upon the specific application, lighting controls or occupancy sensors may
also be required to meet the requirements of California Title 24.

INSTALLATION (continued) HC-958
INSTALL TRIM ASSEMBLIES
Install trim by one of the following methods:
TORSION SPRINGS: Squeeze the arms together and insert them
into the slotted tabs on the inside of the housing. Push upward fully
so springs will hold trim in place (see Diagram 1).
COIL SPRINGS: You must bend the slotted tabs back up out of the
w
ay (just push upward with finger). Then hook the coil springs into the
slots cut into the sides of the housing (see Diagram 2).
PRESSURE SPRINGS: Bend slotted tabs up and insert trim into
housing. Push upward fully and pressure springs will hold trim in
place (see Diagram 3).
TO INSTALL LAMPS: Select proper lamp (see lamp maximum
wattage label in housing). Do not exceed maximum wattage lamp
shown for each trim.
FOR EYEBALL TRIMS: Before installing trim, remove socket plate
from housing by loosening wing nut. Unfasten socket from socket
plate and snap into hole provided in top of trim.
CAUTION!
THE FOLLOWING RULES MUST BE ADHERED TO WHEN INSTALLING
LIGHT FIXTURES. FAILURE TO COMPLY WITH THESE REQUIREMENTS
COULD LEAD TO AN ELECTRICAL SHOCK OR FIRE WHICH COULD BE
INJURIOUS OR EVEN FATAL.
MAKE CER
TAIN:
1) TO DISCONNECT POWER AT MAIN FUSE BOX BEFORE
INSTALLING FIXTURE.
2) THE GROUND WIRE (BARE OR GREEN INSULATED WIRE) IS
NOT CONNECTED TO CURRENT CARRYING SUPPLY WIRES.
3) NO BARE WIRES ARE EXPOSED OUTSIDE OF
CONNECTORS WHEN CONNECTING CURRENT CARRYING
FIXTURE WIRES
T
O CURRENT CARRYING HOUSE WIRES.
4) THE INSULATION ON FIXTURE WIRES HAS NOT BEEN
DAMAGED DURING INSTALLATION.
5) NO ROUGH OR SHARP EDGES OF ANY SURFACE ARE IN
CONTACT WITH WIRES.
6) FIXTURE SUPPL
Y WIRES ARE CONNECTED TO PROPER
HOUSE SUPPLY WIRES.
7) TO USE LIGHT BULBS WITH WATTAGES NO GREATER THAN
SPECIFIED FOR
THE FIXTURE.
IF Y
OU HA
VE ANY DOUBTS ABOUT HOW TO INST
ALL A LIGHT FIXTURE
OR IT F
AILS TO OPERA
TE PROPERL
Y
,
CONT
ACT A LOCAL LICENSED
ELECTRICIAN.
1
2
3
TORSION
SPRINGS
COIL
SPRINGS
PRESSURE
SPRINGS
SLOTTED
TABS
TORSION
SPRINGS
COIL
SPRING
BEND UP
PRESSURE
SPRINGS
TRIM
TRIM
TRIM
HOUSING
SOCKET
PLATE
/


