Installation And Safety Instructions
Line art shown may not exactly match the fixture enclosed. However, the installation instructions do apply to
this fixture. Fill in Item Number on Carton and File This Sheet For Future Reference. ITEM#_______________
HC-933
1
02308
• Be sure the electricity to the system you are working on is turned off;
either the fuse removed or the circuit breaker set at off.
• Use of other manufacturers components will void warranty, listing and
create a potential safety hazard.
• If you are unclear as to how to proceed, contact a qualified electrician.
• You don’t need special tools to install this fixture.
• Be sure to follow the steps in the order given.
• Read instructions carefully.
• Save these instructions.
IMPORTANT SAFETY INSTRUCTIONS
1
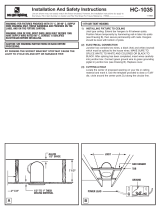
TORSION
SPRINGS
SLOTTED
TABS
TORSION
SPRINGS
TRIM
PRESSURE
SPRINGS
PRESSURE
SPRINGS
TRIM
COIL
SPRINGS
SLOT HOOK
SPRINGS HERE
COIL
SPRING
TRIM
2
3
Carefully remove the fixture from the carton and check that all parts
are included, as shown in Figure 1 & 2. Be careful not to misplace
any of the screws or parts which are needed to install this fixture.
BEFORE YOU BEGIN
T
ORSION SPRINGS:
S
queeze the arms together
and insert them into the slotted tabs on the inside of the housing.
Push upward fully so springs will hold trim in place (see Diagram 1).
PRESSURE SPRINGS: Bend slotted tabs up and insert trim into
housing. Push upward fully and pressure springs will hold trim in
place (see Diagram 2).
COIL SPRINGS: Y
ou must bend the slotted tabs back up out of the
way (just push upwar
d withfinger). Then hook the coil springs into the
slots cut into the sides of the housing
(see Diagram 3).
INSTALLATION