Page is loading ...

USER MANUAL
DRO-200

2
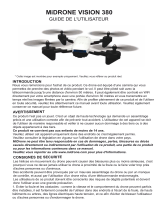
CONTROLS
One-button take-off/landing
REMOTE CONTROL BATTERY INSTALLATION
1: Use a screwdriver to remove the battery cover.
2: Install 3 x AAA batteries.
3: Replace the battery cover.
Note: Please follow the above illustration to install the batteries correctly.
Headless mode
Power switch
Direction lever
Backward trimming
Calibration
Rightward trimming
Forward trimming
Short press: 3D flip. This
feature is not available in
the aerial version.
Press and hold:
One-button rotation
Throttle lever
Speed button
One-button return
Light
Emergency stop
3 x AAA batteries

3
AIRCRAFT BATTERY CHARGING
Insert the battery connector to the small end of the USB charger
(ensure to connect tight and correct).
Use the USB charger to charge the aircraft battery pack. Charging
time: about 100 minutes. When the battery is charged completely,
disconnect the USB charger.
LED indicator USB
When the LED turns off the battery is charging. When the LED lights up, charging is completed.
Charging must be supervised at all times.
PAIRING TRANSMITTER AND RECEIVER
Step 1
Set up the drone level and insert the Li-Po
battery as shown in the illustration.
Step 2
Switch the drone on and do not move it until the
LED changes from fast to slow flashing. Now the
remote control can be paired with the drone.
Step 3
Remove the drone battery after flying.
Develop correct habits so as not to cause security
risks.
Warning: If the battery is not removed from the
drone for long period of time, it may be damaged
due to over-discharge, or even become a fire
To switch off, press and hold for 3
seconds, the LED turns off.
Press once to switch
on; the LED turns on
Li-PO
3.7V/350mAh

4
hazards.
If the transmitter is not to be used for a longer period of time,
remove the battery for storage.
Step 4
Turn off the transmitter. If transmitter is not to
be used for a longer period of time, remove the
batteries for storage.
Warning: If the batteries are left in the
transmitter, potential leakage could occur which
may damage the transmitter, and create a fire
hazards.
FLIGHT ADJUSTMENT AND SETTING
Read all instructions carefully before flying.
1. Place the aircraft in an open field with the tail pointing in your direction.
2. Practice to operate the throttle stick (as below illustration).
TRIM
Forward and backward trim.
1. When the drone flies
forward/backward, press the
backward/forward trim button to
adjust.
Up
Down
Forward
Backward
Turn left
Turn right
Move left
Move right
Forward trim
Backward
trim

5
Left and right flying trim
2. When the drone flies left/right, press
the right/left trim button to adjust.
RECALIBRATION
If the trim buttons do not correct the problem, place the drone on
a flat surface and recalibrate as follows.
Press the calibration button (see illustration).
Then the LED of the drone flashes quickly and the calibration is
finished when the LED lights up.
HEADLESS MODE
Headless mode: When pressing the headless button, two beep tones are emitted.
(In this mode, the flying direction is still controlled by the controller.) No matter where the
forward direction is, it is according to the operation of the controller. It is very simple and
convenient. Press this button again, to exit headless mode; a beep tone is emitted.
One-button return
Within the controllable range, no matter where you are, after pressing this button, you will hear
a beep tone and the drone will return to its original position. Move a joystick of the controller or
press the button again to quit this mode.
HIGH SPEED AND LOW SPEED
Press this function button to change the speed of the drone during flight. There are 3 speed
levels available: low, medium and high. When pressing the button, two beep tones will be heard
and you changed to medium speed. Press the button again an three beep tones will be heard and
you changed to high speed. Pressing the button a third time will return to low speed and a single
beep tone is emitted…
3D FLIP
Right flying trim
Left flying
Right
flying

6
Press the flip button, and you will hear two beep tones. Move the right joystick to make the
aircraft flip. When moving the joystick to the left, you will fly a left flip. Move it right to fly a right
flip.

7
Please notice - All products are subject to change without any notice. We take reservations
for errors and omissions in the manual.
ALL RIGHTS RESERVED, COPYRIGHT DENVER ELECTRONICS A/S
Electric and electronic equipment and included batteries contains materials, components
and substances that can be hazardous to your health and the environment, if the waste
material (discarded electric and electronic equipment and batteries) is not handled correctly.
Electric and electronic equipment and batteries is marked with the crossed out trash can
symbol, seen above. This symbol signifies that electric and electronic equipment and
batteries should not be disposed of with other household waste, but should be disposed of
separately.
As the end user it is important that you submit your used batteries to the appropriate and
designated facility. In this manner you make sure that the batteries are recycled in
accordance with legislature and will not harm the environment.
All cities have established collection points, where electric and electronic equipment and
batteries can either be submitted free of charge at recycling stations and other collection
sites, or be collected from the households. Additional information is available at the technical
department of your city.
Hereby, Inter Sales A/S declares that the radio equipment type DRO-200 is in compliance
with Directive 2014/53/EU. The full text of the EU declaration of conformity is available at
the following internet address: www.denver-electronics.com and then click the search ICON
on topline of website. Write model number: DRO-200. Now enter product page, and RED
directive is found under downloads/other downloads.
Operating Frequency Range:
Max Output Power:
DENVER ELECTRONICS A/S

/