Pennsylvania Traditions 368011-00269 Installation guide

Type
Installation guide
INSTALLATION GUIDE
Read all instructions before installation.
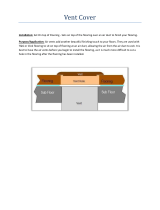
Laminate ooring should never be nailed or glued to the
suboor. The oor should not be installed against any
xed, vertical objects.
IMPORTANT
Allow a minimum of 5/16 inch expansion space around
the perimeter of the room and any xed objects.
Use T-mouldings for rooms wider or longer than 30 feet
and openings less than 6 feet.
Stagger boards by a minimum of 12 inches.
Do not install in rooms with relative humidity exceeding
70%.
Flooring should be installed and maintained in a climate
controlled environment with ambient temperature
between 60ºF - 80ºF and a relative humidity of 35% -
70%.
The minimum length for the rst and last plank per row
is 12 inches.
SUGGESTED TOOLS AND MATERIALS:
Laminate installation kit (including spacers, tapping
block, pull bar)
Premium grade laminate ooring underlayment (for
ooring without an attached pad)
Hammer
Table or hand saw
Carbide-tipped circular saw blades
Vacuum
Tape measure
Duct tape
Premium laminate glue
Sandpaper
Level
Age-resistant, non-permeable polyethylene vapor
barrier (0.008 inch) - for installations over concrete
Safety glasses
Gloves
Caution: use safety glasses and gloves when cutting this
product. During the cutting process, laminate may create
wood dust; install in a well-ventilated area.
GENERAL REQUIREMENTS FOR ALL SUBFLOORING:
Laminate ooring can be installed over most oors;
substrates should be structurally sound and immobile.
Before installing ooring, ensure the suboor is leveled
within 3/16 inch in 10 feet. Irregularities in the suboor
should be smoothed using a hydraulic cement base
patching and leveling compound.
Wood:
Suspended wood suboors should have a minimum of
18 inches of well-ventilated air space air space above
the ground.
The moisture content of the wood suboor should not
exceed 12%.
Concrete:
New concrete subooring should be cured for at least
90 days prior to installation. (Moisture test: moisture
vapor<3 lbs/1,000 sq ft/24 hours per ASTM 1869
calcium chloride test).
Install 0.008 inch age-resistant, non-permeable
polyethylene vapor barrier over the concrete suboor.
Tape seams with adhesive tape, such as duct tape. The
vapor barrier should be installed up the wall by 1 inch.
For sheet vinyl, tile and wood subooring, the moisture
content of the wood suboor should not exceed 12%.
Carpeting:
Remove deep-pile carpeting and padding prior to
installation.
Laminate ooring can be installed over industrial direct
glue-down carpeting that was installed over wood
suboors without padding.
Carpet installed over concrete must be removed. See
instructions for installation over a concrete suboor.
Radiant Heating Systems:
Laminate ooring can be installed on under-oor radiant
heating systems if the heating element is installed into
wood or concrete suboors.
Lower heating system to 60ºF for 1 week before
installation.
After installation, slowly increase the temperature in
increments of 10ºF per hour
Surface temperature must not exceed 85ºF.
Follow installation instructions for wood or concrete as
outlined above.
CONDITIONING:
Allow laminate ooring to acclimate to room temperature
(between 65F-75ºF) by placing the packaged ooring at in
the room for a minimum of 48 hours prior to installation. Do
not remove the plastic wrapping.
ROOM PREPARATION:
1. Remove all existing mouldings.
2. If room has electric baseboard heaters, leave a minimum
of 1/2 inch between the surface of the ooring and the
bottom of the heaters, allowing heat to circulate.
3. Check door clearances and make necessary
adjustments before laying the ooring. Door mouldings
(jambs) should be undercut to accommodate the
thickness of the ooring as well as the underlayment
(whether pre-attached or installed separately).
4. Install underlayment per manufacturer’s instructions
(for ooring without attached pad).
5. Inspect each plank for defects prior to installation. Do
not install defective planks; installation of defective
planks implies acceptance of material.
6. Determine which direction to lay the planks. If installing
in narrow hallways or small rooms, the area will appear
larger if ooring is laid parallel to the longest wall.
Clarion Laminates REV 08/2015
Page 1 of 3
Tongue / Languette / Lengüeta
(Short side / Côté court / Deslizador corto)
Figure A
Groove / Rainure / Ranura
(Short side / Côté court / Deslizador corto)
Tongue
(Long side)
Languette
(Côté long)
Lengüeta
(Deslizador largo)
Groove
(Long side)
Rainure
(Côté long)
Ranura
(Deslizador largo)
It is important to understand the parts of the plank to ensure proper installation:
NOTE: ILLUSTRATION IS NOT TO SCALE. FOR ILLUSTRATIVE PURPOSES ONLY.
STEP 1 – Begin laying planks
left to right, placing 5/16 inch
spacers between the wall and
the plank on either side of the
joint. Note: Ensure the tongue
side of the plank is positioned
against the wall.
STEP 2 – Use a laminate
ooring tapping block to gently
tap second plank against the
short side to join plank A and
plank B.
Refer to CUTTING A PLANK
before proceeding to step 3.
STEP 3 – Install the second row
by angling plank C to allow the
tongue to slip into the groove
of the plank in row 1. Push the
plank at to the oor until it
clicks into place. CAUTION: Do
not force the plank closed, and
never tap the long side of the
plank.
STEP 4 – The next plank (plank
D) should be installed with the
tongue on the left side of the
plank next to the previous plank.
Push plank at to the oor as in
step 3.
STEP 5 – Once plank is at,
gently tap the second plank
against the short side of plank
C, joining plank C and D.
STEP 6 – Continue laying
the oor from left to right, as
described in steps 1 to 5.
CUTTING A PLANK:
STEP 1 – If you need to cut
a plank in order to achieve
a desired staggered look or
because the last (or rst) plank
in a row is too long (but not
less than 12 inches), ip a full-
sized plank over so the tongue
points toward the wall, with the
underside of the plank facing up. Mark where the plank
should be cut, then cut with the decor side down.
STEP 2 – Flip the plank back
over (décor side up) so the
tongue faces the groove of
the adjacent plank; install as
shown in step 4.
STEP 3 – Tap the two sides
together using a pull bar. If the
remainder of the previous plank
is at least 12 inches long, use it
to start the next row.
INSTALLATION INSTRUCTIONS
Clarion Laminates REV 08/2015
Page 2 of 3
FINAL INSTALLATION:
In difcult-to-t areas, such as door mouldings, remove the lip on the groove edge of the planks you are tting into. This can
be done by lightly sanding or planing off the lip of the plank, allowing the plank to be installed laying at. Once the lip has
been trimmed on the plank being tted to, lay the plank down at on the oor. Apply a thin bead of premium laminate glue
on the top of the tongue, then push the plank into position. Once the plank is positioned, wipe off excess glue with a damp
cloth and warm water.
Remove the spacers placed along the perimeter of the room and cover the expansion space with the appropriate moulding.
Be sure to fasten the moulding into the wall, not through the ooring. Quarter-rounds should be pre-drilled before nailing
them to the wall.
Felt protection pads should be placed under furniture legs or other heavy objects to be left in place for an extended period
of time. Do not drag or pull heavy furniture, as doing so will damage the oor.
CLEANING AND CARE:
Vacuum using a soft bristle brush attachment. Do NOT use vacuums with beater bars as doing so can damage your
oor.
Laminate oors may be lightly damp-mopped when needed. Avoid standing water as it may cause the joints between
the planks to lift. Do NOT use steam cleaners, jet-mops or any mop that sprays liquid directly onto the oor. Apply
cleaning solution formulated for laminate ooring to a cloth or mop, not directly to the oor. Clean oor in the same
direction as the planks.
Any furniture that rests directly on top of a laminate oor should have oor protectors or wide furniture coasters under
all feet. Placement of mats at all outside entrances and heavy trafc areas is recommended.
Do not use oil soaps or wax-based cleaning products. These products will leave a dull nish on your oor. Use a oor
cleaner specically formulated for cleaning laminate ooring.
Pets’ claws may scratch the surface if not trimmed regularly.
When liquids are spilled on the laminate ooring, use a slightly damp white cloth or paper towel to immediately blot up
and dry the affected area.
QUESTIONS?
Contact Customer Service:
allen + roth® - 1-866-439-9800
Style Selections
TM
- 1-877-888-8225
Project Source
TM
- 1-866-389-8827
Page 3 of 3
FINAL INSTALLATION & CARE
Clarion Laminates REV 08/2015
  • Page 1 1
  • Page 2 2
  • Page 3 3

Pennsylvania Traditions 368011-00269 Installation guide

Type
Installation guide

Ask a question and I''ll find the answer in the document

Finding information in a document is now easier with AI