Page is loading ...
Release Notes
English
739-00422A-EN
Xerox CX Print Server, Powered by Creo for Xerox
DocuColor 7000AP/8000AP Digital Presses

Copyright
© Creo, 2007. All rights reserved.
Creo is a trademark of Creo.
Acrobat, Adobe, Distiller, Illustrator, PageMaker, Photoshop, and PostScript are trademarks of Adobe Systems
Incorporated.
Apple, AppleShare, AppleTalk, iMac, ImageWriter, LaserWriter, Mac OS, Power Macintosh, and TrueType are registered
trademarks of Apple Computer, Inc. Macintosh is a trademark of Apple Computer, Inc., registered in the U.S.A. and other
countries.
Hexachrome, PANTONE, PANTONE Hexachrome, and PANTONE MATCHING SYSTEM are the property of Pantone, Inc.
PEARL, PEARLdry, PEARLgold, PEARLhdp, and PEARLsetter are registered trademarks of Presstek, Inc.
XEROX is a trademark of XEROX CORPORATION.
http://www.pod-wf..com
Internal 739-00422A-EN
Revised August 2007

Introduction 1
What is in These Release Notes ....................................................................................................................... 1
Software Kit Contents 2
Key Features 3
Hardware Components................................................................................................................................... 3
Spire Tabs Plug-In ........................................................................................................................................... 3
Mixed Paper Size ............................................................................................................................................ 5
Imposition Template Builder............................................................................................................................ 6
Viewing Templates................................................................................................................................... 8
Simulating Jobs With a Template ............................................................................................................. 8
Imposition Tab.............................................................................................................................................. 10
Imposition Methods ............................................................................................................................... 10
Template Options .................................................................................................................................. 11
Scale...................................................................................................................................................... 12
The Preview Window ............................................................................................................................. 13
Spire Print Driver Software ............................................................................................................................ 14
Setting up the Print Driver Software ....................................................................................................... 15
Using the Print Driver software Software................................................................................................ 15
Protecting Spot Colors .................................................................................................................................. 16
Defining RGB and CMYK Spot Colors .................................................................................................... 17
Protecting Spot Colors in the Workflow ................................................................................................. 19
PDF Analyzer ................................................................................................................................................ 20
Default Trim Size .......................................................................................................................................... 21
Print Mode ................................................................................................................................................... 21
Enhanced Job Info ........................................................................................................................................ 23
Soft Proof ..................................................................................................................................................... 23
Job Slug Line ................................................................................................................................................ 23
Storage Management ................................................................................................................................... 23
Restore Paper Sets ........................................................................................................................................ 24
New CMYK Emulation Profile ....................................................................................................................... 24
Enfocus PitStop Edit Software ....................................................................................................................... 24
Limitations 25
Jobs with Exceptions Freezing in Print Queue ................................................................................................ 25
Mixed Paper Size .......................................................................................................................................... 25
Export/Print Accounting Report..................................................................................................................... 25
Imposed VPS Jobs ......................................................................................................................................... 25
Huffman Compression .JPG Files................................................................................................................... 26
Printing Slip Sheets and Front and Back Covers ............................................................................................. 26
PPML File Scaling .......................................................................................................................................... 26
Number of Copies in PowerPoint and Excel................................................................................................... 26
Job Preview & Editor—Adobe Acrobat .......................................................................................................... 26
Admin Page Limitation.................................................................................................................................. 27
VIPP Extension Limitation .............................................................................................................................. 27
Remote Admin with Remote Desktop Limitation ........................................................................................... 27
Spire Job Info................................................................................................................................................ 27
HCSS Front Staple Option Display ................................................................................................................. 28
Spire Print Driver Software ............................................................................................................................ 28
Contents

2 Xerox CX Print Server 1.0 Release Notes
Backup and Restore Configuration ............................................................................................................... 28
Incorrect Print Status Information ................................................................................................................. 28
Job Preview & Editor—Adobe Acrobat Window in Background..................................................................... 29
Simulating Jobs in the Imposition Template Builder....................................................................................... 29

Introduction
We are pleased to send you the release notes for Xerox® CX Print Server, Powered
by Creo® for Xerox DocuColor® 7000AP/8000AP Digital Presses software. These
release notes highlight the key features for the 1.0 release of CX print server
software. Where appropriate, they refer you to the CX Print Server User Guide for
more information.
What is in These Release Notes
The release notes include the following sections:
Software Kit Contents—describes the contents of the CX print server software kit.
Key Features—describes new menu commands, options, windows, or dialog boxes
that were added to the CX print server software.
Limitations—lists the limitations in this CX print server software release.

2 Xerox CX Print Server 1.0 Release Notes
Software Kit Contents
The software kit includes two DVDs and one CD (DVD #1, DVD #2, and CD #3).
Each CD is described below.
DVD #1
This DVD includes the Microsoft
®
Windows
®
XP Professional operating system
with a customized menu for reinstalling the CX print server.
DVD #2
This DVD contains the CX print server software (setup files, PPD files, printer
drivers, and utilities). The CX print server was successfully tested with McAfee
VirusScan 8.0 for Windows XP Professional server antivirus software.
CD #3
This CD contains the utilities, and the CX Print Server User Guide.
The CD has both Macintosh
®
and Windows partitions and can be mounted on
both platforms. You can copy the Xerox CX Print Server, Powered by Creo for
Xerox DocuColor 7000AP/8000AP Digital Presses User Guide to any client
workstation that has a CD-ROM drive and send the guides to any printer.
To print the User Guide using the CX print server software:
1. Make sure that the CX print server workspace is open; then insert CD #3 (CX
Print Server Documentation and Utilities) into the CX print server CD-ROM
drive.
2. From the Job menu, select Import Job.
3. Browse to the CD, and select a file.
4. In the upper list in the Import window, select the desired file(s) and click the
add button .
The file appears on the lower side of the Import dialog box.
5. From the Virtual printer list, select ProcessPrint.
6. Click Import.
The selected file is submitted to the CX print server to print.
Note: This version includes Internet Explorer 6.0 and Service Pack 2.0
Note: Make sure that the Print queue has not been stopped.

Key Features 3
Software Installation
For CX print server software issues, contact your customer service and technical
support.
Key Features
This section lists features that were added to the release of CX print server software.
Hardware Components
The CX print server platform includes:
• 2 × Dual-Core Intel Xeon Processor 2GHz with 1333 MHz FSB
• 1 GB FBDIMM (Fully Buffer Dimm) Host Memory
• Creo dedicated hardware
SSC ( Signal Splitter Controller)
Fusion XM2 board with 1024 MB image memory, 1 × 512 MB (input
memory), 2 × 256 MB (output memory)
• DVD-RW drive
• User disk:2 × 250 GB SATA2 disks as system disk
• Printer (Image) disk: 2 × 250 GB SATA2 disks as image disks
Spire Tabs Plug-In
The Spire Tabs plug-in for Acrobat (version 7.0 or later) is used to create and place
tabs in your unprocessed (PDF or PostScript) jobs, manage the tab and text
attributes, and save a set of attributes for future use.
When using the Spire Tabs plug-in to create tabs, it is not necessary to define
exceptions on the
Exceptions tab.
Important: When you install the CX print server version 1.0 from DVD #1, all the files
stored on disks C and D are deleted. Make sure to back up any important customer files
before installing version 1.0. For more information, see the CX print server 1.0 Technical
Manual.
Important: If you add tabs to your job, you need to select the Mixed paper
size document check box (in the Job Parameters window, on the Paper Stock
tab, under Mixed paper size).
4 Xerox CX Print Server 1.0 Release Notes
To create tabs with the Tabs plug-in:
1. In the Storage window, right-click your unprocessed job and select
Job Preview&Editor.
The job opens in Acrobat software.
2. From the Plug-Ins menu, select Spire Tabs Printing.
The Tabs Printing window opens, displaying the
Text Attributes tab.
On the
Content tab you can select the location of the tab pages for the job as
well as type the text that will appear on the tab itself.
The tabs that you add become part of the document.
Note: The job must be a PDF or PostScript file.
Key Features 5
You can also manage the tabs while on the Content tab. The following actions can
be performed:
• Remove a tab
• Change the location of a tab
• Replace a page with a tab
• Insert a tab before or after a specific page
• Delete a page or tab from the document
• Save the tab settings
• Apply saved settings to a job
• Delete saved settings
Mixed Paper Size
On the Paper Stock tab, Mixed paper size has been added to the parameters list,
and also to the PPD file. This enables you to print a job with mixed paper sizes
without the need for exceptions programming—for example, documents with tabs
or manuals with folded drawings.
The CX print server automatically support mixed paper size exceptions for the
following input files: PS, PDF, and VPS.
6 Xerox CX Print Server 1.0 Release Notes
Imposition Template Builder
The Imposition Template Builder enables you to create templates for similar types
of jobs that have the following imposition settings in common:
• Imposition method
• Columns
• Rows
• Simplex/duplex
• Binding
All imposition templates are modified and managed (renamed, deleted, duplicated,
exported or imported) through the Imposition Template Builder.
To Open the Imposition Template Builder
¾
From the To ols menu, select Imposition Template Builder.
The Imposition Template Builder window appears.
Note: When printing a job with mixed paper sizes from Acrobat, you must select the
Choose Paper Source by PDF page size check box, in the Page Handling area in the
Acrobat Print window.
Note: The Imposition Template Builder replaces the Ultimate inSpire
optional template builder. Therefore, custom templates created in Ultimate
inSpire are no longer supported. These templates will need to be recreated
using the Imposition Template Builder.

Key Features 7
To Create a New Template
1. From the Method list, select an imposition method.
2. Click New .
3. Type the name of the new template, and press ENTER.
4. In the Layout area, type the number of columns and number of rows that you
need.
The imposition method that you select determines the number of columns and
rows that you can enter. For
Saddle Stitch and Perfect Bound, you can place up
to 64 pages on one sheet (8 × 8). For
Step & Repeat and Step & Continue, you
can place up to 625 pages on one sheet (25 × 25).
5. Under Type , select Simplex or Duplex.
6. Under Orientation, select Portrait or Landscape.
7. From the Binding list, select the appropriate binding method.
8. Click Save.
All saved templates appear on the
Imposition tab. After you select an imposition
method
, the related templates appear in the Template parameters, in the Layout
list. See Table 1. For example, if you created a
Step & Continue template, the
template appears in the
Layout list only when you select the Step & Continue
imposition method.
Some templates appear under more than one imposition method.
Note: The Orientation setting in the Imposition Template Builder is for
display purposes only. This parameter is not saved in the template. (You set
job orientation on the Imposition tab, under Sizes.)
Note: Binding is available only when Saddle Stitch and Perfect Bound
imposition methods are selected.

8 Xerox CX Print Server 1.0 Release Notes
Table 1: Saved imposition templates in Layout list according to imposition method
Viewing Templates
As you create or modify a template, you can see your template in the template
viewer. As you select parameters, the template viewer dynamically changes to
reflect your selections.
In the template viewer
, you can view the front or back pages of a template, or both
front and back pages simulataneously.
The template viewer also enables you to rotate one or more pages and change the
location of pages on the sheet.
Simulating Jobs With a Template
You can simulate how jobs from the Storage window will look if you apply an
imposition template to them.
Method selected on
Imposition tab:
Template layout type in the
layout list:
Step & Repeat Step & Repeat, Cut & Stack
Step & Continue Step & Continue
Saddle Stitch Saddle Stitch, Perfect Bound
Perfect Bound Saddle Stitch, Perfect Bound
Notes:
• When Simplex is selected, only the Front view is available.
• Sheet size is set on the Imposition tab. The sheet size that appears in the
template viewer is dynamic. It changes to accomodate the parameters that
you choose.

Key Features 9
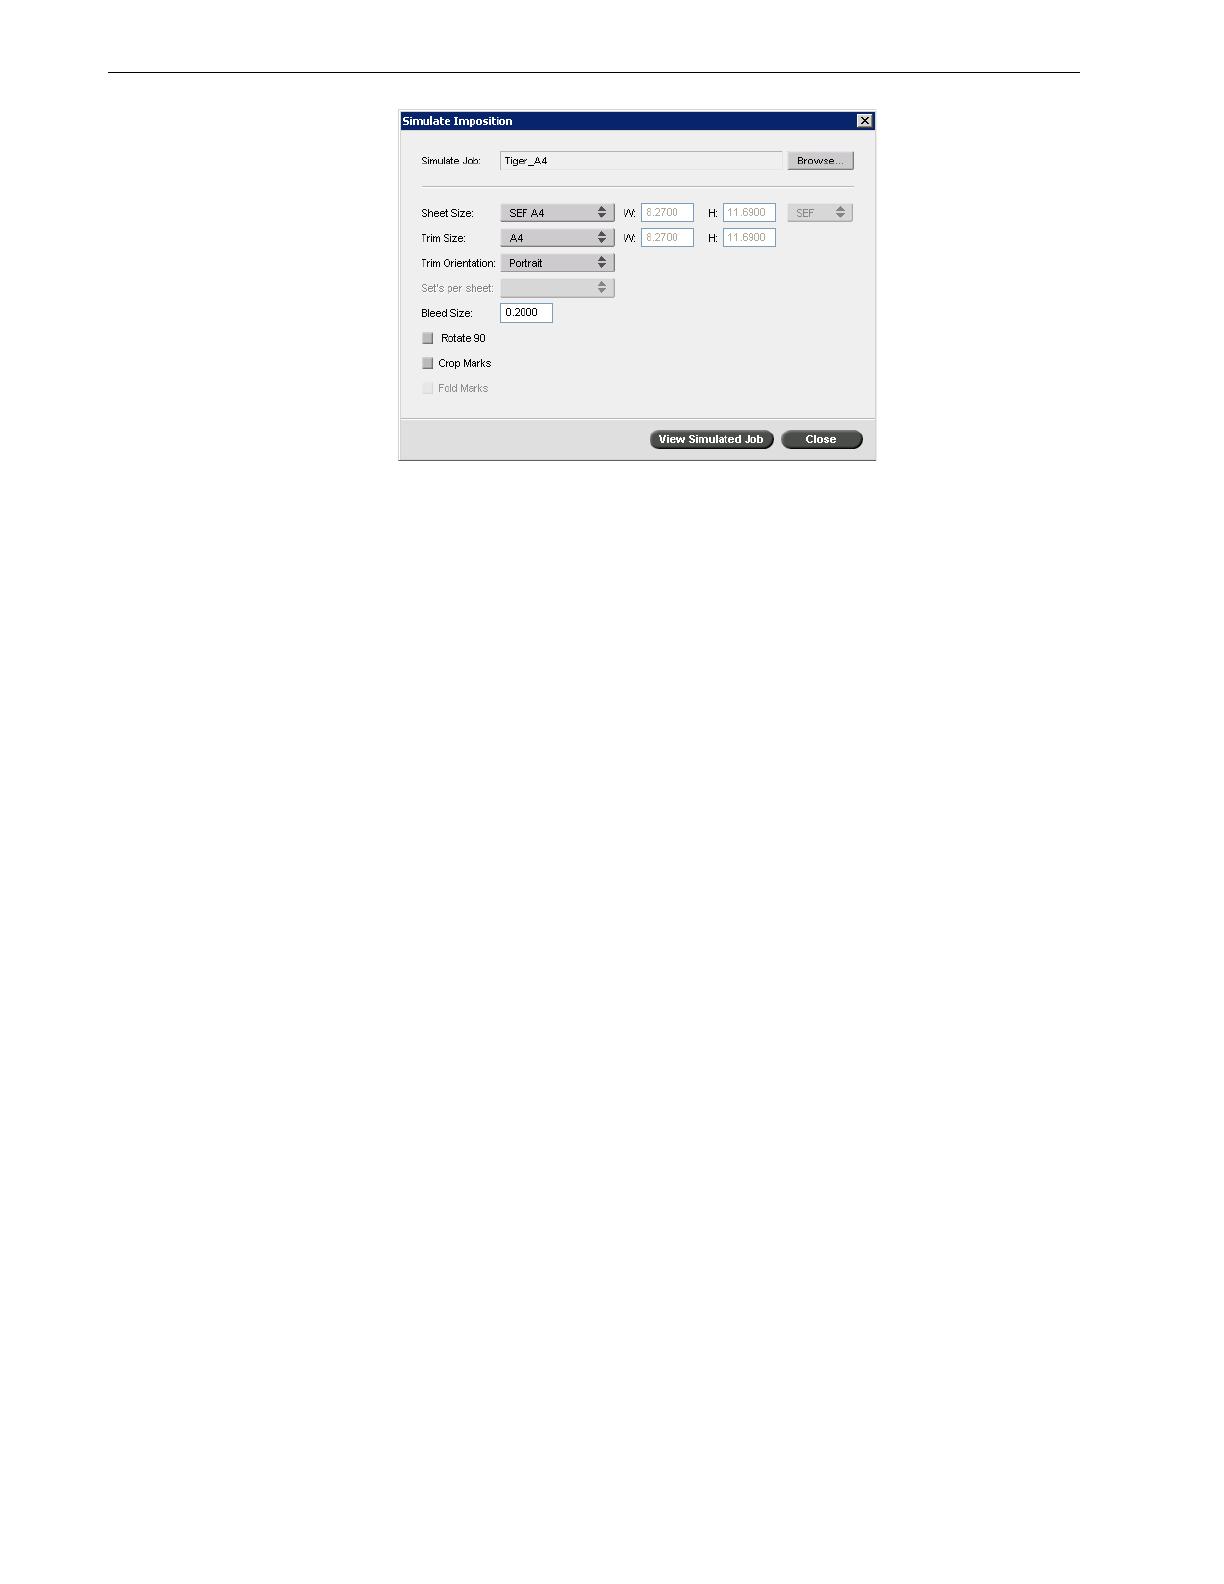
To simulate a job with a specific imposition template:
1. In the Imposition Template Builder window, click the Simulate button.
2. Click Browse.
The Storage window opens.
3. Select a job, and then click Select.
The parameters of the job (
Sheet Size, Trim Size, Trim Orientation, Sets per
sheet
, Bleed Size, Rotate 90, Crop Marks, and Fold Marks) appear with their
values in the Simulate Imposition window.
4. Change the parameters as desired.
Note: Both RTP and non-RTP jobs are available for simulation.
10 Xerox CX Print Server 1.0 Release Notes
5. Click View Simulated Job.
The Preview window appears.
A simulation of the job is displayed with the current imposition template
applied.
Imposition Tab
Changes have been made to the Imposition tab, which are described in the
following sections.
Imposition Methods
The following methods have been changed or added to the Imposition method
options:
• Step & Continue has been added to the list of Imposition method options. Step
& Continue
prints different pages of a job on one sheet so that the sheet is filled
to capacity.
• Cut & Stack has been moved out from under the Step & Repeat method and
can be selected on its own, independent of the
Step & Repeat method.
Cut & Stack enables jobs to be printed, cut, and stacked in the most efficient
manner, while preserving the original sorting. A job’s pages, booklets, or books
are sorted in a Z-shape. In other words, each stack of pages is sorted in
consecutive order. When stacks are piled one on top of another, the entire job is
already sorted up or down.
• sets per sheet has been added as part of the Saddle Stitch imposition method.
When
Saddle Stitch is selected, sets per sheet enables you to select how many
sets of the job will print on one press sheet.

Key Features 11
Template Options
Layout options are now presented in a list. The Imposition method that you select
determines which layouts appear in the list. There are two types of layouts:
• System layouts
The Custom option enables you to set up custom imposition parameters for
a job. This layout is available for all imposition methods.
When the Best Fit option is selected, the server determines how many
columns and rows will best fit the sheet and whether the pages need to be
rotated 90 degrees according to the imposition method and paper size that
you have chosen. The
Best Fit layout is available for the Step & Repeat, Step
& Continue
, and Cut & Stack imposition methods.
• User-defined templates (created in the Imposition Template Builder)
Binding and Rotate 90 deg methods are all under Template options.
The
North South check box is available when the Step & Repeat method is selected
and the number of columns and rows is 2×1 or 1×2. Selecting the
North South
check box places pages 180 degrees from each other, on the same side of the
imposed sheet.
The
Rotate 90 deg. check box rotates all pages 90 degrees to the right. This can help
correct imposition conflicts.
Note: If you select Best Fit or a user-defined layout, some or all of the other
parameters are unavailable.
Note: The Binding option is available only when Saddle Stitch or Perfect
Bound is selected as the Imposition method.

12 Xerox CX Print Server 1.0 Release Notes
Scale
Scale options have been added to the Imposition tab parameters.
• Scale by changes the scale of all imposed sheets. This is the default option, set
to 100%. In the
% box, type a value from 25% to 400% for how you want to
change the scaling of the imposed sheets
• Fit layout to sheet size fits the page layout to the sheet size.
Key Features 13
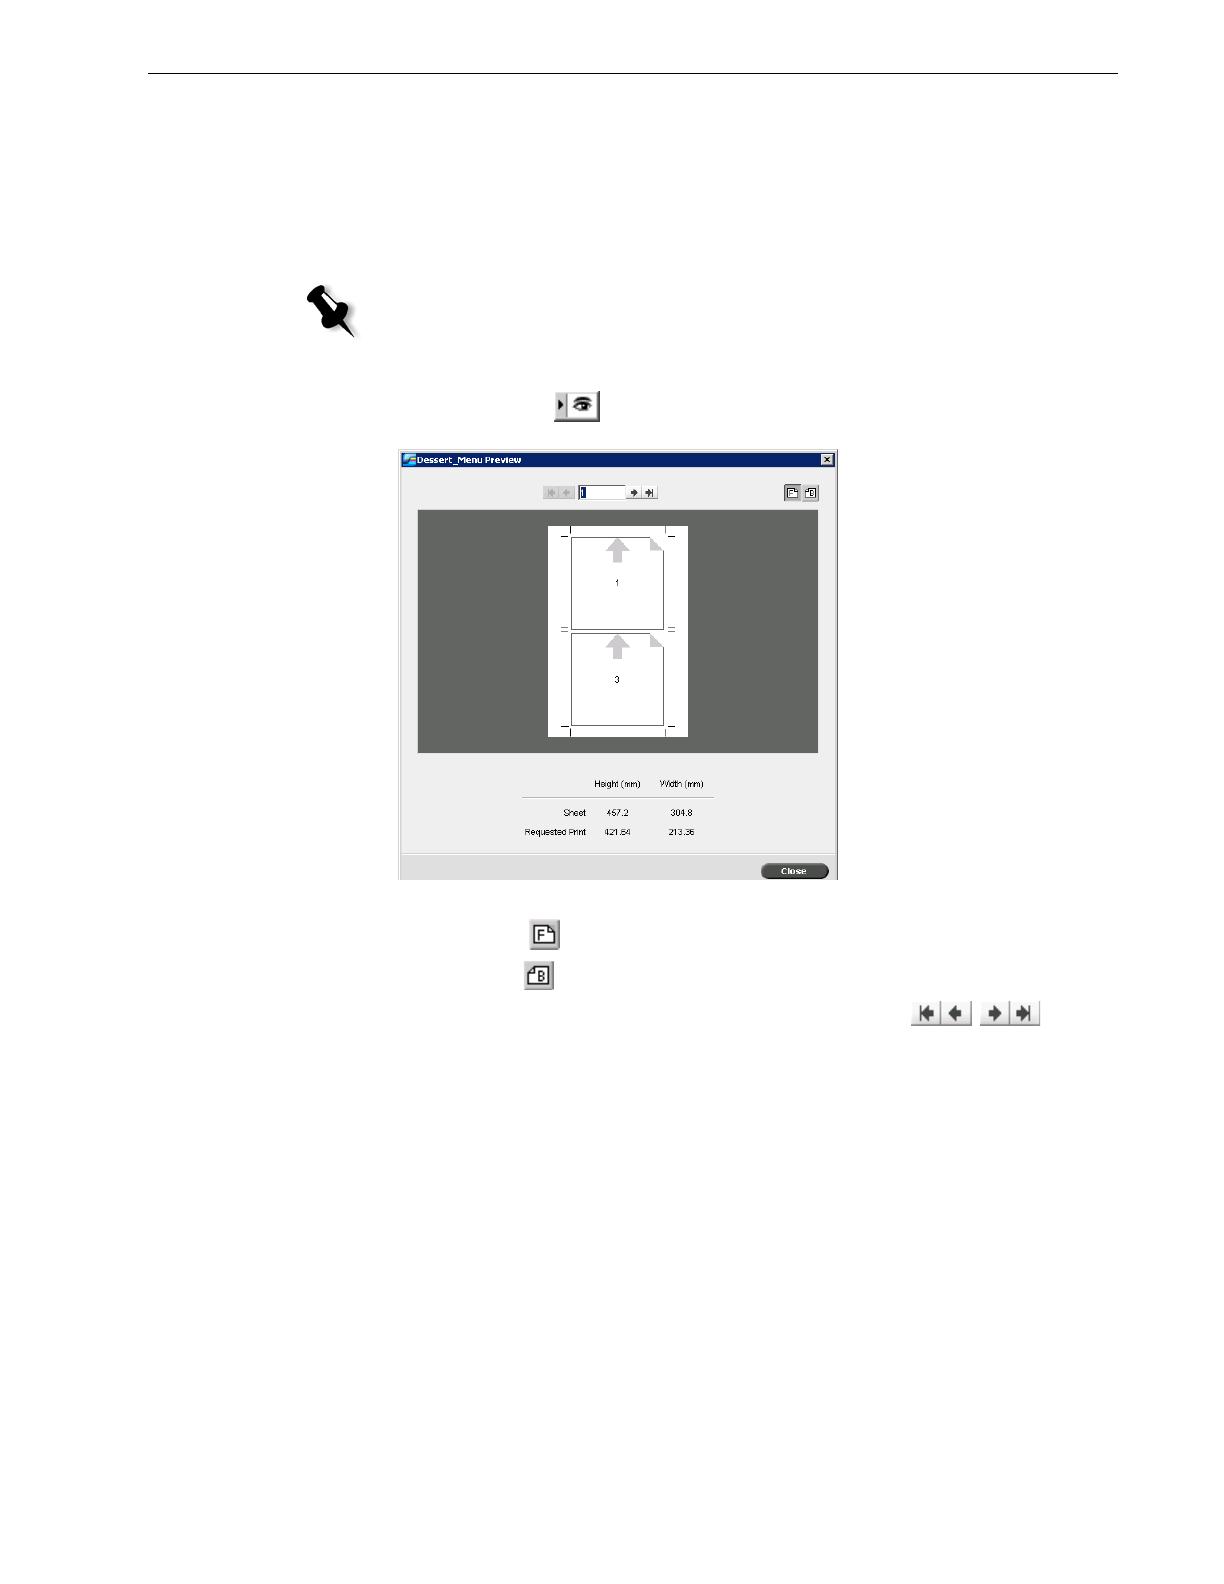
The Preview Window
The Preview window enables you to view your imposition layout and settings.
You can open the Preview window at any time and keep it open to check your
imposition settings as you select them. The Preview window dynamically reflects
any changes that you make.
To open the Preview window:
¾
Click preview .
In the Preview window you can perform the following functions:
• Click Front to view the front pages.
• Click Back to view the back pages.
• Move between sheets by clicking the navigation arrows .
• Jump to a specific sheet by typing a number in the navigation box.
Gray arrows indicate the direction of the pages on the sheet. The sequence of pages
is indicated by the page numbers.
If any parameters conflict,
Imposition Conflict appears in red in the Preview
window and also on the
Imposition tab.
Note: The Preview window is not available if the Imposition method is set to
None.

14 Xerox CX Print Server 1.0 Release Notes
A red border along the edge of the page indicates where the conflict exists.
• If the red border appears along the upper and lower edges of the page, a conflict
exists in the
Height value.
• If the red border appears along the left and right edges of the page, a conflict
exists in the
Width value.
Problematic values appear in red.
Spire Print Driver Software
The CX print server Print Driver software enables you to set job parameters for jobs
that you send to the DocuColor 8000AP Digital Press from any application on your
client workstation. The Print Driver software also enables you to see the DocuColor
8000AP Digital Press configuration, monitor the printer’s status, and save a set of
print parameters for reuse.
The print driver software contains the following tabs:
• Spire Settings
• Printer
• PostScript
• About
Notes:
• The Print Driver software is only available for PC clients.
• When using the Print Driver software, ProcessStore and SpoolStore virtual
printers are submitted as Process Print.
Key Features 15
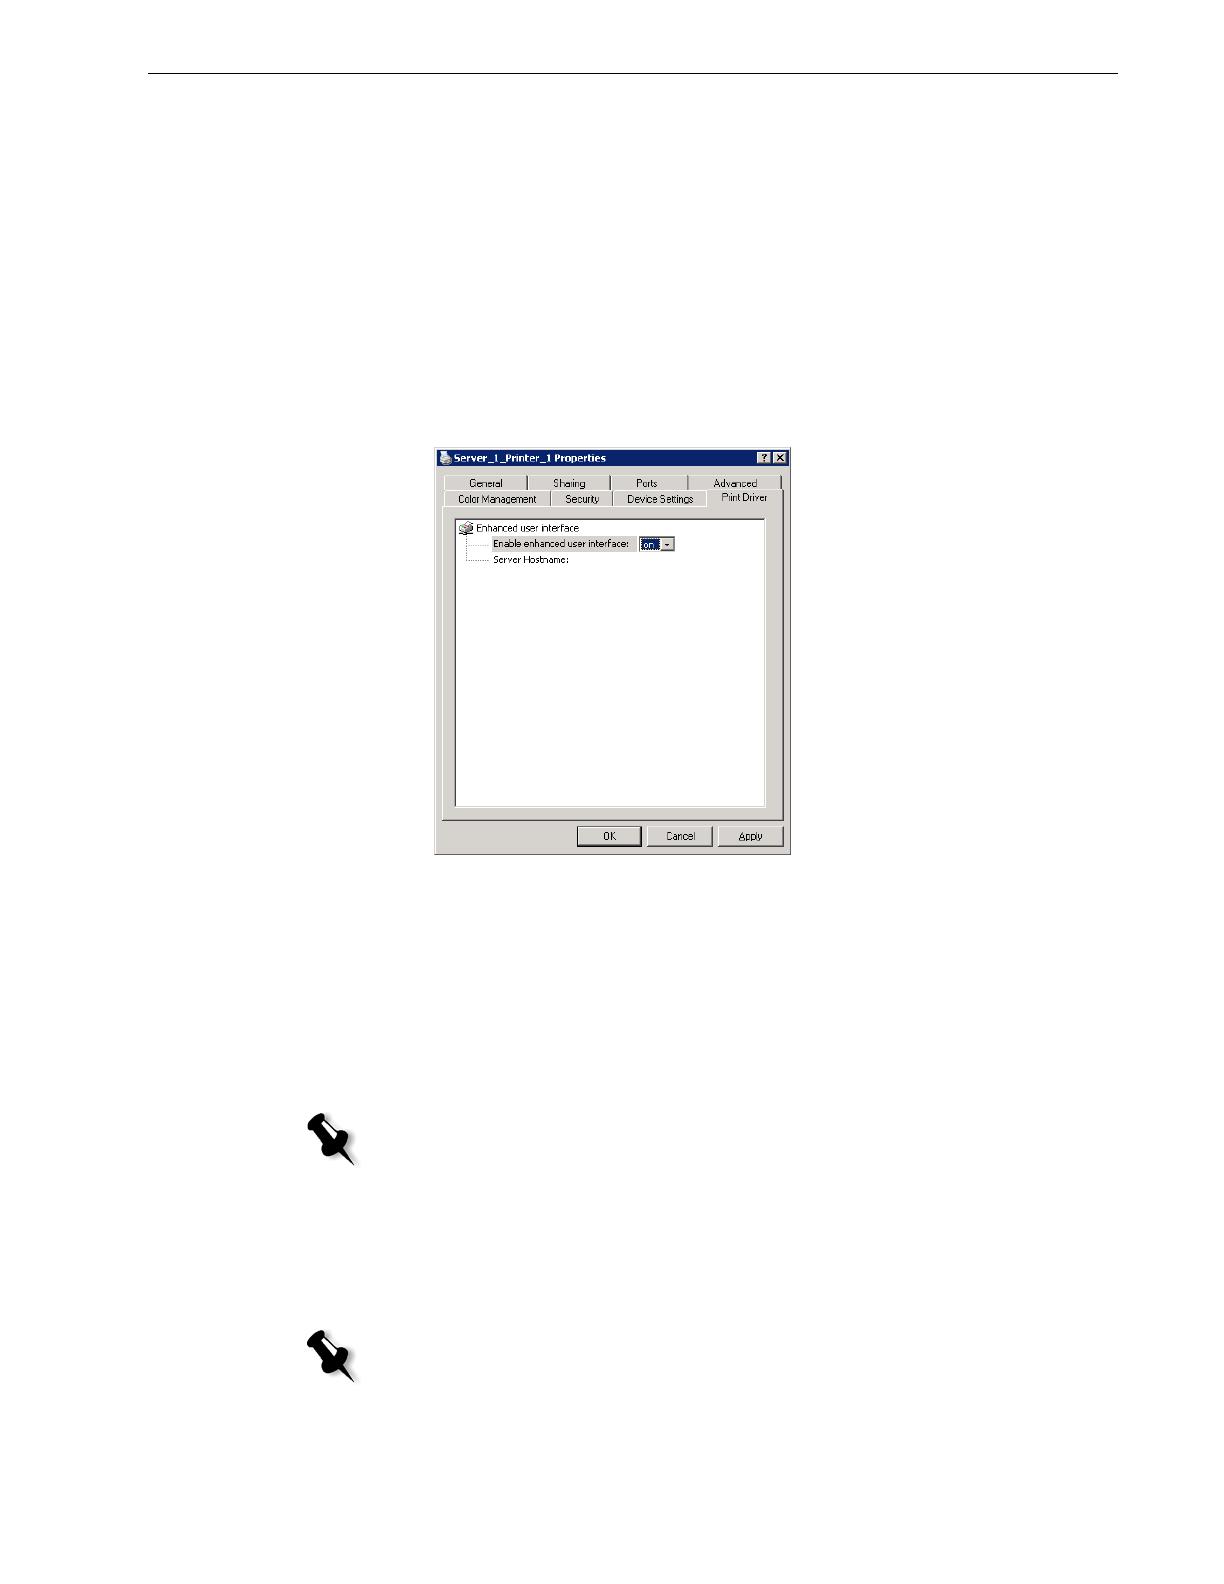
Setting up the Print Driver Software
The Print Driver software is automatically installed on the client workstation when
you set up a network printer. Once the printer is defined, you must activate the
print driver’s enhanced user interface.
To activate the print driver’s enhanced user interface:
1. On the desktop, select Start > Settings > Printers and Faxes.
2. Right-click the printer icon and select Properties.
3. Click the Print Driver tab.
4. In the Enable enhanced user interface list, select on.
5. Click Apply.
6. Click OK to close the dialog box.
Using the Print Driver software Software
1. Open the file that you want to print—for example, a PDF file.
2. From the File menu, select Print.
3. In the Print dialog box, click Properties.
If this is the first time that you are using the Print Driver software, a message
tells you that the software is loading. Then a dialog box appears with the print
settings.
Note: When printing a job from Acrobat using the Print Driver software, you must
select the Choose Paper Source by PDF page size check box, in the Page
Handling area in the Acrobat Print window.
Note: The loading process might take a few minutes. Afterwards, accessing
the print driver takes less time.

16 Xerox CX Print Server 1.0 Release Notes
In the print driver window, you can perform the following actions:
• Define job parameters
• Change parameters and save the settings as a profile
• Load a saved profile
• Check the status of the DocuColor 8000AP Digital Press
• Define PostScript settings for the job
Protecting Spot Colors
Using the Spot Color Editor window, you can now define specific RGB or CYMK
colors that you want to protect—for example, official logos or company colors—to
help produce color fidelity and color consistency between devices.
New tabs have been added to the Spot Color Editor window:
• Spot Editor
• Protect RGB
• Protect Gray
• Protect CMYK
Important: The Protect Gray feature is included in this release but is not
currently functional.
/