
Using Avaya IX
™
Huddle Camera HC050
Release 11.0
Issue 1
May 2020

©
2020, Avaya Inc.
All Rights Reserved.
Notice
While reasonable efforts have been made to ensure that the
information in this document is complete and accurate at the time of
printing, Avaya assumes no liability for any errors. Avaya reserves
the right to make changes and corrections to the information in this
document without the obligation to notify any person or organization
of such changes.
Documentation disclaimer
“Documentation” means information published in varying mediums
which may include product information, operating instructions and
performance specifications that are generally made available to users
of products. Documentation does not include marketing materials.
Avaya shall not be responsible for any modifications, additions, or
deletions to the original published version of Documentation unless
such modifications, additions, or deletions were performed by or on
the express behalf of Avaya. End User agrees to indemnify and hold
harmless Avaya, Avaya's agents, servants and employees against all
claims, lawsuits, demands and judgments arising out of, or in
connection with, subsequent modifications, additions or deletions to
this documentation, to the extent made by End User.
Link disclaimer
Avaya is not responsible for the contents or reliability of any linked
websites referenced within this site or Documentation provided by
Avaya. Avaya is not responsible for the accuracy of any information,
statement or content provided on these sites and does not
necessarily endorse the products, services, or information described
or offered within them. Avaya does not guarantee that these links will
work all the time and has no control over the availability of the linked
pages.
Warranty
Avaya provides a limited warranty on Avaya hardware and software.
Refer to your sales agreement to establish the terms of the limited
warranty. In addition, Avaya’s standard warranty language, as well as
information regarding support for this product while under warranty is
available to Avaya customers and other parties through the Avaya
Support website:
https://support.avaya.com/helpcenter/
getGenericDetails?detailId=C20091120112456651010 under the link
“Warranty & Product Lifecycle” or such successor site as designated
by Avaya. Please note that if You acquired the product(s) from an
authorized Avaya Channel Partner outside of the United States and
Canada, the warranty is provided to You by said Avaya Channel
Partner and not by Avaya.
“Hosted Service” means an Avaya hosted service subscription that
You acquire from either Avaya or an authorized Avaya Channel
Partner (as applicable) and which is described further in Hosted SAS
or other service description documentation regarding the applicable
hosted service. If You purchase a Hosted Service subscription, the
foregoing limited warranty may not apply but You may be entitled to
support services in connection with the Hosted Service as described
further in your service description documents for the applicable
Hosted Service. Contact Avaya or Avaya Channel Partner (as
applicable) for more information.
Hosted Service
THE FOLLOWING APPLIES ONLY IF YOU PURCHASE AN AVAYA
HOSTED SERVICE SUBSCRIPTION FROM AVAYA OR AN AVAYA
CHANNEL PARTNER (AS APPLICABLE), THE TERMS OF USE
FOR HOSTED SERVICES ARE AVAILABLE ON THE AVAYA
WEBSITE,
HTTPS://SUPPORT.AVAYA.COM/LICENSEINFO UNDER
THE LINK “Avaya Terms of Use for Hosted Services” OR SUCH
SUCCESSOR SITE AS DESIGNATED BY AVAYA, AND ARE
APPLICABLE TO ANYONE WHO ACCESSES OR USES THE
HOSTED SERVICE. BY ACCESSING OR USING THE HOSTED
SERVICE, OR AUTHORIZING OTHERS TO DO SO, YOU, ON
BEHALF OF YOURSELF AND THE ENTITY FOR WHOM YOU ARE
DOING SO (HEREINAFTER REFERRED TO INTERCHANGEABLY
AS “YOU” AND “END USER”), AGREE TO THE TERMS OF USE. IF
YOU ARE ACCEPTING THE TERMS OF USE ON BEHALF A
COMPANY OR OTHER LEGAL ENTITY, YOU REPRESENT THAT
YOU HAVE THE AUTHORITY TO BIND SUCH ENTITY TO THESE
TERMS OF USE. IF YOU DO NOT HAVE SUCH AUTHORITY, OR IF
YOU DO NOT WISH TO ACCEPT THESE TERMS OF USE, YOU
MUST NOT ACCESS OR USE THE HOSTED SERVICE OR
AUTHORIZE ANYONE TO ACCESS OR USE THE HOSTED
SERVICE.
Licenses
THE SOFTWARE LICENSE TERMS AVAILABLE ON THE AVAYA
WEBSITE,
HTTPS://SUPPORT.AVAYA.COM/LICENSEINFO,
UNDER THE LINK “AVAYA SOFTWARE LICENSE TERMS (Avaya
Products)” OR SUCH SUCCESSOR SITE AS DESIGNATED BY
AVAYA, ARE APPLICABLE TO ANYONE WHO DOWNLOADS,
USES AND/OR INSTALLS AVAYA SOFTWARE, PURCHASED
FROM AVAYA INC., ANY AVAYA AFFILIATE, OR AN AVAYA
CHANNEL PARTNER (AS APPLICABLE) UNDER A COMMERCIAL
AGREEMENT WITH AVAYA OR AN AVAYA CHANNEL PARTNER.
UNLESS OTHERWISE AGREED TO BY AVAYA IN WRITING,
AVAYA DOES NOT EXTEND THIS LICENSE IF THE SOFTWARE
WAS OBTAINED FROM ANYONE OTHER THAN AVAYA, AN AVAYA
AFFILIATE OR AN AVAYA CHANNEL PARTNER; AVAYA
RESERVES THE RIGHT TO TAKE LEGAL ACTION AGAINST YOU
AND ANYONE ELSE USING OR SELLING THE SOFTWARE
WITHOUT A LICENSE. BY INSTALLING, DOWNLOADING OR
USING THE SOFTWARE, OR AUTHORIZING OTHERS TO DO SO,
YOU, ON BEHALF OF YOURSELF AND THE ENTITY FOR WHOM
YOU ARE INSTALLING, DOWNLOADING OR USING THE
SOFTWARE (HEREINAFTER REFERRED TO
INTERCHANGEABLY AS “YOU” AND “END USER”), AGREE TO
THESE TERMS AND CONDITIONS AND CREATE A BINDING
CONTRACT BETWEEN YOU AND AVAYA INC. OR THE
APPLICABLE AVAYA AFFILIATE (“AVAYA”).
Avaya grants You a license within the scope of the license types
described below, with the exception of Heritage Nortel Software, for
which the scope of the license is detailed below. Where the order
documentation does not expressly identify a license type, the
applicable license will be a Designated System License as set forth
below in the Designated System(s) License (DS) section as
applicable. The applicable number of licenses and units of capacity
for which the license is granted will be one (1), unless a different
number of licenses or units of capacity is specified in the
documentation or other materials available to You. “Software” means
computer programs in object code, provided by Avaya or an Avaya
Channel Partner, whether as stand-alone products, pre-installed on
hardware products, and any upgrades, updates, patches, bug fixes,
or modified versions thereto. “Designated Processor” means a single
stand-alone computing device. “Server” means a set of Designated
Processors that hosts (physically or virtually) a software application
to be accessed by multiple users. “Instance” means a single copy of
the Software executing at a particular time: (i) on one physical
machine; or (ii) on one deployed software virtual machine (“VM”) or
similar deployment.
License types
Designated System(s) License (DS). End User may install and use
each copy or an Instance of the Software only: 1) on a number of
Designated Processors up to the number indicated in the order; or 2)
up to the number of Instances of the Software as indicated in the
order, Documentation, or as authorized by Avaya in writing. Avaya
may require the Designated Processor(s) to be identified in the order
by type, serial number, feature key, Instance, location or other
specific designation, or to be provided by End User to Avaya through
electronic means established by Avaya specifically for this purpose.
Shrinkwrap License (SR). You may install and use the Software in
accordance with the terms and conditions of the applicable license
agreements, such as “shrinkwrap” or “clickthrough” license
accompanying or applicable to the Software (“Shrinkwrap License”).
Copyright
Except where expressly stated otherwise, no use should be made of
materials on this site, the Documentation, Software, Hosted Service,
or hardware provided by Avaya. All content on this site, the
documentation, Hosted Service, and the product provided by Avaya
including the selection, arrangement and design of the content is
owned either by Avaya or its licensors and is protected by copyright
and other intellectual property laws including the sui generis rights
relating to the protection of databases. You may not modify, copy,
reproduce, republish, upload, post, transmit or distribute in any way
any content, in whole or in part, including any code and software

unless expressly authorized by Avaya. Unauthorized reproduction,
transmission, dissemination, storage, and or use without the express
written consent of Avaya can be a criminal, as well as a civil offense
under the applicable law.
Virtualization
The following applies if the product is deployed on a virtual machine.
Each product has its own ordering code and license types. Unless
otherwise stated, each Instance of a product must be separately
licensed and ordered. For example, if the end user customer or
Avaya Channel Partner would like to install two Instances of the
same type of products, then two products of that type must be
ordered.
Third Party Components
“Third Party Components” mean certain software programs or
portions thereof included in the Software or Hosted Service may
contain software (including open source software) distributed under
third party agreements (“Third Party Components”), which contain
terms regarding the rights to use certain portions of the Software
(“Third Party Terms”). As required, information regarding distributed
Linux OS source code (for those products that have distributed Linux
OS source code) and identifying the copyright holders of the Third
Party Components and the Third Party Terms that apply is available
in the products, Documentation or on Avaya’s website at:
https://
support.avaya.com/Copyright or such successor site as designated
by Avaya. The open source software license terms provided as Third
Party Terms are consistent with the license rights granted in these
Software License Terms, and may contain additional rights benefiting
You, such as modification and distribution of the open source
software. The Third Party Terms shall take precedence over these
Software License Terms, solely with respect to the applicable Third
Party Components to the extent that these Software License Terms
impose greater restrictions on You than the applicable Third Party
Terms.
The following applies only if the H.264 (AVC) codec is distributed with
the product. THIS PRODUCT IS LICENSED UNDER THE AVC
PATENT PORTFOLIO LICENSE FOR THE PERSONAL USE OF A
CONSUMER OR OTHER USES IN WHICH IT DOES NOT RECEIVE
REMUNERATION TO (i) ENCODE VIDEO IN COMPLIANCE WITH
THE AVC STANDARD (“AVC VIDEO”) AND/OR (ii) DECODE AVC
VIDEO THAT WAS ENCODED BY A CONSUMER ENGAGED IN A
PERSONAL ACTIVITY AND/OR WAS OBTAINED FROM A VIDEO
PROVIDER LICENSED TO PROVIDE AVC VIDEO. NO LICENSE IS
GRANTED OR SHALL BE IMPLIED FOR ANY OTHER USE.
ADDITIONAL INFORMATION MAY BE OBTAINED FROM MPEG LA,
L.L.C. SEE
HTTP://WWW.MPEGLA.COM.
Service Provider
THE FOLLOWING APPLIES TO AVAYA CHANNEL PARTNER’S
HOSTING OF AVAYA PRODUCTS OR SERVICES. THE PRODUCT
OR HOSTED SERVICE MAY USE THIRD PARTY COMPONENTS
SUBJECT TO THIRD PARTY TERMS AND REQUIRE A SERVICE
PROVIDER TO BE INDEPENDENTLY LICENSED DIRECTLY FROM
THE THIRD PARTY SUPPLIER. AN AVAYA CHANNEL PARTNER’S
HOSTING OF AVAYA PRODUCTS MUST BE AUTHORIZED IN
WRITING BY AVAYA AND IF THOSE HOSTED PRODUCTS USE
OR EMBED CERTAIN THIRD PARTY SOFTWARE, INCLUDING
BUT NOT LIMITED TO MICROSOFT SOFTWARE OR CODECS,
THE AVAYA CHANNEL PARTNER IS REQUIRED TO
INDEPENDENTLY OBTAIN ANY APPLICABLE LICENSE
AGREEMENTS, AT THE AVAYA CHANNEL PARTNER’S EXPENSE,
DIRECTLY FROM THE APPLICABLE THIRD PARTY SUPPLIER.
WITH RESPECT TO CODECS, IF THE AVAYA CHANNEL
PARTNER IS HOSTING ANY PRODUCTS THAT USE OR EMBED
THE H.264 CODEC OR H.265 CODEC, THE AVAYA CHANNEL
PARTNER ACKNOWLEDGES AND AGREES THE AVAYA
CHANNEL PARTNER IS RESPONSIBLE FOR ANY AND ALL
RELATED FEES AND/OR ROYALTIES. THE H.264 (AVC) CODEC
IS LICENSED UNDER THE AVC PATENT PORTFOLIO LICENSE
FOR THE PERSONAL USE OF A CONSUMER OR OTHER USES
IN WHICH IT DOES NOT RECEIVE REMUNERATION TO: (I)
ENCODE VIDEO IN COMPLIANCE WITH THE AVC STANDARD
(“AVC VIDEO”) AND/OR (II) DECODE AVC VIDEO THAT WAS
ENCODED BY A CONSUMER ENGAGED IN A PERSONAL
ACTIVITY AND/OR WAS OBTAINED FROM A VIDEO PROVIDER
LICENSED TO PROVIDE AVC VIDEO. NO LICENSE IS GRANTED
OR SHALL BE IMPLIED FOR ANY OTHER USE. ADDITIONAL
INFORMATION FOR H.264 (AVC) AND H.265 (HEVC) CODECS
MAY BE OBTAINED FROM MPEG LA, L.L.C. SEE
HTTP://
WWW.MPEGLA.COM.
Compliance with Laws
You acknowledge and agree that it is Your responsibility for
complying with any applicable laws and regulations, including, but not
limited to laws and regulations related to call recording, data privacy,
intellectual property, trade secret, fraud, and music performance
rights, in the country or territory where the Avaya product is used.
Preventing Toll Fraud
“Toll Fraud” is the unauthorized use of your telecommunications
system by an unauthorized party (for example, a person who is not a
corporate employee, agent, subcontractor, or is not working on your
company's behalf). Be aware that there can be a risk of Toll Fraud
associated with your system and that, if Toll Fraud occurs, it can
result in substantial additional charges for your telecommunications
services.
Avaya Toll Fraud intervention
If You suspect that You are being victimized by Toll Fraud and You
need technical assistance or support, call Technical Service Center
Toll Fraud Intervention Hotline at +1-800-643-2353 for the United
States and Canada. For additional support telephone numbers, see
the Avaya Support website: https://support.avaya.com or such
successor site as designated by Avaya.
Security Vulnerabilities
Information about Avaya’s security support policies can be found in
the Security Policies and Support section of
https://
support.avaya.com/security.
Suspected Avaya product security vulnerabilities are handled per the
Avaya Product Security Support Flow (
https://
support.avaya.com/css/P8/documents/100161515).
Downloading Documentation
For the most current versions of Documentation, see the Avaya
Support website:
https://support.avaya.com, or such successor site
as designated by Avaya.
Contact Avaya Support
See the Avaya Support website:
https://support.avaya.com for
product or Hosted Service notices and articles, or to report a problem
with your Avaya product or Hosted Service. For a list of support
telephone numbers and contact addresses, go to the Avaya Support
website:
https://support.avaya.com (or such successor site as
designated by Avaya), scroll to the bottom of the page, and select
Contact Avaya Support.
Regulatory Statements
Industry Canada (IC) Statements
RSS Standards Statement
This device complies with Industry Canada licence-exempt RSS
standard(s). Operation is subject to the following two conditions:
1. This device may not cause interference, and
2. This device must accept any interference, including
interference that may cause undesired operation of the
device.
Le présent appareil est conforme aux CNR d'Industrie Canada
applicables aux appareils radio exempts de licence. L'exploitation est
autorisée aux deux conditions suivantes:
1. L'appareil ne doit pas produire de brouillage, et
2. L'utilisateur de l'appareil doit accepter tout brouillage
radioélectrique subi, même si le brouillage est susceptible
d'en compromettre le fonctionnement.
Industry Canada (IC) Statements
This Class A digital device complies with Canadian ICES-003.
This product meets the applicable Innovation, Science and Economic
Development Canada technical specifications.

Cet appareil numérique de la classe A est conformeà la norme
NMB-003 du Canada.
Japan Statements
Class A Statement
This is a Class A digital device. Operation of this product in a
residential environment may cause radio interference. In such cases
you may need to take corrective action.
この装置は、クラスA機器です。この装置を住宅環境で使用すると
電波妨害を引き 起こすことがあります。この場合には使用者が適切
な対策を講ずるよう要求される ことがあります。 VCCI-A
Denan Power Cord Statement
Danger:
Please be careful of the following while installing the
equipment:
• Please only use the connecting cables, power cord, and
AC adapters shipped with the equipment or specified by
Avaya to be used with the equipment. If you use any
other equipment, it may cause failures, malfunctioning,
or fire.
• Power cords shipped with this equipment must not be
used with any other equipment. In case the above
guidelines are not followed, it may lead to death or
severe injury.
本製品を安全にご使用頂くため、以下のことにご注意ください。
• 接続ケーブル、電源コード、AC アダプタなどの部品は、必ず
製品に同梱されております添付品または指定品をご使用くだ
さい。添付品指定品以外の部品をご使用になると故障や動作
不良、火災の原因となることがあります。
• 同梱されております付属の電源コードを他の機器には使用し
ないでください。上記注意事項を守らないと、死亡や大怪我
など人身事故の原因となることがあります。
México Statement
The operation of this equipment is subject to the following two
conditions:
1. It is possible that this equipment or device may not cause
harmful interference, and
2. This equipment or device must accept any interference,
including interference that may cause undesired operation.
La operación de este equipo está sujeta a las siguientes dos
condiciones:
1. Es posible que este equipo o dispositivo no cause
interferencia perjudicial y
2. Este equipo o dispositivo debe aceptar cualquier
interferencia, incluyendo la que pueda causar su operación
no deseada.
U.S. Federal Communications Commission (FCC) Statements
Compliance Statement
The changes or modifications not expressly approved by the party
responsible for compliance could void the user’s authority to operate
the equipment.
This device complies with part 15 of the FCC Rules. Operation is
subject to the following two conditions:
1. This device may not cause harmful interference, and
2. This device must accept any interference received,
including interferences that may cause undesired
operation.
Class A Part 15 Statement
This device has been tested and found to comply with the limits for a
Class A digital device, pursuant to Part 15 of the FCC Rules. These
limits are designated to provide reasonable protection against
harmful interferences in a residential installation. This device
generates, uses and can radiate radio frequency energy and, if not
installed and used in accordance with the instruction manual, may
cause harmful interference to radio communications. Operation of
this equipment in a residential area is likely to cause harmful
interference in which case the user will be required to correct the
interference at his own expense.
EU Countries
This device when installed complies with the essential requirements
and other relevant provisions of EMC Directive 2014/30/EU, and LVD
Directive 2014/35/EU. A copy of the Declaration may be obtained
from
http://support.avaya.com or Avaya Inc., 4655 Great America
Parkway, Santa Clara, CA 95054–1233 USA.
Warning:
This device is compliant with Class A of CISPR 32. In a
residential environment this device may cause radio
interference.
Brazil Statement
Este equipamento não tem direito à proteção contra interferência
prejudicial e não pode causar interferência em sistemas devidamente
autorizados
General Safety Warning
• Use only the Avaya-approved Limited Power Source power
supplies specified for this product.
• Ensure that you:
- Do not operate the device near water.
- Do not use the device during a lightning storm.
- Do not report a gas leak while in the vicinity of the leak.
- For accessory power supply: Use only a limited power
supply with 12VDC and 3.33A output, and products that
conform to Radio Equipment Directive, EU directive
2014/35/eu.
• Do not place a naked flame source, such as lighted candles,
on or near the device.
• Do not intentionally hit the device or place heavy or sharp
objects on the device.
• Do not attempt to repair the device yourself. Always use a
qualified service agent to perform adjustments and repairs.
• Keep the device away from benzene, diluents, and other
chemicals.
Avertissement de sécurité général
• Utilisez uniquement les alimentations par source à puissance
limitée approuvées par Avaya et spécifiées pour ce produit.
• Assurez-vous de prendre les précautions suivantes:
- N'utilisez pas l'appareil à proximité d'une source d'eau.
- N'utilisez pas l'appareil en cas d'orage.
- En cas de fuite de gaz, éloignez-vous avant de la signaler.
- Pour l'alimentation électrique d'un auxiliaire : utilisez
uniquement une alimentation à puissance limitée sortie
12VDC, 3.33A, et des produits conformes à la directive
relative aux équipements radioélectriques, directive UE
2014/35/eu.
• N'enfoncez pas d'objets dans les trous et les orifices de
ventilation de l'appareil.
• Ne placez par sur l'appareil ou à proximité de ce dernier une
flamme libre, telle que des bougies allumées.
• Ne heurtez pas intentionnellement l'appareil et ne placez pas
d'objets lourds ou pointus sur celui-ci.

• Ne tentez pas de réparer vous-même l’appareil. Utilisez
toujours un prestataire de services qualifié pour effectuer les
réglages et les réparations.
• Conservez l'appareil loin de sources de benzène, de diluants
et d'autres produits chimiques.
Trademarks
The trademarks, logos and service marks (“Marks”) displayed in this
site, the Documentation, Hosted Service(s), and product(s) provided
by Avaya are the registered or unregistered Marks of Avaya, its
affiliates, its licensors, its suppliers, or other third parties. Users are
not permitted to use such Marks without prior written consent from
Avaya or such third party which may own the Mark. Nothing
contained in this site, the Documentation, Hosted Service(s) and
product(s) should be construed as granting, by implication, estoppel,
or otherwise, any license or right in and to the Marks without the
express written permission of Avaya or the applicable third party.
Avaya is a registered trademark of Avaya Inc.
All non-Avaya trademarks are the property of their respective owners.
Linux
®
is the registered trademark of Linus Torvalds in the U.S. and
other countries.

Contents
Chapter 1: Introduction............................................................................................................ 7
Chapter 2: Packing List............................................................................................................ 8
Chapter 3: Rear end connectors............................................................................................. 9
Chapter 4: Setting up Avaya IX Huddle Camera HC050...................................................... 10
Setting up Avaya IX
™
Huddle Camera HC050 as the main camera............................................ 11
Setting up Avaya IX
™
Huddle Camera HC050 as a USB camera for your Workplace Client or
Spaces client........................................................................................................................ 12
Chapter 5: HC050 Camera software client............................................................................ 15
HC050 Camera Avaya IX
™
Workplace Client setup.................................................................. 15
HC050 Camera Avaya IX
™
Spaces client setup....................................................................... 17
Chapter 6: Infrared remote control........................................................................................ 19
Chapter 7: Setting the camera IR code................................................................................. 22
Chapter 8: Maintenance and incorrect use.......................................................................... 23
Chapter 9: Advanced parameters ......................................................................................... 24
May 2020 Using Avaya IX
™
Huddle Camera HC050 6
Comments on this document? [email protected]

Chapter 1: Introduction
The Avaya HC050 USB PTZ camera for the Avaya XT Series brings a high quality full HD video
source to your Avaya IX video endpoint, with HD 1080p and 30 fps, including 12x optical zoom, 16x
digital zoom (total 192x), and an optimal horizontal field of view for video conference rooms. It can
also be used as an HD camera for your Avaya IX
™
Workplace Client or Avaya IX
™
Spaces client.
May 2020 Using Avaya IX
™
Huddle Camera HC050 7
Comments on this document? [email protected]

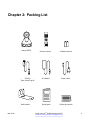
Chapter 2: Packing List
Avaya HC050
Remote control 2x AAA batteries
USB 3.0
Type-A and Type-B
AC adapter
Power cable
Wall bracket Quick guide
Safety declaration
May 2020 Using Avaya IX
™
Huddle Camera HC050 8
Comments on this document? [email protected]

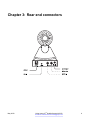
Chapter 3: Rear end connectors
-
+
May 2020 Using Avaya IX
™
Huddle Camera HC050 9
Comments on this document? [email protected]

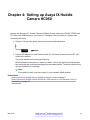
Chapter 4: Setting up Avaya IX Huddle
Camera HC050
You can use the Avaya IX
™
Huddle Camera HC050 as the main camera on XT4300, XT5000, and
XT7100 or as a USB camera for your Avaya IX
™
Workplace Client or Avaya IX
™
Spaces client.
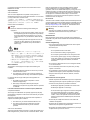
Connecting the power
1. Plug the C13 end of the power cable into the power cable transformer.
2. Plug the AC adapter into an AC outlet and the DC 12V power connector into the DC 12V
socket of the camera.
The power indicator on the front panel lights up.
After the camera is powered on, it starts to initialize. It tilts to the top limit position and then
both horizontal and vertical before stopping at the middle position. The motor stops running
and the initialization is completed.
Note:
If the position preset 0 has been stored, it is the camera’s default position.
Related links
Setting up Avaya IX Huddle Camera HC050 as the main camera on page 11
Setting up Avaya IX Huddle Camera HC050 as a USB camera for your Workplace Client or
Spaces client on page 12
May 2020 Using Avaya IX
™
Huddle Camera HC050 10
Comments on this document? [email protected]

Setting up Avaya IX
™
Huddle Camera HC050 as the main
camera
About this task
You can use the Avaya IX
™
Huddle Camera HC050 as the main camera on XT4300, XT5000, and
XT7100. The HC camera has embedded microphones which by default are active as the audio
source input of the XT codec.
Note:
Camera presets are not accessible using the XT remote control. It is possible to store and
recall presets using the camera remote control.
Before you begin
Connect the power cable, see Setting up Avaya IX Huddle Camera HC050 on page 10.
Procedure
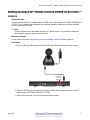
1. Plug the USB Type-B connector into the USB Type-B socket at the rear of the camera.
XT Series Codec Unit
Plug the USB
connector into
the upper
USB socket
2. Plug the USB Type-A connector into the upper USB Type-A socket at the rear of the XT
Series endpoint (XT4300, XT5000 or XT7100).
3. Remove the lens cap. You can use the lens cap for privacy.
Setting up Avaya IX
™
Huddle Camera HC050 as the main camera
May 2020 Using Avaya IX
™
Huddle Camera HC050 11
Comments on this document? [email protected]

4. If you are using Avaya IX
™
Huddle Camera HC050 as the first camera, you must enable it
as the default camera in one of the following two ways:
• Using the directly attached interface (monitor and keyboard), select: Configure >
Advanced > I/O connections > Cameras > General > Default Camera > USB
• Through the web using the IP address, select: Administrator Settings > I/O
Connections > Cameras > General > Default camera > USB
The video signal source for the XT unit is changed to the USB port.
5. To configure the audio source, see Avaya IX Video Conferencing XT Series Deployment
Guide.
Related links
Setting up Avaya IX Huddle Camera HC050 on page 10
Setting up Avaya IX
™
Huddle Camera HC050 as a USB
camera for your Workplace Client or Spaces client
About this task
You can use the Avaya IX
™
Huddle Camera HC050 as a USB camera for your Avaya IX
™
Workplace Client or Avaya IX
™
Spaces client. The audio source is the embedded microphones.
Note:
Under this configuration, you can control Avaya IX
™
Huddle Camera HC050 using the
provided remote control.
Setting up Avaya IX Huddle Camera HC050
May 2020 Using Avaya IX
™
Huddle Camera HC050 12
Comments on this document? [email protected]

Before you begin
Connect the power cable, see
Setting up Avaya IX Huddle Camera HC050 on page 10.
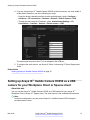
Procedure
1. Plug the USB Type-B connector into the USB Type-B socket at the rear of the camera.
2. Remove the lens cap. You can use the lens cap for privacy.
3. Plug the USB Type-A connector into your laptop USB port. To ensure optimal camera
performance plug it into a USB 3.x port and not a USB hub or docking station. Plugging the
camera into a USB 2.0 port does not guarantee proper behavior in all the possible
scenarios and with all laptop models.
USB 3.0 cable
USB 3.0 port
HDMI cable
HDMI
(not included)
HDMI
Setting up Avaya IX
™
Huddle Camera HC050 as a USB camera for your Workplace Client or Spaces client
May 2020 Using Avaya IX
™
Huddle Camera HC050 13
Comments on this document? [email protected]

Related links
Setting up Avaya IX Huddle Camera HC050 on page 10
Setting up Avaya IX Huddle Camera HC050
May 2020 Using Avaya IX
™
Huddle Camera HC050 14
Comments on this document? [email protected]

Chapter 5: HC050 Camera software client
After you install the camera, you must configure the camera to be the source camera for your
desired software client application. Following are setup procedures for the Avaya IX
™
Workplace
Client and the Avaya IX
™
Spaces client.
Note:
The camera is also compatible with third party conferencing clients such as Microsoft
®
Skype for
Business, Microsoft
®
Teams, Zoom
®
, BlueJeans
®
and others. Refer to the relevant service
provider documentation to select the camera from the list of video resources on the selected
client.
Related links
HC050 Camera Avaya IX Workplace Client setup on page 15
HC050 Camera Avaya IX Spaces client setup on page 17
HC050 Camera Avaya IX
™
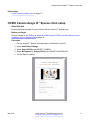
Workplace Client setup
About this task
Perform the following steps to use the camera with the Avaya IX
™
Workplace Client.
Before you begin
Plug the camera in, see
Setting up Avaya IX Huddle Camera HC050 as a USB camera for your
Workplace Client or Spaces client on page 12.
Procedure
1. Run the Avaya IX
™
Workplace Client application on Windows or macOS.
2. Select the Settings > User Preferences > Audio/Video menu and select the HC camera
among the available cameras.
May 2020 Using Avaya IX
™
Huddle Camera HC050 15
Comments on this document? [email protected]

Figure 1: Windows
Figure 2: macOS
3. It is possible to select the Avaya IX
™
Huddle Camera HC050’s microphone for video and
audio input.
HC050 Camera software client
May 2020 Using Avaya IX
™
Huddle Camera HC050 16
Comments on this document? [email protected]

Related links
HC050 Camera software client on page 15
HC050 Camera Avaya IX
™
Spaces client setup
About this task
Perform the following steps to use the camera with the Avaya IX
™
Spaces client.
Before you begin
Plug the camera in, see Setting up Avaya IX Huddle Camera HC050 as a USB camera for your
Workplace Client or Spaces client on page 12.
Procedure
1. Run the Avaya IX
™
Spaces client application on Windows or macOS.
2. Select Audio/Video Settings.
3. Select Avaya HC050 under SELECT CAMERA.
4. Select Microphone (2– Avaya HC050) under SELECT MICROPHONE.
5. Join the Spaces meeting.
HC050 Camera Avaya IX
™
Spaces client setup
May 2020 Using Avaya IX
™
Huddle Camera HC050 17
Comments on this document? [email protected]

Related links
HC050 Camera software client on page 15
HC050 Camera software client
May 2020 Using Avaya IX
™
Huddle Camera HC050 18
Comments on this document? [email protected]

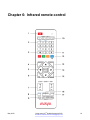
Chapter 6: Infrared remote control
May 2020 Using Avaya IX
™
Huddle Camera HC050 19
Comments on this document? [email protected]

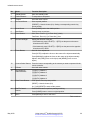
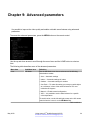
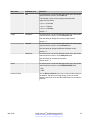
No. Name Function Description
1 Standby Button Enter into standby mode.
2 Position Buttons To set preset or call preset.
3 * Button Used with other buttons.
4 Set Preset Button Store a preset position.
[PRESET] + Numeric button (0-9): Setting a corresponding numeric key
preset position.
5 Home Button Press [HOME] back to the middle position.
6 Back Button Press to return to previous.
7 Zoom Buttons Slow Zoom: Zoom In [+] or Zoom Out [-] slowly
Fast Zoom: Zoom In [+] or Zoom Out [-] fast
8 Set Pan Left/Right Setting the direction of the pan.
• Simultaneously press [L/R SET] + 1 [STD]: set the pan turn the same
direction as the L/R Set.
• Simultaneously press [L/R SET] + 2 [REV]: set the pan turn the opposite
direction as the L/R Set.
9 Focus Buttons Used for focus adjustment.
Press [AUTO] to adjust the focus on the center of the object automatically.
Press [MANUAL] to adjust the focus on the center of the object manually.
Adjust it with [FAR] (Focus on far object) and [NEAR] (Focus on near
object).
10 Camera Select Buttons Press the button corresponding to the camera you want to operate with the
remote controller.
11 # Button Used with other buttons.
12 Set Camera IR
Address Buttons
[*]+[#]+[F1]: Address 1
[*]+[#]+[F2]: Address 2
[*]+[#]+[F3]: Address 3
[*]+[#]+[F4]: Address 4
13 Clear Preset Buttons Clear preset: Erase a preset position.
[RESET] + Numeric button (0-9)
Or: [*]+[#]+[RESET] to erase all the presets.
14 Pan/Tilt Control
Buttons
Press arrow buttons to perform panning and tilting.
Press [HOME] button to return to original position.
15 Menu Press [MENU] to enter or exit menu.
Table continues…
Infrared remote control
May 2020 Using Avaya IX
™
Huddle Camera HC050 20
Comments on this document? [email protected]
Page is loading ...
Page is loading ...
Page is loading ...
Page is loading ...
Page is loading ...
-
 1
1
-
 2
2
-
 3
3
-
 4
4
-
 5
5
-
 6
6
-
 7
7
-
 8
8
-
 9
9
-
 10
10
-
 11
11
-
 12
12
-
 13
13
-
 14
14
-
 15
15
-
 16
16
-
 17
17
-
 18
18
-
 19
19
-
 20
20
-
 21
21
-
 22
22
-
 23
23
-
 24
24
-
 25
25


Ask a question and I''ll find the answer in the document
Finding information in a document is now easier with AI
Related papers
-
Avaya Vantage Installing And Administering
-
Avaya 273909 User manual
-
Avaya B179 Release Notes
-
-
Avaya HC010 User guide
-
-
-
-
-
Avaya J100 User manual
Other documents
-
Fujifilm X100S User manual
-
A T IKON 100 User guide
-
-
SonicWALL SMA 1000 Series User guide
-
 HRT Huddle Hub One+ Installation guide
-
Home Decorators Collection 1178810210 Operating instructions
-
ClearOne HUDDLE CONTROL User manual
-
Home Decorators Collection 1185810410 Operating instructions
-
Key Digital KD-App Owner's manual
-
FSR HVTB-MINI28-EM Operating instructions
