Page is loading ...

ICS-2000 Ion Chromatography System
Installation Instructions
Document No. 031858
Revision 03
April 2006

©2006 by Dionex Corporation
All rights reserved worldwide.
Printed in the United States of America.
This publication is protected by federal copyright law. No part of this publication
may be copied or distributed, transmitted, transcribed, stored in a retrieval system, or
transmitted into any human or computer language, in any form or by any means,
electronic, mechanical, magnetic, manual, or otherwise, or disclosed to third parties
without the express written permission of Dionex Corporation, 1228 Titan Way,
Sunnyvale, California 94088-3603 U.S.A.
DISCLAIMER OF WARRANTY AND LIMITED WARRANTY
THIS PUBLICATION IS PROVIDED “AS IS” WITHOUT WARRANTY OF
ANY KIND. DIONEX CORPORATION DOES NOT WARRANT,
GUARANTEE, OR MAKE ANY EXPRESS OR IMPLIED
REPRESENTATIONS REGARDING THE USE, OR THE RESULTS OF THE
USE, OF THIS PUBLICATION IN TERMS OF CORRECTNESS, ACCURACY,
RELIABILITY, CURRENTNESS, OR OTHERWISE. FURTHER, DIONEX
CORPORATION RESERVES THE RIGHT TO REVISE THIS PUBLICATION
AND TO MAKE CHANGES FROM TIME TO TIME IN THE CONTENT
HEREINOF WITHOUT OBLIGATION OF DIONEX CORPORATION TO
NOTIFY ANY PERSON OR ORGANIZATION OF SUCH REVISION OR
CHANGES.
TRADEMARKS
AES, Atlas, Chromeleon, EluGen, IonPac, OnGuard, and SRS are registered
trademarks of Dionex Corporation. CarboPac, MicroMembrane, MMS, Reagent-
Free, and RFIC are trademarks of Dionex Corporation.
Acrobat, Adobe, and Adobe Reader, are registered trademarks of Adobe Systems,
Incorporated.
PEEK is a trademark of Victrex PLC.
Teflon is a registered trademark of E.I. duPont de Nemours & Company.
Microsoft and Windows are registered trademarks of Microsoft Corporation.
PRINTING HISTORY
Revision 01, March 2003
Revision 02, September 2005
Revision 03, April 2006

Doc. 031858-03 4/06 i
Contents
1 Facility Requirements . . . . . . . . . . . . . . . . . . . . . . . . . . . . . . . . . . . . . . . 1
2 Unpacking the ICS-2000 System . . . . . . . . . . . . . . . . . . . . . . . . . . . . . . 2
2.1 Unpacking the Computer (North America only). . . . . . . . . . . . . 4
2.2 Unpacking the Computer (outside North America) . . . . . . . . . . 4
3 Installing Chromeleon . . . . . . . . . . . . . . . . . . . . . . . . . . . . . . . . . . . . . . . 5
4 Installing the Chromeleon Software License . . . . . . . . . . . . . . . . . . . . . 6
5 Connecting the ICS-2000 to the Chromeleon PC . . . . . . . . . . . . . . . . . 10
5.1 Connecting the ICS-2000 to the PC . . . . . . . . . . . . . . . . . . . . . 10
5.2 Connecting Additional USB Devices . . . . . . . . . . . . . . . . . . . . 11
6 Connecting the Power Cord . . . . . . . . . . . . . . . . . . . . . . . . . . . . . . . . . . 12
7 Turning On the ICS-2000 Power . . . . . . . . . . . . . . . . . . . . . . . . . . . . . . 13
8 Setting Up Chromeleon . . . . . . . . . . . . . . . . . . . . . . . . . . . . . . . . . . . . . 15
8.1 Assigning the ICS-2000 to a Timebase. . . . . . . . . . . . . . . . . . . 15
8.2 Assigning DX-LAN Devices to the Timebase (Optional) . . . . 20
9 Installing and Plumbing the Columns and Suppressor . . . . . . . . . . . . . 23
9.1 Setting Up the Column Heater . . . . . . . . . . . . . . . . . . . . . . . . . 23
9.2 Installing the Columns. . . . . . . . . . . . . . . . . . . . . . . . . . . . . . . . 24
9.3 Installing the Suppressor. . . . . . . . . . . . . . . . . . . . . . . . . . . . . . 25
10 Connecting the Waste Lines . . . . . . . . . . . . . . . . . . . . . . . . . . . . . . . . . 27
10.1 Installing the Gas Separator Waste Tube . . . . . . . . . . . . . . . . . 27

ICS-2000 Ion Chromatography System
ii Doc. 031858-03 4/06
11 Setting Up the Eluent Reservoir . . . . . . . . . . . . . . . . . . . . . . . . . . . . . . .29
12 Setting the Eluent Level . . . . . . . . . . . . . . . . . . . . . . . . . . . . . . . . . . . . .30
13 Priming the Pump . . . . . . . . . . . . . . . . . . . . . . . . . . . . . . . . . . . . . . . . . .31
13.1 Priming the Eluent Lines with a Syringe . . . . . . . . . . . . . . . . . .32
13.2 Priming the Pump Heads with the Prime Button . . . . . . . . . . . .34
14 Setting Up the Eluent Generator . . . . . . . . . . . . . . . . . . . . . . . . . . . . . . .35
14.1 Eluent Generator Setup for KOH, LiOH, MSA, and NaOH
Eluents . . . . . . . . . . . . . . . . . . . . . . . . . . . . . . . . . . . . . . . . . . . .36
14.2 Eluent Generator Setup for Carbonate/Bicarbonate Eluent . . . .53
14.3 Eluent Generator Setup for Carbonate Eluent . . . . . . . . . . . . . .79
15 Setting Up a Chromeleon Application . . . . . . . . . . . . . . . . . . . . . . . . . .96
15.1 Verifying Chromeleon Communication. . . . . . . . . . . . . . . . . .105
16 Equilibrating the System . . . . . . . . . . . . . . . . . . . . . . . . . . . . . . . . . . .106
16.1 EluGen Cartridge Backpressure Requirements . . . . . . . . . . . .107
17 Verifying Operational Status . . . . . . . . . . . . . . . . . . . . . . . . . . . . . . . .107
18 Connecting an AS or AS50 (USB) Autosampler (Optional) . . . . . . . .108
18.1 AS or AS50 (USB) Connections . . . . . . . . . . . . . . . . . . . . . . .109
18.2 AS or AS50 (USB) Chromeleon Setup . . . . . . . . . . . . . . . . . .111
19 Connecting an AS40 Automated Sampler (Optional) . . . . . . . . . . . . .112
20 Connecting the Analog Output (Optional) . . . . . . . . . . . . . . . . . . . . . .114
21 Pressurizing the Eluent Reservoir (Optional) . . . . . . . . . . . . . . . . . . . .114
21.1 Connect the Gas Source . . . . . . . . . . . . . . . . . . . . . . . . . . . . . .115
21.2 Pressurize the Eluent Reservoir . . . . . . . . . . . . . . . . . . . . . . . .116


ICS-2000 Ion Chromatography System
iv Doc. 031858-03 4/06

Doc. 031858-03 4/06 1
Installation
This document provides instructions for the initial installation of the ICS-2000 Ion
Chromatography System.
NOTE The order of the steps is important. It is especially
important to install Chromeleon® before connecting the
USB cable and turning on the ICS-2000 power.
1 Facility Requirements
•Make sure the ICS-2000 installation site meets the following environmental
specifications:
Operating Temperature: 4 to 40 °C (40 to 104 °F)
Humidity: 5% to 95% relative humidity, noncondensing
•Provide a sturdy workbench for the ICS-2000 of a height that ensures
convenient access to the interior of the ICS-2000.
•Allow at least 15 cm (6 in) behind the ICS-2000 for power connections and
ventilation. For optimal performance, install the ICS-2000 in a draft-free
location, out of the path of air conditioning and heating vents.
•(Optional) Provide a clean gas source regulated to between 0.55 and
0.83 MPa (80 and 120 psi) for pressurization of the eluent reservoir.
•Use ASTM filtered, Type I (18-megohm) deionized water when preparing
eluent and regenerant.

ICS-2000 Ion Chromatography System
2Doc. 031858-03 4/06
2 Unpacking the ICS-2000 System
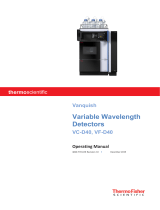
1. After removing the ICS-2000 from the shipping box and removing the top
layer of foam, remove the next layer of foam (see Figure 1).
Figure 1. Unpacking the ICS-2000
2. Set the eluent bottle on top of the
ICS-2000 (see Figure 2).
3. TURN OVER THE EGC
HOLDER, and set it on top of the
ICS-2000.
Figure 2. ICS-2000 After Installing
Eluent Bottle and EGC Holders
Eluent
Bottle
EGC Holder
(upside down)
EGC Holder
(right-side up)

Unpacking the ICS-2000 System
Doc. 031858-03 4/06 3
4. Remove the next layer of foam and remove the Ship Kit box (see Figure 3).
Figure 3. ICS-2000 with Ship Kit
5. The bottom foam layer has two cutouts on either side of the ICS-2000
module; use these as handholds when lifting the module (see Figure 3).
6. Lift the ICS-2000 out of the bottom layer of foam and set it on a workbench.
Inspect the ICS-2000 for any shipping damage.
Two or more persons should lift the ICS-2000, which weighs 30 kg
(66 lb). Lift the ICS-2000 only from each side of the cabinet bottom.
Lifting from the front door will damage the door hinges.
Au moins deux personnes peuvent soulever le ICS-2000: il pèse 30 kg
(66 lb). Ne soulevez le ICS-2000 que par chaque côté du fond de
l'armoire. Son soulèvement par la porte du panneau avant
endommagera les charnières de la porte.
Der ICS-2000 wiegt über 20 kg. Daher sollte das Gerät nur von zwei
oder mehr Personen angehoben werden. Greifen Sie dazu an beiden
Seiten unter das Gerät. Heben Sie den Autosampler nicht an der
Vordertür an, da dadurch die Türangeln beschädigt werden könnten.
Ship
Kit
Cutouts
for lifting

ICS-2000 Ion Chromatography System
4Doc. 031858-03 4/06
2.1 Unpacking the Computer (North America only)
NOTE These instructions assume that Chromeleon
software was installed on the computer before
shipping.
1. Remove the central processing unit (CPU), keyboard, mouse, and all
documentation from the computer box and place these items on a
workbench.
2. Remove the monitor from its box and place it on the workbench.
3. Follow the instructions in the computer installation guide to hook up
the monitor, mouse, keyboard, and CPU.
4. Go on to Section 4, “Installing the Chromeleon Software License.”
2.2 Unpacking the Computer (outside North America)
1. Refer to Installing the Chromeleon IC System (Document No.
031883) to verify that the computer being used meets Chromeleon
specifications. The manual is on the Dionex Reference Library CD-
ROM (P/N 053891).
2. Remove the central processing unit (CPU), keyboard, mouse, and all
documentation from the computer box and place these items on a
workbench.
3. Remove the monitor from its box and place it on the workbench.
4. Follow the instructions in the computer installation guide to hook up
the monitor, mouse, keyboard, and CPU.
5. If Chromeleon is not installed on the computer, go on to Section 3,
“Installing Chromeleon.”
6. If Chromeleon is already installed on the computer, go on to
Section 4, “Installing the Chromeleon Software License.”

Installing Chromeleon
Doc. 031858-03 4/06 5
3 Installing Chromeleon
NOTES
•Windows® 2000 or Windows XP is required for controlling the ICS-2000
with Chromeleon. Chromeleon version 6.5 SP2 or later is required.
•To install Chromeleon, you must log onto Windows 2000 or XP with
administrator privileges. Administrator privileges are not required to
run Chromeleon.
•For additional details about installing Chromeleon, refer to Installing the
Chromeleon Chromatography Management System with a Dionex Ion
Chromatograph (IC) (Document No. 031883)
1. Turn on the computer power.
2. Follow the Windows setup steps as they appear on the screen.
3. Verify that the monitor display is set to a minimum of 1024 x 768 with 16 bit
color.
4. Insert the Chromeleon CD-ROM into the CD-ROM drive.
5. The Chromeleon Setup menu appears.
6. If the Setup menu does not appear automatically, go to the Autorun folder on
the Chromeleon CD-ROM and double-click autorun.exe.
7. Select Launch Chromeleon Setup.
8. Setup now guides you through the installation procedure; follow the on-
screen instructions as they appear.
9. When prompted, select whether to add the Chromeleon Server Monitor to the
Startup group. If you select yes, the Server Monitor starts automatically when
the computer is started, and the program icon appears in the taskbar.
10. After installing the software, restart the computer.
11. Go on to Section 4, “Installing the Chromeleon Software License.”

ICS-2000 Ion Chromatography System
6Doc. 031858-03 4/06
4 Installing the Chromeleon Software License
For the Chromeleon computer to control the ICS-2000, a valid software license
must be installed. To install the license, you first install a dongle on the computer
and then enter a license “Key Code” in Chromeleon. (A dongle is an adapter that
is connected to the parallel PC interface or USB port. The dongle stores the serial
number of a Chromeleon computer.)
NOTE If the software license is managed with a License
Server, a dongle is not required.
1. Plug the dongle into the appropriate port on the computer (either the parallel
or USB port, depending on the type of dongle). Tighten the connector screws
on a parallel port dongle.
2. Microsoft Windows will automatically detect the USB dongle and launch the
Found New Hardware Wizard. Complete the wizard by selecting the
following options:
•If asked whether Windows can connect to Windows Update to search for
software, select No, not this time.
IMPORTANT
Installing DX-LAN Devices
If you will also be installing a module that requires a DX-LAN interface
connection, verify that the following steps are completed before continuing:
1. If it is not already installed, install the DX-LAN card in the module. Refer
to the operator’s manual for the module for installation instructions.
2. Install the DX-LAN card in the computer.
3. Connect the module to the DX-LAN.
4. Install the DX-LAN card driver.
Instructions for Steps 2 through 4 are in Installing the Chromeleon
Chromatography Management System with a Dionex Ion Chromatograph (IC)
(Document No. 031883).

Installing the Chromeleon Software License
Doc. 031858-03 4/06 7
•Select the Install the software automatically (Recommended) option (see
Figure 4) (it is not necessary to insert a hardware installation CD or floppy
disk).
Figure 4. Windows Found New Hardware Wizard
3. If it is not already running, start the Chromeleon Server Monitor by double-
clicking the Server Monitor icon on the Windows taskbar.
If the Server Monitor icon is not on the taskbar, click Start on the taskbar and
select All Programs > Chromeleon > Server Monitor.

ICS-2000 Ion Chromatography System
8Doc. 031858-03 4/06
4. If the server is not already running, start it by clicking Start (see Figure 5).
5. Check the server status:
•If “Chromeleon Server is running idle” is displayed, the license Key Code
was entered before shipping the computer, and you can omit the
remaining steps in this section. Click Close and go on to Section 5.
•If “Chromeleon Server is running idle (Evaluation Mode)” is displayed
(see Figure 6), the license Key Code has not yet been entered. If this is the
case, go on to Step 6.
6. Open Chromeleon (select Start>Programs (or All
Programs)>Chromeleon>Chromeleon).
Figure 5. Server Not Running
Figure 6. Server Evaluation Mode

Installing the Chromeleon Software License
Doc. 031858-03 4/06 9
7. Select File>Preferences to open the Preferences dialog box (see Figure 7).
Select the License tab and click Dongle. Enter the Key Code exactly as it
appears on the Chromeleon Software License key code sheet. Click OK.
8. Check the Server Monitor status. It should now display “Chromeleon Server
is running idle.” (see Figure 8).
9. Click Close to close the Server Monitor window.
10. Go on to Section 5.
Figure 7. Preferences: License Page
Figure 8. Server Running

ICS-2000 Ion Chromatography System
10 Doc. 031858-03 4/06
5 Connecting the ICS-2000 to the Chromeleon PC
The ICS-2000 rear panel provides a USB receptacle for connecting the ICS-2000
to a USB port on the Chromeleon PC. The rear panel also provides two USB ports
for connecting other Dionex USB-compliant modules to the system.
5.1 Connecting the ICS-2000 to the PC
1. Locate the USB cable (P/N 960779) in the ICS-2000 Ship Kit
(P/N 064375).
2. Plug the cable’s “A” connector into a USB port on the Chromeleon
PC and plug the cable’s “B” connector into the USB receptacle
(labeled FROM PC) on the ICS-2000 rear panel (see Figure 9).
Do not turn on the power to the ICS-2000 or other USB module(s) until
after you connect the USB cable.
Before connecting the USB cable, verify that Chromeleon is installed.
If not, Windows will be unable to identify the new USB device when
the power is turned on. See Section 3 to install Chromeleon.
Figure 9. Example Connections: One ICS-2000 Connected to the Computer
ICS-2000
USB Cable
A
B
Plug the “B”
into the FROM PC
receptacle on the ICS-2000.
USB cable’s
connector Plug the “A”
into USB
port on the Chromeleon PC
.
USB cable’s
connector the
Chromeleon PC
FROM PC USB receptacle
on the ICS-2000 rear panel

Connecting the ICS-2000 to the Chromeleon PC
Doc. 031858-03 4/06 11
5.2 Connecting Additional USB Devices
The ICS-2000 provides two USB ports for connecting additional Dionex
USB-compliant modules to the system.
To connect an additional USB module, plug the “A” connector on a USB
cable into an “A” port (labeled TO MODULE) on the ICS-2000 rear panel
and plug the cable’s “B” connector into the USB receptacle on the USB
module (see Figure 10).
NOTE If the number of USB devices in the system exceeds the
number of available USB ports, connect the devices to
the system with a USB-compliant, full-speed external
hub. One or more hubs is also required if the ICS-2000
or other USB device is more than 5 meters (16 ft) from
the PC. Refer to the manual provided by the hub vendor
for complete installation instructions.
Figure 10. Example Connections: Two Dionex USB Modules
Connected to the ICS-2000
The USB standard limits the USB cable length to 5 meters (16 ft). Each
USB device can be separated from the PC by no more than five hubs.
Thus, each USB device can be located no more than 30 meters
(32 yds) from the PC.

ICS-2000 Ion Chromatography System
12 Doc. 031858-03 4/06
6 Connecting the Power Cord
Connect the power cord (IEC 320 C13) (ordered separately) from the main power
receptacle on the rear panel to a grounded power source. The ICS-2000 power
supply is auto-sensing, so no adjustment is required to select the line voltage.
Go on to Section 7.
SHOCK HAZARD—To avoid electrical shock, use a grounded
receptacle. Do not operate the ICS-2000 or connect it to AC power
mains without an earthed ground connection.
The power supply cord is used as the main disconnect device. Make
sure the socket-outlet is located near the ICS-2000 and is easily
accessible.
Operation at AC input levels outside of the specified operating voltage
range may damage the ICS-2000.
DANGER D'ÉLECTROCUTION—Pour éviter toute électrocution, il faut
utiliser une prise de courant avec prise de terre. Ne l'utilisez pas et ne
le branchez pas au secteur C.A. sans utiliser de branchement mis à la
terre.
Le cordon d'alimentation principal est utilisé comme dispositif
principal de débranchement. Veillez à ce que la prise de base soit
située/installée près du module et facilement accessible.
STROMSCHLAGGEFAHR—Zur Vermeidung von elektrischen
Schlägen ist eine geerdete Steckdose zu verwenden. Das Gerät darf
nicht ohne Erdung betrieben bzw. an Wechselstrom angeschlossen
werden.
Das Netzkabel ist das wichtigste Mittel zur Stromunterbrechung.
Stellen Sie sicher, daß sich die Steckdose nahe am Gerät befindet und
leicht zugänglich ist.

Turning On the ICS-2000 Power
Doc. 031858-03 4/06 13
7 Turning On the ICS-2000 Power
1. If it is not already on, turn
on the computer power and
log onto Windows 2000 or
Windows XP as an
administrator.
2. If the Chromeleon Server is
not running (the icon on the
taskbar is crossed out in red
), start the Server by
right-clicking the icon and
selecting Start Server.
When the server starts, the
icon changes to gray .
3. Press the power switch on
the ICS-2000 rear panel (see
Figure 11) to turn on the
power.
Figure 11. ICS-2000 Rear Panel
4. Windows automatically detects the new USB device. A message flashes on
the screen to inform you that new hardware was found.
Before turning on the ICS-2000 power, verify that Chromeleon
software is installed. See Section 3 for installation instructions. If
Chromeleon is not installed first, Windows will be unable to identify
the new USB device.
Power
Switch

ICS-2000 Ion Chromatography System
14 Doc. 031858-03 4/06
5. The Found New Hardware Wizard appears. This wizard installs the ICS-2000
device into the Windows Device Manager. Complete the wizard by selecting
the following options:
•If asked whether Windows can connect to Windows Update to search for
software, select No, not this time.
•Select the Install the software automatically (Recommended) option
(see Figure 12).
•After you click Next, Windows installs the software.
•When the wizard finishes installing the software, click Finish.
6. Go on to Section 8.
Figure 12. Windows Found New Hardware Wizard
/