Page is loading ...

CAMO Clip Installation Instructions
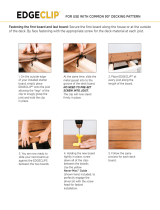
1. Installing the starter board:
a. Secure the starter board by fastening the outside edge with CAMO capstock/composite
screws or trim head screws.
b. Place first clip firmly in groove over the center of the joist and partially drive the screw
into the joist to hold clip in place in groove. Do not fully drive the screw at this time.
c. Move to next joist and repeat down the length of the deckboard, partially driving each
screw holding the clips in place.
2. Installing the second board:
a. Slide the next deck board into place positioning so that clip is fully inserted into the
groove along the entire length of the new board. Clips provide automatic and uniform
¼” spacing.
b. Next, complete the fastening of one side of the deck board by driving each screw
completely, firmly fastening each clip into place. One side of the deckboard will now be
held firmly in place. You are ready to move to the other side.
c. On the outside edge of the deck board, repeat the process of inserting the clips in the
groove at each joist and partially fastening each one to hold in place.
d. Repeat step 2A to complete the fastening of the board.
3. Repeat Step 2 for each board in succession until all deckboards are in place.
4. Finishing: Fasten the outside edge of the last deck board in place using CAMO
composite/capstock screws or trim head screws.
/


