Page is loading ...

decking | railing | lighting | fastening TimberTech.com
Installing TimberTech
®
Decking .................................................................................... 2
Fastening Methods ........................................................................................................ 4
TimberTech
®
Square Shouldered Boards ...................................................................... 5
Trimming a TimberTech
®
Deck ..................................................................................... 6
CONCEALoc
®
Hidden Fasteners .................................................................................... 7
Co r tex
®
Hidden Fastening System .............................................................................. 10
Care and Cleaning ....................................................................................................... 12
Warranty ...................................................................................................................... 13
Notes ........................................................................................................................... 14
Decking Installation & Maintenance Guide
TimberTech PRO
™
, TimberTech EDGE
™
, and Specialty Decking

Page 2
Installing TimberTech
®
Decking
Tools Required
TimberTech boards can be installed with a minimum number
of readily available tools. However, many other tools are
available that can provide even greater efficiency and ease
of installation. All tools should be used per applicable
manufacturers’ instructions. Some of the basic tool
requirements:
• Cordless Driver • Spacing Tools
• Chalk Line • Circular Saw
• Tape Measure • Safety Glasses
• Jig Saw • Drill Bits
• Carpenter Square
Use the jigsaw to cut around obstructions such as posts. A
power miter saw can also be very helpful during installation.
For a power miter or compound power miter saw a fine
finish alternate top bevel blade is also recommended. When
working with TimberTech products be sure to wear proper
clothing and safety equipment. Safety glasses should be
used during the entire installation process.
STOP! Read this section before you start!
Always make sure to visit TimberTech.com to ensure you are viewing the most current installation instructions,
care and cleaning, technical information and more.
Color and Grain Patterns
TimberTech Decking is designed to mimic the look of real
wood, and like real wood, there will be a slight difference
in color and grain pattern from board to board. This is
intentional and part of the manufacturing process, giving
TimberTech decking the most realistic and wood-like
appearance possible. This variation is purely aesthetic and
does not or will not affect the performance of the product.
TwinFinish, ReliaBoard, and DockSider are designed to
naturally weather over time and the surface grain pattern
will weather to a more consistent color. Most of the
weathering process will be complete within the first year
of the deck’s life.
Note
TimberTech is NOT intended for use as columns, support
posts, beams, joist stringers or other primary load-bearing
members. TimberTech must be supported by a code-
compliant substructure. While TimberTech products are
great for deck re-boarding (removing old deck surface
boards and installing TimberTech on code-compliant
substructure), TimberTech boards CANNOT be installed
on top of existing deck boards.
Routing
TimberTech Decking SHOULD NOT be routed aside from
routing a 2” wide groove in the side of solid boards for
start/stop of CONCEALoc.
Notching
Whenever notching a board for a post or any obstruction,
the deck board must be handled carefully and be fully
supported under the notched area when installed.
Walking Surface
TimberTech boards are intended to be installed
embossed side up. The unembossed surface is not to be
used as a walking surface. This applies to all TimberTech
boards.
Directional Notch
TimberTech’s surface on TwinFinish, ReliaBoard,
DockSider, TwinFascia and TwinRiser boards are
directional in manner. A notch has been added to one
side of the boards. When installing boards, this marked
edge must be laid to the same side for the entire
installation for a consistent appearance. Similarly,
TimberTech’s TwinFascia board and TwinRiser have one
long beveled edge on the front and back. To ensure a
consistent appearance from board to board, the beveled
edge must be laid to same side. If you rip a piece, be sure
to note the location of the bevel. See individual board
installation instructions.
Static Electricity
The buildup or generation of static electricity is a
naturally occurring phenomenon in many plastic based
products such as carpeting, upholstery, and clothing,
and can occur on alternative decking under certain
environmental conditions.
Cantilevering
All TimberTech PRO, TimberTech EDGE, TwinFinish,
Reliaboard, and Docksider can be cantilevered a
maximum of 1”. All scalloped, PRO Terrain, EDGE
Prime, and Reliaboard, can only be cantilevered on the
ends.
Safety
Unlike traditional wood, TimberTech product is splinter-
free.
Access Installation Resources 24/7.
Installation guides and videos are available on our web site at
www.timbertech.com
Do you need help with your installation?
We have an excellent customer service team that is here to
help you with your installation questions. If you need help
you can call customer service at 1-800-307-7780 or visit
TimberTech.com to view TimberTech installation videos.
TimberTech Decking should be installed using the same good
building principals used to install wood or composite decking and
in accordance with the local building codes and the installation
guidelines included below. AZEK
®
Building Products Inc. accepts no
liability or responsibility for the improper installation of this product.
TimberTech Decking may not be suitable for every application and it
is the sole responsibility of the installer to be sure that TimberTech
Decking is fit for the intended use. Since all installations are
unique, it is also the installer’s responsibility to determine specific
requirements for each deck application. AZEK Building Products
recommends that all applications be reviewed by a licensed
architect, engineer or local building official before installation. To
get more information visit TimberTech.com.

Page 3
Installing TimberTech
®
Decking
Extreme Heat Warning
Be aware of excessive heat on the surface of TimberTech
products from external sources, such as but not limited to,
fire or reflection of sunlight from energy-efficient window
products. Low-emissivity (Low-E) glass can potentially harm
TimberTech products. Low-E glass is designed to prevent
passive heat gain within a structure and can cause unusual
heat build-up on exterior surfaces. This extreme elevation
of surface temperatures, which exceeds that of normal
exposure, can possibly cause TimberTech products to melt,
sag, warp, discolor, increase expansion/contraction, and
accelerate weathering. Current or potential TimberTech
customers that have concerns about possible damage by
Low-E glass should contact the manufacturer of the product
which contains Low-E glass for a solution to reduce or
eliminate the effects of reflected sunlight.
Color and Temperature
Although TimberTech products are cooler to the touch than
many other deck board products in similar colors, all decking
products will get hot in the sun. Additionally, the darker the
decking color, the hotter it will feel.
Excessive Construction Debris
It is important during construction, that the deck’s surface
stay clear from excessive build-up of dirt, sand, and dust
from tile, concrete, landscape blocks, or any other masonry
products. If these materials are not removed immediately,
the deck surface will become difficult to clean and can
potentially damage the deck’s surface finish. TimberTech
Decking should not be used as a work surface. If a
build-up does occur please refer to the Care and Cleaning
section in TimberTech’s installation guide or website,
www.TimberTech.com.
Calculating Material Requirements
To determine how much TimberTech decking material you
will need, start by calculating the square footage of your
deck surface by multiplying length by width. Once you know
this number, divide it by the numbers provided below for 12’
boards, 16’ boards and 20’ boards.
Once you know the square footage number, divide it by 5.5 for
12’ boards, 7.3 for 16’ boards and 9.1 for 20’ boards.
When calculating the amount of decking you will need, it is
recommended that you add roughly 10% to the total for a
scrap factor.
Example: Length x Width = Total Square Footage
Square Footage ÷ by 5.5 (12’), 7.3 (16’) or 9.1 (20’) = Boards
Needed (Round the number up)
Boards Needed + 10% (Scrap Factor) = Final Number of
Boards Needed (Round the number up)
Butt Joint Gapping Requirements
32° F and below 33° F to 74° F 75° F and above
3/16" gap 1/8" gap 1/32" gap
Working With TimberTech Boards
Gapping Requirements For All TimberTech Boards
• Side-to-side board gapping must be minimum 1/8” to
maximum 3/16”.
• Allow 3/16” minimum gap where the boarding meets any
adjoining structure or post.
• Follow these butt joint gapping guidelines for all
TimberTech boards: a
Expansion and Contraction
TimberTech deck boards will experience expansion and
contraction with changes in temperature. Expansion and
contraction are most significant where extreme temperature
changes occur. Fastening the deck boards according to
the gapping requirements noted in the following table
accommodates for this movement.
Changes in length are most significant during the installation
process, and should be accounted for if working in extreme
temperatures. A good example would be cutting your boards
during a hot afternoon, letting them sit outside overnight
in the cool air and then installing them the next morning.
Chances are, you will notice a certain amount of contraction.
The best way to minimize this problem is to fasten your
boards as soon after cutting as possible.
For a Wildlife Urban Interface compliant installation per SFM
12-7A-4A, the following products should be used with the
side-to-side gapping below:
• TimberTech EDGE Premier Square Shouldered Decking
installed with edge to edge gap spacing of 1/8”.
• TimberTech PRO Reserve-FR Grooved Decking installed
with edge to edge gap spacing of a maximum 3/16”
(minimum 1/8”).
• TimberTech PRO Reserve-FR Square Shouldered
Decking installed with edge to edge gap spacing of 1/8”.

Page 4
TimberTech
®
Fascia and Riser Boards
Using screws with proper installation of TimberTech
Fascia provides the best long-term holding. TimberTech
recommends the use of TimberTech TOPLoc Fascia Fasteners
for best results. Refer to gapping requirements on page 3 for
proper installation.
For Use with TOPloc Fascia Fasteners:
Using the TOPLoc Fascia Bit, pre-drill 2” from the top and
bottom alternating a maximum of 12”. It is recommended
that screws are evenly spaced for the best look.
• Set fascia in place being sure to follow proper gapping
requirements.
• Drive TOPLoc fascia fastener 90 degrees with the fascia
surface so that the screw head is flush with the surface.
Do not completely torque down screw; screw should
serve as a hanging mechanism to allow for expansion and
contraction in the fascia.
• Continue fastening in pattern described being sure to work
left to right or right to left. This will ensure flatness in the fascia.
• If preferred, TopLoc Fascia Fasteners may be installed 2
every 12", 2" from the top and bottom.
12"
Installing TimberTech
®
Decking
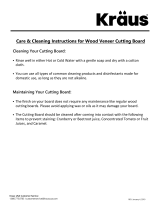
Installation Preparation
Follow these guidelines for best deck installation:
• TimberTech Deck Boards are one-sided products. Deck Boards are to
be installed with the grain side up for the walking surface. Fascia is
to be installed grain side out.
• TimberTech Fascia is one-sided.
• Prior to installation, check to make sure all joists are level,
structurally sound, and there are no nails or screws protruding.
• Ensure that all joists are crowned correctly and that all joists are
level across the top as TimberTech Deck will conform to the surface
contour of the substructure.
• Proper joist spacing is required for proper installation. Joist spacing
should never exceed 16” on center. For a more rigid feel,
12” may be preferred.
16”BASIC INSTALLATION
SUBSTRUCTURE
16” on center maximum joists.
(12” on center for commercial applications)
PICTURE FRAME INSTALLATION
SUBSTRUCTURE
16” on center maximum joists plus additional
support for picture frame structure (12” on
center for commercial applications)
DIAGONAL INSTALLATION
SUBSTRUCTURE
12” on center maximum joists.
More severe angles may require closer joist
spacing.
1 2 3
16”
16”
12”
• For best results, installing solid wood blocking between each joist,
placed every 4’ - 6’ within the structure, can help reduce movement
or twisting of the joists. Limiting joist movement can help reduce
excessive gapping and also ensure more uniform finished surface of
the TimberTech Deck.

Page 5
Fastening Methods
TimberTech
®
Square Shouldered Boards
TimberTech recommends the use of TimberTech Cortex
or TimberTech TOPLoc for square shouldered deck board
installations. Pre-drilling is required when within 1-1/2”
of the ends of the board and for temperatures below 45
degrees Fahrenheit to avoid splitting and screw shear.
Alternate fasteners are stainless steel or high-quality
coated composite deck screws.*
TimberTech PRO, TimberTech EDGE, TwinFinish and
Reliaboard:
Use Cortex, TOPLoc or a minimum #8 x 2-1/2”
stainless steel or other high-quality coated composite
deck screws.*
DockSider: Use TOPLoc Stainless Steel or a minimum #8
x 3” stainless steel or high-quality coated deck screws.*
Fastener Mushrooming:
This may occur when a non-composite deck screw is
driven into the decking. It can be greatly reduced or
eliminated by using a screw designed for composite
lumber. When installing TimberTech decking, using
TOPLoc reduces chance of mushrooming. If mushrooming
occurs, we recommend pre-dimpling the board by drilling
a hole slightly smaller in diameter than the screw head
and as deep as the screw head before driving the screen.
*TimberTech does not recommend any fastener that is not explicitly stated
in the TimberTech Decking Installation Guide. Use of any alternative
fastener does not void the TimberTech warranty; however, if a decking
failure is caused by using one of these alternative fastening methods, any
corresponding claims will be denied.
Terrain
Collection
5.360”
.94”
Reliaboard
5.360”
.94”
TwinFinish
5.360”
1”
Reserve, Legacy
and Tropical
Collections
(where available)
5.360”
.94”
Docksider
5.50”
1.25”
Fasteners should be installed perpendicular to the deck surface and driven flush; do not overdrive or splitting will
occur. Always double joists at butt seams.
Do not toe screw deck boards as this will cause splitting.
Always be sure to check and cut the factory cut ends of all
boards to ensure they are square.
EDGE Prime
and Prime+
5.360”
.94”
EDGE Premier
5.360”
.89”
TimberTech EDGE Collection
(3- Sided Cap)
TimberTech PRO Collection
(4- Sided Cap)
Any fastener driven through the edge of a TimberTech
PRO, TimberTech EDGE, Reliaboard, TwinFinish, or
Docksider board, should not be used to avoid splitting of
the board. CAMO
®
Edge Deck Fastener is an examples
of this type of fastener. The use of this type of fastener
voids any warranty provided with TimberTech Decking.
TimberTech Specialty

Page 6
TimberTech
®
Square Shouldered Boards
Important Information
To get information on other TimberTech products, visit
timbertech.com or ask your dealer for these installation guides:
• TimberTech boards are intended to be installed embossed
side up. The unembossed surface is not to be used as a
walking surface. This applies to all decking surfaces.
• The serrated bottom side of TwinFinish is great for accents
like benches and flower boxes.
• In areas with obstructed airflow such as roofs and
on-grade applications, a minimum of 1-1/2” sleeper system
supported by and connected to the substructure over which
the deck is built is required.
• To aid water run-off, the deck should slope 1/2” for every 8’
away from the house.
• To further minimize expansion and contraction, proper
ventilation and airflow should be considered.
• For best practices in climates with extreme temperature
cycles, limiting the length of the deck board and avoiding
affixing to the rigid length of the joist in applications such as
picture framing or parting boards can help avoid movement
and screw shear.
Square Shouldered Board Installation
Instructions
• Always be sure to check and cut the factory cut ends of all boards
to ensure they are square.
• Install from the outside edge of the deck and work toward
the house.
• Fasten no closer than 3/4” from the outside edge of each board,
using two screws per joist including end joints.
• For gapping requirements, see page 3.
• The ends of the boards must fall on a joist. Always double joists
at butt seams. Do not toe screw deck boards as this will cause
splitting.
• Always install fasteners perpendicular to board surface and drive
flush. Do not overdrive or splitting and mushrooming
will occur.
• Pre-drilling is required when within 1-1/2” of the ends of the
board and for temperatures below 45 degrees Fahrenheit to avoid
end splitting and screw shear.
• TimberTech Cortex requires pre-drilling with a 3/16” bit for ALL
applications in TimberTech Pro Tropical, Pro Legacy, and EDGE
Premier
Special conditions will require an engineering inspection and/or
reduced spans. Always consult local building codes.
Maximum Joist Spacing
90° Angle 30° Angle 45°Angle
100psf 24" 24" 24”
90° Angle 30° Angle 45° Angle
100psf 20" 18" 16"
100psf 16" 14" 12"
TwinFinish
TimberTech PRO, TimberTech EDGE, and Reliaboard
DockSider
3/4”
3/4”
Directional Notch
TwinFinish, ReliaBoard, DockSider, TwinFascia and TwinRiser Boards:
The surfaces of these products are directional in manner. A notch has
been added to one side of the boards. When installing boards, this
marked edge must be laid to the same side for the entire installation
for a consistent appearance. The TwinFascia board has one long edge
beveled on the front and back. To ensure a consistent appearance from
board to board when installing the TwinFascia, the beveled edge must
be laid to the same side. If you rip a piece of TwinFascia be sure to note
the location of the bevel on the ripped piece to ensure consistency.
Identification
Mark
Bevel
Bevel
•
If installed without proper 3/16” Pre-drill,
mushrooming will occur. Cortex or TOPLoc
fasteners are recommended for best results.
• On-grade decks must have additional provisions for drainage
beneath the deck structure.
•
For best practices, decking should not be installed in
applications where ventilation and airflow cannot be achieved.
TimberTech PRO
™
, TimberTech EDGE
™
, TwinFinish
®
, ReliaBoard
®
, and DockSider
®

Page 7
Square Shouldered Boards/Trimming a TimberTech Deck
Trimming a TimberTech Deck
TimberTech Fascia Boards:
• For Fascia and Riser Installation, see Fastening Guidelines
on page 4.
TwinFascia
®
• Cedar and Grey
• 12’ lengths – 9/16” thick by 12” wide.
Fascia
• All TimberTech PRO and EDGE colors
• 12’ lengths – 9/16” thick by 12” wide.
TimberTech Stair Risers
• Use as a riser for stairs.
• Can also be used as a fascia board for a 2x8 rim joist.
• 12’ lengths and 9/16” thick x 7-1/4” wide.
TwinRiser
®
• Cedar and Grey
Riser
• All TimberTech PRO and EDGE colors
TimberTech PRO
™
, TimberTech EDGE
™
, TwinFinish
®
, ReliaBoard
®
, and DockSider
®
Additional PRO Terrain and EDGE Prime Components
General Stair Installation
Support
Bracket
Bracket Nails
2x6 Support
1.5”x2.0” Simpson Strong Tie A23Z Galvanized Connecting Angles
1-1/2” Simpson Strong-Tie N10D5HDG (0.150 in diameter, 0.315 in head diameter) galvanized nails
PRO Terrain and EDGE Prime
and EDGE Prime+
Front View
16” O.C. Maximum
Bracket &
Nails
Stringer
2x6 Support
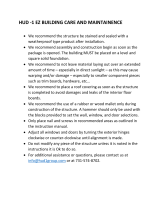
Stair Installation
TimberTech does not recommend installing boards on steps without a riser board.
• Stairs should be constructed per local code requirements.
• Ensure the stringer step is at least the depth of two full boards plus a 1/8” to
3/16” gap between boards.
• For gapping requirements, see page 3.
• Ensure there is at least one stringer for support in the middle of the stair span.
• Stair landings and multi-level decks where there is a step down should use the
same structural support as required on stairs.
PRO Terrain, EDGE Prime and EDGE Prime+ must be
used as a veneer in a stair tread application. Please
see figure to the right.
TimberTech Stair Stringer Spacing Chart
Board
Prime & Prime+
Premier
DockSider
TwinFinish
Tropical (where available)
Legacy (where available)
Reserve (where available)
ReliaBoard
Terrain
Maximum Spacing
16” When used as as veneer
9”
21”
12”
10”
10"
10”
9”
16” When used as a veneer

Page 8
CONCEALoc
®
Hidden Fastener
Important Information
CONCEALoc
®
Hidden Fastener Installation Instructions
CONCEALoc Hidden Fasteners were designed exclusively to
install TimberTech grooved and square shouldered boards.
Always be sure to check and cut the factory cut
ends of all boards to ensure they are square.
• In areas with obstructed airflow such as roofs and
on-grade applications, a minimum of 1-1/2”, sleeper system,
is required.
• Sleeper system must be supported by and connected to the
substructure over which the deck is built.
• To further minimize expansion and contraction, proper
ventilation and airflow should be considered.
• On-grade decks must have additional provisions for drainage
beneath the deck structure.
• For best practices, decking should not be installed in
applications where ventilation and airflow cannot be achieved.
• Do not use CONCELoc Hidden Fasteners or L-Bracket for
stair installation.
• For gapping requirements, see page 3
CONCEALoc Accessories
•
100-square-foot coverage box. Includes stainless steel screws.
•
Bulk Bucket – 1,000-square-foot coverage. Includes stainless
steel screws.
•
CONCEALoc Gun Pail – 500-square-foot coverage for use with the
fastener installation gun sold separately by TigerClaw. Includes
quality coated pneumatic fasteners. Stainless steel fasteners for
coastal applications available through TigerClaw.
•
L-Bracket – avoid face-screwing by using the L-Bracket on first and
last boards or as a butt seam clip to ensure a fastener-free surface.
•
CONCEALoc Router Bit – cut a 2” wide groove on a solid board
for a perfect CONCEALoc fastener fit – even allows for cutting an
installed board over a joist.
•
CONCEALoc screw packs available through
www.timbertechstore.com.
•
If using the CONCEALoc Gun Pail with the TigerClaw Installation
Gun please refer to the retail packaging for further installation
guidelines.
1
• Pre-drill with 5/32” drill bit and fasten outer
edge of the first board at each framing support
1” from the edge using TOPLoc or a #8 x 2-1/2”
stainless steel or other high-quality coated deck
screws. For a complete fastener-free surface, the
L-Bracket or Cortex can be used on first and last
boards. (Except PRO Terrain, EDGE Prime, and
Reliaboard.)
• For further instructions for the L-Bracket or
Cortex, please refer to the instructions in the
package.
INSTALL THE FIRST BOARD
2
• Fully insert the CONCEALoc fastener into
grooved edge of board. Screw hole should be
lined up with the center of support joist.
POSITION CONCEALoc
®
FASTENERS
TOOLS NEEDED
DrillSafety Glasses
Router with Slot
Cutting Blade (Optional)
Incorrect
Incorrect
Correct
Off Center
Not fully
engaged
Correct

Page 9
4
a.
b.
c.
•
Place the next board into position against the fasteners.
Slightly raise the outer edge of the board being installed and
slide it onto the fastener until the board contacts the spacer
tab. When properly installed the inserted board should be
in contact with the bent-forward spacer tab at the left end
of the clip. To achieve this use a scrap piece of decking at
least 24” in length and use it as a tamping block to drive the
board further onto the clip and the screw will fully engage the
board to the spacer tab if not already in contact. Do not use a
hammer or damage to the edge of the board will occur.
• The last board will need to have the outside edge attached
using the method described in Step #1. It may be necessary
to rip the last board to fit.
COMPLETE INSTALLATION
5
HOW TO INSTALL AT BUTT JOINTS
(UNLESS USING TIMBERTECH
®
L-BRACKET)
Offset 1/4”
From Center
3
• Install provided screw at 45° angle through
the fastener and into the joist while applying
pressure on the fastener.
• Install one fastener and screw at each joist.
• Make sure fastener is in full contact with edge
of board and the screw is holding the fastener
down tight to the deck board.
INSTALL CONCEALoc
®
FASTENERS
CONCEALoc
®
Hidden Fastener
Joists at butt joints must be
doubled up for proper
fastener attachment.
•
Install fasteners as detailed below.
Note that the two clips on the right
are shifted approximately 1/4” to
the right of center on the joists. If
this is not done the spacer tab may
fall within the gap of the butt joist.

Page 10
7
• Make two parallel cuts down the center of the board to be replaced, then remove the
center piece.
• Using a small pry bar, remove the remaining pieces of decking from the tabs.
• Using a reciprocating saw, remove the tabs on the side of the board with the screw heads showing.
• Position new board into place, and carefully drive onto remaining tabs.
• Once the board is set into position, secure the loose edges with L-Bracket, Cortex, stainless steel, or
high-quality coated deck screws.
HOW TO: REPLACE A BOARD
6
• When the deck is located in a corner
of the house, start with small
triangular piece of decking in the
corner and work your way out.
• Offset the center 1/2” towards the
long point of the joist, so screw will
not exit the side of the joist when
driven.
HOW TO: INSTALL ON DIAGONAL
8
• Create a 2” long groove on the edge of
the board at every joist. Do not groove
the full length of square shouldered
deck boards.
• Use TimberTech’s CONCEALoc Groove
Cutting Router Bit or a Freud model
#56-112 or Bosch model #85610M
1/4” slot cutting bit.
• Flip the board over and start the
groove 3/8” off the bottom of the
board.
• Set the depth of the cut from 7/16” to
1/2”deep.
Note: Be sure to ID the side of the board that has the directional
notch; the boards with IDs should be installed to the same side. See
Directional Notch on page 5.
HOW TO: USE CONCEALoc
®
FASTENERS
WITH SQUARE SHOULDER BOARDS
CONCEALoc
®
Hidden Fastener
3/8”
3/8” Depth
1/4”
2”
Incorrect Correct: Shift over 1/2”
ReliaBoard cannot be grooved. It must ONLY be face-fastened. Grooving ReliaBoard will void the warranty.
Do not use CONCEALoc Hidden Fasteners or L-Brackets for stair installations.

Page 11
Cortex
®
Hidden Fastening System
Suggested Drills
Corded or cordless (18V battery) drill with 1/2” chuck.
Cortex
®
Hidden Fastening System Installation Instructions
Restricted Cortex Uses
The TimberTech Cortex System is designed for traditional
elevated deck surfaces. The following applications require a
different fastening method:
• Sleeper systems: Framing rests directly on the ground or
roof deck.
• For attaching fascia and riser boards: TimberTech TOPLoc
Fascia Fasteners should be used.
• Docks or decks with framing members in constant contact
with saltwater.
• Deck materials with a scalloped bottom such as, but not
limited to PRO Terrain, EDGE Prime, EDGE Prime+, and
Reliaboard.
Important Information
• Pre-drilling with a 3/16” drill bit is always required when
installing Cortex in TimberTech decking.
• The Cortex Setting Tool must be used to set the Cortex screw
to the proper depth.
• The Cortex fastener must be driven perpendicular to the deck
surface for proper fit and ideal finished look.
• The cored hole must be free of debris or moisture. Use a
smooth hammer head to set the Cortex plug.
• The interaction between the deck board, screw, and plug is
essential. Use of non-Cortex Screws or non-Cortex plugs will
nullify the warranty.
• For gapping requirements, see page 3
End and Edge Distance Minimums
• Pre-drilling is required for installation into TimberTech decking or
mushrooming and splitting will occur.
• Pre-drilling should be done with a 3/16” drill bit to create the
proper pilot hole.
• No fasteners should be installed closer than 3/4” from the end
or edge of the board.
Impact Drivers are not recommended when
using TimberTech Cortex.

Page 12
1
• Pre-drill deck board with a 3/16”
drill bit
PRE-DRILL
2
• Using Setting Tool provided, drive
screw at medium or high speed until it
disengages at the proper level below
the deck surface.
• Drive at one continuous speed,
do not slow down.
• Install two screws into decking at
each joist.
• Maximum spacing between each row of
screws should be 16” on center.
DRIVE SCREWS INTO JOISTS
3
• Place plug into cored hole and
gently tap flush with deck surface.
• If mushrooming occurs, stop
installation and call customer service
at 1-800-307-7780.
INSTALL PLUG
Cortex
®
Hidden Fastening System

Page 13
Care and Handling
With proper installation and care, TimberTech
®
products will provide years of outdoor living pleasure.
For most current recommendations or to download a PDF, visit TimberTech.com/warranty-and-care/care-and-cleaning
or surface contamination, use an all purpose cleaner like
Chomp
®
Pro Gutter Cleaner or Zep
®
Fast 505.*Note that
composite deck cleaners such as Corte Clean
®
, Thompson’s
®
Water Seal
®
— Oxy Action, Olympic
®
Deck Cleaner, or other
cleaners specified as composite deck cleaners, in powder
or liquid form, should not be used with TimberTech PRO and
EDGE deck boards. TimberTech PRO and EDGE deck boards
are a capped composite material, the cap of these products are
not compromised of a wood/plastic composite.
Cleaning Procedures:
In preparation for spot cleaning as well as full surface
cleaning, you will need a bucket of water, one of the
recommended scrub brushes with an extension handle and
one of the recommended cleaners.
Work in small manageable areas. Avoid cleaning in direct
sunlight, the UV and heat will dry the surface quickly as you
attempt to clean.
Saturate the area with one of the recommended cleaners and
allow the cleaner to soak for 30-60 seconds. DO NOT allows
the cleanser to dry or evaporate before scrubbing. Rinse area
thoroughly with water after scrubbing.
Using the recommended brush and extension handle, scrub
using moderate downward pressure, first scrubbing in the
direction of the grain and then against the grain getting into
the surface texture. DO NOT allow the treated area to dry
before rinsing throughly as this will allow dirt residue to dry in
the surface texture.
Thoroughly rinse the treated area with clean water, then allow
the area to completely air dry. Note that any residual cleaner
can leave a difficult to remove surface film. Always rinse
thoroughly and never allow the cleaner to dry or evaporate on
the surface prior to rinse.
Recommended Products for TwinFinish
®
,
ReliaBoard
®
and DockSider
®
Collections
Although TimberTech products are low-maintenance, we
recommend periodic cleaning to help maintain the beauty
of the product. TwinFinish, ReliaBoard, and DockSider are
composite products and cleaning is not the same as for capped
composite products. These recommended products can be
purchased at many hardware stores including Lowe’s and
Home Depot as well as online. Always make sure to read the
cleaning product manufacturers specific information before
using any product on your TimberTech Deck and follow their
instructions.
Power Washing
A power washer can be used when cleaning TimberTech
products. The recommended maximum pressure is 1500 psi
for TimberTech decks. A fan tip nozzle should be used along
with the proper cleaning product. Spray in the direction of
the brush/grain pattern to avoid damaging the product. Use
caution not to damage the material and always take the proper
safety precautions when operation a power washer.
Cleaner
Recommended Products for TimberTech
PRO
™
and TimberTech EDGE
™
We know you want to keep your TimberTech Deck clean and
looking its best, so here are a few guidelines on the best
products and methods to use to keep your TimberTech Deck
looking great.
These recommended products can be purchased at many
hardware stores including Lowe’s and Home Depot as
well as online. Always make sure to read the cleaning
product manufacturers specific information before using
any product on your TimberTech Deck and follow their
instructions.
Storage
Store TimberTech products under cover to maintain a clean
surface. If store outdoors, they must be covered with a non-
translucent material.
• All products should be stored flat and on a dry surface.
• Stack units with banding and bottom supports aligned.
Handling
Although all TimberTech boards are made with low-
maintenance materials, each board’s unique features
require special care and handling ensuring lasting beauty.
To maintain the beauty of TimberTech products, please
follow these important guidelines when moving and working
with TimberTech:
• Never dump TimberTech materials when
unloading.
• When carrying TimberTech boards, carry on edge
for better support. When carrying a 20’ boards should
be carried by 2 persons to more evenly distribute the
weight of the board and not concentrate the load at one
point.
• Do not slide boards against each other when moving
them. When removing them from the unit, lift the
boards and set them down.
• Do not slide tools or drag equipment across the top of
the boards during construction.
• Keep the surface of the boards free of construction
waste to prevent damage to the boards
Brushes
The correct brush is very important so that it not only
cleans the surface, but also does not damage or dull the
board surface. We recommend using either the Quickie
®
Professional Pool and Deck Scrub or a medium plastic
bristle deck brush. DO NOT use a natural fiber deck brush
on capped composites as they can dull the surface.
Cleaner
For general periodic maintenance cleaning, use a dilution
of mild liquid soap and water. Dawn Ultra
®
has shown
best results. For more difficult to remove dirt, mud, clay,

Page 14
Warranty
TimberTech products are made exclusively from technologically advanced materials designed to provide years of use and enjoyment.
TimberTech PRO, TwinFinish, Reliaboard, and Docksider products are covered by a 30-year limited warranty for residential applications
and a 10-year warranty for commercial applications. TimberTech PRO products are covered by a 30 year residential fade and stain
warranty. TimberTech EDGE products are covered by a 25-year limited warranty for residential applications and a 10-year warranty for
commercial applications. TimberTech EDGE products are covered by a 25-year residential fade and stain warranty. For a complete copy
of TimberTech warranties, visit TimberTech.com.
Care and Cleaning
The cleaners TimberTech recommends for periodic cleaning
or use with ReliaBoard, TwinFinish, and DockSider include:
• Wash Safe Spray and Clean Composite Deck Cleaner
• Resist Mist Composite Deck Cleaner
• Corte Clean
• Super Deck Composite Deck Cleaner
• Thompson’s Water Seal — Oxy Action
Dirt, Grime, Tannin and Mildew Stains:
TimberTech wood/plastic composite products are formulated
to inhibit mildew growth and minimize staining. Rinse off
your TimberTech products periodically with a hose. Even if it
appears clean, it is important to prevent build-up of pollen/
debirs. Mildew stains may occur where moisture, pollens, and/
or dirt are present. Mildew needs a food source to grow, which
can be grass, pollens, dirt, debris, wood and wood resins.
Maintaining a clean, dry surface is the best method for
combating mildew. Ensure that water drains effectively
from your deck. For TimberTech TwinFinish, DockSider, and
ReliaBoard, be sure that gaps exist between boards to allow
for drainage.
Tannin Staining
Like any other wood-based product, TimberTech’s wood-
plastic composite products (ReliaBoard, TwinFinish, and
DockSider) may experience a naturally occurring process
called Extractive Bleeding/Tannins. This process may cause
temporary discoloration that will weather away with exposure
to flushing rainfall and UV. In most cases the weathering
process takes 8-10 weeks but could vary depending on
location and specific product application such as a covered
porch. Tannins may also be cleaned by utilizing the cleaners
referenced for Basic Cleaning Recommendations for
ReliaBoard, TwinFinish, and DockSider. These guidelines may
not cover every care and maintenance scenario encountered.
For additional questions about care and maintenance, call
800-307-7780.
Other Considerations:
To keep your TimberTech deck looking its best, here are a few
additional things to consider. Depending on environmental
conditions. TimberTech product colors may appear to weather
over time as part of the natural weathering process.
Heat Buildup
Please be aware that excessive heat build on the surface of
TimberTech products from external sources such as, but not
limited to, fire or reflection of sunlight can potentially lead
to damage. For example, sunlight which may be reflected
by low-emissivity (Low-E) glass can potentially lead to
damage of exterior building products, including TimberTech
Deck, Rail, and accessories, due to elevation of surface
temperatures which far exceed that of normal exposure of the
same materials to direct sunlight. Possible damage by such
reflected, concentrated light may include melting, sagging,
warping, distortion, surface discoloration, increased expansion
or contraction, and unusual weathering. Although TimberTech
Deck products are cooler to the touch than many other deck
board products in similar colors, all decking products will get
hot in the sun. Additionally, the darker the decking color, the
hotter it will feel.
Static Electricity
The buildup of generation of static electricity is a naturally
occurring phenomenon in many plastic based products such
as carpeting, upholstery, and clothing, and can occur on
alternative decking under certain environmental conditions.
Snow & Ice Removal
AS with any walking surface, TimberTech decking products may
become slippery in winter weather. Take caution when walking
on your TimberTech deck in these conditions. Most products
containing calcium chloride can be used without damage to the
deck/porch surface. These products may leave a white residue
which can be cleaned using the cleaning guidelines above.
Metal shovels or plastic shovels with a metal leading edge
may damage the surface of TimberTech decking and are not
recommended for clearing snow from the deck surface.
Important
Do not allow airborne dust from concrete, landscape blocks,
or any masonry product to accumulate on the surface of
TimberTech Deck, Rail, and accessories as it may damage
the surface of the deck. Do not cut any product on or near
TimberTech Decking products. Always remove job site dust,
clay, dirt, mud, and other construction dirt and debris to sit on
the TimberTech Deck surface. Do not cut metal objects such
as railing on the deck surface, the hot debris from the cut may
become embedded in the deck surface resulting in staining
and damage.

Page 15
Notes

© 2019 The AZEK Company LLC LIT-DECKINSTALL | 07/19
TimberTech
894 Prairie Avenue
Wilmington, OH 45177
TimberTech.com
1.800.307.7780
Decking Installation
& Maintenance Guide
/