Page is loading ...

3

Page 1
Babylock.com
Table of Contents
Congratulaons on Your Baby Lock Tiara III Purchase ������������������������������������������������������������� 2
Baby Lock Tiara III Important Informaon
������������������������������������������������������������������������������� 3
Regulaons ������������������������������������������������������������������������������������������������������������������������� 3
Important Safety Instrucons ��������������������������������������������������������������������������������������������� 4
How to Pack/Unpack Machine ������������������������������������������������������������������������������������������� 5
Instrucons Before Using Machine������������������������������������������������������������������������������������� 5
Oponal U.S. Grounding ����������������������������������������������������������������������������������������������������� 6
About Your Machine: Quick Facts
�������������������������������������������������������������������������������������������� 7
Package Contents/Included Accessories
��������������������������������������������������������������������������������� 8
Oponal Accessories
��������������������������������������������������������������������������������������������������������������� 9
Baby Lock Tiara III Components
�������������������������������������������������������������������������������������������� 10
Front Side View ����������������������������������������������������������������������������������������������������������������� 10
Back Side View ������������������������������������������������������������������������������������������������������������������ 11
Rear and Front Views �������������������������������������������������������������������������������������������������������� 12
Installaon and Setup
����������������������������������������������������������������������������������������������������������� 13
Seng Up the Table (and Taking Down for Storage) ������������������������������������������������������� 13
Placing Machine in Table �������������������������������������������������������������������������������������������������� 13
Installing the Power Cord ������������������������������������������������������������������������������������������������� 14
Installing the Foot Pedal ��������������������������������������������������������������������������������������������������� 14
Installing Thread Antennae
��������������������������������������������������������������������������������������������������� 14
Installing Color Touch-Screen Display
������������������������������������������������������������������������������������ 15
Inserng or Changing Needle
������������������������������������������������������������������������������������������������ 15
Needle/Thread Selecon Guide
�������������������������������������������������������������������������������������������� 16
Changing Hopping Foot
��������������������������������������������������������������������������������������������������������� 17
Threading the Machine
��������������������������������������������������������������������������������������������������������� 18
Bobbin Case and Bobbin Thread Tension Adjustments
��������������������������������������������������������� 20
Top Thread Tension Adjustment
�������������������������������������������������������������������������������������������� 22
Maintenance
������������������������������������������������������������������������������������������������������������������������� 23
Using the Touch-Screen Displays
������������������������������������������������������������������������������������������� 25
Preparing to Quilt
������������������������������������������������������������������������������������������������������������������ 35
Troubleshoong
�������������������������������������������������������������������������������������������������������������������� 36

Page 2
Baby Lock Tiara III Instrucon Manual
Congratulations on your purchase of the Baby Lock
Tiara III
You haven’t just purchased a quilng machine, you’ve joined the Baby Lock family and we welcome you.
Baby Lock is commied to innovaon, reliability, customer service and educaon. Our quilng machines
are designed for quilters and we are commied to your quilng success.
With that in mind, we invite you to bookmark our website: www.babylock.com and invite you to visit to
learn more about the art of quilng.
Remember, if you ever have quesons, your authorized Baby Lock retailer can help you. If your retailer is
not available, contact Baby Lock directly by vising our website, www.babylock.com or contacng our Baby
Lock Consumer Helpline at 1-800-313-4110, Monday through Friday, 8 AM to 6 PM CST.

Page 3
Babylock.com
Important Information: Regulations
Federal Communicaons Commissions (FCC) Declaraon of Conformity (For USA Only)
Responsible Party: Tacony Corporaon
1760 Gilsinn Lane
Fenton, MO 63026
declares that the product
Product Name: Baby Lock Tiara III Model BLTR16-3
complies with Part 15 of the FCC Rules. Operaon is subject to the following two condions: (1) this device
may not cause harmful interference, and (2) this device must accept any interference received, including
interference that may cause undesired operaon.
This equipment has been tested and found to comply with the limits for Class B digital device, pursuant
to Part 15 of the FCC Rules. These limits are designed to provide reasonable protecon against harmful
interference in a residenal installaon. This equipment generates, uses, and can radiate radio frequency
energy and, if not installed and used in accordance with the instrucons, may cause harmful interference
to radio communicaons. However, there is no guarantee that interference will not occur in a parcular
installaon. If this equipment does cause harmful interference to radio or television recepon, which
can be determined by turning the equipment o and on, the user is encouraged to try to correct the
interference by one or more of the following measures:
• Reorient or relocate the receiving antenna.
• Increase the separaon between the equipment and receiver.
• Consult the retailer or an experienced radio/TV technician for help.
• Changes or modicaons not expressly approved by the manufacturer or local sales distributor could
void the user’s authority to operate the equipment.
Canadian Department of Communicaons Compliance Statement (For Canada Only)
This digital apparatus does not exceed the Class B limits for radio noise emission from digital apparatus
as set out in the interference-causing equipment standard entled “Digital Apparatus”, ICES-003 of the
Department of Communicaons.
Radio Interference (Other than USA and Canada)
This machine complies with EN55022 (CISPR Publicaon 22) /Class B and AUS/NZ 55022/Class B.

Page 4
Baby Lock Tiara III Instrucon Manual
Important Safety Instructions
This device complies with Part 15 of the FCC Rules. Operaon is subject to the following two condions: (1)
This device may not cause harmful interference, and (2) this device must accept any interference received,
including interference that may cause undesired operaon.
Please note: Do not operate your Baby Lock Tiara III quilng machine unl you have completely read
the informaon contained in this manual. Please keep all packaging and order informaon for warranty
purposes.
Read all instrucons before using.
When using this machine, basic safety precauons should always be taken, including the following.
DANGER - To reduce the risk of electric shock:
• A quilng machine should never be le unaended when plugged in. Always unplug the machine from
the electrical outlet immediately aer using and before cleaning.
WARNING - To reduce the risk of burns, re, electric shock, or injury to persons:
• The Baby Lock Tiara III is heavy. Never aempt to li it alone. Always use two people when liing.
Always li from the throat of the machine.
• Always unplug the Baby Lock Tiara III from the electrical outlet when performing any maintenance,
changing the needle, removing thread locks, or when le unaended.
• Do not unplug by pulling on cord. To unplug, grasp the plug, not the cord.
• Keep ngers away from all moving parts. Use cauon around the needle or sharp external components.
• Change the needle oen. Do not use bent or dull needles. “Every quilt deserves a new needle”.
• Switch the machine to the symbol o, or 0, posion to turn it o when making any adjustments in the
needle area, such as threading needle, changing needle, threading bobbin, changing hopping foot, and
so forth.
• Never drop or insert foreign objects into any opening.
• The Baby Lock Tiara III should only be used indoors away from moisture.
• The Baby Lock Tiara III should not be stored or used in extreme temperatures.
• Use the Baby Lock Tiara III only for its intended use as described in this manual.
• To disconnect from the wall outlet, push the switch to the o posion, then remove the plug
from outlet pulling from the plug, not the cord. Never operate the Baby Lock Tiara III if the cord is
damaged or not working correctly. Return the Baby Lock Tiara III to the nearest Baby Lock retailer for
examinaon, repair, electrical, or mechanical adjustment.
• It is not recommended that the Baby Lock Tiara III quilng machine be used with any machine quilng
frame other than those recommended by Baby Lock.
• Use this quilng machine only for its intended use as described in this manual. Use only aachments
recommended by the manufacturer as contained in this manual.
• Never operate the machine with any air openings blocked. Keep venlaon openings of the machine
free from the accumulaon of lint, dust, and loose cloth.
• Do not operate where aerosol (spray) products are being used or where oxygen is being administered.
• Do not pull or push the fabric excessively while stching. It may deect the needle enough to cause it
to break.

Page 5
Babylock.com
• Use only needles designed for free moon quilng and recommended by Baby Lock for this machine.
Other types of needles may be break during normal quilng.
• Children shall not play with the machine. Close aenon is necessary when this machine is used by or
near children.
• This sewing machine may be used by children age 8 years and above and persons with reduced
physical, sensory, or mental capabilies or lack of experience and knowledge if they have been given
supervision or instrucon concerning use of the machine in a safe way and understand the hazards
involved.
• Cleaning and user maintenance shall not be made by children without supervision.
Save These Instrucons
This machine is intended for household or commercial use.
Disclaimer
Baby Lock and its authorized retailers are in no way legally responsible or liable for damage to the Baby
Lock Tiara III when used improperly or not in accordance with the guidelines stated in this manual or when
used on machine quilng tables not recommended by Baby Lock.
How to Unpack/Repack the Machine
Keep the carton and packing materials. You will need them in the event that you need to return the
machine to your authorized Baby Lock retailer or send it for repair. If you do not pack the machine properly
or if you do not use the correct packaging materials, the machine could be damaged. Baby Lock is not
liable for damage that occurs during return shipping. Follow the diagram below to unpack and repack the
machine.
IMPORTANT
These packaging materials are designed to prevent the machine from being damaged. Keep them in case
you need to bring this machine to your authorized Baby Lock retailer or send it for repair.
PLEASE READ THESE INSTRUCTIONS BEFORE USING THE MACHINE.
To use the machine safely
1� Carefully watch the needle while sewing. Do not touch the handwheel, take up lever, needle or other
moving parts.
2� Turn the machine o and unplug the cord in the following cases
• when you have stopped using the machine;
• when you replace or remove the needle or any other part;
• in case of failure when you use the machine;
• when you check or clean the machine;
• when you leave the machine unaended.

Page 6
Baby Lock Tiara III Instrucon Manual
3� Connect the machine directly to the wall outlet. Do not use extension cords.
To increase the life of your machine
1� Do not store this machine in areas exposed to direct sunlight or high humidity. Never use or store the
machine near a heater, an iron, a halogen lamp or other hot objects.
2� Use only neutral soaps or detergents to clean the machine. Benzene, solvents and scouring powders
can damage the case and the machine and therefore should never be used.
3� Do not drop or bump the machine.
4� Always consult the manual to replace or x the hopping foot, needle or any other part of the machine.
To repair or adjust the machine
If the machine malfuncons or requires adjustment, rst check the troubleshoong chart in the appendix
to inspect and adjust the machine yourself.
For more product informaon and updates, visit our website at www.babylock.com.
The contents of this manual and product specicaons are subject to change without prior noce.
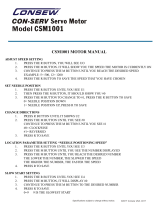
Oponal U.S. Grounding
GROUNDED OUTLET BOXES
METAL
SCREW
ADAPTER
(B)
(C)
TAB FOR
GROUNDING
SCREW
(A)
GROUNDING PIN
Figure 1
This product is for use on a nominal 120 V or nominal 220 V circuit, and has a grounding plug that looks like
the plug illustrated in sketch A in Figure 1. A temporary adapter, which looks like the adapter illustrated in
sketches B and C, may be used to connect this plug to a 2-pole receptacle as shown in sketch C if a properly
grounded outlet is not available. The temporary adapter should be used only unl a properly grounded
outlet can be installed by a qualied electrician. The green colored rigid ear, lug, and the like, extending
from the adapter must be connected to a permanent ground such as a properly grounded outlet box cover.
Whenever the adapter is used, it must be held in place by the metal screw.
Note: In Canada, the use of a temporary adapter is not permied by the Canadian Electric Code.

Page 7
Babylock.com
About Your Machine
Quick Facts
The Baby Lock Tiara III ulizes high-tech electronics and an innovave touch screen to oer greater
funconality and ease of operaon to home quilters than ever before conceived in the quilng industry.
The Baby Lock Tiara III quilng machine is a high quality machine that incorporates very robust design
features and is very easy to service.
Throat Dimensions 8.25" X 16" (245mm X 610mm)
Quilng Speed: Maximum 1800 SPM
Needle System 134 (135 X 7)
Needle Sizes 12/80 to 20/125
Hook System Rotary, Horizontal axis, M-class bobbin
Bobbin Type Aluminum, Class M
Bobbin Case Type MF
Motor Type Brushless DC
Needle Posioning Up and down, e-o stch
Electrical Power
US/Canada*
Rest of world
* Complies with internaonal
cercaons
105 - 120 VAC, 47 - 63HZ, 300W peak
100 - 250 VAC, 47 - 63HZ, 300W peak
LED Power Consumpon
2�25W
Hopping Foot Stroke/Li 5mm
Needle Bar Stroke 35.3mm
Take-Up Stroke 73mm
Lubricaon, main components Kluber Lube, permanent
Lubricaon of hook Velocite 10, Texaco 22
Disclaimer
Baby Lock and its authorized retailers are in no way legally responsible or liable for damage to the Baby
Lock Tiara III when used improperly or not in accordance with the guidelines stated in this manual or when
used on home machine quilng tables not recommended by Baby Lock.

Page 8
Baby Lock Tiara III Instrucon Manual
Package Contents/Included Accessories
Part Name Part Code
Machine Box
Baby Lock Tiara III Quilng Machine BLTR16A3
Instrucon Manual
IBBLTR16-3
Class M Bobbins (5 pieces) BLJ-BOB (3 pkg.)
Needle size 16 (1 pkg. of 10) 134FG-100
Needle size 18 (1 pkg. of 10) 134FG-110
Bobbin Case JW000586
Thread Antenna JW010214
Oiler JW010272
Power Cord JW020277
Brush JW010270
Disc-shaped Screwdriver XC1074051
Screwdriver (bobbin case) JW010269
2.5mm Allen Wrench QM10286
3.0mm Allen Wrench JW010287
5.0mm Allen Wrench JW010289
8mm Open Wrench QM40235
Open-Toe Hopping Foot QM10510
Bobbin Winder Box
Variable-Speed Bobbin Winder BLQBW
Table Box
Tiara III Quilng Table BLTRT16

Page 9
Babylock.com
Oponal Accessories (available from your authorized Baby Lock retailer)
Tiara III 18” Quilng Table Extension (BLTRT16-E)
Tiara III Quilng Table Overlay (BLTRT16-O)
Horizontal Spool Pin (BLJ18-HS)
TruStch Stch Regulator for Tiara III (BLTRTS)
Couching Feet Set (BLQ-CCF)

Page 10
Baby Lock Tiara III Instrucon Manual
Baby Lock Tiara III Components
Front Side View
3
2
1
7
6
4
5
8
10
23
18
19
21
20
15
14
13
12
11
DETAIL 'A'
17
16
22
9
Figure 2
1� Thread Antennae
2� Thread Guide A
3� Three-Hole Thread Guide B
4� Thread Guide C
5� Top Thread Tension Assembly
6� Srrup Thread Guide E
7� Take-Up Lever
8� Thread Guide F
9� Front Casing/Frame
10� Handwheel

Page 11
Babylock.com
Back Side View
11. Needle Bar 18. Presser Bar
12. Needle Bar Clamp Thumb Screw 19. Front Threaded Display Mounng Holes
13. Needle Bar Thread Guide 20. Front Base
14. Needle 21. Back Casing/Frame
15. Hopping Foot 22. Rear Base
16. Needle Plate 23. Color Touch-Screen Display Connector
17. Mount 24. Threaded Horizontal Spool Pin Mounng Hole
Detail
16
17
14
22
21
20
23
24
19
18
11
12
13
15
Figure 3

Page 12
Baby Lock Tiara III Instrucon Manual
Rear and Front Views
25. On/O Switch 32. LED Light Ring
26. Power Cord Connector 33. Power Pod (P-Pod)
27. Accessory Power Connector 34. Spool Pin 2
28. Foot Pedal Connector
29. Spool Pin 1
30. Electronic Control Pod (C-Pod)
31. Bobbin Assembly
33
32
31
25
26
36
35
34
37
Detail
31
32
33
34
29
30
Figure 4
25
27
28
26

Page 13
Babylock.com
Installation and Setup
Seng Up the Table (and Taking it Down for Storage)
The Baby Lock Tiara III table has been designed to accommodate the Baby Lock Tiara III machine. It has folding legs
that are height-adjustable and is heavy enough to provide stabilizaon for quilng at high speeds.
1� Open the box and gently remove the table, taking care not to drop the table on the oor. The table weighs over
50 pounds, so it is recommended that you ask someone for assistance.
2� Remove shipping brace from underneath quilng table by removing the two bolts holding it in place.
3� Unfold the legs by pulling on the horizontal braces, while being careful not to pinch ngers, unl the legs snap
into place.
4� Make the table taller by pinching the two height-adjustment tabs on each set of legs and liing on table, while
holding legs down with your foot. Make the table shorter by pinching the same tabs and pushing down on the
table.
5� To store the table, remove machine and return legs to their lowest posion.
6� The legs are aached to the table top with brackets of two dierent sizes. One is longer than the other. Idenfy
the long and the short leg brackets.
7� Fold in the short bracket leg rst. Push on the horizontal braces to loosen the legs and push them back toward
the table top.
8� Repeat with the long bracket leg.
Placing the Machine in the Table
We recommend having someone help li and place the machine into the table.
1� Li the machine by pung one arm through the throat space.
2� Guide the machine from the back of the table into the slot. Machine is posioned correctly when the back of the
machine is ush with the back of the table.

Page 14
Baby Lock Tiara III Instrucon Manual
Installing the Power Cord
Check that the On/O switch (see page 12, Figure
4, #25) is turned o (the 0 seng). Plug the power
cord into the top power outlet on the back of the
machine (Figure 5). Do not plug the power cord
into an electrical outlet at this me.
The accessory power connector (see page
12, Figure 4, #27) is available for powering
future aachments as they are developed by
manufacturer. (Not yet available.)
Figure 5
Installing the Foot Pedal
1. Plug in the foot pedal cord end into the foot pedal connector (see page 12, Figure 4, # 28).
2. Place the foot pedal under the table where operator can reach it from the front of the machine.
Installing the Thread Antennae
Figure 6
Locate the threaded hole on top of the machine near
the rear by the handwheel.
2. The thread antennae comes with a washer and a nut.
Remove the nut and washer, replace the nut onto the
antennae and ghten for two or three turns.
3. The washer protects the painted surface when the nut
is ghtened. Place the washer on the hole and insert
the thread antennae.
4. Turn the thread antennae clockwise several
revoluons, stopping when the antennae eyelets are
posioned directly over the spool pins.
5. Tighten the nut to secure the thread antennae to the
machine.
NOTE: The eyelets of the thread antennae MUST
be centered over the spool pins. This ensures
that the thread cone will not pull, turn or lt,
which will cause thread tension problems (see
Figure 6).

Page 15
Babylock.com
Installing the Color Touch-Screen Display
The color touch-screen display comes pre-installed on
its mounng bracket and should have one end of the
D cable aached to the back of the touch screen (see
Figure 7).
NOTE: Conrm that the power is turned o
before installing the touch-screen display.
1. Remove the two long bolts from the bag in which they
are packed.
2. There are three holes on top of the machine head
(see page 11, Figure 3, #19). Only the two holes that
are in line wth each other are used. Ignore the third
hole located to the side of these two holes.
Figure 7
3. Align the holes in the color touch-screen bracket with the two holes on top of the machine, with the touch-
screen display facing the needle end of the machine.
4. Use a 5mm Allen wrench to insert the two long bolts through the holes of the bracket and into the machine
(Figure 7). Tighten in place.
5. Plug the remaining cable end into the display connector located on the side of the machine (see page 11, Figure
3, #23).
6. Carefully remove the protecve plasc from the touch-screen display before using.
Inserng or Changing the Needle
The needle that is in the machine when it arrives at
your home has been used for 20 minutes of tesng. It is
possible that it could be damaged in shipping or as you
remove the machine from the box. For these reasons,
Baby Lock recommends that you replace the needle
before beginning to quilt with your new machine.
1. Move the needle bar to the highest posion by
turning the handwheel.
2. Conrm that the power is turned o and that the
machine is unplugged.
3. Loosen the needle bar clamp thumb screw with the
disc-shaped screwdriver or ngers (see Figure 8)
enough to assure that the needle can be inserted all
the way up to the top of the sight hole.
Needle
Bar
Clamp
Screw
Sight
Opening
Figure 8

Page 16
Baby Lock Tiara III Instrucon Manual
4. With the scarf (small recess area on the back side of the needle just above the needle eye) facing the handwheel
locaon of the machine, and the long groove down the front of the needle facing the bobbin case side (see page
15, Figure 8), push the needle all the way up inside the needle bar – unl it can go no further. Look into the sight
hole to verify that the bu of the needle reaches the top of the sight hole.
 IMPORTANT: If the needle is not fully inserted inside the needle bar, the machine ming will be o and it
may be possible for the needle to collide with internal parts causing damage not covered by warranty.
5. Carefully ghten the needle bar clamp thumb screw. Over-ghtening the thumb screw will result in damaged
threads or stripping of the screw hole. A side eect of damaged threads from over-ghtening the needle bar
clamp thumb screw is that it may become dicult to insert the needle properly into the needle bar. Stripped
holes are not covered under warranty. When ghtening the thumb screw using the disc-shaped screwdriver,
gently turn the screwdriver unl the screw is ghtened snuggly. This will avoid over-ghtening the screw.
NOTE: Changing the needle is recommended for each new quilt sewn with the machine or any me the
needle becomes bent, dull or burred. Needles are inexpensive and are important to the success of your
project. Plan to change needles every 5 to 7 hours of quilng or more oen if working with a lot of fusibles
or heavy materials. Quilt bang dulls needles quickly.
U CAUTION: Never leave machine unaended while plugged in. Always unplug this machine from the
electrical outlet immediately aer using and before maintenance.
Needle/Thread Selecon Guide
Needle Size
12 (80)
14 (90)
16 (100)
18 (110)
20 (125)
Thread weight
Monolament, 100 wt. Silk,
60 wt. poly, mylar
Silk (100 wt), 60 wt., monolament,
glier, some metallics
60 wt., 50 wt., 40 wt., monolament,
glier, metallics
50 wt., 40 wt., 30 wt., metallic
30 wt., 20 wt., 12 wt.

Page 17
Babylock.com
Changing the Hopping Foot
Your machine comes with two hopping feet: a ruler foot and an open-toe foot. Use the ruler foot for ruler work and
everyday quilng, and the open-toe foot when you need greater stch visibility (such as micro quilng).
1. Remove the foot that is on the mount by using the
2.5mm Allen wrench to loosen the mounng screw
far enough that you can slide the foot o of the
mount.
2. Slide the desired foot onto the mount (Figure 9). Note
that the opening on the side of the foot is lined up
with the screw hole. Push the foot up as far as it will
go�
3. Ensure the middle of the foot opening is centered
with the needle when the foot is fully ghtened with
the 2.5mm Allen wrench. If it isn’t properly centered,
loosen the lock nut; center the foot with the needle;
hold the foot in posion; and rmly ghten the lock
nut (Figure 10).
Figure 10
Figure 9

Page 18
Baby Lock Tiara III Instrucon Manual
Threading the Machine
F
C
Take Up Spring
Tension Assembly
FRONT
BACK
A
B
Figure 11
1� Place a cone or spool of thread on the spool pin. If
using a spool, make sure that the slits on the spool
are against the base of the spool pin holder. Pass
the thread through the thread antennae eyelet from
back to front, connuing to thread guide A (Figure
11).
Page 12
HQ
18
Avanté User Manual
1. Place a cone or spool of thread on the spool pin.
Pass the thread through the thread-mast eyelet from
back to front, continuing to thread guide A.
(Figure 11)
2. Continue to the three-hole thread guide B. Wrap
all three holes from back to front, hand wheel side to
needle side (see Figure 12).
Note: The purpose of the three-hole thread guide B
is to prevent loops of thread coming off the thread
cone from going into the top tension as a knot caus-
ing thread breakage and bad tension. For most
threads on a cone, it is important to thread all three
holes for consistent results and to make adjust-
ments at the top tension assembly. An exception to
this rule is when working with very delicate threads,
such as holographic or threads that are prone to
breakage, in which case you may try skipping one or
two holes on thread guide B.
Threading the Machine
B
C
D
E
A
BACKFRONT
2
TENSION ASSEMBLY
TAKE UP SPRING
1
E
C
D
DETAIL 2
B
DETAIL 1
Figure 11
Figure 12
Note: See “HQ Quilting Machines Getting Started”
DVD (included with your machine) for videos show-
ing threading and other tips. These videos are also
available on www.HandiQuilter.com.
B
E
C
D
DETAIL 2
F
Figure 12
2� Connue to the three-hole thread guide B.
Beginning at the top of the guide, wrap all three
holes from back to front, handwheel side to needle
side being careful not to cross threads (see Figure
12).

Page 19
Babylock.com
NOTE: The purpose of the three-hole thread guide B is to prevent loops of thread coming o the thread
cone from going into the top tension as a knot causing thread breakage and bad tension. For most threads
on a cone, it is important to thread all three holes for consistent results and to make adjustments at
the top tension assembly. An excepon to this rule is when working with very delicate threads, such as
holographic or threads that are prone to breakage. You may try skipping one or two holes on thread guide
B when using these threads.
3. Thread connues through thread guide C, and then
down to the tension assembly (see Figure 13).
NOTE: It is important that the thread is ossed
between the two tension discs. If the thread
is not rmly in place between the two tension
discs, the thread will rest on the outside of the
tension discs (without tension) and looping on
fabric or thread nests may occur.
4. Once the thread is in place, be sure that the thread
catches on the take-up spring and then pull it down
under the srrup thread guide D.
5. Bring the thread back up through the take-up lever
from back to front, and then down through thread
guide E. Pull the thread at the take-up lever to ensure
that it is properly ossed between the tension disks.
If it is properly ossed in the tension disks you should
feel some resistance as you pull the thread. If thread
is not properly in the tension disks, then the thread
will pull freely with no tension. If this is the case, then
rethread the machine.
6. Pull the thread down to the needle thread guide and
thread through the hole for thread guide F (see
Figure 13).
7. Make sure the thread is following the groove down
the front of the needle and insert thread through the
eye of the needle from front to back. Be careful that
the thread does not twist around the needle.
F
F
C
C
D
E
F
Figure 13
/