Page is loading ...

CH-DVD 452
www.cyberhome.de
12
DVD-Player
ENG
DE
Operation Guide
Bedienungsanleitung

CONTENTS
ENG
Safety instructions ......................................................................................................................5
Introduction ................................................................................................................................8
Accessories ........................................................................................................................................................................8
Region code information ....................................................................................................................................................8
Compatibility ........................................................................................................................................................................9
Usable disc types ........................................................................................................................................................................................9
Compatibility of PC created discs................................................................................................................................................................9
Data transfer rates ......................................................................................................................................................................................9
Taking care of player and discs ........................................................................................................................................10
Handling of discs ......................................................................................................................................................................................10
Cleaning of discs ......................................................................................................................................................................................10
Storage of discs ........................................................................................................................................................................................10
Discs to avoid ............................................................................................................................................................................................10
Disc accessories ........................................................................................................................................................................................10
Cleaning of the DVD player ......................................................................................................................................................................10
Operation....................................................................................................................................11
Operation of control panel ................................................................................................................................................11
Operation of VFD display ..................................................................................................................................................12
Operation of rear panel ....................................................................................................................................................13
Operation of remote control ..............................................................................................................................................14
Preparing the remote control ....................................................................................................................................................................14
Replacing the battery ................................................................................................................................................................................14
Using the remote control............................................................................................................................................................................15
Cautions regarding use of remote control ................................................................................................................................................15
Important notes about the battery..............................................................................................................................................................15
Remote control buttons ....................................................................................................................................................16
Audio and video connections ..................................................................................................18
Television connections ......................................................................................................................................................18
Audio/Video connection to a TV with Composite Video and Stereo Audio input ......................................................................................18
Audio/Video connection to a TV with SCART socket ................................................................................................................................19
Audio/Video connection to a TV with S-Video and Stereo Audio input ....................................................................................................20
Video connection to a TV/Beamer with Component Video inputs (YCbCr/YPbPr) ..................................................................................21
Audio output connections ..................................................................................................................................................22
Audio connection to a TV/receiver using the analogue stereo outputs ....................................................................................................22
Audio connection to a receiver using the coaxial digital output ................................................................................................................22
Getting started ..........................................................................................................................24
Powering on the unit..........................................................................................................................................................24
Inserting a disc ..................................................................................................................................................................24
Start playing ......................................................................................................................................................................25
Pausing a disc ..................................................................................................................................................................25
Stop playing ......................................................................................................................................................................25
Removing a disc................................................................................................................................................................25
Switching off the power ....................................................................................................................................................25
Playback ....................................................................................................................................26
General playback hints......................................................................................................................................................26
Playing a DVD-Video disc ................................................................................................................................................26
Playing a DVD+-R/RW disc ..............................................................................................................................................27
Playing a (Super) Video CD ..............................................................................................................................................27
Playing an Audio CD ........................................................................................................................................................27
Playing an MP3 disc..........................................................................................................................................................28
Playing a WMA CD............................................................................................................................................................28
Playing a Picture CD ........................................................................................................................................................28
Playing a mixed format disc ..............................................................................................................................................29

CONTENTS
Playing functions ......................................................................................................................30
Selecting a section of the disc to play ..............................................................................................................................30
1. Selecting a chapter using the DVD menu ............................................................................................................................................30
2. Playing from a specific time ..................................................................................................................................................................30
3. Playing a specific track, picture, title or chapter....................................................................................................................................30
4. Playing a specific track, picture, title or chapter using the number buttons..........................................................................................31
5. Skipping through chapters, tracks or pictures ......................................................................................................................................31
Using the repeat features..................................................................................................................................................32
1. Repeating an entire disc or playlist ......................................................................................................................................................32
2. Repeating a track, picture, folder, chapter or title ................................................................................................................................32
3. Repeating a section of a disc (A-B) ......................................................................................................................................................33
Playing a disc at different speeds (fast forward/fast backward)........................................................................................33
Slow play ..........................................................................................................................................................................34
Still the picture frame / Pause a disc ................................................................................................................................34
Zooming in and out of an image ......................................................................................................................................34
Using position markers (Bookmark) ..................................................................................................................................35
Displaying disc information................................................................................................................................................35
Suspending audio with the “MUTE” button ......................................................................................................................35
Adjusting volumes ............................................................................................................................................................36
Changing the audio settings..............................................................................................................................................36
Special playing functions for DVD-Video discs ....................................................................36
Using the DVD menu ........................................................................................................................................................36
Displaying subtitles............................................................................................................................................................37
Changing the camera angle ..............................................................................................................................................37
Special playing functions for Video CD’s ..............................................................................38
Using playback control (PBC) ..........................................................................................................................................38
Special playing functions for Audio CD’s ..............................................................................38
Random play ....................................................................................................................................................................38
Creating a playlist ....................................................................................................................39
Creating a playlist of DVDs ..............................................................................................................................................39
Creating a playlist of Video CDs or Audio CDs ................................................................................................................39
User preferences ......................................................................................................................40
Notes for moving in the menu ..........................................................................................................................................40
Changing the language settings........................................................................................................................................40
Changing the video settings..............................................................................................................................................42
Changing the audio settings..............................................................................................................................................44
Changing the security settings ..........................................................................................................................................45
Changing the general settings ..........................................................................................................................................46
Troubleshooting ........................................................................................................................48
Specifications ............................................................................................................................50
Glossary ....................................................................................................................................51

5
SAFETY INSTRUCTIONS
Dear Customer,
May we take this opportunity to thank you for purchasing this DVD play-
er. We strongly recommend that you carefully study the Operating
Instructions before attempting to operate the unit and that you note the
listed precautions.
Read instructions: All safety/operating instructions should be read before the
product is operated.
Keep these instructions: These instructions should be retained for future re-
ference.
Observe all warnings: Adhere to all warnings on the appliance and in the
operating instructions.
Follow all instructions: All operating instructions should be followed.
Accessories: Only use accessories specified by the manufacturer.
Power cord protection: To avoid any malfunctions of the unit and to protect
yourself against electric shock, fire or personal injury, please observe the fol-
lowing:
- Hold the plug firmly when connecting or disconnecting the AC power cord.
- Do not connect or disconnect the AC power cord when your hands are wet.
- Keep the AC power cord away from heating appliances.
- Never put any heavy object on the AC power cord.
- Do not attempt to repair or reconstruct the AC power cord in any way.
- Remove dust, dirt, etc. on the plug at regular intervals.
- If the unit has been dropped or otherwise damaged, turn off the power and
disconnect the AC power cord.
- If smoke, odours or noises are emitted from the unit, turn off the power and
disconnect the AC power cord.
The power cord must be routed properly to prevent people from stepping on
them or objects from resting on them. Check the cords at the plugs and pro-
duct. Do not damage, break or alter the electric cord. Do not cover the cord
under a carpet or similar covering, as you may not be aware of it and may place
heavy objects on it or damage it.
Power supply: This product must operate on a power source specified on the
specification label. If you are not sure of the type of power supply used in your
home, consult your dealer or local power company.
External flexible cords: Where the mains plug or an appliance coupler is used
as the disconnect device, the disconnect device shall remain readily operable.
Where an all-pole mains switch is used as the disconnect device, the location
on the apparatus and the function of the switch shall be described, and the
switch shall remain readily operable.
Polarized plugs: Do not defect the safety purpose of the polarized plug. A
polarized plug has two blades with one wider than the other. The wide blade is
provided for your safety. If the provided plug does not fit into your outlet, con-
sult an electrician for replacement of the obsolete outlet.
Overloading: Do not overload AC outlets or extension cords as this may cause
fire or electric shock.
ENG

6
Relocating: When relocating the product placed on a cart, it must be moved
with utmost care. Sudden stops, excessive force and uneven floor surface may
cause the product to fall from the cart.
Placing: Please do not place the product on an unstable cart, stand, tripod or
table. Placing the product on an unstable base may cause the product to fall
resulting in damage to the product. Avoid placing the unit in areas of direct sun-
light or heating radiators, high temperature [over 35°C (95°F)] or high humidity
(over 90%), excessive dust, vibration, impact or tilted surfaces, as the internal
parts may be seriously damaged.
Stacking: Place the unit in a horizontal position and do not place anything
heavy on it. Do not place the unit on amplifiers or other equipment, which may
become hot.
Heat sources: Keep the product away from heat sources such as radiators,
heat registers, stoves or other heat-generating products (including amplifiers).
Ventilation: Do not block any ventilation openings.
Water and moisture: Do not use the product near water, e. g. near a bathtub,
washbowl, kitchen sink and laundry tub, in a wet basement or near a swimming
pool, etc. When this product is installed beside a window or outdoors, keep it
dry, otherwise there is a risk of fire or electric shock.
Keep away from liquids and magnets: The device shall not be exposed to
dripping or splashing and no objects filled with liquids, such as vases, shall be
placed on the device. Keep magnetic objects, such as speakers, distant from
the DVD player.
Condensation: Moisture may form in the device: immediately after a heater
has been turned on, in a steamy or very humid room or if the unit is moved from
a cold environment to a warm one. If moisture forms inside this unit, it may not
operate properly. In this case, turn off the power and wait about one hour for the
moisture to evaporate.
Non-use periods: Unplug this product during lightning storms. When the unit
is not used, turn the power off.
Cleaning: Clean only with a dry cloth. Unplug the power cord from the AC out-
let before cleaning the product. Do not use any liquid or detergents for clean-
ing.
Do not touch internal parts: Touching internal parts of this unit is dangerous,
and may cause serious damage to the unit. Do not attempt to disassemble the
unit. There will be no warranty claim in this case. Do not put any foreign object
on the disc tray.
Servicing: Do not attempt to service the product yourself. Removing covers
may expose you to high voltage and other dangerous conditions. Refer to
qualified service personnel for servicing.
Replacement parts: In case the product needs replacement parts, please
make sure that the service person uses replacement parts specified by the
manufacturer, or those with the same characteristics and performance as the
original parts. Any use of unauthorized parts may result in fire, electric shock
and/or other danger.
SAFETY INSTRUCTIONS

SAFETY INSTRUCTIONS
7
ENG
WARNING
TO REDUCE THE RISK OF FIRE, ELECTRIC SHOCK OR ANNOYING
INTERFERENCE, DO NOT EXPOSE THIS APPLIANCE TO RAIN OR MOIS-
TURE AND ONLY USE THE RECOMMENDED ACCESSORIES.
CAUTION
To reduce the risk of electric shock, do not remove the cover (or back). No
user-servicable parts inside. Refer to qualified service personnel for ser-
vicing. Only open the device if it is disconnected from the power source -
unplug the power cord!
The lightning flash with arrowhead symbol, within an equilateral triangle, is
intended to alert the user to the presence of not isolated “dangerous voltage”
inside the product that may be sufficient magnitude to constitute a risk of elec-
tric shock to persons.
The exclamation point within an equilateral triangle is intended to alert the user
to the presence of important operating and servicing instructions in the litera-
ture accompanying the appliance.
Use of controls, adjustments or performance of procedures other than
those specified herein may result in hazardous radiation exposure.
DANGER
Laser radiation when cover is opened and interlock failed or defeated.
Avoid direct exposure to beam.
This DVD player is a class 1 laser product. However, this DVD player uses a
visible laser beam, which could cause hazardous radiation exposure, if direct-
ed. Be sure to operate this DVD player correctly as instructed.
When this DVD player is plugged into the plug socket, do not place your eyes
close to the opening of the disc tray and other openings to look into the inside
of this player.
Do not open covers and do no repairs yourself. Refer to qualified personnel for
servicing.
Manufactured under license from Dolby Laboratories. "Dolby” and the double-
D symbol are trademarks of Dolby Laboratories.
.
RISK OF ELECTRIC SHOCK!
DO NOT OPEN!
CAUTION
CLASS 1
LASER PRODUCT
.
Disclaimer of warranty
The information in this manual is subject to change without notice. Cyber
Home assume no liability for direct, indirect, accidental or other damages/con-
sequential damages arising from the use or utilisation of the information con-
tained in this manual.
This product incorporates copyright protection technology that is protected by
U.S. patents and other intellectual property rights. Use of this copyright protec-
tion technology must be authorized by Macrovision, and is intended for home
and other limited viewing uses only unless otherwise authorized by Macrovi-
sion. Reverse engineering or disassembly is prohibited.
Consumers should note that not all high definition television sets are fully com-
patible with this product and may cause artifacts to be displayed in the picture.
In case of 525 or 625 Progressive Scan picture problems, it is recommended
that the user switch the connection to the ‘Standard Definition’ output. If there
are questions regarding our TV set compatibility with this model 525p and 625p
DVD Player, please contact our customer service center.

8
Accessories
Please make sure that the following accessories are in the box when you open
it. You can find the order numbers for the accessories below the picture.
Note: Pictures may deviate.
Region code information
This portable DVD-Player has been constructed and produced in the way that
it adheres to “Local Management” information, which are recorded on a Digital
Versatile Disc (DVD). If the number of the destination area on a DVD does not
correspond with the number of the destination area of this DVD Player, this
device won’t be able to play the corresponding disc. The device is set to region
code “2”.
You can find the region code on the back side of the DVD cover. DVD’s must
be labelled with “ALL” for all regions or with “2” for region 2, for that they can be
played in this device. Should another region be printed on the DVD, it cannot
be played in this DVD player. The list on the left side shows the various DVD
regions of the world.
INTRODUCTION
Region 1 USA, Canada
Region 2 Europe, Middle East, South Africa,
Japan
Region 3 Southeast Asia, Taiwan
Region 4 Central and South America, Mexi-
co, Australia, New Zealand
Region 5 Russian federation, Africa (part),
India, Pakistan
Region 6 China
ALL
Remote control
CH452ME-302-001
Battery (CR2025, 3V)
Audio/Video cable (optional*)
(Composite Video, Stereo Audio)
CH452ME-314-001
SCART cable for Europe (optional*)
CH452ME-315-001
TMTM
POWER
10+
0C
9
6
5
4
3
ENTERENTER
PBC
DISPLAY
8
7
GOTO
2
1
A-B
1/ALL
REPEAT
RETURNRETURN BOOKMARK ZOOM SLOW
PAUSE
STOP
PLAY
MUTEAUDIOSUBTITLEANGLE
PROGRAMMENUTITLE
OPEN/CLOSESETUP
VOLUME
User Manual
CH452ME-301-001
CH-DVD 452
www.cyberhome.de
12
DVD-Player
Operation Guide
Bedienungsanleitung
*Note:
Optional means that some devices
include the cable in the box, however
not all devices. This depends on
whether the respective dealer wishes
this.

9
Compatibility
Usable disc types
The following discs can be used in your DVD player for playback:
DVD-Video (Digital Versatile Disc)
DVD+RW (Digital Versatile Disc + rewritable)
DVD+R (Digital Versatile Disc + recordable)
DVD-R (DVD-Recordable)
DVD-RW (DVD-Rewritable)
Audio CD (Compact Disc Digital Audio)
Video CD (format 1.x/2.0)
Super Video CD
CD-R (CD-Recordable) with audio/MP3/JPEG/MPEG contents
CD-RW (CD-Rewritable) with audio/MP3/JPEG/MPEG contents
Kodak Picture-CD
Compatibility of PC created discs
When recording a disc with a PC, even if it is recorded in a compatible format
as listed above, there may be cases in which the disc cannot be played in this
device due to the application software setting used to create the disc.l In this
case, please contact the software publisher for more detailed information.
Note: Don’t load any exceptional discs in the unit, as this will cause null play-
back or other problems (also with copy-protected Audio CDs).
Data transfer rates
The maximum speed for playing CDs is 4x. The corresponding data transfer
rate is 600 KB/sec. The maximum speed for playing DVDs is 2x with a data
transfer rate of 2700 KB/sec.
INTRODUCTION
ENG
RW
RW
DIGITAL VIDEO
SUPER VIDEO
ReWritable
Recordable
R

10
Taking care of player and discs
Handling of discs
- Please hold the disc by gripping the rim or by placing the index finger in the
central hole. Never touch the signal surface, which is shiny. This applies to
both sides of double sided discs.
- Never add labels or adhesive tapes on the discs and do not scratch or dam-
age the discs.
Cleaning of discs
- Finger prints or stains on the surface of the disc can cause signal missing.
Depending on the degree of stain, the reflected luminosity from the signal sur-
face may be weakened, resulting in a poorer picture quality. Therefore, please
use a soft cloth and wipe in a radiating manner from the centre to the outer
rims when cleaning the disc.
- If the surface of your disc is very dirty, please wipe the disc with a moist cloth,
finally use a dry soft cloth to remove all the water stains.
- Never use electrostatic prevention products as well as solutions which contain
benzene, thinner or any other vaporizing substances, as they may damage
the disc surface.
Storage of discs
- To prevent discs from getting bent or deformed, they should be vertically kept
in the disc storage case.
- To prevent damages, avoid placing them in a car, which may contact direct
sunlight. Also avoid leaving discs in excessively cold or humid environments.
- For more information refer to the instructions that come with discs.
Discs to avoid
Please only use conventional, fully circular discs in this DVD-Player. It is not
recommended to use warped, cracked, chipped or otherwise damaged discs in
this device.
Disc accessories
Do not use any disc accessory to improve the audio quality, disc protective
solutions or lens cleaner. These products may cause problems.
Cleaning of the DVD player
The control panel and the case of the player will only require occasional wiping
with a soft cloth. Areas with stubborn stains can be cleaned with a soft cloth
dipped in a neutral detergent. To prevent damaging the player, never use vapor-
izing solutions.
INTRODUCTION
Labeling side
Labels
Tapes
Surface

11
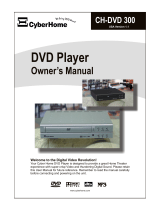
Operation of control panel
1. ON / STANDBY: Switches the device on or off. When pressing this button
you can only go into Standby mode.
2. VFD DISPLAY: The front Vacuum Fluorescent Display shows informa-
tion about the unit’s operational status.
3. DISC TRAY: For inserting discs.
4. K : Opens or closes the disc tray.
5. H / G : Press this button shortly to skip to the previous track,
chapter or title. Hold down this button 3 seconds for fast
backward search while playing (2/4/8/16/32x).
6. E / F : Hold down this button 3 seconds for fast forward search
while playing (2/4/8/16/32x). Press this button shortly to
skip to the next track, chapter or title.
7. STANDBY LED: If the device is in Standby mode, the LED will light red. If
the Player is in operation, the LED will be off.
8. A : Press this button to start the playback of a disc.
9. I : Press this button to pause a disc.
10. J : Press once to stop playback of a disc. The data will be
stored. The disc can be played back from the stop point
by pressing “A”. Press this button two times to enter
stop mode.
OPERATION
12 3456
78910
ENG

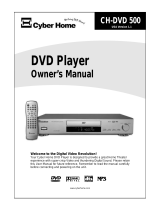
Operation of VFD display
1. DISC TYPE INDICATORS: Displays the type of the optical disc inserted -
DVD, SVCD, VCD, CD (Audio CD) or MP3. If a DVD+R/RW or DVD-R/RW
is inserted, DVD is displayed.
2. PLAYBACK INDICATOR: Indicates that the disc is playing.
3. PBC FUNCTION INDICATOR: Indicates that the PBC (Playback Control)
function is enabled.
4. PLAYBACK STATUS INDICATORS: Shows the playback status of a DVD,
CD or other optical discs.
•
A: Currently playing
• I : Paused
5. MULTIFUNCTION INDICATOR / TEXTLINE:
• Playing a DVD or optical disc, there will be displayed the elapsed or
remaining time of the chapter, track or file. For this, please press the
“DISPLAY” button.
• When playing an Audio CD the elapsed or remaining time of the whole
disc will be displayed by pressing the “DISPLAY” button several times.
• Display of information
6. FILE INDICATOR: Shows the current position of the file or folder which is
momentary marked with the cursor. This display will be shown automatical-
ly when inserting a data CD or data DVD.
7. FILE TYPE INDICATOR: Shows the type of the file which is momentary
marked with the cursor. Example:
Marking a JPEG picture file will show
JPG.
8. DOLBY DIGITAL: Indicates which sound mode is activated.
• : A Dolby Digital sound signal is given out over the digital audio out-
put.
9. REPEAT FUNCTION INDICATOR: Indicates that the repeat chapter/title/
track (or all) function is active.
10. TRACK INDICATOR: Shows the number of the current track when playing
Audio CDs. For this, please press the button “DISPLAY” five times (as long
as “Display off” is shown on the screen).
11. TOTAL NUMBER OF TRACKS: Shows the number of all tracks available
on an Audio CD. For this, please press the button “DISPLAY” five times
(as long as “Display off” is shown on the screen).
12
OPERATION
1
10
7
4325
9
11
6
8

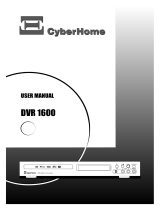
Operation of rear panel
1. COAXIAL: Digital coaxial audio output for connection to a digital
audio device (amplifier/receiver). Please note that the
amplifier/receiver has to be compatible to Dolby Digital,
MPEG and/or PCM (for more information please refer to
the manual of your amplifier/receiver).
2. AUDIO OUT L/R: Analogue 2-channel audio outputs (white/red socket) for
connection to a television, AV receiver, beamer or stereo
system.
3. VIDEO: Composite video output (yellow socket) for connecting to
a TV or AV receiver with a video input (CVBS, compos-
ite video) by an audio/video cable.
4. RGB / SCART: For connection to a television or monitor that is compat-
ible with this kind of connection by means of a 21-pin
SCART cable. This connection enables the output of
audio and video signals.
5. REGION CODE: Indicates that the device is set to DVD region code “2”.
6. P-SCAN: High quality video output for connection to the compo-
nent video inputs of a television, AV receiver, beamer or
monitor by means of a YCbCr connecting cable. Please
note that the Progressive Scan signal is only available
over the component video output.
7. AC IN: This device has a fixed power cord. Plug the other end
of the fixed power cord into the wall socket.
8. S-VIDEO: S-Video output for connecting to a TV or AV receiver with
S-Video input by an S-Video cable. The S-Video output
can be used instead of the video output. By this, a high-
er video quality can be reached than with composite
video.
13
OPERATION
12 3 4 5 6 7
8
ENG

14
Operation of remote control
Preparing the remote control
The DVD player comes with a remote control. Simply pull out the plastic tab in
the remote control to activate the battery. The plastic tab - which covers the bat-
tery terminals - extends the life of the battery.
Note: Please note that some models will not include this plastic tab. If this is the
case, please refer to the next section for battery installation.
Replacing the battery
If the remote control only operates when you get closer to the device, it means
that the battery has been used up. Please replace the battery with a new Lithi-
um battery (CR2025, 3V). To replace the remote control’s battery, the battery
holder must be removed. Be sure to take note of the polarity marking on the bat-
tery. The “ + “ side must face the bottom of the remote (the side without any but-
tons).
1. Use your thumbnail to slide the clip on the battery holder to the right side
and pull out the battery holder simultaneously in order to remove the battery
compartment.
2. Insert a new battery into the battery holder. Make sure that the positive side
(marked on the battery as “+”) is facing upwards.
3. Reinstall the battery holder into the remote control to complete the battery
installation.
OPERATION
Plastic tab
Pull
Remote control
Remote control
bottom
Remote control
bottom

Using the remote control
You can use the enclosed wireless remote control to control this device. When
using the remote control, please aim at the device’s remote control sensor,
located on the front of the device. A 30 degree angle is recommended for best
operation.
Note:
• Objects between the remote control and the sensor window may prevent
proper operation.
• Similar remote controls could interfere with the function of the player.
• Make sure not to store the remote control upside down or with any objects
pressing on the buttons - this could drain the batteries.
Cautions regarding use of remote control
• Please do not expose the remote control to shock and liquids and do not place
it in areas with high humidity. Do not install or place the remote control under
direct sunlight, as the heat may cause deformation of the unit.
• When the remote sensor window is exposed to direct sunlight, it may not work
properly. If so, please operate the remote control closer to the remote sensor
window or change the angle of the lighting or device.
Important notes about the battery
• If the unit is not used for a longer period of time, we recommend you to
remove the battery.
• Please do not use batteries other than specified. Improper use of batteries
can result in a leakage of chemicals and/or explosion.
• In case of any leakage of batteries, dispose of the batteries right away and
avoid touching the chemical discharge. Make sure to clean the remote con-
trol’s battery compartment before installing a new battery.
OPERATION
30°
30°
TMTM
15
ENG

16
TMTM
POWER
10+
0C
9
6
5
4
3
ENTER
PBC
DISPLAYDISPLAY
8
7
GOTO
2
1
A-B
1/ALL
REPEAT
RETURN BOOKMARK ZOOM SLOW
PAUSE
STOP
PLAY
MUTEAUDIOSUBTITLEANGLE
PROGRAMMENUTITLE
OPEN/CLOSESETUP
VOLUME
OPERATION
Remote control buttons
POWER Switch on/off To switch the device on or off (only stand-
by mode).
DISPLAY Screen display for indicating the disc and time informa-
tion.
SETUP OSD menu: To call up or cancel the main menu.
OPEN/CLOSE
K To open or close the disc tray.
TITLE For DVDs, this displays the DVD menu.
MENU “PBC” To enter the menu of DVD discs or to select the PBC
function for VCD discs.
GOTO Used for the direct selection of a track, title, chapter or
time for intended play. Follow with the corresponding
number button.
PROGRAM This can be used to set up a playlist.
ANGLE Changes the camera angle depending on the disc con-
tent (only supported on DVDs).
SUBTITLE For DVDs, this can be used to display subtitles and
select the language to use.
AUDIO Interchanges the audio settings depending on the disc
content (on DVD, Audio discs and VCD discs).
MUTE To turn off the sound. Press again to turn sound on
again.
G Fast backward: Fast backward search while playing
(2/4/8/16/32x). Not possible with JPEG files.
C, D, B, A Direction buttons: Up, down, left, right.
E Fast forward: Fast forward search while playing
(2/4/8/16/32x). Not possible with JPEG files.
A Play: Press this button to start the playback of a disc.
ENTER Select: To select options in menus.
J Stop: Stops the playback, but holds the resume location.
Press this button two times to enter stop mode.
H Select previous title: Press this button to skip to the
previous track, chapter or title.
F Select next title: Press this button shortly to skip to the
next track, chapter or title.
I Pause: This is used to pause a disc.

17
RETURN For returning to the previous menu.
BOOKMARK To store specific portions of the disc in memory and play
them immediately whenever you want without the need
to search.
ZOOM For zooming in and out of the picture.
SLOW Slow play: Slow forward search while playing (1/2, 1/4,
1/8, 1/16).
0-9, 10+ Number buttons: Use the “10+” button to enter nume-
ric values greater than 10. Press once for each value
above 10, then enter the corresponding number by using
“0-9”. Press twice for values above 20, etc.
REPEAT “1/ALL” Repeats an entire disc, track, chapter, folder or title.
REPEAT “A-B” Repeats the sequence stipulated by two selected play-
back points.
VOLUME + Increases the volume level.
C Delete: For deleting the last entry.
VOLUME - Decreases the volume level.
OPERATION
ENG

18
Television connections
In order to use your DVD player, you will need to make a video connection to
your TV. The capabilities of your TV and the cables you have on hand will deter-
mine the connections you can use. There are four possible connection types:
Composite video - The most widely used connection. An audio/video
cable for composite video is required.
RGB (over Scart) - Audio and video connection which enables an optimal
picture quality. This connection possibility requires a Scart cable (optional-
ly included in your accessory).
S-Video - A higher quality connection that requires a special S-Video cable
and a S-Video capable TV.
Component Video & Progressive Scan - The highest quality video con-
nection. Supported on high-end TVs or beamers and requires a special
cable.
In detail:
Audio/Video connection to a TV with Composite V
ideo and
Stereo Audio input
If your TV has only a single Video input jack, typically a yellow-coloured plug,
you will use the composite video output of your DVD player for the video con-
nection. For the audio connection you can use the red and white stereo audio
in connectors of your TV.
Have the following cable ready:
1. Audio/Video cable (optionally supplied; red, white and yellow plug)
1. Use the audio/video cable optionally included in your accessory to connect
the video output of your DVD player to the video input of your TV. This is
normally a yellow-coloured connector that matches the video output on the
back of this unit.
AUDIO AND VIDEO CONNECTIONS
1
Composite video
input jack
V
RL
RED
YELLOW
WHITE
VIDEO INPUT
STEREO AUDIO INPUT

19
2. If you wish to hear sound through the TV, connect the stereo audio outputs
of your DVD player to the matching inputs of your TV using the red and white
connectors on the audio/video cable.
3. As this device has a fixed power cord, only plug the other end of the fixed
power cord into the wall socket.
4. Turn on the TV and the DVD-Player.
5. Select the corresponding video input on your TV. For this please refer to the
user manual of your TV. You should now see the DVD player’s splash
screen on your TV.
Audio/Video connection to a TV with SCART socket
If your TV has a SCART socket, you can optionally connect your device with the
TV over the SCART socket. The advantage is here an optimal picture quality.
Have the following cable ready:
1. SCART cable (optionally supplied)
1. Use a completely connected SCART cable, which is included in your acces-
sory (optional), to connect the SCART output of your DVD player to the
SCART socket of your TV.
2. As this device has a fixed power cord, only plug the other end of the fixed
power cord into the wall socket.
3. Turn on the TV and the DVD player.
4. If the TV offers the possibility to choose manually between RGB and CVBS,
you should set your TV to RGB in order to achieve a better picture quality. If
the DVD player is connected with the TV over the SCART cable, the TV
automatically switches to the DVD mode when you turn on the player (if the
TV supports this function).
AUDIO AND VIDEO CONNECTIONS
1
SCART CABLE
SCART INPUT
TV
ENG

20
Audio/Video connection to a TV with S-Video and Stereo Audio
input
If your TV has an S-Video input, it is recommended that you use this Video con-
nection. The S-Video connector is distinguishable by its 4 pins, as shown on the
left side. S-Video separates brightness and colour signals, resulting in a higher
video quality than standard composite video. For the audio connection you can
use the red and white stereo audio in connectors of your TV.
Have the following cables ready:
1. S-Video cable (not supplied)
2. Audio/Video cable (optionally supplied; red and white plug)
1. Use the audio/video cable optionally included in your accessory to connect
the S-Video output of your DVD. Use a special S-Video cable (not included
in your accessory).
2. If you wish to hear sound through the TV, connect the stereo audio outputs
of your DVD player to the matching inputs of your TV Using the red and
white connectors on the audio/video cable.
3. As this device has a fixed power cord, only plug the other end of the fixed
power cord into the wall socket.
4. Turn on the TV and the DVD player.
5. Select the S-Video input on your TV. For this please refer to the user man-
ual of your TV. You should now see the DVD player’s splash screen on your
TV.
AUDIO AND VIDEO CONNECTIONS
12
S-Video socket
S
R
L
RED
WHITE
TV
S-VIDEO INPUT
STEREO AUDIO
INPUT

21
Video connection to a TV/Beamer with Component
Video inputs (YCbCr/YPbPr)
Component video separates the video signal into three separate “components”,
resulting in a higher picture quality than S-Video or standard composite video.
In order to use component video, you have to use a TV/Beamer equipped with
component video inputs.
You will also need a component/P-Scan video cable (not included) with sepa-
rate connectors for Y, Cb/Pb and Cr/Pr signals. This type of cable also supports
the Progressive Scan mode when used with high-end P-Scan TVs. Using the
component video output or P-Scan mode requires the following steps:
1. Preparation:
- First, use an audio/video cable or S-Video cable to connect the DVD play-
er to the composite video or S-Video input on your TV/beamer.
- As this device has a fixed power cord, only plug the other end of the fixed
power cord into the wall socket.
- Turn on the TV/beamer and the DVD player and select the corresponding
video input on your TV/beamer.
2. Entering the setup menu to change the Video setting:
Enter the player’s setup menu by pressing the “SETUP” button on the
remote control. Use the direction button “A” to navigate to the “Video” setup
page, then press “ENTER” navigate down to the “Video output” menu and
press “ENTER” to enter the menu. Use the direction button
“D” to proceed down to the “YUV” setting and press “ENTER” to confirm
your selection. On the screen will now be displayed a warning hint. Follow
the instructions on the screen.
3. Connecting the player using the Component Video cable:
Unplug the Composite Video or S-Video cable and connect the Component
Video cable to the appropriate jacks on your TV/Beamer. Normally, cables
and jacks are color-coded to make the connection easier. Then adjust the
TV’s/Beamer’s video input setting to correspond to the component video
input.
AUDIO AND VIDEO CONNECTIONS
COMPONENT VIDEO CABLE
TV or
Beamer
COMPONENT
VIDEO INPUT
ENG
Language Video Audio Security General
Video settings
TV shape Wide S-Video
TV system PAL YUV
Video output S-Vi RGB
Video mode
Sharpness Mid
Brightness 00
Contrast 00
Set the video output
4. Using a Progressive Scan TV: To switch from Interlace to Progressive
Scan, please read section “Video mode” on page 43.
/