Page is loading ...


This machine has been engineered to our own rigid safety and performance
standards. It has been designed to comply with sanitation and health guidelines
recommended by the Automatic Merchandising Health-Industry Council (AMHIC)
and it conforms with all other NAMA safety recommendations.
This machine has been manufactured in accordance with the safety
standards of both Underwriter’s Laboratories and the Canadian Standards
Association. To maintain this degree of safety and to continue to achieve the level
of performance built into this machine, it is important that installation and
maintenance be performed so as to not alter the original construction or wiring and
that replacement parts are as specified in the Parts and Service Manual. Your
investment in this equipment will be protected by using this Operator’s Guide and
the
Parts and Service Manual in your operation, service and maintenance work. By
following prescribed procedures, machine performance and safety will be
preserved.
This Merchandiser is warranted for one (1) year against defective parts and
workmanship. Any part or parts which are proven to be defective within one (1)
year of the date of shipment will be repaired or replaced free of charge when the
defective part is returned, with transportation charges prepaid, to the destination
designated by the National Vendors Warranty Department.
This warranty applies only to the original purchaser of the Merchandiser
and is null and void if the Merchandiser is sold during the period of warranty.
This warranty does not apply to a) electrical components, wiring, or circuits
and/or for all mechanical parts or assemblies damaged as a result of operating the
Merchandiser at other than the design voltage and frequency specified on the
Electrical Rating Tag, or b) in event of vandalism, fire or negligence, or c)
incandescent lamps, neon lamps, fluorescent lamps, ballasts, starters or other
expendable items or d) when other manufactured components are installed in
National Vendors Merchandisers.
National Vendors is not responsible for any cost of service rendered or
repairs made by customer or its agents on Merchandiser or parts unless authoriza-
tion to incur such expense has been given in writing by National Vendors prior to
incurring such expense.
THIS WARRANTY IS IN LIEU OF ALL OTHER WARRANTIES
EXPRESSED OR IMPLIED, INCLUDING WITHOUT LIMITATION, WARRAN-
TIES OF MERCHANTABILITY OR FITNESS FOR A PARTICULAR PURPOSE.
NATIONAL VENDORS SHALL NOT BE RESPONSIBLE FOR CONSEQUEN-
TIAL OR PUNITIVE DAMAGES. National Vendors neither assumes nor
authorizes any person to assume for it any obligation or liability in connection with
the sale of said equipment or any part thereof.

November, 2002 i 6700001
HOT DRINK SETUP/PROGRAMMING GUIDE
TABLE OF CONTENTS
SPECIFICATIONS ................................................................................................ V
MAJOR PARTS................................................................................................... VII
CONTROLS AND INDICATORS ....................................................................... XI
I. LOCATION PREPARATION ........................................................................... 1
Electrical Power Requirements ........................................................................ 1
II. POSITIONING THE MERCHANDISER ...................................................... 3
III. CONNECTING EVERYTHING..................................................................... 3
1. Connect the Merchandiser to the Water Supply ......................................... 3
IV. FINAL MECHANICAL PREPARATION ..................................................... 4
1. Level the Merchandiser ............................................................................... 4
2. Mount the Base Plate .................................................................................. 5
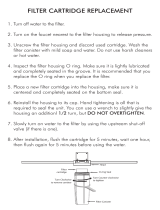
3. Install the Water Filter Cartridge ................................................................. 6
Hydrolife Brand................................................................................................ 8
Installation ................................................................................................... 8
Removal ....................................................................................................... 8
Load the Optional Filter Paper ......................................................................... 9
(CONTINUED) ................................................................................................ 9
Replace The Cup Station And Grounds Bucket............................................. 11
Install The Optional Coin Box Lock .............................................................. 11
Set Up And Load The Coin Mechanism ........................................................ 12
Standard Coin Mechanism............................................................................. 12
MDB Coin Mechanism .................................................................................. 12
Fill The Tank .................................................................................................. 14
Fill The Canisters ........................................................................................... 14
Load Cups ...................................................................................................... 15
Cup Size(s) ..................................................................................................... 16
Set Prices ........................................................................................................ 17
Set Up The Menu ........................................................................................... 17
Establish Time Of Day Vending Periods........................................................ 17
Customize The Drink Recipes ....................................................................... 17
Set Up Custom Messages ............................................................................... 17
Posivend™ ..................................................................................................... 17
V. ADJUSTMENTS AND MINOR MAINTENANCE...................................... 19
1. Empty the Bill Stacker .............................................................................. 19
2. Adjust the Water Valves ............................................................................ 19
3. Adjust the Air Pressure .............................................................................. 20
4. Install Canisters ........................................................................................ 20
5. Adjust the Cup Mechanism....................................................................... 21
VIEW A ...................................................................................................... 21
VIEW B...................................................................................................... 21
6. Set Up the Menu Assembly ....................................................................... 22
GETTING AROUND ............................................................................................. 23
THE SERVICE KEYPAD ....................................................................................... 23
THE SELECTION SWITCH PANEL ..................................................................... 23
PROGRAMMING THE HOT DRINK ................................................................... 23
THE DISPLAYS ...................................................................................................... 24
THE FUNCTION KEYS ......................................................................................... 25
OTHER KEYS ........................................................................................................ 25
TABLE OF CONTENTS

6700001 ii November, 2002
HOT DRINK SETUP/PROGRAMMING GUIDE
III. CONTROL PANEL SWITCHES EXPLAINED ........................................ 26
PROGRAMMING PROCEDURES........................................................................ 28
THE SUPERVISOR MODE ................................................................................... 28
GAIN ACCESS TO THE SUPERVISOR MODE................................................... 29
ENTER A NEW SUPERVISOR CODE .................................................................. 29
ENTER A FREEVEND CODE ............................................................................... 29
THE SUPERVISOR MODE ................................................................................... 29
LOCK OR UNLOCK MODE OR PAYOUT KEYS............................................... 30
SET PRINTER OR DEX OPTIONS ....................................................................... 30
LOCK OR UNLOCK DATA CLEARING ACCESS ............................................. 31
SELECT DISPLAY LANGUAGE........................................................................... 31
SELECT COIN MECHANISM AND OPTIONS ................................................... 32
SELECT BILL VALIDATOR AND OPTIONS ....................................................... 33
BILL LIST OPERATION ........................................................................................ 33
SELECT MONETARY OPTIONS .......................................................................... 35
SELECT CARD READER AND OPTIONS .......................................................... 37
SET UP WINNER MODE ...................................................................................... 38
ADVANCED OPTIONS.......................................................................................... 38
SET UP THE MUG DISCOUNT ............................................................................ 39
SET THE PRINTER BAUD RATE ........................................................................ 39
LOCK OR UNLOCK SELECTIONS ..................................................................... 40
DISABLE SELECTIONS IN THE MERCHANDISER ......................................... 40
ASSIGN CUP SIZES TO SELECTIONS ................................................................ 41
(SUPERVISOR MODE ONLY) .............................................................................. 41
SET UP A HOT DRINK .......................................................................................... 42
WHIPPER OPTIONS .............................................................................................. 43
DIFFERENCES(OPTIONS) ................................................................................... 44
VIEW OR SET THE HOT WATER TANK TEMPERATURE .............................. 44
SET UP LOW TEMPERATURE DISPENSING..................................................... 45
TSET UP LOW POWER SETTINGS ..................................................................... 45
SET THE RATIO OF CHOCOLATE IN CAPPUCCINO ....................................... 47
SET THE BREWER RINSE TIME INTERVAL..................................................... 47
THE BOWL RINSE TIME...................................................................................... 48
TURN POSIVEND™ ON OR OFF ........................................................................ 48
OPTIONAL OR MANDATORY POSIVEND™ .................................................... 49
SET UP THE POSIVEND™ ANTI-JACKPOT TIMER ......................................... 49
VIEW NUMBER OF MUG VENDS ...................................................................... 50
VIEW MACHINE ID NUMBER ............................................................................ 50
VIEW CUP RING CYCLES RELATED TO POSIVEND™ .................................. 50
VIEW TIMES NO CUP WAS DETECTED AFTER A CUP RING CYCLED....... 51
VIEW HOME SWITCH USAGE RELATED TO POSIVEND™ .......................... 51
VIEW POSIVEND™ LAST RECORDED CALIBRATION.................................. 52
VALUE .................................................................................................................... 52
VIEW POSIVEND™ AVERAGE CALIBRATION VALUE ................................. 52
CONTINUE ............................................................................................................. 52
CLEAR TANK ERRORS AND FILL THE TANK ................................................. 52
SET THE MACHINE TYPE CONFIGURATION CODE ...................................... 53
SET UP THE CUP ONLY OPTION (SUPERVISOR MODE ONLY).................... 55
SET UP DELIVERY DOOR OPTIONS (SUPERVISOR MODE ONLY) ............. 55

November, 2002 iii 6700001
HOT DRINK SETUP/PROGRAMMING GUIDE
COLLECTING DRY PRODUCT GRAM THROWS ............................................. 56
DRY PRODUCT WEIGHT AND THROW TIME FACTORY DEFAULT
SETTINGS .............................................................................................................. 57
CAPPUCCINO RECIPE ......................................................................................... 59
CAPPUCCINO ........................................................................................................ 59
MOTOR SPEED BY LOCATION .......................................................................... 60
HINTS ................................................................................................................... 60
CAFFÉ LATTE RECIPE ......................................................................................... 64
CAFFÉ LATTE ........................................................................................................ 64
ENTER THE SUPERVISOR CODE ...................................................................... 64
SET THE MACHINE TO VEND A LARGE "D" SELECTION ............................ 64
SET UP YOUR SELECTION ................................................................................. 65
EUROPEAN CAPPUCCINO ................................................................................. 65
RECONFIGURE THE MACHINE ......................................................................... 65
COLLECTING WATER THROWS ........................................................................ 67
EUROPEAN CAPPUCCINO RECIPE ................................................................... 67
WATER THROW DEFAULT TIMES AND VOLUMES ....................................... 68
SET PRICES FOR INDIVIDUAL SELECTIONS .................................................. 69
SET THE PRICE FOR A CUP ONLY..................................................................... 70
SET ONE PRICE FOR THE ENTIRE MACHINE ................................................ 70
SET ONE PRICE FOR ALL REGULAR SIZE DRINKS ....................................... 70
SET ONE PRICE FOR ALL LARGE SIZE DRINKS ............................................ 71
SET THE TIME....................................................................................................... 71
SET THE DAY OF THE WEEK ............................................................................. 71
SET THE DATE AND YEAR ................................................................................. 72
SET TIME-OF-DAY INHIBITED VENDING ........................................................ 72
SET TIME-OF-DAY DISCOUNT VENDING ........................................................ 73
SET TIME-OF-DAY FREE VENDING .................................................................. 73
TIME INTERVAL EDITING ................................................................................... 74
STAND BY.............................................................................................................. 75
SELECT A STANDBY MESSAGE ........................................................................ 76
SELECT AN OUT-OF-SERVICE MESSAGE ........................................................ 77
SELECT A FREEVEND MESSAGE ...................................................................... 77
EDIT CUSTOM MESSAGES................................................................................. 78
THE END OF MESSAGE CHARACTER ............................................................. 78
ENTERING YOUR MESSAGE ............................................................................. 79
THE CHARACTER SET ........................................................................................ 79
TEST VEND SELECTIONS AND VERIFY CREDIT ADDED ............................ 80
TEST THE DISPLAY .............................................................................................. 80
TEST THE CUP MECHANISM ............................................................................. 81
TEST THE AUTOMATIC DOOR (OPTIONAL) ................................................... 81
TEST THE WHIPPERS .......................................................................................... 81
TEST THE AIR COMPRESSOR ............................................................................ 82
TEST THE BREWER ............................................................................................. 82
RINSE ALL MIXING BOWLS ............................................................................... 83
VIEW FREEVEND SALES BY TIME INTERVAL ............................................... 83
VIEW DISCOUNT SALES BY TIME INTERVAL ................................................ 84
VIEW FREE VENDS .............................................................................................. 84
VIEW WINNERS .................................................................................................... 85
VIEW TIME DATA ................................................................................................. 85

6700001 iv November, 2002
HOT DRINK SETUP/PROGRAMMING GUIDE
VIEW TOTAL UNPAID SALES ............................................................................. 87
VIEW TOTAL UNPAID VENDS ............................................................................ 87
VIEW NUMBER OF TEST VENDS ...................................................................... 87
VIEW SALES DATA BY PRICE ............................................................................ 87
SET FREEVEND OPTIONS .................................................................................. 88
NO MONEY REQUIRED....................................................................................... 88
VIEW MACHINE ID NUMBER ............................................................................ 89
VIEW NON-RESETTABLE SALES AND VEND DATA...................................... 89
VIEW DATA THREE DIFFERENT WAYS ............................................................ 89
RINSE THE BREWER ........................................................................................... 90
FILL THE TANK ..................................................................................................... 90
TEST VARIOUS SENSORS AND SWITCHES..................................................... 91
PAYOUT COINS ..................................................................................................... 91
VIEW TOTAL PAID SALES .................................................................................. 92
VIEW CARD READER PAID SALES .................................................................. 92
VIEW TOTAL PAID VENDS ................................................................................. 92
CLEAR ALL RESETTABLE DATA ....................................................................... 93
CLEAR PAID SALES DATA ONLY ...................................................................... 93
VIEW AMOUNT IN COIN BOX ........................................................................... 93
VIEW AMOUNT IN VALIDATOR ........................................................................ 94
VIEW DIAGNOSTIC MESSAGES ........................................................................ 94
DOWNLOAD DATA TO A PDCD .......................................................................... 98
CHANGE MACHINE ID NUMBER...................................................................... 99
VIEW THE WATER TANK TEMPERATURE ....................................................... 99
VIEW THE CURRENT SOFTWARE VERSION NUMBER ................................ 99
VIEW THE SELECTION MACHINE TYPE ....................................................... 100
VIEW THE SELECTION CONFIGURATION..................................................... 100
SANITATION ...................................................................................................... 101
Basics ........................................................................................................... 101
How Do I Sanitize? ...................................................................................... 101
Chemicals ..................................................................................................... 101
Heat
Food-Contact Parts ....................................................................................... 103
Non Food-Contact Parts ............................................................................... 104
OVERALL CLEANING ..................................................................................... 104
Preventive Maintenance Cleaning ............................................................... 104
APPENDIX A. THE OPTIONAL PRINTER .................................................... A1
APPENDIX B. THE INFRARED MUG/CUP SENSOR ................................. B3
Indicator Light ............................................................................................... B3
Cleaning ........................................................................................................ B3
Calibration ..................................................................................................... B4
APPENDIX C. DEX/UCS INTERFACE OPERATION................................... C7
Select Data Transfer Method ......................................................................... C7
Download Data.............................................................................................. C7
APPENDIX C. DEX/UCS INTERFACE OPERATION.................................. C7
APPENDIX D. MODIFY CANISTER TO VEND 12 OZ. CUPSD9
APPENDIX E. CLEAN THE HOT WATER TANK...................................... E11
APPENDIX F. THE FREE VEND KEYSWITCH OPTION........................ F13
Using The Free Vend Key Switch ................................................................ F13

HOT DRINK SETUP/PROGRAMMING GUIDE
November, 2002 Page - v 6700001
SPECIFICATIONS
SENIHCAMLLAOTNOMMOCSNOITACIFICEPS
SNOISNEMID hgih)mc381("27
ediw)mc18("23
peed)mc27("5.82
THGIEW )gk5.512(sbl574
STNEMERIUQERRETAW )aPk8.731(isp02:muminiM
)aPk2.155(isp08:mumixaM
ERUTAREPMETTNEIBMA )C°5(F°14:muminiM
)C°23(F°09:mumixaM
GNITAREPO
TNEMNORIVNE
ylnoesuroodniroF
SEITICAPACPUC
)ETAMIXORPPA(
569-spuczo5
508-)tauqs(spuczo7
537-spuczo52.8
077-)tauqs(spuczo9
096-spuczo01
066-spuczo21
SEITICAPACRETSINAC
)ETAMIXORPPA(
)ylno436ledoM(sbl31-eeffocwerbhserF
sbl2-eeffocyrdezeerF
)ylno436ledoM(sbl9-facedwerbhserF
sbl2-facedyrdezeerF
sbl5.1)yrdezeerf(aeT
sbl01-etalocohC
)sbl4(sbl7.6-)etutitsbusragusro(puoS
sbl11-raguS
sbl5.4-renethgiL
SNOITPOTCUDORP
werBhserF076ledoM :noitarugifnoCdradnatS
)dnuorg-erp(eeffocwerbhserF
facedyrdezeerfROwerbhserF
aetyrdezeerF
"ylnopuc"dna,etalocohctoh,oniccuppac,osserpsE
snoitceles
:snoitarugifnoClanoitpO
noitcelesretawtoH
noitcelespuoS
RO
tnemidnocetutitsbusraguS
deirDezeerF876ledoM :noitarugifnoCdradnatS
eeffocyrdezeerF
facedyrdezeerF
aetyrdezeerF
"ylnopuc"dna,etalocohctoh,oniccuppac,osserpsE
snoitceles
:snoitarugifnoClanoitpO
noitcelesretawtoH
noitcelespuoS
RO
tnemidnocetutitsbusraguS

6700001 Page - vi November, 2002
HOT DRINK SETUP/PROGRAMMING GUIDE
)deunitnoc(SENIHCAMLLAOTNOMMOCSNOITACIFICEPS
SNOITPO roodyreviledcitamotuA
)dedis1(tikellirgesaB
)dedis3(tikellirgesaB
kcolxobnioC
tikretnirpataD
redaerdractibeD
tikgnipirtsrooD
tikretlifretaweruprevE
tikretlifretawonuC
tikretlifretawefiL-ordyH
tikreppihwpuoS
yekdnakcolroodecAxelF
yekdnakcolroodnaV
hctiwsyekdneveerF
)llat"4(seveelsnoisnetxeretsinactneidergnino-panS
tiketutitsbusragusropuoS
yartesnirtneidergnI
)tikhctiwsdlohpuc(rosnescinortcelegum/puC
dneVisoP
tiknoitcelesretawtoH
rewerbrof)llorrepsdnev0005(tikrepapretliF
)ylno436ledoM(
tniap"yargderutxeT"ro"etihwderutxeT"foeciohC
roodtenibacrof
SENIHCAMTLOV511OTEUQINUSNOITACIFICEPS
LACIRTCELE CAstloV511
ztreH06
spmA21
esahpelgniS
SEIROSSECCADNASNOITPO
MSINAHCEMNIOC
0006-CRTSRAM
0003NORTNIOC
)V42(VX0106-CRTSRAM
)V42(400-XPSUledoMxulnoC/akaM
)V42(FL-2039ledoMsrotpeccAnioC
SROTADILAVLLIB eslup1MFVSRAM
laires3MFVSRAM
eslupAKAM
OCNIOC
BDM
SENIHCAMTLOV042-022OTEUQINUSNOITACIFICEPS
LACIRTCELE CAstloV042-022
ztreH05
spmA01
Wk2
esahpelgniS
SEIROSSECCADNASNOITPO
MSINAHCEMNIOC ecafretnimsinahcemniocevitucexE

HOT DRINK SETUP/PROGRAMMING GUIDE
November, 2002 Page - vii 6700001
MAJOR PARTS
The diagrams on the following pages will acquaint you with the major parts of the Hot Drink
merchandiser. For more detailed information, please consult your PARTS MANUAL. If you
do not have a PARTS MANUAL, contact National Vendors Parts Department.
FRONT OF MERCHANDISER
CRANE
NATIONAL VENDORS
POINT OF
PURCHASE
PHOTO
˜
˜
EXTERIOR
DOOR
ASSEMBLY
LOC
K
MENU
ASSEMBLY
MAJOR PARTS

6700001 Page - viii November, 2002
HOT DRINK SETUP/PROGRAMMING GUIDE
CUP MECHANISM
TURRET ASSEMBLY
AND MOTOR AND PCB
ASSEMBLY
DELIVERY DOOR
LOCK BAR
ASSEMBLY
FRONT VIEW OF MERCHANDISER
636p0048
BACK SIDE OF MERCHANDISER DOOR

HOT DRINK SETUP/PROGRAMMING GUIDE
November, 2002 Page - ix 6700001
MERCHANDISER CABINET INTERIOR
MONETARY
PANEL
ASSEMBLY
BILL
ACCEPTOR
(OPTIONAL)
COIN
MECHANISM
POWER CORD
&
PLATE ASSEMBLY
LEG & LEVELER
ASSEMBLY
COIN BOX
ASSEMBLY
LEG, HINGE, &
LEVELER ASSEMBLY
CUP DELIVERY
ASSEMBLY
WATER FILTER
CARTRIDGE
FILTER & VALVE
HEAD ASSEMBLY
DRINK WHIPPER
ASSEMBLY
SOUP OR SUGAR
SUBSTITUTE
CANISTER
CHOCOLATE
CANISTER
T
WO INGREDIENT
CHUTE
LIGHTENER
CANISTER
SUGAR
CANISTER
WATER TANK
ASSEMBLY
CABINET
F.D. TEA
CANISTER
F.B. DECAF
CANISTER
( OPTIONAL )
F.B. COFFEE
CANISTER
RINSE
HOSE
ASSEMBLY
SERVICE LIGHT
ASSEMBLY
BREWER
(OPTIONAL)
GROUNDS
PAIL
LIQUID
WASTE
PAIL
( OPTIONAL )
F.D. CANISTERS
CRANE
NATIONAL VENDORS
D
E
C
A
F
D
E
C
A
F
C
O
F
F
E
E
C
O
F
F
E
E

6700001 Page - x November, 2002
HOT DRINK SETUP/PROGRAMMING GUIDE
MERCHANDISER CABINET INTERIOR
OVERFLOW
SWITCH
ASSEMBLY
OPTIONAL INFRARED
CUP/MUG SENSOR
OR
Posi-Vend
EXHAUST
FAN
BRACKET
ASSEMBLY
MAIN
CONTROLLER
PCB ASSEMBLY
INTERFACE
BOARD
˜
˜
O
I
POWER
PANEL
ASSEMBLY
636P0047

HOT DRINK SETUP/PROGRAMMING GUIDE
November, 2002 Page - xi 6700001
CONTROLS AND INDICATORS
POWER PANEL. You may have one of three power panels, depending upon where you
live. The controls are fundamentally the same, however.
Circuit Breakers. Circuit breakers protect the merchandiser against failures in the power
supply or any of the electrical components. If a circuit breaker trips and cannot be reset,
consult your troubleshooting manual.
Back Side of U.S./ Canada Power Control Panel. The circuit board mounted on the rear
of the U.S. and Canadian power control panel is a dc power supply for the coin
mechanism. A fuse protects the board circuitry in the event of a coin mechanism solenoid
failure. If the coin mechanism is not working, check this fuse. If the fuse is blown, a bad
coin mechanism solenoid could be at fault.
Main Power Switch. This is the main ON/OFF switch for the merchandiser.
WARNING
To protect against electrical shocks and possible damage to the
machine, turn this switch OFF when performing any mainte-
nance on the merchandiser.
LABEL
MAIN
POWER
SWITCH
ELECTRONICS
BREAKER
O
I
626P0005
CONTROLS AND INDICATORS

6700001 Page - xii November, 2002
HOT DRINK SETUP/PROGRAMMING GUIDE
BACK SIDE OF U.S./CANADA POWER CONTROL PANEL
DC POWER
SUPPLY PCB
FOR 110V COIN MECH
˜
AGC
1
FUS
E
1 AM
P
TOP
BACK SIDE
POWER CONTROL PANEL
(U.S./CANADA)
LABEL
MAIN
CIRCUIT
BREAKER
MAIN
POWER
SWITCH
LOW VOLTAGE
CIRCUIT BREAKER
OFF
ON
626P0006

HOT DRINK SETUP/PROGRAMMING GUIDE
November, 2002 Page - xiii 6700001
L
ABEL
MAIN POWER
SWITCH
ELECTRONICS
CIRCUIT BREAKE
R
MOUNTING STUDS
FOR MEXICO ONLY
POWER CONTROL PANEL
(U.K. / MEXICO)
OFF
ON

6700001 Page - xiv November, 2002
HOT DRINK SETUP/PROGRAMMING GUIDE
MAIN CONTROLLER PCB DISPLAY
LED1 LED2
MAIN CONTROLLER
PCB ASSEMBLY
POWER ON
(LED 1)
FLASHING
HEARTBEA
T
(LED 2)
Main Controller PCB Display. This display consists of two light emitting diodes (LED)
mounted on the controller PCB.
POWER ON When lit, this red LED indicates electrical power is applied to
(LED 1) the controller PCB.
HEARTBEAT When flashing, this red LED indicates that the controller PCB is
(LED 2) active, and the software is operating.
NORMAL CONDITIONS:
When the merchandiser is operating normally, you should see a
steady red POWER ON indicator. The red HEARTBEAT indicator
should be flashing with a balanced on/off pattern (on for the same
length of time that it is off).
ERROR CONDITIONS:
If an error is present, the red HEARTBEAT indicator will flash with an
unbalanced on/off pattern (on longer than it is off). The error(s) can be
viewed under the DIAGNOSTICS mode.

HOT DRINK SETUP/PROGRAMMING GUIDE
November, 2002 Page - xv 6700001
MONETARY PANEL
HIGH VOLTAG
E
INTERLOCK
SWITCH
LOW VOLTAG
E
DOOR SWITC
H
SERVICE
KEYPAD
CABINET
SELECTION
SWITCH
BILL
ACCEPTOR
(OPTIONAL)
COIN
INSERT
COIN
RETURN
BUTTON
MONETARY
PANEL
NUMERALS
1-9, *,0, #
LETTERS
A-H,J
I
NSTRUCTION
PLATE
FREE VEND
KEYSWITCH
(OPTIONAL)
MESSAGE
DISPLAY

6700001 Page - xvi November, 2002
HOT DRINK SETUP/PROGRAMMING GUIDE
High Voltage Interlock Switch (U.S./ Canada). When the cabinet door is open, this
switch turns off the optional fan and bean light (if equipped), and turns on the service light.
High Voltage Interlock Switch (International). When the cabinet door is open, this
switch turns off all high voltage to the cabinet. Pulling the switch out restores high voltage
for maintenance purposes.
Low Voltage Door Switch. Informs the controller software of the main door open or
closed status.
Message Display. This is how the merchandiser communicates with the outside world.
Customers can see messages about how much money they have put into the merchan-
diser. The message display also tells customers when a selection is sold out and when
vending is free, inhibited, or discounted. The message display shows you what you are
doing when you program the merchandiser, and can show you what is wrong if there is
a failure.
Free Vend Keyswitch. This allows someone (other than maintenance people) to set the
merchandiser to free vend without opening the door.
Selection Switch Panel. The customer uses these switches to make selections. Also,
maintenance people may use this switch panel during programming and other support
modes.
Coin Return Button. Pressing this button returns any coins that have been paid into the
merchandiser prior to a vend.
Bill Acceptor (Optional). Accepts bills in various denominations, depending upon the
type of bill validator, and how the machine is configured.
Service Keypad. The service keypad is located at the top of the monetary panel. It gives
service personnel the means to program, retrieve data from, and view diagnostic
information about, the merchandiser.
SERVICE KEYPAD

HOT DRINK SETUP/PROGRAMMING GUIDE
6700001 Page - 1 November, 2002
INITIAL SETUP
I. LOCATION PREPARATION
After your machine is unpacked and placed near its permanent location, you need
to make sure you have the proper electrical and water service.
ELECTRICAL POWER REQUIREMENTS
This merchandiser needs electrical power as shown in the following table.
NOTE
Each merchandiser should have its own electrical circuit.
Power Requirements
Country Volts Frequency (Hz)
Current (Amps
Canada 115 60 15
France 230 50 10
Germany 230 50 10
United Kingdom 230 50 10
United States 115 60 15
1. Check the Power Outlet
This merchandiser is supplied with a service cord for the country of use and is termi-
nated in a grounding type plug. The wall receptacle used for this merchandiser must be
properly polarized, grounded, and of the correct voltage. Operating the merchandiser
from a source of low voltage will VOID YOUR WARRANTY. Each merchandiser should
have its own electrical circuit and that circuit should be protected with a circuit breaker or
fuse conforming to local regulations.
Voltage Check - Place the leads of a voltmeter across the LINE (LIVE) and
NEUTRAL terminals of the wall receptacle. The voltmeter should indicate 110-130
volts ac for 120 volt, 60 Hz locations, or 220-240 volts ac for 230 volt, 50 Hz
locations.
Polarity Check - Place the leads of a voltmeter across the LINE (LIVE) and
GROUND terminals of the wall receptacle. The voltmeter should indicate 110-130
volts ac for 120 volt, 60 Hz locations, or 220-240 volts ac for 230 volt, 50 Hz
locations.
Noise Potential Check - Place the leads of a voltmeter across the NEUTRAL and
GROUND terminals of the wall receptacle. The voltmeter should indicate 0 volts
ac. A measurement greater than 1.5-2.0 volts ac could result in problems for the
merchandiser's electronic circuitry caused by electrical noise.
Any deviation from these requirements could result in unreliable performance from your
merchandiser.

HOT DRINK SETUP/PROGRAMMING GUIDE
November, 2002 Page - 2 6700001
WATER REQUIREMENTS
The best type of water for coffee brewing is normal hard (tap) water. If your location
has chemically softened water, you should do one of the following things:
• Have a non-softened supply line run to the merchandiser
• Contact your local water filter supplier for information and suggestions
Well water can also be used in the Hot Drink Machine. However, you should
have it checked for levels of carbonates and alkalies. Contact your water filter
supplier if these values are relatively high.
What is the Water Pressure at Your Location?
It should be no less than: 10 psi ( 69.0 KPa) at 1/2 gallon/minute
And no more than: 80 psi (522.0 KPa) at 1/2 gallon/minute
If you're not sure about the pressure and flow rate, check with your water company.
What to do With the Water Supply Line:
Locate the supply line at the rear of your merchandiser.
Equip the line with a shut-off valve.
Flush the water supply line before connecting it to the merchandiser. A minimum of
five gallons is usually required before connecting the merchandiser to the supply line.
DO NOT flush the merchandiser water system. If you do, you might introduce water
line contaminants into the merchandiser.
/