DFI EC300/EC310/EC320/EC321/EC322 Installation Guide User manual

Type
User manual

This manual is also suitable for

1
EC300/310/320/321/322 Series
Installation Guide
Package Contents
1 System unit
1 SATA data/power cable
1 120W power adapter (-CR6G60/-CRA060/-CR6881)
1 160W power adapter (-CR4866)
1 Installation Guide
1 CD disk includes:
- Drivers
- Manual
Optional Items
1 Wallmount kit
1 Power cord
1 3G
System Models
Rear I/O Ports
EC3xx-
CR6881
EC3xx-
CR6G60
EC3xx-
CRA060
EC300/320/321/
322-CR4G65
EC3xx-CR4866
DC-in power jack:
3-pole terminal block
111 1 1
Speaker-out:
2W 3.5mm audio jack
111 1 1
VGA: DB-15 D-sub 111 1 1
DVI (DVI-D signal) 100 0 0
Gigabit LAN: RJ45 with LEDs 222 5 2
PoE Gigabit LAN: RJ45 000 0 4
COM: DB-9 D-sub
(RS232/422/485)
664 4
4
(2 ports are RS232.)
COM: 5-pole terminal block
(RS232/422/485)
006 0 0
USB 3.0 Type A
222 2 2
USB 2.0 Type A 200 0 0
GPIO: 9-pole terminal block 8-bit 16-bit 0 16-bit 8-bit
Reset button 111 1 1
Power LED 111 1 1
HDD LED 111 1 1
Alert LED 111 1 1
Front I/O Ports
EC3xx-
CR6881
EC3xx-
CR6G60
EC3xx-
CRA060
EC300/321-
CR4G65
EC3xx-CR4866
USB 2.0 Type A
444 4 4
Power button with indicator 111 1 1
Reset button 111 1 1
HDD LED 111 1 1
Alert LED
1 1 1 1 1
Wi-Fi module antenna hole
2 2 2 2 2
2
Installing a SATA Drive
1. Locate the SATA drive bay on the cover.
SATA drive bay
Cover
2. Remove the 4 mounting screws that secure the HDD brackets to the drive
bay.
Mounting screw
3
3. Align the mounting holes of the SATA drive with the mounting holes on the
HDD bracket and then use the provided mounting screws to secure the drive in
place.
HDD bracket
SATA drive
Mounting screw
4. Place the SATA drive (with HDD bracket) into the cover. Align the mounting
holes on the HDD bracket with the mounting holes on the SATA drive bay and
then use the provided mounting screws to secure the drive in place.
HDD bracket
Mounting hole
Mounting screws
4
5. Connect A to the SATA power/data connector on the SATA drive, B and C to
the SATA power connector and SATA data connector respectively on the system
board.
SATA power connector (B)
SATA power/data
connector (A)
SATA data
connector (C)
Mounting hole
Mounting screw
5
SATA data
connector
SATA power connector
SATA power/data
connector
6
System Boards and Jumper Settings
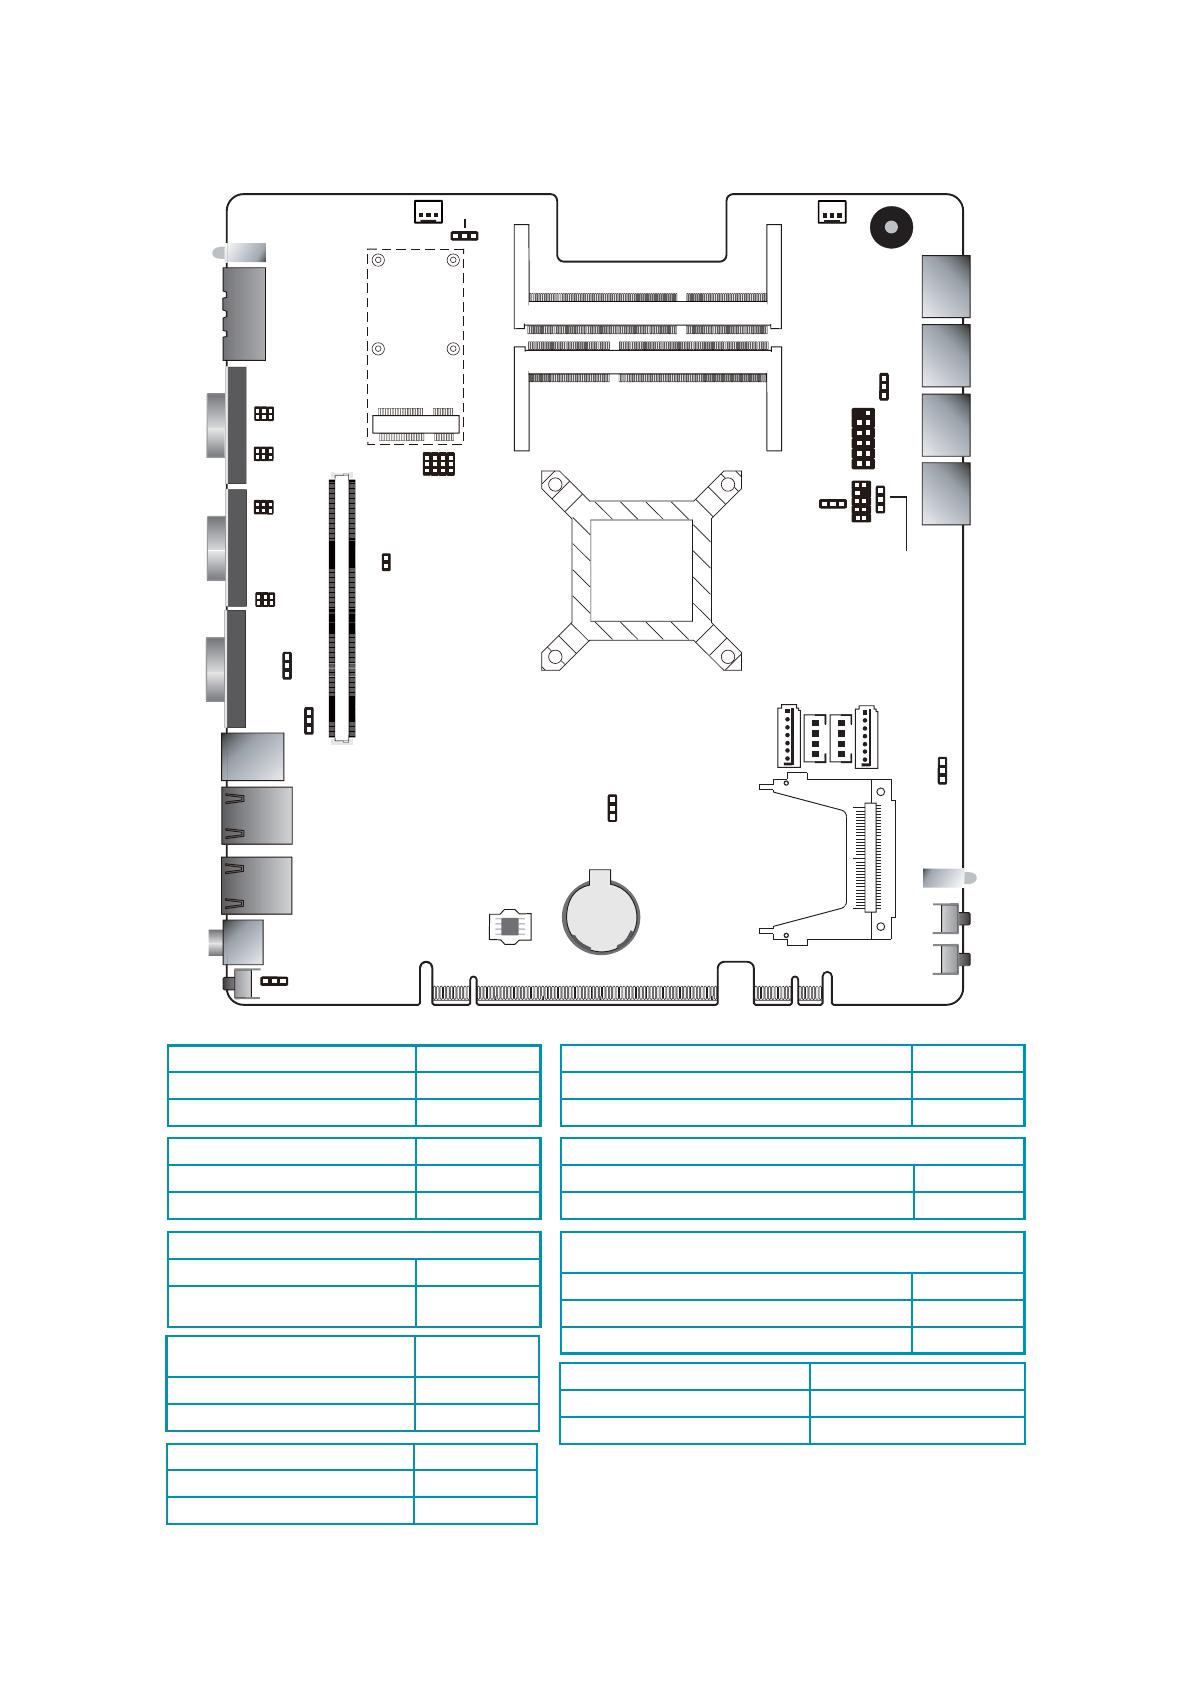
USB Power: 0-1 (JP8), 4-5 (JP3), 6-7 (JP2)
+5V (default) 1-2 On
+5V_standby 2-3 On
Power-on Select JP5
Power-on via power button (default) 1-2 On
Power-on via AC power 2-3 On
COM1 (JP11), COM2 (JP13) RS232/RS422/RS485
Select
RS232 (default) 1-2 On
RS422 Full Duplex 3-4 On
RS485 5-6 On
Mini PCIe/mSATA
Power Select
JP4
3V3 (default) 1-2 On
3VDU 2-3 On
Mini PCIe/mSATA Select JP6
Mini PCIe (default) 1-2, 4-5, 7-8, 10-11 On
mSATA 2-3, 5-6, 8-9, 12-13 On
COM1 (JP12), COM2 (JP14) RS232/Power
RS232 (default) 1-3, 2-4 On
RS232 with power
3-5 (+12V),
4-6 (+5V) On
PS/2 Power JP1
+5V (default) 1-2 On
+5V_standby 2-3 On
Clear CMOS Data JP7
Normal (default) 1-2 On
Clear CMOS Data 2-3 On
VGA
COM 2
VGA
COM 1
DC-IN
LAN 1
LAN 2
Audio
USB 0-1
Reset
1
Reset/Power on
select (JP10)
Reset
Power
Battery
USB 4
USB 5
USB 6
USB 7
1
USB 0-1 power
select (JP8)
1
Chassis
intrusion
2nd level rear I/O
module connector
1
2
3
Mini PCIe/mSATA
select (JP6)
1
System fan
CPU Fan
1
DDR3_2 SODIMM2
DDR3_1 SODIMM1
1
PS/2 power
select(JP1)
1
2
9
10
PS/2 KB/MS
1
USB 4-5 power
select (JP3)
1
USB 6-7
power select
(JP2)
1
2
1112
Mini PCIe
Mini PCIe/mSATA
Power select (JP4)
1
SPI Flash
BIOS
Riser card connector
1
Clear CMOS (JP7)
6
5
COM1 RS232/422/485
select ( )JP11
COM2
RS232/422/485
select (JP13)
COM1 RS232/Power
select ( )JP12
1
Power-on
select (JP5)
SATA 0
1
SATA 1
1
HDD Power
CompactFlash
LED
LED
Front Panel
10
11
12
COM2 RS232/
Power select
(JP14)
1
1
1
Factory Testing
(JP15)
2
1
6
5
2
1
6
5
2
1
6
5
2
1
Reset/ Power on Select JP10
Reset (default) 1-2 On
Power on 2-3 On
Note: The Reset/ Power on Select is used to select
the function of the reset bottom.
934-EC3000-1A0G
A22133525
  • Page 1 1
  • Page 2 2
  • Page 3 3
  • Page 4 4
  • Page 5 5
  • Page 6 6

DFI EC300/EC310/EC320/EC321/EC322 Installation Guide User manual

Type
User manual
This manual is also suitable for

Ask a question and I''ll find the answer in the document

Finding information in a document is now easier with AI