
©2003 Sony Corporation
4-244-987-11(1)
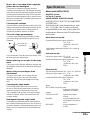
Micro Hi-Fi
Component
System
Operating Instructions
Owner’s Record
The model and serial numbers are located on the rear of the unit. Record the serial number
in the space provided below. Refer to them whenever you call upon your Sony dealer
regarding this product.
Model No. ______________ Serial No. ______________
CMT-CPX1

2
GB
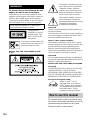
To prevent fire or shock hazard, do not
expose the unit to rain or moisture.
To prevent fire, do not cover the ventilation of the
apparatus with news papers, table-cloths, curtains, etc.
And don’t place lighted candles on the apparatus.
To prevent fire or shock hazard, do not place objects
filled with liquids, such as vases, on the apparatus.
This appliance is
classified as a CLASS 1
LASER product. This
label is located on the
rear exterior.
Don’t throw away the battery with
general house waste, dispose of it
correctly as chemical waste.
NOTICE FOR THE CUSTOMERS IN THE
U.S.A.
This symbol is intended to alert the
user to the presence of uninsulated
“dangerous voltage” within the
product’s enclosure that may be of
sufficient magnitude to constitute a
risk of electric shock to persons.
This symbol is intended to alert the
user to the presence of important
operating and maintenance (servicing)
instructions in the literature
accompanying the appliance.
CAUTION
The use of optical instruments with this product will
increase eye hazard.
As the laser beam used in this CD player is harmful to
eyes, do not attempt to dissemble the cabinet. Refer
servicing to qualified personnel only.
Note to CATV system installer:
This reminder is provided to call the CATV system
installer’s attention to Article 820-40 of the NEC that
provides guidelines for proper grounding and, in
particular, specifies that the cable ground shall be
connected to the grounding system of the building, as
close to the point of cable entry as practical.
CAUTION
You are cautioned that any changes or modifications
not expressly approved in this manual could void your
authority to operate this equipment.
NOTICE FOR THE CUSTOMER IN CANADA
CAUTION
TO PREVENT ELECTRIC SHOCK, DO NOT USE
THIS POLARIZED AC PLUG WITH AN
EXTENSION CORD, RECEPTACLE OR OTHER
OUTLET UNLESS THE BLADES CAN BE FULLY
INSERTED TO PREVENT BLADE EXPOSURE.
Except for European model
ENERGY STAR
®
is a U.S.
registered mark. As an E
NERGY
S
TAR
®
partner, Sony Corporation
has determined that this product
meets the E
NERGY STAR
®
guidelines for energy efficiency.
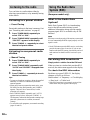
This manual mainly explains operations using
the remote, but the same operations can also be
performed using the buttons on the system
having the same or similar names.
WARNING
Do not install the appliance in a confined space,
such as a bookcase or built-in cabinet.
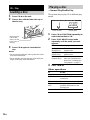
How to use this manual

3
GB
How to use this manual...........................2
Getting Started
Hooking up the system............................4
Setting the clock......................................5
CD – Play
Loading a disc.........................................6
Playing a disc..........................................6
— Normal Play/Shuffle Play
Playing repeatedly...................................7
— Repeat Play
Creating your own program....................7
— Program Play
Tuner
Presetting radio stations..........................8
Listening to the radio............................10
— Preset Tuning
— Manual Tuning
Using the Radio Data System (RDS)....10
(European model only)
Tape – Play
Loading a tape.......................................11
Playing a tape........................................11
Tape – Recording
Recording your favorite CD tracks on a
tape..................................................12
— CD-TAPE Synchro Recording
Recording on a tape manually...............12
— Manual Recording
Sound Adjustment
Adjusting the sound ..............................13
Timer
Falling asleep to music..........................13
— Sleep Timer
Waking up to music ..............................14
— Daily Timer
Timer recording radio programs...........15
Display
Turning off the display......................... 16
— Power Saving Mode
Viewing information about the disc in the
display ............................................ 16
Optional Components
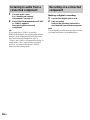
Hooking up optional components......... 17
Listening to audio from a connected
component......................................18
Recording on a connected component.. 18
Troubleshooting
Problems and remedies......................... 19
Messages...............................................21
Additional Information
Precautions............................................22
Specifications........................................ 23
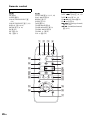
List of button locations and reference
pages............................................... 25
Table of Contents

4
GB
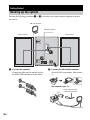
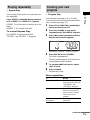
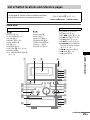
Perform the following procedures 1 to 3 to hook up your system using the supplied cords and
accessories.
1 Connect the speakers.
Connect the right and left speaker cords to
the SPEAKER terminals as shown below.
2 Connect the FM and AM antennas.
Set up the AM loop antenna, then connect
it.
FM antenna (Type A)
Getting Started
Hooking up the system
3
2
1
AM loop antenna
Right speaker Left speaker
FM lead antenna
L
R
AM
FM75
Ω
COAXIAL
Extend the FM lead
antenna horizontally
AM loop antenna

Getting Started
5
GB
FM antenna (Type B)
Note
To prevent noise pickup, keep the antennas away from
the system and other components.
3 Connect the mains lead to mains.
If the plug does not fit the wall socket,
detach the supplied plug adaptor (only for
models equipped with an adaptor).
To turn on the system, press ?/1.
To attach the speaker pads
Attach the supplied speaker pads to the bottom
of the speakers to stabilize the speakers and
prevent them from slipping.
Inserting two R6 (size AA)
batteries into the remote
Note
If you do not use the remote for a long period of time,
remove the batteries to avoid possible damage from
battery leakage and corrosion.
Tip
When the remote no longer operates the system,
replace both batteries with new ones.
1 Press ?/1 to turn on the system.
2 Press CLOCK/TIMER SET.
3 Press . or > repeatedly to set the
hour.
4 Press ENTER.
5 Press . or > repeatedly to set the
minute.
6 Press ENTER.
The clock starts working.
To adjust the clock
1 Press CLOCK/TIMER SET.
2 Press . or > until “CLOCK” appears,
then press ENTER.
3 Do the same procedures as step 3 to 6
above.
Note
The clock is not displayed in Power Saving Mode.
AM
FM75
Ω
COAXIAL
Extend the FM lead
antenna horizontally
AM loop antenna
E
e
e
E
Setting the clock

6
GB
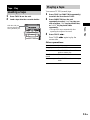
1 Press CD Z on the unit.
2 Place a disc with the label side up on
the disc tray.
3 Press CD Z again to close the disc
tray.
Notes
• Do not use a disc with tape, seals or paste on it as this
may cause malfunction.
• Do not forcibly press the disc tray closed with your
finger, as this may cause malfunction.
This system lets you play CD in different play
modes.
1 Press CD (or FUNCTION repeatedly) to
switch the function to CD.
2 Press PLAY MODE in stop mode
repeatedly until the mode you want
appears.
3 Press CD NX.
Other operations
CD – Play
Loading a disc
Z
x
u
.
m
M
When you play
a 8 cm disc,
place it on the
inner circle of
the tray.
Playing a disc
— Normal Play/Shuffle Play
Select To play
No display
(Normal Play)
The tracks on the disc in
original order.
SHUFFLE
(Shuffle Play)
All tracks on the disc in
random order.
PROGRAM
(Program Play)
The tracks on the disc in the
order you want them to be
played (see “Creating your
own program” on page 7).
To Do this
Stop play Press CD x.
Pause Press CD NX. Press again to
resume play.
Select a track Press . or > repeatedly.
Find a point in a
track
Keep pressing m or M during
playback and release it at the
desired point.
Remove a disc Press CD Z on the unit.
REC SLEEP
DAILY
PRESET SHUFFLE PROGRAM REPEAT 1 STEREO TUNEDAUTO
SYNC
Track number Playing time

CD – Play
7
GB
You can play all the tracks or a single track on a
disc repeatedly.
Press REPEAT repeatedly during playback
until “REPEAT” or “REPEAT 1” appears.
REPEAT: For all the tracks on the disc up to five
times.
REPEAT 1: For a single track only.
To cancel Repeat Play
Press REPEAT repeatedly until both
“REPEAT” and “REPEAT 1” disappear.
You can make a program of up to 25 steps.
You can synchro record the programmed tracks
onto a cassette tape (page 12).
1 Press CD (or FUNCTION repeatedly) to
switch the function to CD.
2 Press PLAY MODE in stop mode
repeatedly until “PROGRAM” appears.
3 Press . or > repeatedly until the
desired track number appears.
4 Press ENTER (or PLAY MODE).
The track is programmed.
The step number appears, followed by the
last programmed track number.
5 To program additional tracks, repeat
steps 3 and 4.
6 Press CD NX.
Program Play starts.
Other operations
Playing repeatedly
— Repeat Play
Creating your own
program
—Program Play
To Do this
Cancel Program Play Press PLAY MODE in stop
mode repeatedly until both
“PROGRAM” and
“SHUFFLE” disappear.
Erase the program Press CLEAR in step 4.
Each time you press the
button, a track is cleared
from the end of the
program.
Add a track to the end of
the program
Perform steps 3 and 4 in
stop mode.
REC SLEEP
DAILY
PRESET SHUFFLE PROGRAM REPEAT 1 STEREO TUNEDAUTO
SYNC
Selected track number Total playing time
continued

8
GB
Tips
• The program you made remains after Program Play
finishes. To play the same program again, press
CD NX. However, the program is cleared when
you open the disc tray.
• “– –.– –” appears when the total program time
exceeds 100 minutes.
You can preset up to 20 FM stations and 10 AM
stations. You can then tune in any of those
stations simply by selecting the corresponding
preset number.
Automatic tuning preset
You can automatically tune in all of the stations
that can be received in your area and then store
the radio frequency of the desired stations.
1 Press TUNER/BAND repeatedly to
select “FM” or “AM”.
2 Press TUNING MODE repeatedly until
“AUTO” appears in the display.
3 Press TUNING +/–.
The frequency changes as the system scans
for a station. Scanning stops automatically
when a station is tuned in. At that time,
“TUNED” and “STEREO” (for stereo
program only) appear.
If “TUNED” does not appear and the
scanning does not stop
Set the frequency of the desired radio
station as described in steps 2 and 3 of
“Manual tuning preset” (page 9).
4 Press TUNER MEMORY.
The preset number flashes. Perform steps 5
and 6 while the preset number flashes.
5 Press TUNING +/– repeatedly to select
the desired preset number.
6 Press ENTER.
7 Repeat steps 3 through 6 to preset
other stations.
Tuner
Presetting radio stations
REC SLEEP
DAILY
PRESET SHUFFLE PROGRAM REPEAT 1 STEREO TUNEDAUTO
SYNC
Preset number

Tuner
9
GB
Tip
Press TUNING MODE to stop scanning.
Manual tuning preset
You can manually tune in and store the radio
frequency of the desired stations.
1 Press TUNER/BAND repeatedly to
select “FM” or “AM”.
2 Press TUNING MODE repeatedly until
“AUTO” and “PRESET” disappear from
the display.
3 Press TUNING +/– repeatedly to tune in
the desired station.
4 Press TUNER MEMORY.
5 Press TUNING +/– repeatedly to select
the desired preset number.
6 Press ENTER.
7 Repeat steps 3 through 6 to preset
other stations.
Other Operations
To change the AM tuning interval
(except for European models)
The AM tuning interval is factory-preset to
9 kHz (or 10 kHz for some areas). To change the
AM tuning interval, tune in any AM station first,
then turn off the system. While holding
TUNING –, press ?/1 on the unit. When you
change the interval, all the AM preset stations
are erased. To reset the interval, repeat the same
procedure.
Note
You cannot change the AM tuning interval in the
Power Saving Mode.
Tips
• The preset stations are retained for about half a day
even if you disconnect the mains lead or if a power
failure occurs.
• To improve the reception, adjust the supplied
antennas or connect an external antenna.
To Do this
Tune in a station
with a weak signal
Follow the procedure described
in “Manual tuning preset”
(page 9).
Set another station
to the existing
preset number
After step 4, press TUNING +/–
repeatedly to select the preset
number you want to store the
station.

10
GB
You can listen to a radio station either by
selecting a preset station, or by manually tuning
in the station.
Listening to a preset station
— Preset Tuning
Preset radio stations in the tuner’s memory first
(see “Presetting radio stations” on page 8).
1 Press TUNER/BAND repeatedly to
select “FM” or “AM”.
2 Press TUNING MODE repeatedly until
“PRESET” appears in the display.
3 Press TUNING +/– repeatedly to select
the desired preset station.
Listening to non-preset radio
station
— Manual Tuning
1 Press TUNER/BAND repeatedly to
select “FM” or “AM”.
2 Press TUNING MODE repeatedly until
“AUTO” and “PRESET” disappear from
the display.
3 Press TUNING +/– repeatedly to tune in
the desired station.
Tips
• To improve broadcast reception, adjust the supplied
antennas, or connect a commercially available
external antenna.
• When an FM stereo program has static noise, press
FM MODE on the unit repeatedly until “MONO”
appears. There will be no stereo effect, but the
reception will improve.
• Press TUNING MODE repeatedly until “AUTO”
appears in step 2 above, then press TUNING +/–.
The frequency indication changes and scanning stops
when the system tunes in a station (Automatic
Tuning).
• To record the radio programs, use manual recording
(pages 12 and 15).
What is the Radio Data
System?
Radio Data System (RDS) is a broadcasting
service that allows radio stations to send
additional information along with the regular
program signal. RDS is available only on FM
stations.*
Note
RDS may not work properly if the station you are tuned
in is not transmitting the RDS signal properly or if the
signal is weak.
* Not all FM stations provide RDS service, nor do they
provide the same types of services. If you are not
familiar with the RDS system, check with your local
radio stations for details on RDS services in your
area.
Receiving RDS broadcasts
Simply select a station from the FM band.
When you tune in a station that provides RDS
services, the station name appears in the display.
To check the RDS information
Each time you press DISPLAY, the display
changes cyclically as follows:
Station name* t Frequency t Clock display
t Bass level t Treble level
* If the RDS broadcast is not properly received, the
station name may not appear in the display.
Listening to the radio Using the Radio Data
System (RDS)
(European model only)

Tape – Play
11
GB
1 Press TAPE Z on the unit.
2 Load a tape into the cassette holder.
You can use TYPE I (normal) tape.
1 Press TAPE (or FUNCTION repeatedly)
to switch the function to TAPE.
2 Press DIRECTION on the unit
repeatedly to select “g” to play one
side of a tape, “h” to play both sides,
or “j”
*
to play both sides
repeatedly.
* The tape deck stops automatically after
repeating the sequence five times.
3 Press TAPE nN.
Press TAPE nN again to play the
reverse side.
Other operations
Tape – Play
Loading a tape
With the side you
want to play/record
facing towards you.
Playing a tape
To Do this
Stop play Press TAPE x.
Pause Press TAPE X on the unit. Press
again to resume play.
Fast-forward or
rewind
Press m or M.
Remove a tape Press TAPE Z on the unit in stop
mode.

12
GB
You can record a whole CD on a tape.
You can use TYPE I (normal) tape.
Use buttons on the unit for the operation.
1 Load a recordable tape.
2 Load a CD you want to record.
3 Press CD SYNCHRO.
“SYNC” appears. “REC” and “N” (or
“n”) light up. The tape deck stands by for
recording and the CD player pauses for
play.
4 Press DIRECTION repeatedly until g
appears to record on one side or h (or
j) to record on both sides.
5 Press TAPE nN repeatedly to select
recording side.
If you select both sides recording or front
side recording, press TAPE nN to light
up the N indicator. If you record on the
reverse side, press TAPE nN again to
light up the n indicator.
6 Press TAPE X .
Recording starts.
When the recording is completed, the CD
player and the tape deck stop automatically.
To stop recording
Press TAPE x.
To record a disc by specifying
track order
You can record only your favorite CD tracks
using Program Play. Between steps 2 and 3,
perform steps 1 to 5 of “Creating your own
program” (page 7).
Tip
If you select both sides recording and the tape reaches
the end of the front side part-way through a track, the
entire track is recorded again from the beginning of the
reverse side.
You can record just the portions you like from a
CD on a tape. You can also record a radio
program.
Use buttons on the unit for the operation.
1 Load a recordable tape.
2 Press FUNCTION repeatedly to select
the desired source to record.
• TUNER: To record from this system’s
tuner.
• CD: To record from this system’s CD
player.
• MD or VIDEO: To record from the
optional component connected to the MD
(VIDEO) IN jacks.
3 Press TAPE z REC.
“N” lights up and the tape deck stands by
for recording.
4 Press DIRECTION repeatedly until g
appears to record on one side or h (or
j) to record on both sides.
5 Press TAPE nN repeatedly to select
recording side.
If you select both sides recording or front
side recording, press TAPE nN to light
up the N indicator. If you record on the
reverse side, press TAPE nN again to
light up the n indicator.
6 Press TAPE X, then start playing the
desired source to record.
Recording starts.
Other operations
Tape – Recording
Recording your favorite
CD tracks on a tape
— CD-TAPE Synchro Recording
Recording on a tape
manually
— Manual Recording
To Do this
Stop recording Press TAPE x.
Pause recording Press TAPE X on the unit.

Tape – Recording/Sound Adjustment/Timer
13
GB
You can adjust the bass and treble to enjoy more
powerful sound.
Generating a more dynamic
sound (Dynamic Sound
Generator)
Press DSG on the unit.
To cancel the DSG, press DSG again.
Adjusting the bass and treble
You can adjust the bass and treble.
1 Press EQ repeatedly to select “BASS”
or “TRE”.
Each time you press the button, the display
changes as follows:
BASS y TRE
2 Press EQ + or – repeatedly to adjust the
level while “BASS” or “TRE” appears.
To adjust the bass on the unit
Turn BASS.
To adjust the treble on the unit
Turn TREBLE.
To exit the bass and treble
settings
Press any button other than EQ or EQ +/–.
Also, if you do not perform any operations for a
few seconds, the display automatically returns to
the original display.
You can set the system to turn off after a certain
time, so that you can fall asleep to music.
Press SLEEP.
Each time you press the button, the minute
display (the turn-off time) changes cyclically as
follows:
AUTO* t 90MIN t 80MIN t … t
10MIN t OFF
* The system automatically turns off in 240 minutes or
after the current CD or tape finishes playing.
Other operations
**You cannot check the remaining time if you select
“AUTO”.
Tip
You can use the Sleep Timer, even if you have not set
the clock.
Sound Adjustment
Adjusting the sound
Timer
Falling asleep to music
—Sleep Timer
To Press
Check the
remaining time**
SLEEP once.
Change the time
to turn off
SLEEP repeatedly to select the
time you want.
Cancel the Sleep
Timer Function
SLEEP repeatedly until “OFF”
appears.

14
GB
You can wake up to music at a preset time. Make
sure you have set the clock (see “Setting the
clock” on page 5).
1 Prepare the sound source you want to
play.
• CD: Load a disc. To start from a specific
track, make a program (see “Creating
your own program” on page 7).
• TAPE: Load a tape (see “Playing a tape”
on page 11).
• TUNER: Tune in the preset radio station
(see “Listening to the radio” on page 10).
2 Press VOL + or – to adjust the volume.
3 Press CLOCK/TIMER SET.
4 Press . or > repeatedly until
“DAILY” appears, then press ENTER.
“ON TIME” appears and the hour
indication flashes.
5 Set the time to start playing.
Press . or > repeatedly to set the
hour, then press ENTER.
The minute indication flashes.
Press . or > repeatedly to set the
minute, then press ENTER.
6 Set the time to stop playing following
the same procedure as step 5.
7 Press . or > repeatedly until the
desired sound source appears.
Each time you press the button, the display
changes cyclically as follows:
8 Press ENTER.
The start time, the stop time, the sound
source and VOLUME appear in turn, then
the original display returns.
9 Press ?/1 to turn off the system.
Other operations
Notes
• The Daily Timer setting or the Timer Recording
setting overlaps with part or all of another timer
setting.
• If you use the Daily Timer and the Sleep Timer at the
same time, the Sleep Timer has priority.
• Do not operate the system from the time the system
turns on until the play starts (about 15 seconds before
the preset time).
• If the system is on about 15 seconds before the preset
time, the Daily Timer will not be activated.
• You cannot use the optional component connected to
MD (VIDEO) IN jacks as the sound source for Daily
Timer.
• When the Daily Timer is set to “OFF”, “SELECT”
does not appear. However, “SELECT” does appear
when the Timer Recording is set to “ON”.
Waking up to music
— Daily Timer
t
TUNER
y
CD PLAY
T
t
TAPE PLAY
T
To Do this
Cancel the timer/
activate the timer/
check the settings
1 Press CLOCK/TIMER
SELECT.
2 Press . or >
repeatedly until “SELECT”
appears, then press ENTER.
3 Press . or >
repeatedly until “DAILY”,
“ON” or “OFF” appears,
then press ENTER.
Change the setting Start over from step 1.
Cancel both Daily
Timer and Timer
Recording
1 Press CLOCK/TIMER
SELECT.
2 Press . or >
repeatedly until “OFF”
appears, then press ENTER.

Timer
15
GB
To timer record, you must first preset the radio
station (see “Presetting radio stations” on
page 8) and set the clock (see “Setting the clock”
on page 5).
1 Tune in the preset radio station (see
“Listening to a preset station” on
page 10).
2 Press CLOCK/TIMER SET.
3 Press . or > repeatedly until
“REC” appears, then press ENTER.
“ON TIME” appears and the hour
indication flashes.
4 Set the time to start recording.
Press . or > repeatedly to set the
hour, then press ENTER.
The minute indication flashes.
Press . or > repeatedly to set the
minute, then press ENTER.
5 Set the time to stop recording following
the same procedure as step 4.
Timer Recording settings and the desired
station appear, then the original display
returns.
6 Load a recordable tape.
7 Press DIRECTION repeatedly until g
appears to record on one side or h (or
j) to record on both sides.
8 Press TAPE nN repeatedly to select
recording side.
If you select both sides recording or front
side recording, press TAPE nN to light
up the N indicator. If you record on the
reverse side, press TAPE nN again to
light up the n indicator.
9 Press ?/1 to turn off the system.
Other operations
Notes
• The Daily Timer setting or the Timer Recording
setting overlaps with part or all of another timer
setting.
• If you use the Timer Recording and the Sleep Timer
at the same time, the Sleep Timer has priority.
• Do not operate the system from the time the system
turns on until the recording starts (about 15 seconds
before the preset time).
• If the system is on about 15 seconds before the preset
time, the Timer Recording will not be activated.
• The volume is reduced to minimum during
recording.
• Note that if the Timer Recording is set at the same
time as the Daily Timer sound source is set to tape,
the Timer Recording sound may be recorded onto the
tape.
• When the Timer Recording is set to “OFF”,
“SELECT” does not appear. However, “SELECT”
does appear when the Daily Timer is set to “ON”.
Timer recording radio
programs
To Do this
Cancel the timer/
activate the timer/
check the settings
1 Press CLOCK/TIMER
SELECT.
2 Press . or >
repeatedly until “SELECT”
appears, then press ENTER.
3 Press . or >
repeatedly until “REC”,
“ON” or “OFF” appears,
then press ENTER.
Change the setting Start over from step 1.
Cancel both Daily
Timer and Timer
Recording
1 Press CLOCK/TIMER
SELECT.
2 Press . or >
repeatedly until “OFF”
appears, then press ENTER.

16
GB
The clock display can be turned off to minimize
the amount of power consumed during standby
(Power Saving Mode).
Press DISPLAY repeatedly while the
system is off until the clock display
disappears.
To cancel Power Saving Mode
Press DISPLAY while the system is off. Each
time you press the button, the display switches
cyclically as follows:
Clock display* y No display (Power Saving
Mode)
* The clock is displayed only if you set the clock.
Tips
• ?/1 indicator lights up even in the Power Saving
Mode.
• The timer continues to operate in Power Saving
Mode.
Note
You cannot perform the following operations in Power
Saving Mode.
– setting the clock
– changing the AM tuning interval (except for
European models)
– turning on the system by pressing the function
buttons
– switching the MD (VIDEO) function
You can check the playing time and remaining
time of the current track or that of the disc.
Checking the remaining time
(CD)
Press DISPLAY during Normal Play.
Each time you press the button, the display
changes cyclically as follows:
Current track number and elapsed playing time
t Current track number and remaining time t
Remaining time of the current disc t Clock
display t Bass level t Treble level
Checking the total playing
time (CD)
Press DISPLAY in stop mode.
Each time you press the button, the display
changes cyclically as follows:
Total playing time t Clock display t Bass
level t Treble level
Display
Turning off the display
— Power Saving Mode
Viewing information
about the disc in the
display

Display/Optional Components
17
GB
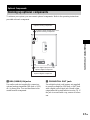
To enhance your system, you can connect optional components. Refer to the operating instructions
provided with each component.
A MD (VIDEO) IN jacks
Use audio cords (not supplied) to connect an
optional analog component (MD deck or VCR,
etc.) to these jacks. You can then listen to the
sound from the component.
B CD DIGITAL OUT jack
Use a digital optical cord (square, not supplied)
to connect an amplifier, MD deck, or DAT deck
with a digital optical input jack. Sound is then
output when the system function is set to CD. If
the jack is covered with a cap, remove it before
use.
Optional Components
Hooking up optional components
Optional analog component
From the audio output jacks of an
optional analog component
To the digital input jack of an
optional digital component
Optional digital component

18
GB
1 Connect audio cords.
See “Hooking up optional
components” on page 17.
2 Press FUNCTION repeatedly until “MD”
or “VIDEO” appears.
Start playing the connected
component.
Tip
If you cannot select “VIDEO” by pressing
FUNCTION repeatedly, turn off the system and then
press ?/1 while holding down FUNCTION on the
unit. The function will change from “MD” to
“VIDEO”, and “VIDEO” will appear in the display. To
change back to “MD”, repeat the same procedure.
However, you cannot switch the MD (VIDEO)
function in Power Saving Mode.
Making a digital recording
1 Connect the digital optical cord.
2 Start recording.
Refer to the operating instructions
provided with connected component.
Note
You can digitally record from the discs only. However,
you cannot record from copy prohibited discs.
Listening to audio from a
connected component
Recording on a connected
component

Troubleshooting
19
GB
Should you encounter a problem with your
system, do the following:
1 Make sure the power cord and speaker
cords are correctly and firmly connected.
2 Find your problem in the troubleshooting
checklist below and take the indicated
corrective action.
If the problem persists after doing all of the
above, consult your nearest Sony dealer.
General
“– –:– –” appears in the display.
• A power interruption has occurred. Set the clock
(page 5) and timer settings (pages 14 and 15)
again.
There is no sound.
• Press VOL +.
• Make sure the headphones are not connected.
• Check the speaker connections (page 4).
Sound comes from one channel, or
unbalanced left and right volume.
• Place the speakers as symmetrically as possible.
• Connect the supplied speakers.
There is severe hum or noise.
• Move the system away from the source of noise.
• Connect the system to a different wall outlet.
• Install a noise filter (commercially available) to
the mains line.
The timer cannot be set.
• Set the clock again (page 5).
The timer does not function.
• Press CLOCK/TIMER SELECT to set the timer
and light up “
cDAILY” or “cREC” in the
display (pages 14 and 15).
• Check the timer setting and set the correct time
(pages 14 and 15).
• Cancel the Sleep Timer Function (page 13).
• Make sure the clock is correctly set.
The color on the TV screen is irregular.
• Move the speakers farther away from the TV set.
The remote does not function.
• Remove the obstacle.
• Move the remote closer to the system.
• Point the remote at the system’s sensor.
• Replace the batteries (R6/size AA).
• Locate the system away from the fluorescent light.
“PROTECT”, “PUSH” and “POWER” appear
alternately.
• A strong signal was input. Press ?/1 to turn off
the system, leave the system turned off for a while,
then press ?/1 again to turn on the system. If
“PROTECT”, “PUSH” and “POWER” still
appear alternately, turn off the system and check
the speaker cords.
Speakers
Sound comes from only one channel, or the
left and right volumes are unbalanced.
• Check the speaker connections and placement.
CD
The disc tray does not open and “LOCKED”
appears.
• Contact your Sony dealer or local authorized Sony
service facility.
The disc tray does not close.
• Place the disc correctly in the center of the tray.
• Always close the tray by pressing CD Z on the
unit. Trying to press the tray closed with your
fingers may cause problems with the player.
The disc does not eject.
• You cannot eject the disc during CD Synchro
Recording. Press x to cancel the CD Synchro
Recording, then press CD Z on the unit to eject
the disc.
• Consult your nearest Sony dealer.
Play does not start.
• Open the disc tray and check whether a disc is
loaded.
• Wipe the disc clean (page 22).
• Replace the disc.
• Place the disc that this system can play.
• Place the disc correctly in the center of the tray.
• Place the disc in the tray with the label side up.
• Remove the disc and wipe away the moisture on
the disc, then leave the system turned on for a few
hours until the moisture evaporates.
• Press CD NX to start play.
Troubleshooting
Problems and remedies
continued

20
GB
The sound skips.
• Wipe the disc clean (page 22).
• Replace the disc.
• Try moving the system to a place without
vibration (e.g., on top of a stable stand).
• Try moving the speakers away from the system, or
placing them on separate stands. When you listen
to a track with bass sounds at high volume, the
speaker vibration may cause the sound to skip.
Play does not start from the first track.
• Press PLAY MODE repeatedly until both
“PROGRAM” and “SHUFFLE” disappear to
return to Normal Play.
Tuner
Severe hum or noise/stations cannot be
received.
• Set the proper band and frequency (page 8).
• Connect the antenna properly (page 4).
• Find a place and an orientation that provide good
reception, then set up the antenna again. If you
cannot obtain good reception, we recommend you
connect a commercially available external
antenna.
• The supplied FM lead antenna receives signals
along its entire length, so make sure you extend it
fully.
• Keep the antennas away from the system and
other components.
• Consult your nearest Sony dealer if the supplied
AM antenna has come off the plastic stand.
• Try turning off surrounding electrical equipment.
A stereo FM program cannot be received in
stereo.
• Press FM MODE on the unit until “STEREO”
appears in the display.
Tape deck
The tape does not record or play, or there is a
decrease in sound level.
• The heads are dirty. Clean them (page 23).
• The record/playback heads are magnetised.
Demagnetise them (page 23).
The tape does not erase completely.
• The record/playback heads are magnetised.
Demagnetise them (page 23).
There is excessive wow or flutter, or the sound
drops out.
• The capstans in the tape deck are dirty. Clean
them using a cleaning cassette.
Noise increases or the high frequencies are
erased.
• The record/playback heads are magnetised.
Demagnetise them (page 23).
The tape does not record.
• No cassette is loaded. Load a cassette.
• The tab has been removed from the cassette.
Cover the broken tab with adhesive tape
(page 23).
• The tape has wound to the end.
Optional components
There is no sound.
• Refer to General item “There is no sound.”
(page 19) and check the condition of the system.
• Connect the component properly (page 17) while
checking:
– if the cords are connected properly.
– if the cord plugs are firmly inserted all the way.
• Turn on the connected component.
• Refer to the operating instructions supplied with
the connected component and start playing.
• Press FUNCTION repeatedly to select “MD” or
“VIDEO” (page 18).
The sound is distorted.
• Set the volume of the connected component
lower.
If the system still does not
operate properly after performing
the above measures, reset the
system as follows:
1 Disconnect the mains lead.
2 Reconnect the mains lead.
3 Press ?/1 to turn on the system.
4 Press TAPE x, CD x and ?/1 on the unit.
The system is reset to the factory settings. You
should set the settings you made, such as the
preset stations, clock, and timer.
Page is loading ...
Page is loading ...
Page is loading ...
Page is loading ...
Page is loading ...
Page is loading ...
Page is loading ...
Page is loading ...
-
 1
1
-
 2
2
-
 3
3
-
 4
4
-
 5
5
-
 6
6
-
 7
7
-
 8
8
-
 9
9
-
 10
10
-
 11
11
-
 12
12
-
 13
13
-
 14
14
-
 15
15
-
 16
16
-
 17
17
-
 18
18
-
 19
19
-
 20
20
-
 21
21
-
 22
22
-
 23
23
-
 24
24
-
 25
25
-
 26
26
-
 27
27
-
 28
28


Ask a question and I''ll find the answer in the document
Finding information in a document is now easier with AI
Related papers
Other documents
-
Aiwa JAX-E3 Operating Instructions Manual
-
-
GE CMT-NEZ5 User manual
-
Aiwa JAX-S77 User manual
-
-
-
-
Philips AZ2415 User manual
-
Cyrus FM7 User Instructions
-
Sharp XL-HP505 User manual