Page is loading ...

4 COLOR SOLAR LIGHT
Model
95665
SETUP AND OPERATION INSTRUCTIONS
Due to continuing improvements, actual product may differ slightly from the product described herein.
Distributed exclusively by Harbor Freight Tools
®
3491 Mission Oaks Blvd., Camarillo, CA 93011
Visit our website at: http://www.harborfreight.com
TO PREVENT SERIOUS INJURY, READ AND UNDERSTAND
ALL WARNINGS AND INSTRUCTIONS BEFORE USE.
Copyright
©
2006 by Harbor Freight Tools
®
. All rights reserved. No portion of this manual
or any artwork contained herein may be reproduced in any shape or form without the
express written consent of Harbor Freight Tools.
For technical questions or replacement parts, please call 1-800-444-3353.

Page 2
SKU 95665
For technical questions, please call 1-800-444-3353
SPECIFICATIONS
Materials Stainless Steel, Molded Polystyrene Plastic Cast Aluminum
Ground Stake
Finish Natural/Mirror
Dimension 26”H x 4-3/16” O.D.
Lamp Head Dimension 4-3/16” O.C. x 1-1/8”H
Switch 3 Position Switch-Day/Seconds/Fixed
LED Bulbs (Total Qty 4) Color-White, Blue, Amber, Green
Switch ON/OFF
Solar Panel Dimension 2”L x 1-7/16”W
Solar Panel Lens 3-1/4” Diameter
Batteries (Qty 2) “AAA” Rechargeable Ni-MH 1.2V 600mAH (included)
Mounting Pole Dimensions 1-5/32” O.D. x 11-9/16”H x 1/32”T
Net Weight 1.1 Lb.
Installed Height 21-1/16” Height
Save This Manual
You will need the manual for the safety warnings and precautions, assembly instruc-
tions, operating and maintenance procedures, parts list and diagram. Keep your invoice with
this manual. Write the invoice number on the inside of the front cover. Keep the manual and
invoice in a safe and dry place for future reference.
SAFETY WARNINGS AND PRECAUTIONS
WARNING: When using this product, basic safety precautions should always be followed to
reduce the risk of personal injury and damage to equipment.
Read all instructions before using this tool!
1. Keep work area clean. Cluttered areas invite injuries.
2. Keep children away. Children must never be allowed to play with this product. This is
not a toy.
3. There are certain applications for which this product was designed. It will do the job
better and more safely at the rate for which it was intended. Do not modify this product
and do not use this product for a purpose for which it was not intended.
4. Use eye protection. Always wear ANSI approved impact safety goggles when assem-
bling any product.
5. Do not overreach. Keep proper footing and balance at all times.
6. Maintain tools with care. Keep this product clean for better and safer performance. If
damaged, have it repaired by an authorized technician. The Solar Panel must be kept
clean, dry, and free from oil and grease at all times.
07g

Page 3
SKU 95665
For technical questions, please call 1-800-444-3353
7. Stay alert. Watch what you are doing, use common sense. Do not set up this product
when you are tired.
8. Check for damaged parts. Before using this product, any part that appears damaged
should be carefully checked to determine that it will operate properly and perform its
intended function. Check for any broken parts or mounting fixtures; and any other con-
dition that may affect proper operation. Any part that is damaged should be properly
repaired or replaced by a qualified technician. Do not use this product if any switch
does not turn On and Off properly.
9. CAUTION: Do not immerse in water.
10. Guard against electric shock. Prevent body contact with grounded surfaces such as
pipes or underground electrical wires when inserting this product into the ground.
11. Follow instructions for changing batteries. Replace with only identical “AAA” recharge-
able batteries. Dispose of the used batteries properly, as cadmium in the batteries is
toxic. For disposable guidelines, check with your local waste management guidelines
in your community.
12. For outdoor use only.
13. Warning: The warnings, cautions, and instructions discussed in this instruction manual
cannot cover all possible conditions and situations that may occur. It must be understood
by the operator that common sense and caution are factors which cannot be built into
this product, but must be supplied by the operator.
1. The Solar Light must be installed in a sunny location where it will receive at least 8
hours of sunlight daily. Do not allow anything to shade or cover the Solar Light, or it
will keep the solar panel from absorbing enough sunlight to operate at full capacity.
2. For best lighting results, it is recommended that you do not space Solar Lights more
than 12 feet apart. Do not place Solar Lights less than five feet from each other or they
may cause the lights to flicker from such a close adjacent light source.
3. Position the Solar Light away from any other night lighting sources as they may interfere
with the lights ability to turn on and off automatically.
UNPACKING
When unpacking, check to make sure that the item is intact and undamaged. If any
parts are missing or broken, please call Harbor Freight Tools at the number on the cover of
this manual as soon as possible.
SPECIFIC SOLAR LIGHT WARNINGS

Page 4
SKU 95665
For technical questions, please call 1-800-444-3353
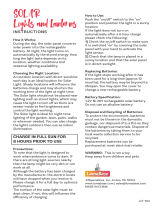
SETUP
(6)
(5)
(10)
(8)
(9)
Figure 2
Figure 3
Figure 1
1. Look on the underside of the Lamp
Head (1). Twist the Transparent Cover
of Lamp Head (8) counterclockwise
to reveal the Switches (5 & 6) located
in the Lamp Head Holder.
2. If the batteries have not been installed
or you need to replace the batteries,
be sure they are “AAA” Rechargeable
Ni-MH batteries.
3. Open the two Battery Boxes (7) by
pushing the lever and removing the
covers. Set aside. Check that the po-
larity of each battery is correct. (See
inside housing). Once the batteries
are in place, replace the Battery Box
covers by lining up the notches and
snapping the covers in place. See
Figures 2 and 3.
Note: Always dispose of used batteries ac-
cording to your local waste disposal
requirements.
Turn the ON/Off Power Switch (6) to
the ON position. See Figure 2.
Choose your lighting sequence
and color, white, amber, blue or
green. Set the Function Option
Switch (5) to “DAY”, “SEC” or “FIX”
(marked near switch) from the choic-
es below:
DAY = Color automatically changes
day by day.
SEC = Color automatically changes
second by second.
FIX = Fix ONE color to light on
continually. See Figure 3 Switch for
choice. See Figure 2.
Assemble the Transparent Cover
of Lamp Head (8) and Lamp Head
Holder (9) together again. Match up
notches and turn clockwise.
4.
5.
6.
(11)
(7)
(7)
07g

Page 5
SKU 95665
For technical questions, please call 1-800-444-3353
1
4
3
2
Lamp Head
Holder (9)
Transparent Cover of
Lamp Head (8)
Figure 4
Push the Lamp Head (1) onto the Bubble Tube (2). Push that assembly onto the Stain-
less Steel Mounting Pole (3). Twist the Ground Stake (4) onto the assembled Mounting
Pole, matching up the threads and tighten. See assembly drawing, page 7.
OPERATION
After choosing from the three functional options (See Page 4), the Solar Powered Light
provides a beautiful column of ever changing color which reflects and scatters light with
its bubble effect, making it perfect for your pathway or walkway.
Choose an area that has full sunlight during the day. It should be in a location that will
show off it’s unique bubbling tube and colored light features and not in a shady location.
Push the assembly with the Ground Stake (4) into the ground so it stands vertically,
avoiding any hidden plumbing, sprinkling systems or electrical wiring.
The Solar Light charges during the daylight and illuminates automatically at night. The
batteries provide up to 8-10 hours of light. The light time differs depending on the degree
of sunshine and shining hours. It will be a shorter time during raining days.
The batteries should be charged in full sun for a couple of days prior to first use. Shut
the Power Switch (6) ‘off’ when charging, to prevent automatic operation and discharge,
at night.
1.
1.
2.
3.
4.
ASSEMBLY

Page 6
SKU 95665
For technical questions, please call 1-800-444-3353
REPLACING THE BATTERIES
The batteries are standard 1.2V, 600mAH Ni-MH rechargeable batteries. The battery
needs to be changed when the light looks very dim within 4 hours in the darkness after
fully sunshine during the day.
Batteries (10)
Figure 5
Unclip the Transparent Cover of Lamp Head (8) from the holder (9) with a counterclock-
wise twist. Set Cover aside. Remove the battery covers of the Battery Boxes (7). Take
the batteries out from the Battery Box (7) and replace with new batteries (1.2V 600mA
AAA ni+MH rechargeable battery). Replace the battery covers.
Re-assemble the Transparent Cover of Lamp Head (8) to the Holder (9), turning clock-
wise until tightened.
Always properly dispose of all used batteries. Contact your local Waste Disposal
Authority for proper battery disposal guidelines.
MAINTENANCE
Keep the Solar Panel in the Lamp Head (1) clean, using a neutral solvent and a wet
cloth. The Solar Light is water resistant but do not submerge in water. The product
should always have the Power Switch (6) “ON”.
Shade will limit the amount of light you get from your product. The Multi-Colored LED
Bulbs (10) are long lasting and non-replaceable. After being in the sunlight for at least
8 hours of charging time and the light does not come on, check your batteries.
1.
2.
3.
4.
1.
2.

Page 7
SKU 95665
For technical questions, please call 1-800-444-3353
PARTS LIST
Part Description Q’ty
1 Lamp Head 1
2 Bubble Tube 1
3 Stainless Steel Mounting Pole 1
4 Ground Stake 1
5 Function Option Switch (not shown) 1
6 On/OFF Power Switch (not shown) 1
7 Battery Boxes (not shown) 2
8 Transparent Cover of Lamp Head 1
9 Lamp Head Holder 1
10 “AAA” Rechargeable Ni-MH Battery (not shown) 2
11 Multi-Colored LED Bulbs (not shown) 4
1
2
3
4
1
4
3
2
(9)
(8)
PLEASE READ THE FOLLOWING CAREFULLY
THE MANUFACTURER AND/OR DISTRIBUTOR HAS PROVIDED THE PARTS LIST AND ASSEMBLY
DIAGRAM IN THIS MANUAL AS A REFERENCE TOOL ONLY. NEITHER THE MANUFACTURER OR
DISTRIBUTOR MAKES ANY REPRESENTATION OR WARRANTY OF ANY KIND TO THE BUYER THAT
HE OR SHE IS QUALIFIED TO MAKE ANY REPAIRS TO THE PRODUCT, OR THAT HE OR SHE IS
QUALIFIED TO REPLACE ANY PARTS OF THE PRODUCT. IN FACT, THE MANUFACTURER AND/OR
DISTRIBUTOR EXPRESSLY STATES THAT ALL REPAIRS AND PARTS REPLACEMENTS SHOULD BE
UNDERTAKEN BY CERTIFIED AND LICENSED TECHNICIANS, AND NOT BY THE BUYER. THE BUY-
ER ASSUMES ALL RISK AND LIABILITY ARISING OUT OF HIS OR HER REPAIRS TO THE ORIGINAL
PRODUCT OR REPLACEMENT PARTS THERETO, OR ARISING OUT OF HIS OR HER INSTALLATION
OF REPLACEMENT PARTS THERETO.
Note: Some parts are listed and shown for illustration purposes only and are not available
individually as replacement parts.
ASSEMBLY DIAGRAM
/