IMPORTANT: The information
in this guideline is designed to
provide a general overview of
how MrSteam products are
installed. The diagrams are for
Illustrative purposes only.
NEVER use this document for
the Installation, Operation or
Maintenance of any MrSteam
product. For Installation,
Operation and Maintenance
information, only use the
specic Installation, Opera-
tion and Maintenance manual
supplied with each Mr. Steam
product. The specic Instal-
lation, Operation and Mainte-
nance manual that is supplied
with each Mr. Steam product
contains important informa-
tion required for the safe and
reliable installation and opera-
tion of the product. Failure
to use the specic Installation,
Operation and Maintenance
manual that is supplied with
each Mr. Steam product may
result in product damage,
property damage, death or
personal injury. If you do not
have an Installation, Opera-
tion and Maintenance manual
please contact MrSteam for a
free copy, or download a copy
from www.mrsteam.com. If
you have any questions about
the installation, operation or
maintenance of any MrSteam
product please contact a
customer or technical service
representative using the con-
tact information on the back
cover of this guideline.
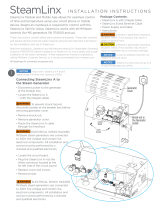
CONTENTS
CONTENTS
Generator Location .............................................. 2
Power Connection .............................................. 3
Water Feed .............................................................. 4
Steam Oulet ............................................................ 5
Drain Line ................................................................ 6
AutoFlush ............................................................... 7
Condensation Pan ................................................. 8
Express Steam ....................................................... 9
Generator ................................................................... 10
Tandom Generator Installation ...................... 11
Steam Control Location .................................... 12
iSteam Installation ............................................... 13
Air Tempo Surface Installation .................... 14
Air Tempo Flush Installation ........................ 15
iTempo Installation ............................................. 16
Remote Temperature Sensor ........................... 17
Remote Temperature Probe .......................... 18
Control Cable Connection ................................. 19
AromaSteam System............................................ 20
AromaSteam SteamHead Installation........... 21
Linear SteamHead Installation ......................... 22
Essential Oil Use...................................................... 23
ChromaSteam3 Installation................................ 24
ChromaSteam72 Installation............................. 25
AudioSteam Installation ..................................... 26
Speaker Installation................................................ 27
Shower Seat Installation...................................... 28
SteamLinx Mobile App ........................................ 29
1