INSTALLATION INSTRUCTIONS FOR 348-37B
For Wall Mount Fixture
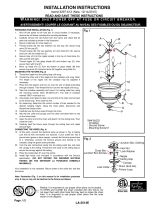
MOUNTING THE FIXTURE (Fig.1)
1. Shut off power at the fuse box or circuit breaker
box. If necessary, remove old fixture and all
mounting hardware from wall junction box.
2. Carefully unpack your new fixture and lay out all
the parts on a clear area. Take care not to lose
any small parts necessary for installation.
3. Attach the crossbar to the junction box with the
two junction box screws as shown. The side of
the crossbar marked “GND” must face out.
4. Thread the nipple part way into the center hole
of the crossbar.
5. Connect the wires as described under
“Connecting the Wires”. (Fig.2).
6. Place the fixture canopy over the nipple so the
nipple protrudes through the center hole.
Holding the fixture in place, thread the cap nut
onto the end of the nipple until fixture is secured
to the wall
.
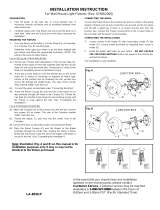
CONNECTING THE WIRES (Fig.2)
7. Connect the fixture wires to the junction box
wires as shown in the Fig. 2. Make sure all wire
connectors are secured and do not easily pull off
with a slight tug. If there is no green ground wire
from the junction box, connect the fixture ground
wire to the crossbar with the green screw
provided
. Note: Twist wires on the same
direction, connect the wire connector onto wires.
COMPLETING THE INSTALLATION (Fig.1)
8. Install the light bulbs in accordance with the
fixture’s specification: DO NOT EXCEED THE
MAXIMUM WATTAGE RATING!
9. Insert the plastic sheet into the glass frame to
protect the glass from scratch.
10. Slide the glass shade into the decorative glass
holder.
11. Pull out the plastic sheet carefully.
Your installation is now complete. Return power
to the junction box and test the fixture
.
MIN 90 SUPPLY CONDUCTORS
SHEET
Confirmed
Mountain Huang
Minka Group
01/11/05