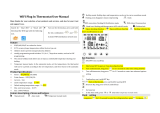
LCD Display Reference
Time period
week
Room Temp
Manual
Floor Temp
Set Temp
Lock
WIFI
Am,Pm
Program Heat On
Power Time Menu Up Down
F L O O R
Time display
Time Set
Temp
Period 1
Set
Time Set
Temp Time
Calibration
Dead Zone
Lock
Function
No.
1
2
3
4
5
6
7
8
9
Press to set Defaul
-9 to 9℃ ℃
0.5 to 5℃ ℃
1:All buttons will lock
0℃
1℃
0
Set
Temp
Period 2
Period 3
Period 4
Period 5
Period 6
Weekday(MON-FRI) Weekend(Saturday) Weekend(Sunday)
6:00
8:00
12:00
14:00
18:00
22:00
22℃
16℃
22℃
16℃
22℃
16℃
6:00
8:00
12:00
14:00
18:00
22:00
22℃
16℃
22℃
16℃
22℃
16℃
6:00
8:00
12:00
14:00
18:00
22:00
22℃
16℃
22℃
16℃
22℃
16℃
ECO
Time
WIFI Wireless Thermostat Manual
Model:TP608RFW
Service
We offer the warranty of 24 months from the sales day. If it is
not the problem of quality or beyond the warranty time, we will
charge for the after-sale service.
About your thermostat
User Guide
Thermostat all passed CE and Rohs standard.
TP608RFW is a modern touch type wifi smart thermostat.
You could use mobile to control your thermostat anywhere.
It can replace most common residential thermostat and is
designed to be used with electric, gas or oil heating control
system.
Unlike ordinary single unit design thermostat, this unit is a
new type of thermostat separating the thermostat function into
two units. Receiver and Control Center.The distance over
150M in the open air.It can be used to control boilers,thermal
actuators,motorized valves etc.
►Power source :Control Centre 2 AA batteries
Receiver 95-240VAC±10% 50/60HZ
►Frequency band:868MHZ
►Relay contact:3A for water heating/gas boile heating
16A for electric heating
►Room temperature setting range:5℃-35℃
►Working environment temperature range:0℃-50℃
►Storage Temperature range:-10℃-60℃
►Accuracy:0.5℃
►Control Center/Receiver Dimension:86mm*86mm*15mm
►Installation:Wall mount or Desktop`
►Temperature display of Celsius
►Programming Period: 5+1+1, 6 separate periods per day.
►WIFI APP control with IOS&Andriod
►Anti-freezing protection
Features of your thermostat
►Large VA screen display with backlight is easy to
read—even in the dark.
►Modern desgin similar as a cell phone.
►White/Black Colour option creates elegant life.
►Acrylic lenses to avoid the finger scrath.
►Touch Button makes simple operation.
1. Press this button to power on /off your thermostat
2. Press this button to set min/hour/week
3. Press this button to select manual /programm mode
Manual mode:Press button to select manual mode.
When you select manual mode,the symbol will show in the
bottom left corner.Press buttons to change the desire
temperature
Program mode:Press button to select program mode.
When you select this mode,the symbol will show in the
bottom left corner.Press buttons over 5seconds to
activate weekly program set mode.Press button to select
(5+1+1)six periods time and temp.When you set the Desire
time and tem.Press button to save the set and return back
home screen.
4. Child clock:You could press 7seconds to lock/unlock
your thermostat
5. Holiday mode:Press 7seconds to enter holiday mode
when power on.The icon will display on left botton, Short
press to set desire day and temp.Press button to
change day range 0-99 or desire temp. Press button to save
1.Power Indicator(Red light):Press SET button to power
on /off the receiver,Power on RED light on.Power off the
RED light off
2.WIFI signal indicator(Blue light):Press SET button over
7seconds when power on.It will enter WIFI connection mode.
Continuous fast flashing means it is in WIFI EZ network
configuration mode; continuous slow flashing means it is in
WIFI AP network configuration mode;When WIFI connect
successful.The blue light will always on.WIFI connect failure,
the light will not on.
3.Load indicator(Green light):In normal operation, the load
output is turned on,.The green light will on.When there load
output is off.The green light will off. When green light quickly
flash it indicator the External sensor error
4.RF signal indicator(Yellow light).
A:Yellow light always on.It means receiver enter pair with
transmitter,When power off.Press SETButton over 7seconds.
RF light will on.Loose the button.Receiver will enter match
code status.Yellow light will flash 3times when match
success with transmitter.
B:Yellow light flash quick,It means receiver receive signal
successful, It will flash one time when receiver receives the
signal from transmitter each time.
C:Yellow light flash slowly,It means receiver match
success with transmitter
5. Emergency output method(Manual output):
When transmitter broken or cann’t control your receiver.
You could use this method.Power off your receiver.Long
press Set button.RF signal light(Yellow light)on all the time.
After 18seconds.Load light(Green light) and RF light
(Yellow light)on the same time.Emergecy output will work.
Short press Set to quit this function.
How to match code between transmitter
with receiver?
Programm Settings
When power is on,press for 7 seconds to enter programm
mode.Press to change the different items.Press to
set the relative values.
The order is Week-time-Temp(Monday-Friday,Saturday,
Sunday=5+1+1)Each day has 6periods setting.
Configuration menu
Turn off the thermostat.Press 7seconds to enter
configuration menu.During this menu,short press to
change parameters.Press to confirm the setting.
Minimum
temperature
setting
5 to 20℃ ℃ 5℃
20 to 35℃ ℃ 3 5℃
Maximum
temperature
setting
Display Mode 0
0:Room temperature
1:Setting temperature
0:Off
1:On.When room temp =5℃,Heat on,When room
temp over 8℃,Heat off
0
ECO mode 0:Off 1:ON 0
1 6℃
5 to 30℃ ℃
ECO Temp
set range
7. Low battery alarm
Low Battery symbol will display on LCD when power <= 10%.
APP will remind you to replace batteries
flash when battery power use almost 99%,RF will stop
working.You have to replace new batteries immediately
10
High temperature
protection(external
sensor only)
25 to 70℃ ℃ 4 5℃
Low Temperature
protection(Anti-
Freez Protection)
*High temperature protection
1. When external sensor detect the floor temp is over
45℃,Thermostat will turn off heat
2. When you connect external sensor.This function will
work.In your thermostat,You could press 7seconds
to check floor temperature.App in settings could check
floor temp.Thermostat LCD Will display ERR when
external senor broken or loosen.App also alert floor
sensor error
If you dont connect external senor.Then you couldn’t
check external sensor temp both thermostat and app.
6.F actory reset:1 weekly program reset,Press button over
7seconds to enter program mode.Then press over
7seconds to go factory setting.The LCD will display”def”in the
botton right corner.
2.C onfiguration menu reset.Press button over 7seconds to
enter configuration menu when power off.Then press to
go factory setting. The LCD will display”def”in the botton right
corner.
►One-touch temp control overrides program
schedule at any time.
Receiver button function
Normally you don’t need need match pair code,All match
well in factory,Each pair will have the same series match
numbers.
However if your transmitter lost signal with your receiver.You
could connect according to follow steps
1.On your receiver,make sure receiver is during match code
status.When power off.Press SET 7seconds.Yellow lights on,
It means receiver enter pair with transmitter standby.
2.On your thermostat,press and 7seconds .The LCD will
display:” ---.”After matchcode sucessful.The transmitter LCD
will display number (1-9 range all ok)
3.T ransmitter’s RF symbol will on it.Receiver’s
yellow light will flash 3times.
NOTE:
Flash means RF not match code.
Disappear means no RF signal.
Always on screen means RF working normal.
Technical Data of your thermostat
►Precise comfort control keeps temperature within
0.5°C of the level you set.
►Data memory when power is off.
Operation
Temperary mode:During program mode.If you need
change the temp,The icon will appear.The presetting
program will return in next period
the set and return back home screen.Press button to exit
this mode
RF
Load W IFI
Powe r
Set
AC220V-N
M
Open
Close
AC220V-L
AC220
Power
Ga s Boiler
N1 NLL1
Boiler
220VAC3A
LOAD 16A
Electric Floor Heating
NTC
NTC
10K
sensor
NC NO COM
AC220
Power
N1 NLL1
N1 NLL1
NC NO COM
220VAC3A
Water Heating
Power
0:All buttons will lock expect power button
RF
Low Battery
Holiday Mode
Wiring Diagram