Black Round Wifi Digital Heating Thermostat User Manual
Many thanks for your selection of our products and services, and also for your trust and
support to us.
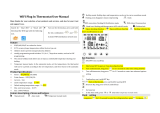
Android also can
search “Smart life”at Google Play,
IPhone also can search or “Smart life”
at App Store
*Turn on the thermostat, long press “ ” for
3-5seconds,the “OFF” and “ ” will flashing in
the same time, short press “ ”for pairing
thermostat with APP.
Product Specifications
☆Power: 90-240Vac 50/60HZ ☆Range of temperature display::0~70°C
☆Display accuracy::0.5°C ☆Insulating condition: Normal environment
☆Probe sensor::NTC(10k)1% ☆Running program: Set per 1 week as a cycle
☆Contact capacity::3A/250V(WW);16A/250V(WE) ☆Output: Switch relay
☆Working environment temperature::0~90°C ☆Installation: Wall mounted or on battery seat
☆Range of temperature adjustment::5~35°C ☆Size(mm):86*86*30
Before wiring and installing
1. Read these instructions carefully. Failure to follow them could damage the product or cause a
hazardous condition.
2. Check the ratings given in the instructions and on the product to make sure the produce is suitable
for your application.
3. Installer must be a trained experienced service technician.
4. After installation is complete.check out produce operation as provided in these instructions
CAUTION
Electrical shock or equipment Damage Hazard. or short equipment circuitry.
Disconnect power supply before installation
Wiring Diagram
Electric heating wiring diagram Water heating wiring diagram
(do not connect terminal "close 4" of electric valve)
Water heating and gas wall-hung boiler heating,
no contact wiringdiagram,(disconnection when electric valve close)
Note:3 & 4 connect with power, 5 & 6 connect with gas boiler,1& 2
connect with thermal actuator, please do not connect 1&2 to gas
boiler,If you connect it wrongly, there will be Short circuit,our gas boiler
board will be damaged.
Displays
Description of icon
Auto mode;run preset program Manual mode
Temporary manual mode Clock
Holiday mode, Holiday days and temperature can be set to run in countdown mode
Heating,,icon disappears to stop heating External NTC sensor
WIFI connection, flashing EZ distribution mode(see wifi pairing step4)
Wifi status: Disconnection Child lock
Cloud icon: flashing AP distribution network mode( see wifi pairing step5)
Operation key
Turn ON/OFF:Short press to turn on/ turn off
1 Short press to switch automatic mode and manual mode
2 Turn on thermostat, long press for 3-5 seconds to enter into programmable
setting
3. Turn off thermostat, long press for 3-5 seconds to enter into advanced setting
1 Confirm key: use it with key
2 Only short press it to set time
3 Turn on thermostat,long press “ ” for 3-5seconds,the “OFF” and “ ” will
flashing in the same time, short press “ ” to holiday mode.
1 Decrease key
2 Long press to lock /unlock
1 Increase key
2 Long press to inquire external sensor temperature
3 In the Auto model, press or enter to temporary manual mode
Programmable
5+2 (factory default),6+1 and 7 models 6 times period setting for user choose. In the advanced options
choose model of you need, under power on state, long press for 3-5 seconds enter into programming
mode setting, then short press choose: hour,minute, time period, and press and to adjust
data, finished setting, about 10 seconds will automatic save and exist.