Page is loading ...

Instruction Manual
10", 12", 14”, 16" RCX400
™
Advanced Ritchey-Chrétien Telescopes
with AutoStar II
®
Hand Controller and Digital Front Focus
MEADE.COM

Focusing the Telescope
As you look over your new RCX telescope, one of the first things you will notice is that it has no Focus Knob!
Because this design is of key importance, we are presenting this information on how to focus your telescope on the inside
front cover so that it is immediately accessible.
The Focus Key
All focusing of the RCX400 is performed digitally, using AutoStar II’s Focus key (number key 4).
The Focus ke
y functions as a toggle key:
J Press the Focus key the first time to focus the telescope and to control
the speed at which you focus.
J Press the Focus key again to set and adjust up to nine focus presets.
To change the focus speed:
1. Press the Focus key once. “Focuser: Fast (or the current speed)” displays for two seconds. Use one of the Scroll keys to
scroll through the list of 4 a
vailable focus speeds: Fast, Medium, Slow, Fine. Scroll through the list until the speed you
desire displays. Choose a focus speed with which you feel comfortable.
To focus the telescope:
1. Press the Focus key once. “Focuser: Fast (or the current speed)” displays. After two seconds, “Focuser: Position = XX” dis-
plays. “XX” stands for a number value in decimal millimeters.
2. Point the telescope at a distant object. Look in the eyepiece and use the Arrow keys until the image in the eyepiece is in
focus.
To exit the focus operation at any time:
1. Press MODE.
If you wish learn how to set focus presets, see page 19.
How to Hot Swap the Autostar II Handbox
You may move the Autostar II handbox from one computer control panel to another, without turning off the RCX control panel.
This is called “hot swapping.”
T
o hot swap the handbox:
1. Unplug the handbox connector and plug Autostar II into the HBX port of the other computer control panel.
2. Press and hold the “?” key for two seconds to refresh the display.

Focusing your Telescope.........................Inside front cover
Quic
k-Start Guide .......................................................... 4
Telescope Features ...................................................... 8
Autostar II Features ........................................................13
Getting Started ..............................................................16
P
arts Listing, How to Attach the Tripod ....................16
How to Assemble the Tripod ....................................16
How to Assemble Your Telescope ............................16
To Attach the Mount..............................................16
To Install the Batteries ..........................................16
To Connect Autostar II and Attach the Holder ......17
To Attach the Diagonal and Eyepiece ..................17
Mounting and Focusing the Viewfinder ....................18
Observing ......................................................................16
Choosing an Eyepiece ..............................................19
F
ocusing the Telescope ............................................19
Observing by Moving the Telescope Manually..........20
Terrestrial Observing ................................................21
Observing Using Arrow Keys ....................................21
Slew Speeds ............................................................21
Observe the Moon, Astronomical Observing ..........22
To Track an Object Automatically ..............................22
Moving Through Autostar II’s Menus ........................22
Automatic Alignment ................................................22
Observe a Star Using Automatic Tracking ................24
Go To Saturn, Using the Guided Tour ......................24
Basic Autostar II Operation ............................................26
Autostar II Menu Exercises ......................................26
Navigating Autostar II................................................27
Autostar II Menus ........................................................28
Menu Tree ................................................................28
Objects Menu............................................................29
Event Menu ..............................................................30
Glossary Menu, Utilities Menu ..................................31
Setup Menu ..............................................................32
Hot Button Menus ....................................................36
Advanced Autostar II Features ......................................37
Adding Observing Sites ............................................37
Creating User Objects
..............................................
38
Observing Satellites, Landmarks ..............................39
Identify ......................................................................40
Browse ......................................................................41
Alternate Alt/Az Alignment Methods ........................42
To Download the Latest Autostar II Software............43
P
eriodic Error Correction ..........................................44
Photography ..................................................................45
Optional Accessories......................................................48
Maintenance
..................................................................
51
Collimation ....................................................................51
Specifications ................................................................54
Appendix A: Equatorial (Polar) Alignment ......................57
Appendix B:
Latitude Char
t ............................................62
Appendix C: How to Create Your Own Guided Tour ......63
Appendix D: Training the Drive ......................................67
Appendix E: The Moon Menu ........................................68
Appendix F: Smart Mount ..............................................69
Appendix G:
16" RCX400 F
eatures
................................
71
Basic Astronomy ............................................................74
CONTENTS
WARNING!
Never use a Meade
®
RCX400 Telescope to
look at the Sun! Looking at or near the Sun
will cause instant and irreversible damage to
your eye. Eye damage is often painless, so
there is no warning to the observer that dam-
age has occurred until it is too late. Do not
point the telescope or its viewfinder at or
near the Sun. Do not look through the tele-
scope or its viewfinder as it is moving.
Children should always have adult supervi-
sion while observing.
Caution: Use care to install batteries in the
orientation indicated by illustration in the bat-
tery slots of the battery holder. Follow battery
manufacturer's precautions. Do not install
batteries backwards or mix new and used
batteries. Do not mix battery types. If these
precautions are not followed, batteries may
explode, catch fire, or leak. Improperly
installed batteries void your Meade warranty.
® The name "Meade" and the Meade logo are trademarks
registered with the U.S. Patent Office and in principal coun-
tries throughout the world. "RCX400 " and "AutoStar II" are
tr
ademar
ks of Meade Instruments Corporation.
P
atents:
US 6,304,376
US 6,392,799
US 6,563,636
D 422,610
Patent Pending.
© 2006 Meade Instruments Corporation.

4
QUICK-START GUIDE
Assemble Your Tripod
STEP 1: Attach the legs of the tripod to the base:
Slide each leg (1) into a leg receptacle (2) .....
STEP 2: Locate the screw in the leg:
....making sure that the screw (3) in the leg.....
STEP 3: Slide screw into groove:
....slides into the groove (4) on the receptacle
STEP 4: Tighten the adjustment lock:
Rotate the leg attachment loc
k (6) and tighten to a fir
m feel.
STEP 5: Set the height of your tripod:
Press and hold down the trigger release lever (5) slide the tripod
leg to the desired length (thereb
y setting the height of the tr
ipod).
Important Step: Let go of the trigger when the tripod leg is at
the desired length. Unhook the trigger release pin to lock the
leg in place. This step prevents your tripod accidentally slip-
ping out of the position you set .
P
erf
or
m this procedure f
or each of the tr
ipod’s legs. The tripod
should no
w be stab
le.
B
f
f
g
c
d
e

5
Attach the Mount to the Tripod
Move the Optical Tube and Install the Batteries
STEP 6: P
osition the mount over the tripod:
Take note of the T-handle/rod (8) that goes through the tripod
base. The T-handle/rod is spring-mounted into position. Note also
that there is a hole (7) on the bottom side of the mount base
.
Lift the mount and position the mount base over the tripod base.
Line up the hole on the mount base over the T-handle rod. When
they are lined up, the rod will “pop up” into the hole.
Caution for 12” and 14” model users: Due to the weight and
size of these products, please use extreme caution whenever
assembling, disassembling, lifting, transporting or storing these
products. Two or more persons should always be used whenever
performing any of these tasks. Disregard for the above warning
could result in serious injury or death.
Caution: Use care to install batteries as indicated by the battery
compartment. Follow battery manufacturer's precautions. Do not
install batteries backwards or mix new and used batteries. Do not
mix battery types. If these precautions are not followed, batteries
may explode, catch fire, or leak.
Improperly installed batteries void your Meade warranty. Always
remo
ve the batteries if they are not to be used for a long period
of time.
STEP 7: Secure the mount with the T-handle:
Rotate the T-handle (9) until the rod is tightened to a firm feel.
STEP 8: Move the optical tube from its shipping position:
Turn the Dec. lock (10) counterclockwise to unlock the the optical
tube (11) and move it perpendicular the fork arms, to the position
depicted in the image at the left. Turn the Dec. lock clockwise to a
firm feel to relock the position of the optical tube.
STEP 9: Install the batteries:
Assemb
ly of the
RCX400 telescope requires eight C-cell (user
supplied) batter
ies. Remove the battery compartment (13) covers
and carefully remove the battery holders (12), being mindful of the
connector wires.
Insert four user-supplied C-cell batteries into each battery
holder, oriented as shown on the diagram on the battery slots
inside the batter
y holder
.
Retur
n the batter
y holders to their
respectiv
e compar
tments and replace the co
vers.
h
i
j
1)
1!
1#
1@

6
QUICK-START GUIDE {CONTINUED}
Insert the Telescope Diagonal Mirror and Eyepiece
STEP 10: Attach the visual back and diagonal mirror:
1. Thread the ring of the visual back (16) over the rear cell (15)
and rotate the r
ing, tightening to a firm feel. Slide the diag-
onal (18) into the visual back and secure it in place using
the visual back thumbscrew (17).
STEP 11: Insert the eyepiece and remove dust cover:
Remove the UltraWide 24mm eyepiece (19) from its
container and place it in the diagonal mirror. Tighten the thumb-
screw (20) located on the diagonal mirror to a firm feel only.
Remove the dust cover (
18, Fig. 1a) from the front of the optical
tube assembly (
19, Fig. 1a) by gently prying it off.
STEP 12: Plug in the AutoStar II handbox
Check that the power switch on the computer control panel (21)
is in the OFF position. Plug the coil cord of the AutoStar II hand-
box into the HBX port of the base control panel (22).
Note: The AutoStar II handbox does not require batteries; the
batteries in the telescope supply the power.
Note: You can only plug one handbox into the telescope at a
time; you cannot plug two handboxes into the two control panels
at the same time.
STEP 13: T
urn on AutoStar:
Press the Power Switch on the computer control panel to the ON
position. The copyright message lights on AutoStar II's LCD dis-
play (23).
Press the key prompted by AutoStar II to accept the Sun warn-
ing. AutoStar II now displays "Automatic Alignment." You can
then use the Arrow keys (24) to slew (move) the
telescope up, down, right, or left.To change the telescope’s slew
speed, press the Speed key (25) and then the Number keys (26).
"9" is the f
astest speed and "1" is the slo
w
est speed.
1*
1&
1^
1%
1(
2)
2#
2$
2%
2^
2!
2@

7
Point, Focus and Observe
STEP 14: Tighten the R.A. and Dec. Locks:
Move the R.A. lock (27) and tighten to a firm feel. Rotate the Dec.
Lock (28) and tighten to a firm feel, also.
STEP 15: Focus:
To change the focus speed:
Press the Focus key (2() once. “Focuser: Fast (or the current
speed)” displays. Use one of the Scroll keys to scroll through the
list of 4 available focus speeds: Fast, Medium, Slow, Fine. Scroll
through the list until the speed you desire displays (choose a
focus speed with which you feel comfortable).
To focus the telescope:
1. Press the Focus key once. “Focuser: Fast (or the current
speed)” displays. After two seconds, “Focuser: Position = XX” dis-
plays. “XX” stands for a number value in decimal millimeters.
2. Point the telescope at a distant object. Look in the eyepiece
and press the Arrow keys until the image in the eyepiece is in
focus.
To exit the focus operation:
1. Press MODE.
STEP 16: Point and Observe:
Sight along the side of the telescope tube to locate an object (if
you wish to attach the viewfinder, see page 18 for more informa-
tion).
Look through the eyepiece and use AutoStar’s arrow keys to cen-
ter the object in your eyepiece.
WHERE
TO GO FROM HERE...
See pages 8 to 12 to learn about your tripod and tele-
scope’s features.
See pages 13 to 15 to learn about AutoStar II’s features.
See pages 16 to 17 to learn more about your telescope’s
assemb
ly
.
See page 18 to lear
n about y
our telescope’
s vie
wfinder
.
See pages 19 to 21 to learn more about observing and
f
ocusing with your scope.
See pages 22 to 24 to lear
n ho
w to initializ
e
, align and
“go
to” with your telescope.
See pages 28 to 44 to learn about AutoStar’s menus.
See pages 45 to 47 to lear
n about photog
r
aph
y and your
telescope
.
See pages 48 to 50 to learn about optional accessories
a
vailable for your scope.
2&
2(
2*

8
TELESCOPE FEATURES
Fig. 1a: The RCX400 Telescope; Dec. Setting Circle (inset).
B
d
f
e
g
h
i
j
1)
1!
1@
1#
1$
1%
1^
1&
1*
1(
2)
2!
Eyepiece
c
Diagonal
mirror
Rear cell and
2” visual back
OTA control
panel
Left fork arm
Battery
compartments
R.A. slow motion control
Base control panel
GPS
Receiv
er
Dec Setting
Circle
Mounting base
R.A. lock
AutoStar II
handbox and
tiltable holder
Right fork arm
Dec. slow
motion control
Dec. lock
Dust cover
Optical tube
Fan
Viewfinder
On the left fork arm
Handles

9
Locking ring
Adjustment
screws
Viewfinder
eyepiece/focuser
Viewfinder
bracket
and dovetail
mount
Tripod base with
leg receptacles
Leg
attachment
lock
Locking latch
and thruster bar
mechanism
Off/On
USB P
or
t
AUX port
12vDC In
12vDC Out
HBX por
t
Serial port
T-handle
2@
2#
Viewfinder
objective lens
2$
2%
2^
2&
Sliding inner leg
extension
2(
2*
Tripod
legs
3)
3@
3!
A
C
USB Ports
H
Ser
ial por
t
J
A
utoguider port
K
B
D
E
F
G
Reticle port
L
HBX port
M
Smar
t accessor
y por
t
N
Fig. 1b: The Viewfinder close up.
Fig. 1c: The Tripod.
Fig. 1d: The Base Computer Control Panel.
Fig. 1e: The Optical Tube Assembly (OTA) Computer Control Panel.

10
RCX400: YOUR PERSONAL
WINDOW TO THE UNIVERSE
The Meade RCX400 models are extremely versatile, high-resolution telescopes. With
high-precision optics, pushbutton controls, precise GPS alignment, true-level and
North electronic sensors, automatic tracking of celestial objects, periodic error
correction f
or both axes, and a library of 145,000+ objects in the AutoStar II data base,
the
RCX400 models offer observatory-level performance.
Obser
ve the feather structure of an eagle from 50 yards or split a difficult double star.
Focus beyond the Solar System on ancient star clusters, remote galaxies, and stars
recently disco
vered to have planets orbiting about them. Meade
RCX400 telescopes
are capable of meeting the requirements of the most demanding advanced observer.
B Eyepiece: Place the 2”, 6-element UltraWide 24mm eyepiece into the diagonal
mirror (
3, Fig. 1a) and tighten in place with the diagonal mirror’s thumbscrew (2,
Fig. 1a
). The eyepiece determines the magnification of the image collected in the
optical tube.
C 2" Diagonal Mirror and Eyepiece Thumbscrew: Provides a more comfortable
right angle viewing position. The eyepiece thumbscrew tightens the eyepiece (
1,
Fig. 1a
) in place. Tighten to a firm feel only.
D Rear Cell P
ort and 2” Visual Back:
The visual bac
k threads onto the rear cell.
The diagonal mirror slides into the visual back and is secured by the visual back
thumbscrew.
E Base Computer Control Panel (see j):
A.
ON/OFF Switch: Turns both computer control panels and AutoStar II
ON or OFF. The red power indicator LED next to the switch illuminates
when power is supplied to the panel and the AutoStar II handbox.
B.
12vDC In: Provides a connection so that the telescope assembly may
be powered from a standard 115v AC home outlet using the optional
RCX AC Wall Adapter with Cable or the optional 12v DC #607 Cigarette
Lighter Adapter. See
OPTIONAL ACCESSORIES, pages 48 - 50.
C.
12vDC Out: Use the 12vDC output to power telescope accessories.
This port may be turned on or off with the Aux Port Power option in the
Utilities menu. On is the default value.
D.
USB 2.0 High Speed Port: Provides a connection for a USB 2.0
device. This port is typically used to connect to a PC.
E.
AUX Port: Provides connection for current Meade accessories. See
OPTIONAL ACCESSORIES, pages 48 - 50.
F.
Handbox (HBX) Port: Plug the AutoStar II coil cord into this port.
Impor
tant Note:
Although both the Base Computer Control P
anel and
the OTA Computer Control Panel include an HBX port, only one hand-
bo
x ma
ybe be plugged in at a time;
you cannot plug handboxes into
both ports at the same time.
G. Serial Port: Provides connection with a PC and for current and future
Meade accessories. Your PC can control your
RCX400 telescope using
serial commands. Go to the Meade website (www.meade.com) to
download the latest serial commands and device pinouts.
Important Note: Although both the Base Computer Control Panel and
the O
TA Computer Control Panel include a serial port, only one may be
used at a time; you cannot plug into both ports at the same time.
F Handles: Use to lift optical tube assemb
ly or to rotate the telescope when
attached to the tripod. Attach the AutoStar II handbox holder to one of the han-
dles (
5, Fig. 1a).
G Left Fork Arm: The left side of the heavy-duty mount that holds the optical tube
securely in place (see
1%).
H Battery Compartments: Insert four user-supplied C-cell batteries into each com-
par
tment (one compar
tment on each f
or
k ar
m;
eight batter
ies total).
I Right Ascension (R.A.) Slo
w-Motion Control:
Mak
e fine adjustments in the Right
Ascension, i.e., the horizontal axis, by turning this control with the R.A. Lock (see
Caution:
Using products other than
standard Meade accessories
may cause damage to the
telescope’s internal electron-
ics and may void the Meade
warranty.
B Want to learn more
about the eyepieces
available for your
RCX400 telescope?
See OPTIONAL
ACCESSORIES
, pages
48, 49, and 50.
i W
ant to lear
n more
about the
Right
Ascension and
Declination setting
circles
? See page 57.
b Want to learn more
about
focusing your
telescope? See page
19.
h Want to learn how to
install the batteries?
See page 16.

11
1#) in the unlocked position. Set the R.A. Lock to a "partially locked" position to create
a comf
ortable drag for the R.A. Slow Motion Control.
Caution: Do not oper
ate the R.A. Slow Motion Control with the R.A. Lock
in the fully locked position, as such operation may result in damage to the
internal gear system and also cause you to lose alignment.
j Optical Tube Assembly (OTA) Computer Control Panel (also see e):
H. USB Port: Provides 3 connections for USB 2.0 devices. This port is
typically used to connect to CCD cameras, such as Meade’s LPI or
Deep Sky Imager
. See
OPTIONAL ACCESSORIES, pages 48 - 50.Y
our
PC can control your
RCX400 telescope using serial commands. Go to
the Meade website (www.meade.com) to download the latest serial
commands and de
vice pinouts.
J. Serial Port: Provides connection with a PC and for current and future
Meade accessories. Your PC can control your
RCX400 telescope using
serial commands. Go to the Meade website (www.meade.com) to
do
wnload the latest serial commands and device pinouts.
Important Note: Although both the Base Computer Control Panel and
the OTA Computer Control Panel include a serial port, only one may be
used at a time; you cannot plug into both ports at the same time.
K. Autoguider Port: Plug the optional autoguider into this port. See the
instruction sheet that came with your autoguider for more information.
Also see OPTIONAL ACCESSORIES, pages 48 - 50.
L. Reticle Port: Plug the optional reticle eyepiece into this port. Control
the reticle through the AutoStar II menus. See
HOT BUTTON MENUS
page 36. Also see OPTIONAL ACCESSORIES, pages 48 - 50.
Note: See the instruction sheets that are included with the reticle and
the autoguider for more details.
M. Handbox (HBX) Port: Plug the AutoStar II coil cord into this port.
Important Note: Although both the Base Computer Control Panel and
the OTA Computer Control Panel include an HBX port, only one hand-
box maybe be plugged in at a time; you cannot plug handboxes into
both ports at the same time.
N. Smart Accessory Port: Provides connection for future Meade acces-
sories.
1) GPS Receiver: Receives information transmitted from Global Positioning System
satellites. See page 25 for more information.
1! Declination (Dec.) Setting Circle (on left fork arm): See APPENDIX A, page 57,
for detailed information.
1@ Mounting Base: Attach to the tripod base (see 2&). See page 16 for mounting
instructions.
1# Right Ascension (R.A.) Lock: Controls the manual horizontal rotation of the
telescope.Turning the R.A. lock counterclockwise unlocks the telescope, enabling
it to be freely rotated b
y hand about the horizontal axis. Turning the R.A. lock
cloc
kwise loc
ks the telescope
, prevents the telescope from being rotated manu-
ally, and engages the horizontal motor drive for AutoStar II operation.
1$ A
utoStar II Handbo
x and
Tiltab
le Holder:
Controls all the electronic functions
of the telescope. See pages 13 - 15 for detailed information. You may have
noticed that there is no manual focus knob; all focus is achieved by
using the
A
utoStar handbo
x.
Attach the holder to one of the handles (see
f).
Holds y
our
handbox in a convenient location.
1% Right Fork Arm: The r
ight side of the hea
vy-duty mount that holds the optical
tube securely in place (see
g).
1^ Dec
lination (Dec.) Slo
w-Motion Contr
ol:
Mak
e fine adjustments in
Declination(altitude) by turning this control with the Dec. Lock (see
1& below) in
the loc
k
ed position. In order for this control to operate properly, power must be off.
1& Dec. Lock: Controls the manual vertical movement of the telescope. Turning the
Dec.
loc
k countercloc
kwise unloc
ks the telescope enabling it to be freely rotated
by hand about the vertical axis. Turning the Dec. lock clockwise (to a firm feel
Definitions
Throughout this manual,
you will notice the terms
"
Alt/Az," "Right
Ascension
," and
"
Declination." Alt/Az or
more properly, altitude-
azimuth (or altazimuth), is
frequently used to refer to
altitude or Declination (the
up-and-down vertical move-
ment of the telescope) and
azimuth or Right Ascension
(the side-to-side horizontal
movement of the tele-
scope). Right Ascension is
abbreviated as "R.A." and
Declination as "
Dec."
Caution:
When loosening the Dec.
lock, be sure to support the
optical tube (19,
Fig.
1a
).
The weight of the tube
could cause the tube to
swing suddenly.

12
only) pre
vents the telescope from being moved manually, but engages the verti-
cal motor drive for AutoStar II operation.
1* Dust Co
ver:
Gently pr
y the dust cover from the front lens of the telescope.
Note: The dust cover should be replaced after each observing session and the
power turned off to the telescope.
1( Optical Tube: The main optical component that gathers the light from distant
objects and brings this light to a focus for examination through the eyepiece. The
tube contains the primary mirror which floats on a layer of adhesive that results
in zero-stress to the glass and no distortion to the optics.
2) Fan: AutoStar controls the fan operation. The amount of time required to stabi-
liz
e the temperature will be dependent upon ambient conditions including the
observation site and preexisting condition of the telescope. The fan should be
activated at the beginning of the observation session to accelerate the tempera-
ture stabilization. As soon as the optics have reached an equilibrium with the
environment the fan should be turned off. Fan operation time should range
between 5 and 25 minutes. While it is permissible to run the fan continuously it is
not recommended because the very slight vibration of the fan may cause notice-
able movement of the objects observed in the sensitive optics.
The Viewfinder
2! 8 x 50mm Viewfinder: A low-power, wide-field sighting scope with crosshairs
that enables easy centering of objects in the telescope eyepiece.
2@ Viewfinder Objective Lens: Gathers the light for the viewfinder.
2# Viewfinder Locking Ring: Locks the objective lens into place. Unlock to adjust
the focus of the objective lens. See page 18 for details.
2$ Viewfinder Adjustment Screws: Use these six screws to adjust the alignment
of the viewfinder.
2% Viewfinder Eyepiece/Focuser: The eyepiece magnifies the image collected by
the viewfinder’s objective lens. Rotate the eyepiece to focus.
2^ Viewfinder Bracket and Mounting: Holds the viewfinder in place.
The Tripod
2& Tripod Base with Leg Receptacles: Attach the mounting base (see 1@) to the
tripod base. See page 16 for mounting instructions. Slide the tripod legs into the
leg receptacles.
2* Leg Attac
hment Lock:
Secures the tr
ipod legs into the leg receptacles.
2( Sliding Inner Leg Extension: Inner leg extension slides in or out to adjust the
tripod height.
3) Variable Height Tripod Legs: Supports the optical tube assembly.
3! Locking Latch and Thruster Bar: Lift latch to release inner leg extensions. Let
go of latch to loc
k inner extension in place. See page 16 for mounting
instr
uctions
.
Also see
Fig.
8
.
3@ T
-Handle:
Thread into the mounting base and tighten to a fir
m f
eel to keep the
tripod stable.
2! Want to learn more
about attaching and
aligning the
viewfinder
? See page
18.

Fig. 2: The Autostar II Handbox.
Tour the Cosmos with Just the Push of a Button
Control of the RCX400 telescope models is through the operation of the standard
Autostar II system. Nearly all functions of the telescope are accomplished with just a
few pushes of Autostar II’s buttons.
Because the Autostar II system uses flash (rewritable) memory, your system will be
able to grow when new features and enhancements become available. Download the
latest satellite data, star and object catalogs, tours, serial commands list, and software
revisions, directly from the Meade website (
www.meade.com). (Requires the option-
al
RCX400 Interface Cable. See OPTIONAL ACCESSORIES, pages 48 - 50.)
Some of the major features of the Autostar II system are:
J Automatically move the telescope to any of the more than 180,000 objects stored
in the object library, including:
Library # of Objects
New General Catalog (NGC): 7,840
Index Catalog (IC): 5,386
Messier Catalog (M): 110
Caldw
ell Catalog:
109
Named Objects:
227
Herschel Catalog:
400
Abell Catalog of Galaxy Clusters:
2,712
Arp Catalog of Irregular Galaxies: 645
Uppsala Galaxy Catalog:
12,940
Mor
phological Catalog of Galaxies:
12,939
Gener
al Catalog of
Variable Stars: 28,484
SAO: 17,191
Hipparcos Star Catalog:
17,325
....plus the Lunar 100, the Washington Star Catalog, the Gliese Catalog, and more!
J F
ocus y
our telescope’
s eyepiece.
J T
ake a guided tour of the best celestial objects to view on any given night of the year.
J Control your RCX400 with your PC using an RS232 or USB interface.
J Align your telescope automatically using GPS (Global Positioning System).
J Access a glossary of astronomical terms.
J Mount the telescope in the
“Alt/Az”
mode (i.e, altitude—azimuth, or
vertical—horizontal mode) for fully automatic tracking of celestial objects.
J Collimate your telescope using only AutoStar II’s Arrow keys.
AUTOSTAR II FEATURES
1
2
4
7
9
J
8
3
5
6
K
Want to learn more about
downloading the latest
updates of Autostar II
software from the
Meade website
? Go to
www.meade.com/sup-
port/auto.html for com-
plete instructions. Also
see page 43.
13

14
The A
utostar II system provides control of virtually every telescope function. The
Autostar II handbox has soft-touch keys designed to have a positive feel. The LCD
(Liquid Crystal Display) is backlit with red LEDs (Light Emitting Diodes) for easy view-
ing in the dark. The backlit display, key arrangement, and sequential menu structure
mak
e Autostar II extremely user friendly.
B 2-Line LCD Display: This screen displays Autostar II's menus and information
about the telescope.
•
Top line: Lists the primary menu.
• Bottom line: Displays other menus that may be chosen, menu options,
telescope status
, or information about a function that is being per-
formed.
c ENTER Key: Press to go to the next menu level or to choose an option in a menu.
The ENTER key is similar to the RETURN or ENTER key on a computer. See
MOVING THROUGH AUTOSTAR II'S MENUS, page 22 and BASIC AUTOSTAR II
OPERATION, pages 26 - 27
d MODE Key: Press to return to the previous menu or data level. The top menu
level is “Select Item." The MODE key is similar to the ESCAPE key on a comput-
er.
Note: Pressing MODE repeatedly while in the “Select Item” level moves
Autostar II to the topmost screen: “Select Item: Object.”
Note: If MODE is pressed and held for two seconds or more, information
about the telescope's status displays. When the status displays, press the
Scroll keys (
7, Fig. 2) to display the following information:
• Right Ascension and Declination (astronomical) coordinates
• Altitude (vertical) and Azimuth (horizontal) coordinates
• Local Time and Local Sidereal Time (LST)
• Timer and Alarm Status
• Date
• Site coordinates
• Battery status
Press MODE again to return to the previous menu.
e GO TO Key: Press to slew (move) the telescope to the coordinates of the cur-
rently selected object. While the telescope is slewing, the operation may be abort-
ed at any time by pressing any key except GO TO. Pressing GO TO again
resumes the slew to the object. Also, press during the alignment or GO TO pro-
cedures to activate a "spiral search."
f Arrow Keys: The Arrow keys have several functions. Press an Arrow key to slew
the telescope in a specific direction (up, down, left, and right), at any one of nine
different speeds. See
SLEW SPEEDS, page 21. Use the Up and Down Arrow keys
to move the telescope vertically up and down. The Left Arrow key rotates the tele-
scope hor
iz
ontally counterclockwise, while the Right Arrow key rotates it clockwise
(unless reversed for Southern Hemisphere use).
Also
, use the Arro
w k
eys to scroll through numbers 0 through 9 and the alphabet.
The Down Arrow key begins with the letter "A;" the Up Arrow key begins with digit
"9."
Additionally
, use the Arrow keys to move the cursor across the display: Use the
Right or Left Arrow key (
5, Fig. 2) to move the cursor from one number to the next
in the display.
g Number K
eys:
Press to
input digits 0 to 9. Each Number key also has a specif-
ic function, which is printed on each key (these are commonly known as "hot but-
tons"—see page 36):
1 SPEED: Changes the slew speeds. To operate, press Speed and then a
Number key (1 is the slowest speed, 9 is highest speed).
2 CALD (Caldwell): Press to display the Caldwell catalog on the Autostar II
handbox.
3 M (Messier): Press to display the Messier catalog library.
e Want to learn more
about using the GO TO
function? See page 24.
W
ant to learn how to
perf
or
m a
spiral
search? See page 24.
Want to learn more
about c
hanging sle
w
speeds? See page 21.
SPEED
1

4 FOCUS: Toggles between two functions. The first press allows you to
change the focus and focus speed. The next press allows you to create
presets that tell the telescope where to f
ocus.
5 SS: Press to display the Solar System library.
6 STAR: Press to display the Star library.
7 RET (Reticle):
Press to display the Reticle Control menu.
8 IC: Press to display the Index Catalog library.
9 NGC (New General Catalog): Press to display the NGC catalog library.
0 LIGHT: Press to turn on and off the red utility light on the top of the hand-
box.
h Scroll Keys: Press to access options within a selected menu. The menu is dis-
played on the first line of the screen. Options in the menu are displayed, one at a
time, on the second line. Press the Scroll keys to move through the options. Press
and hold a Scroll key to move quickly through the options.
The Scroll keys also control the speed of text scrolling on the Autostar II display.
When text is scrolling, press and hold the Up Scroll key for a faster display speed
and the Down Scroll key for a slower display speed.
i ? K
ey
:
Press to access the "Help" file. "Help" provides on-screen information on
how to accomplish whatever task is currently active.
Press the ? key and then follow the prompts on the display to access details of
Autostar II functions in the Help feature. The Help system is essentially an on-
screen instruction manual.
If you have a question about an Autostar II operation,
e.g., INITIALIZATION,
ALIGNMENT,
etc., press the ? key and follow the directions that scroll on the sec-
ond line. When satisfied with the Help provided, press MODE to return to the orig-
inal screen and continue with the chosen procedure.
j Coil Cord Port: Plug one end of the Autostar II coil cord (10, Fig. 2) into this port
located at the bottom of the Autostar II handbox.
1) Coil Cord: Plug one end of the Autostar II coil cord into the HBX port (F, Fig. 1d)
of the computer control panel of the telescope and the other end into the Autostar
II coil cord port. See
j above.
1! Utility Light: Use this built-in red light to illuminate star charts and accessories
without disturbing your eye's adaptation to darkness. Press "0" to turn the light on
and off.
15
Join an Astr
onomy Club, Attend a Star Party
One of the best ways to increase your knowledge of astronomy is to join an astronomy
club. Check your local newspaper, school, library, or telescope dealer/store to find out if
there’
s a club in y
our area.
At club meetings
, y
ou will meet other astronom
y enthusiasts with whom you will be able
to share your discoveries. Clubs are an excellent way to learn more about observing the
sky, to find out where the best observing sites are, and to compare notes about tele-
scopes
, eyepieces, filters, tripods, and so forth.
Often, club members are excellent astrophotographers. Not only will you be able to see
examples of their art, but you may even be able to pick up some “tricks of the trade” to
try out with your
RCX400 telescope. See page 45 for more information about photogra-
phy with the
RCX400.
Man
y g
roups also hold regular
ly scheduled Star P
arties at which you can check out and
observe with many different telescopes and other pieces of astronomical equipment.
Magazines such as
Sky & Telescope and Astronomy print schedules for many popular
Star Parties around the United States and Canada.
RCX400 TIPS
Want to learn
more about the
Reticle
menu? See page 36.
Want to learn
more about the
Focus
menu
? See page 19.
FOCUS
4
RET
7
Tip:
When an astronomical
term
appears in [brack-
ets
], press ENTER for a
definition or more detailed
information. Press MODE
to return to the scrolling
Autostar II Help display.
If a
celestial object's
name appears in brackets
(and your telescope is
aligned), press ENTER
and then GO TO to slew
the telescope to the object.

16
Parts Listing
Getting the telescope ready for first observations requires only a few minutes. When
first opening the pac
king box, note carefully the following parts:
J RCX400 Telescope with fork mount system and GPS Receiver
J AutoStar II handbox and interface coil cord; handbox holder
J 8 x 50mm viewfinder assembly
J 2" diagonal mirror and
2” visual back barrel
J Series 5000 UltraWide 24mm eyepiece
J V
ariable height tripod
J USB cable and software CD ROM
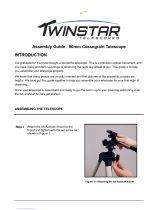
How to Assemble the Tripod
Remove the parts of the tripod from the shipping carton. Assembly of the tripod will
take just a few minutes.
To assemble the tripod:
1. Slide a leg (1) into a leg receptacle (Fig. 7), making sure that the screw (3) in the
leg (
Fig. 8) slides into the groove (4) on the receptacle (Fig. 9).
2. Rotate the leg attachment lock (6) and tighten to a firm feel.
3. Press and hold down the trigger release lever (5) slide the tripod leg to the
desired length (thereby setting the height of the tripod). See
Fig. 11. Let go of the
trigger when the tripod leg is at the desired length.
5. Repeat steps 1 through 4 for the other two tripod legs. The tripod should now be
stable.
How to Assemble Your Telescope
The telescope’s fork mounting base attaches directly to the tripod. The telescope in
this way is mounted in an “altazimuth” (“altitude-azimuth,” or “vertical-horizontal”) for-
mat. It is recommended that two people attach the mount to the tripod.
Caution for 12” and 14” model users: Due to the weight and size of
these products, please use extreme caution whenever assembling,
disassembling, lifting, transporting or storing these products. Two or more
persons should always be used whenever performing any of these tasks.
Disregard for the above warning could result in serious injury or death.
Note: The field tripod also can be used in conjunction with the optional
equatorial wedge (see your wedge’s instruction sheet for more
information) for long exposure astrophotography.
The tripod base comes with a tangent arm attached for use with the superwedge.
T
o attac
h the mount:
1. Take note of the T-handle under the tripod base. The T-handle is spring-mounted
into position.
Note also that there is a hole on the bottom side of the mount base
.
2. Lift the mount and position the mount base over the tripod base. Line up the hole
on the mount base over the T-handle rod. When they are lined up, place the
mount down onto the rod and the rod will “pop up” into the hole (
Fig. 12).
3.
Rotate the
T
-handle until the rod is tightened to a fir
m feel (
Fig.
13
).
To install the batteries:
Assemb
ly of the
RCX400 telescope requires eight C-cell (user-supplied) batter
ies or
the optional RCX A
C
Wall Adapter to a standard 115v home outlet . Plug the adapter
into the 12vDC In port of the computer control panel (
B, Fig. 1d).
1. Turn the Dec. lock (
17, Fig. 1a) counterclockwise to unlock the the optical tube
(
19, Fig. 1a). Move the optical tube to the position depicted in Fig. 1a and turn
the Dec. lock clockwise to a firm feel to relock the position of the optical tube.
2. Remove the battery compartment covers (
7, Fig. 1a) and carefully remove the
battery holders, being mindful of the connector wires (
Fig. 15). Insert four user-
supplied C-cell batter
ies into each batter
y holder
, or
iented as sho
wn on the dia-
gram on the battery slots inside the battery holder. Return the battery holders to
their respectiv
e compar
tments and replace the co
v
ers.
Caution: Use care to install batter
ies as indicated b
y the batter
y
GETTING STARTED
Fig. 11: Lift the trigger lever (5) so
that y
ou can adjust the height of the
tripod leg.
Fig. 7: Attach leg (1) to leg
receptacle (2).
Fig. 8: Slide the screw (3)...
Fig. 9: ... into groove on the
receptacle (4).
Fig. 10: Tighten the leg adjustment
loc
k (6).
f
B
c
d
e
g
f

compar
tment. Follow battery manufacturer's precautions. Do not install
batteries backwards or mix new and used batteries. Do not mix battery
types
. If these precautions are not followed, batteries may explode, catch
fire, or leak. Improperly installed batteries void your Meade warranty.
Alw
ays remove the batteries if they are not to be used for a long period of
time.
T
o attach AutoStar II and connect the handbox holder
1. Plug in the AutoStar II handbox: Check
that the power switch on the computer control panel (
12, Fig. 16) is in the OFF
position. Plug the coil cord of the AutoStar II handbox into the HBX port of the
base control panel (13, Fig. 16) or the HBX port of the OTA control panel (M, Fig.
1e
).
Note: The AutoStar II handbox does not require batteries; the batteries in
the telescope supply the power.
Note: You can only plug one handbox into the telescope at a time; you
cannot plug in two handboxes into the two control panels at the same time.
2. Attach the handbox holder: Remove the handbox holder from the plastic bag. If
necessary, loosen the lock knob (
14, Fig. 17a) and place the clamp (15, Fig. 17a)
about one of the fork arm handles (
15, Fig. 1a). Tighten the lock knob to a firm
feel. Slide the AutoStar II handbox into the holder (
16, Fig. 17a).You may also
snap the handbox into the holder: Slide one side of the handbox into the holder
and then firmly press the other side of the handbox into the holder until it snaps
in place. Adjust the tilt of of the holder by loosening the lock knob and then mov-
ing the holder clamp to the desired angle. Retighten the lock knob.
To attach the diagonal mirror and the eyepiece
1. Attach Visual back and Diagonal mirror: Thread the ring of the visual back over
the rear cell and rotate the ring, tightening to a firm feel (see
Figs. 18 and 19) .
Slide the diagonal into the visual back and secure it in place using the visual back
thumbscre
w
.
Fig. 15: Battery installation.
Fig. 12: Line up the T-handle rod (8)
with the hole on the base (7).
Fig. 13: Tighten the T-handle (9) to a
“firm feel.”
Fig. 14: Loosen the R.A. (11) and
Dec.
(10) loc
ks to Move the optical
tube from its shipping position.
Fig. 17a: Handbox holder: (14) Lock
knob; (15) Clamp; (16) Holder.
Fig. 17b: Handbox holder attached to
fork arm handle.
Fig.
18:
Rear cell
(17).
Fig.
19:
Thread the r
ing of the
visual back (18) onto the rear
cell (17). Slide diagonal into the
visual bac
k and secure with
thumbscrew (19).
Fig.
20
:
Slide e
y
epiece (20)
into the diagonal mirror and
tighten thumbscrew (21).
Fig.
16:
Locations of the On/Off s
witch and the
HBX por
t on the Computer Control Panel locat-
ed on the base of the telescope
.
h
i
j
1)
1!
1$
1%
1^
1*
1(
1&
2)
2!
17
1@
1#
1&
A
B

18
2. Insert eyepiece: Remove the UltraWide 24mm eyepiece from its container and
slide it in the diagonal mirror. Tighten the thumbscrew (
Fig. 20) located on the
diagonal mirror to a firm feel only.
3. Remove dust cover: Remove the dust cover (
18, Fig. 1a) from the optical tube
assembly by gently prying it off.
Mounting and Focusing the Viewfinder for the First Time
The first time you mount and focus the viewfinder, follow the these steps:
1. Slide the track on the bottom of the viewfinder bracket into the slot in the viewfind-
er mounting assembly. See
Fig. 21. To secure the viewfinder to the mounting
assembly, tighten the two thumbscrews to a firm feel only.
2.
Slide the viewfinder tube (see
Fig.
22
) into the vie
wfinder bracket. Loosely tight-
en the adjustment screws (see
Fig. 23). You will use the adjustment screws to
align the viewfinder (see the next section below).
2. Look through the viewfinder. Rotate the eyepiece/focuser until you sharply focus
the crosshairs.
3. Loosen (rotate clockwise) the objective lens locking ring.
4. Rotate the objective lens until you sharply focus on an object located at infinity.
5. Tighten the locking ring.
6. You may now rotate the eyepiece to focus on objects.
Aligning the Viewfinder
To align the viewfinder, perform steps 1 through 4 during the daytime; perform step 5
at night.
1. If you have not already done so, insert the UltraWide 24mm eyepiece into the
diagonal mirror.
2. Unlock the R.A. (
13, Fig. 1a) and Dec. (17, Fig. 1a) locks so that the telescope
moves freely on both axes.
3. Point the telescope at some well-defined and stationary land object at least 200
yards distant, such as the top of a telephone pole or street sign. Center the object
in the telescope eyepiece. Re-tighten the R.A. and Dec. locks.
4. Look through the viewfinder eyepiece and loosen or tighten, as appropriate, one
or more of the viewfinder adjustment screws (see
Fig. 23) until the viewfinder
crosshairs are precisely centered on the object you previously centered in the tel-
escope eyepiece.
5. Check this alignment on a celestial object, such as the Moon or a bright star, and
mak
e an
y necessar
y refinements
, using the method outlined in steps 2 through 4.
Note: Seeing conditions v
ar
y widely from night-to-night and site-to-site
.
T
urbulence in the air, even on an apparently clear night, can distort
images. If an image appears fuzzy and ill-defined, back off to a lower
po
w
er e
y
epiece f
or a more w
ell-resolved image (see
Fig.
24a and 24b
).
Fig. 21: Viewfinder bracket assembly:
Slide the track (23) into the mounting
slot (22). Tighten the thumbscrews
(24) to secure.
Fig.22: 8x50 Viewfinder tube:
Objective lens (25), eyepiece/focuser
(26) and locking ring (27).
Fig. 23: Viewfinder adjustment screws
(28).
Fig. 24a & 24b: Jupiter; examples of
the r
ight amount of magnification and
too much magnification.
T
oo Much Power?
Can you ever have too much power? If the type of power you’re referring to is
e
y
epiece magnification, y
es
, you can! The most common mistake of the begin-
ning obser
ver is to “overpower” a telescope by using high magnifications which
the telescope’
s aper
ture and atmospheric conditions cannot reasonably support.
Keep in mind that a smaller, but bright and well-resolved image is far superior to
one that is larger, but dim and poorly resolved (see
Figs. 24a and 24b). Powers
abo
v
e 400X should be employed only under the steadiest atmospheric condi-
tions.
A
utostar II can calculate the best e
y
epiece for you to use. Try out the “Eyepiece
Calc” feature in the Utilities menu.
Most obser
v
ers should ha
v
e three or f
our additional eyepieces to achieve the full
r
ange of reasonab
le magnifications possible with the
RCX400 telescopes
.
See
OPTIONAL ACCESSORIES, pages 48 - 50.
RCX400 TIPS
2@
2#
2$
2%
2^
2&
2*

OBSERVING
Choosing an Eyepiece
A telescope’s eyepiece magnifies the image formed by the telescope’s main optics.
Each eyepiece has a focal length, expressed in millimeters, or “mm.” The smaller the
focal length, the higher the magnification. For example: An eyepiece with a focal
length of 9mm has a higher magnification than an eyepiece with a focal length of
26mm.
Your telescope comes supplied with an UltraWide 24mm eyepiece which gives a
wide, comfortable field of view with high image resolution.
Low power eyepieces offer a wide field of view, bright, high-contrast images, and eye
relief during long observing sessions. To find an object with a telescope, always start
with a lower power eyepiece such as the UltraWide 24mm. When the object is locat-
ed and centered in the eyepiece, you may wish to switch to a higher power eyepiece
to enlarge the image as much as practical for prevailing seeing conditions. For infor-
mation about optional eyepieces for your telescope, see
OPTIONAL ACCESSORIES,
pages 48 - 50.
The power, or magnification of a telescope is determined by the focal length of the tel-
escope and the focal length of the eyepiece being used (an eyepiece's focal length is
printed on the side of the eyepiece). To calculate eyepiece power, divide the tele-
scope's focal length by the eyepiece's focal length.
For example: A 24mm eyepiece is
supplied with
RCX400 models. The focal length of the 12" f/8 RCX400 is 2438mm (see
SPECIFICATIONS, pages 54 - 56).
Eyepiece Power = Telescope focal length ÷ Eyepiece focal length
Eyepiece Power = 2438mm ÷ 24mm
Eyepiece Power = 102
The eyepiece power, or magnification is therefore 102X (approximately).
Note: For a list of magnification ratings of the eyepieces available for the
RCX400 telescopes, see OPTIONAL ACCESSORIES, pages 48 - 50.
Focusing the Telescope
All focusing of the RCX400 is performed digitally, using AutoStar II’s Focus key
(number key 4). The Focus key functions as a toggle key:
J Press the Focus key the first time to focus the telescope eyepiece and to control
the speed at which you focus.
J Press the Focus key again to set and adjust up to nine focus presets.
To change the focus speed:
1. Press the Focus key once. “Focuser: Fast (or the current speed)” displays for
two seconds. Use one of the Scroll keys to scroll through the list of 4 available
focus speeds: Fast, Medium, Slow, Fine. Scroll through the list until the speed
y
ou desire displa
ys
. Choose a focus speed with which you feel comfortable.
To focus the telescope eyepiece:
1. Press the Focus key once. “Focuser: Fast (or the current speed)” displays. After
two seconds, “Focuser: Position = XX” displays. “XX” stands for a number value
in decimal millimeters
.
2. Point the telescope at a distant object. Look in the eyepiece and use the Arrow
keys until the image in the eyepiece is in sharp focus.
Presets:
If y
ou “Park” your telescope, you do not have to refocus the telescope each time you
use it. Nine preset focus positions are available, and they operate much like presets
on a car radio—everyone can have their own favorite station, or in this case, their own
personalized focus. You can set one preset to take into account your own eyesight,
one f
or your observing partner (who may wear glasses), one for your camera’s focus,
and so forth.
Three preset menus are available. Use the Define Preset menu to assign a preset,
use the GoTo Preset menu to select a preset you have previously assigned, and use
Important Note:
Objects appear upside-down
and reversed left-for-right
when observed in the
viewfinder. Objects viewed
through the telescope eye-
piece when inserted into the
diagonal prism assembly
appear right-side-up, but
reversed left-for-right.
This image inversion is of no
consequence when observ-
ing astronomical objects and,
in fact, all astronomical tele-
scopes yield inverted
images.
During terrestrial observing,
where a fully-correctly-orient-
ed image (right-side-up and
correct left-for-right) is desir-
able, an optional #928 45°
Erecting Prism and optional
1.25” eyepiece holder are
available. See
OPTIONAL
ACCESSORIES, pages 48 -
50.
19
Fig.
25:
F
ocus is all-digital, using the
Focus key (the #4 Number key) of
the AutoStar II handbox.
FOCUS
KEY

20
Sync On Preset men
u if
y
ou do not park
y
our telescope (this menu will reset all your
focus presets after you turn off and turn on your scope again ).
To define a preset:
1.
Point the telescope at a distant object, press FOCUS and use the Up and Down
Arrow keys to focus the telescope until the object is sharply focused as previously
e
xplained.
2. Press the Focus key again (FOCUS toggles between the Focus menu and the
Preset menu). “Focuser Preset: Go To” displays. Use a Scroll key and scroll down
the list of options until “Focuser Preset: Define Preset” displays. Press ENTER.
3. A list of presets displays. If no preset is currently assigned, “1- Unnamed” displays
(f
ollowed by 2- Unnamed, up to 9 - Unnamed).
4. Use the up and down Scroll keys to scroll through the alphabet and the right and
left Arrow keys to move to cursor right or left across the display.
5. When you have finished typing in a name and focusing the telescope, press
ENTER. That number preset is now defined. You can enter 9 names. For exam-
ple, you may enter “Joe,” “Jill,” “Deep Sky Imager” and so forth.
6. To select one of these presets, you will use the “Focuser Preset: Go To” menu.
To select a previously defined focus preset
1. Press the Focus key twice. “Focuser Preset: Go To Preset” displays. Press
ENTER to select this menu.
2. Use a Scroll key and scroll down the list of previously defined presets. When the
desired preset displays (for example, “Deep Sky Imager”), press ENTER.
Important Note: If you do not park your telescope, you will need to select
one of the presets and refocus your telescope using the Sync On menu.
See
TO SYNC ON A FOCUS PRESET below.
To sync on a focus preset
If you park your telescope, AutoStar II remembers all the focus positions you
defined as presets and you will not need this menu.
If you do not park your telescope, you will need to select just one of the presets and
refocus your telescope using the Sync On menu. Then AutoStar II will then reset all
the other presets back to the focus preset positions you previously defined.
1. Press the Focus key twice. “Focuser Preset: Go To Preset” displays. Use a Scroll
key and scroll until “Focuser Preset: Sync On Preset” displays and press ENTER
to select this menu.
2. Use a scroll key to choose one of the previously entered presets from this list (the
most likely preset you will choose will be one that accounts for your own
eyesight).
3.
Use the Up or Do
wn Arrow keys to focus the eyepiece.
4. Press ENTER. AutoStar II now “remembers” the relative focus positions of the
e
yepiece.You can now choose any preset and it will be correctly focused.
To exit the focus operation at any time:
1. Press MODE.
Observing by Moving the Telescope Manually
If you wish to observe a distant land object, such as a mountain top or a bird, you can
observe by merely pointing the telescope and looking through the eyepiece.
1. Loosen the telescope’s R.A. lock (
13, Fig. 1a) and Dec. lock (17, Fig. 1a).
2. Move your telescope to observe distant street signs, mountains, trees, and other
structures. Use your viewfinder to help site-in on an object.
3. Center the object in the viewfinder’s crosshairs and then in the telescope eye
piece
.
When the object is
centered in your eyepiece, remember to re-tighten the
R.A. and Dec. locks.
4. To move telescope in the R.A. and Dec. axes again, remember to loosen the R.A.
lock and tighten the Dec. lock. Then rotate the manual slow motion control knobs
(
10, Fig. 1a) and (16, Fig. 1a) .
5. Practice digitally focusing on objects.
See FOCUSING THE TELESCOPE, page 19.
6. Once you get a feel for how your telescope moves and focuses, try to view some-
Note:
Viewing conditions vary wide-
ly from night-to-night and site-
to-site. Turbulence in the air,
even on an apparently clear
night, can distor
t images.
Lo
w-po
w
er e
yepieces, such
as the UltraWide 24mm sup-
plied with your telescope, are
better suited to resolving
images in poor viewing condi-
tions
.
/