Page is loading ...


Function Buttons and External Sockets
Rear panel of the TV set
Front panel the TV set
COAXIAL
Audio left channel output terminal
Coaxial terminal
Antenna/ CATV input socket
Video output terminal
Audio right channel output terminal
Video input terminal
Audio left channel input terminal
Audio right channel input terminal
PROGRAM
Program


Using the Remote Control
OPEN/CLOSE
POWER
SCAN
MUTE
1 2
3
4
5
6
7
8
TV/DVD
MENU
EXIT
P.STD
9
0
-/--
TV/AV
STOP
PLAY/ENTER
PAUSE/STEP
REV FWD PREV NEXT
SETUP
D.MENU
REPEAT
TITLE/PBC
SEARCH
ANGLE
AUDIO
ZOOM
A-B
SLOW
PROGRAM
D.CALL
Power Switch
Open/close DVD Tray
Channel Scan
Return to Previous Channel
Mute Sound
On Screen Display
Channel / Track Selection
TV / AV Mode Selection
Select 1 or 2 Digit Cha nnel / Track Number Inputting
(Non Functional)
TV / DVD Mode Selection
Volume/Channel Adjusting
Go to TV / DVD Men u
Exit On Screen Display
Adjust Picture Mode
Calendar Function
CCD ( closed caption) On / Off
Time Menu
(Non Functional)
DVD FAST REVERSE
DVD NEXT Chapter / Track
DVD FAST FORWARD
DVD PREVIOUS Chapter / Track
DVD STOP Playback
10+
Enter DVD SETUP
DVD PAUSE/STEP
DVD MENU
DVD A-B REPEAT
DVD Menu Navigation Buttons
DVD REPEAT Mode
DVD Playback / Confirm Menu Selection
DVD Slow
DVD ANGLE Change
DVD SEARCH
DVD AUDIO Mode
DVD TITLE
Zoom Function
DVD PROGRAMMED PLAYBACK
DVD INFORMATION
DVD CAPTION (SUBTITLE) Selection
Buttons on the remote control
UP
DOWN
LEFT
RIGHT
CALENDAR
TIME
10
CCD
RECALL DISPLAY
CH+
CH-
VOL- VOL+
SUBTITLE

Remote Features
Power Button:
To turn power ON or OFF , press power button on remote control.
Control
System and Channel Display Button:
This will show you the current channel number. System type will
also be displayed if set.
TV/AV input Button:
This button has three settings: A)Video1, B)Video 2, C)SVHS,D)TV .
Pressing this button will cycle you through each input type.
Mute Button:
Press mute button to turn off the TV volume.
Direct Channel Access Selection:
one of the procedures noted below to access a channel.
Selection:
channel
number digit.
Selection:
When you want to select two-digit channel. Press the digit
button twice, then enter the two channel digits .
When you want to select a three digit channel. Press the
digit select button three times, then enter the three digits .
Follow
One Digit Channel
When you want to select one digit channel ,press 0 and
Two Digit Channel
Three Digit Channel Selection:
CCD Button:
Press CCD button to set the C.Caption (Closed )
ON or OFF.
Captioning
DVD/TV Button:
Press this button to change between TV and DVD mode.
OPEN/CLOSE Button:
Press this button to open or close the DVD disc tray .
POWER
DISPLAY
TV/DVD
TV/AV
MUTE
-/--
1 2
3
4
5
6
7
8
9
0
CCD
OPEN/CLOSE

MENU
CH+
CH-
VOL- VOL+
Channel (+/-) Select Button:
button and CH (-) button.
Menu Select Button:
You can the menu by pressing the MENU button.
You can by pressing the corresponding
button on the remote control.
You can cycle through the channels by pressing CH (+)
This button can also be used to adjust the functions while in the Menu Mode.
access mode
access the sub menu
Volume (+/-) Select Button:
You can increase the volume by pressing VOL (+) button and
decrease VOL(-) button. This button can also be used to adjust the function
selections in the Menu Mode.
Picture Preference Button: Selection
By pressing this button, you can select different preset brightness
levels for various viewing environments.
Program Scan Button:
This feature automatically scans available channels.
Pressing it starts the search, pressing again stops the channel scan.
System and Channel Display Cancel Button:
This button allows you to turn off the channel display and exit
system menus.
Last Channel Recall Button:
This feature allows you to recall the previously viewed channel.
Time Menu Button:
When pressed it displays Time Menu Screen.
10+ Button:
This button can also be used to 2 digit channel numbers.enter
RECALL
P.STD
SCAN
EXIT
TIME
10

Menu Functions
Video Setup:
Pressing MENU button once will bring up the Video Setup menu on the TV.
The following is shown on your TV screen:
Follow the procedure below to adjust
1.Press the CH(+) and CH(-) button to go up and down menu.
2.Press the VOL(+) and VOL(-) button to increase and decrease the level to your
preference for each item.
one of the picture settings:
within the
Picture Quality Adjustments:
By decreasing the level, the brightness level will be decreased. By
increasing the level, the brightness level will be increased.
By decreasing the level, color intensity will be decreased. By
increasing the level, color intensity will be increased.
This setting allows you to adjust the tint of the picture.
from three color temperature
settings: A)Neutral, B)Warm, C)Cool.
Picture: By increasing the level. It will adjust white areas of picture and by
decreasing the level , it will adjust black areas of picture.
Brightness:
Color:
Sharpness: By decreasing the level, the picture becomes softer. By increasing
the level, the picture becomes clearer.
Hue:
By decreasing the level, it will give red tint to skin color and by
increasing the color it will give green tint to skin color.
Color Temp : Press the VOL(-/+) buttons to select
Picture 70
Color 50
Sharpness 40
Hue 50
Color Temp. Neutral
Brightness 32
Video
Information to user: This television receiver is equipped with
decoder and parental blocking technology
as required by the FCC.
closed captioning

Audio Setup:
By pressing MENU button ,and then pressing VOL(-/+) buttons it will bring you to
Audio Setup . You will see the following menu on your TV screen:menu
Follow the procedure below to adjust the sound quality:
Press VOL (+) button to increase and VOL (-)button to decrease the level to your
preference.
Audio
Volume 45
Timer Setup:
By pressing MENU button ,and then pressing VOL(-/+) buttons it will bring you to
Timer Setup menu. You will see the following menu on your TV screen:
Follow the procedure below to select one of the above options:
1.Press the CH(+) and CH(-) button to go up and down the menu.
2.Press VOL (+) button or VOL (-) button to select your preference.
Clock: Press VOL (-/+) buttons for HOURS and VOL(-/+) buttons for MINUTES
adjustment.
Time-On: Press VOL(-/+) buttons for HOURS and VOL (-/+) buttons for
MINUTES adjustment. This feature works like an alarm clock. Your
TV will turn on at the set time.
Ch. Select: This feature switches you to your favorite channel at the set time.
Press VOL(+) and VOL(-) buttons to select the channel.
Time-Off : Press VOL (+/-) buttons for HOURS and VOL (+/-) buttons for
MINUTES adjustment. This feature works like an alarm clock. Your TV
will turn off at the set time.
Sleep Time: This feature allows you to turn off the television after a pre-selected
minutes (180, 170,160, ........,10 and 0).
Remind Time: Press VOL(+/-) buttons to set HOURS of attention and VOL (+/-) buttons
to set MINUTES of attention. You will see the flashing time on your TV
when the reminder time arrives.
Ch. Switch:
number of
Note: This exclusive feature can
remind you of important tasks when watching TV.
This feature lets you store your favorite channel. Once you store the
channel number in this function, when the set time is up, it will switch
over to the set channel. This feature is used with the Exchange feature.
Press VOL(+) or VOL(-) button to select the channel.
Timer
Time-on 18:00
Ch. Select 1
Time-off --:--
Sleep Time 0
Remind Time --:--
Ch. Switch 1
Clock 17:18

Follow the procedure below to select one of the above options:
1.Press the CH(+) and CH(-) button to go up and down the menu.
2.Press the VOL(+) and VOL(-) button to increase and decrease the level to your
preference for each item.
Language:
Background: Press the VOL (-/+) buttons to select between Background ON or
Background OFF. When the Background ON function is chosen, a
moving "NO SIGNAL" sign will be displayed if there is no input signal
to the set.
Black Stretch: Press VOL (-/+) buttons to turn the Black Stretch feature on or off.
When the Black Stretch function is on, the screen automatically
increases the contrast range.
VNR: Press VOL (-/+) buttons to turn the VNR function on or off. VNR is a
term for Video Noise Reduction, a built-in device that reduces video
noise interference so the viewer is assured a clear picture.
Fade: FADE control allows for the picture tube to warm up and gently turn
on,
VOL(+) button or VOL (-) button to
set it ON or OFF.
Change: Press VOL (-/+) buttons to turn the Soft Change feature on or off.
C.Caption: Press VOL (-/+) buttons to select the Closed Caption options. Closed
Captioning helps the hearing impaired with the broadcast program, as
well as helping children learn how to read. A built in decoder displays
the audio portion of a program as text on the screen when this option is
selected.
Use VOL(-/+) buttons to select the OSD language.
AVL: Automatic Volume Limit control reduces effect of large volume changes
such as when the ads come on.Press
Soft
which can help prolong the life of the picture tube.
OFF: When OFF is displayed on C.Caption is turned off.
CC1: When Cc1 on TV means C.Caption is turned on.
CC2 to CC4: For other modes of video related broadcast information.
T1: For program guide and other information displayed by broadcasters.
(This blocks a large portion of the picture on your screen).
T2 to T4 :For other modes of information displayed by broadcasters.
(This blocks a large portion of the picture on your screen).
TV, it means
is displayed
Note: Select CC1 for full translation of the primary language such as English in your
area. Select CC2 for secondary language translation such as French or any other
language that may be broadcast in your area.
Function Setup:
By pressing the MENU button, and then pressing VOL(-/+) buttons
Function Setup menu. You will see the following menu on your screen:
, you will enter the
Setup
Demo Mode: This will display the main functions of the TV set.
Language English
Background on
VNR on
Fade off
AVL on
Soft Change off
C. Caption on
Demo mode
Black stretch on
IMPORTANT: Closed captioning availability entirely depends on broadcasters
supplying the signal. Therefore, closed captioning might not always be available and
language availability will differ by broadcast.

Channel setup:
By pressing MENU button ,and then pressing VOL-/+ button it will bring you to
Channel Setup menu. You will see the following display on TV screen.
Follow the procedure below to select above options:
1.Press the CH(+) and CH(-) button to go up and down the menu.
2.Press VOL (+) button or VOL (-) button to select your preference.
Channel System: Press the VOL(-/+) buttons to select the correct channel system.
In general, you can set it as "AUTO" AUTO,NTSC and NTSC443
will display in turn
Air Cable: Press VOL (+) button or VOL(-) button to select
Skip : Press VOL(+) button or VOL(-) button to add or delete a channel
from the stored memory.
Current Ch. : Press VOL(+) button to go up and VOL (-) button to go down to set
the channel position. The display will show the current playing
channel.
Channel Coverage by Antenna:
Antenna Type Channel Range
VHF 2-13
UHF 14-69
CATV 1-125
Fine: If the picture and/or sound are poor, try using the FINE TUNE
feature. Do not use this feature unless reception is poor. Press
VOL (+/-) to start the Fine Tune function.
Auto Program:
Note: The Auto Search function will scan the channels on the selected antenna
input. If the TV is connected to cable, please select Cable under
Aerial Antenna
(VHF and UHF) or Cable Antenna (CATV) reception preference.
Press VOL (+) button to auto program channels. This search
automatically adds only the active channels in your area to the TV's
memory. It deletes any channels on which there is no broadcast or
a poor signal.
' Air Cable ' sub menu.
Channel
Air Cable Air
Skip off
Current Ch. 2
Fine
Auto Program
Channel System Auto

Calendar:
Your TV has been designed with a calendar. By pressing MENU button ,and then
pressing VOL(-/+) buttons it will bring you to Calendar. You will see the following
display on TV screen.
Calendar
OCT
OCT
OCT
Follow the procedure below to adjust the Calendar
1. +/-) buttons
date:
the year, month or day.
Press the CH( to select the year item, the month item or the date item.
2. Press the VOL(-/+) buttons to change
3. Press EXIT button to exit the calendar mode.
2005 9 14

PARENTAL LOCK Setup:
menu onto
Press the MENU Button on your remote control to go to Password menu, then input
the password (0000). It will bring Parental Lock set up the screen. You
will see the following menu on your screen:
This function enables you to lock certain TV channels in accordance to the V-CHIP
requirement established by the FCC.
To the function:
Select the TV Rating option. You will see the TV Rating menu on your TV screen:
1.Press CH(+/-) buttons to go up and down the menu.
2. Press VOL(-/+) buttons to go into TV Rating and Movie Rating menus.
3.Press VOL(-/+) buttons to set the Parental Lock ON and Parental Lock OFF.
When TV rating is selected, you will see the following rating table on your TV screen.
setup PARENTAL LOCK
Note: You can press CH(+/-) buttons to go up and down the menu, then press VOL(+)
button to select "B" (block channel) or "U" (unblock channel).
Parental Lock
Parental Lock off
TV Rating
MPAA Rating
Lock Menu
Change Password
Passsword
Password ----
TV Rating
Rating FV
TV-Y
TV-Y7
TV-G
TV-PG
TV-14
TV-MA
D L S V
U U U U
U U U U
U U U
U
U
U
U
U
U
>
U

When MPAA Rating is selected, you will see the following rating table on your TV
screen.
Parental Lock off means the lock function is turned off . If the Parental Lock is in
"off" mode then function will not be active to accept the broadcast signal.
Parental Lock on means the lock function is turned on. If the lock is in the "on"
mode then function is activated to accept the broadcast signal.
Password
The "Default Password" preset by the manufacturer is "0000" . If you want to change
the preset password to your own password, just choose any four digits that can be
easily remembered and set. Once you set password for a particular channel, that
channel will be blocked. This channel can only be accessed with the password.
MPAA Rating
G U
PG U
R U
NC-17 U
X U
PG-13 U
Lock Menu
AV Lock: When it is set to ON,
Program Lock: When it is set to ON, the current channel is
the AV inputs are locked and therefore the TV will not
allow you to view sources hooked up via AV inputs on the front and back of the TV.
To unlock this feature, simply set this option to OFF
locked and can therefore
not be viewed. To view the channel (unlock) once again, set this option to OFF.

PARENTAL LOCK TECHNOLOGY:
The "P.L. Technology" allows you to use U.S. and Canadian Movies and TV
PROGRAMS Guide ratings to block certain types of TV programs and movies.
information:
these types
towards
these types
these types
To clearly understand TV program rating codes, read the following
U.S. TV Program Ratings
NR: Not Rated-this means that programs are not rated or rating does not apply.
TV-Y: For all children - of rated programs are designed for a very young
audience, including children from ages 2-6.
TV-Y7: Directed older children - this type of rated programs may include
comedic violence of mild physical, or may frighten children under the age of 7.
TV-G: General audience - of rated programs contains little or no
violence, no strong language, and little or no sexual dialogue and situations.
TV-PG:Parental Guidance Suggested-this type of rated programs may contain
limited violence, some suggestive sexual dialogue and situations, and rare
language.
TV-14: Parents strongly cautioned-these types of rated programs may contain sexual
content, strong language and more intense violence.
TV-MA:Mature audience only of rated programs may contain sexual
violence, explicit sexual content and profane language.
FV: This type of rated programs contain Fantasy and cartoon violence.
Violence: This type of rated programs contain violence.
S: This type of rated programs contain sex.
L: This type of rated programs contain offensive language.
D: This type of rated programs contain dialogue with sexual content.

To understand clearly about movie rating codes, read the following list:
U.S. Movie Rating Chart
NR: This means movie is not rated yet. It is pending government rating approval.
G: General Audience-this type of movie rating means all ages admitted to see
the movie.
PG-13:Parents Strongly Cautioned - this type of movie rating means some material
may not be appropriate for children under13.
R: Restricted- This type of movie rating means children under 17 of age require
to be with parent or guardian.
NC-17:This type of movie rating means no one 17 and under admitted.
X: This type of movie rating means adults only.
To clearly understand Canadian program rating codes, read the
following list:
Canadian English Rating Chart
E:
news, sports, documentaries, talk shows, music
videos, and variety of other programs.
C: for children under age 8. There is no
offensive language, nudity or sexual content.
C8+:T of rated programs are generally considered acceptable for children
8 years and over. There is no profanity, nudity or sexual content.
G: T of rated programs are generally suitable for all audiences.
PG: Parental Guidance Suggested -in of rated programs, some material
may not be suitable for children.
14+: In of rated programs, some content may not be suitable for viewers
under the age of 14.Parents are strongly cautioned not to have their children
view 14+ rated programs by pre-teens and early teens.
18: Adults Only-these types of rated programs are only for adult viewers only.
These types of programs are exempt from the rating system. Exempt
programming includes:
This type of programming is intended
hese types
hese types
these types
these types

DVD Features
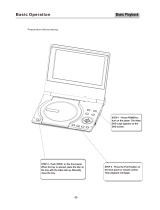
Basic Playback
Preparations
1. Press OPEN/CLOSE to open the disc tray,
place a disc in the disc tray.
There are two different disc sizes. Place the
disc in the correct guide on the disc tray. If the
disc is out of the guide, it may damage the disc
and cause the DVD player to malfunction.
Do not place a disc which is unplayable in this
DVD player.
2. Press OPEN/CLOSE to close the disc tray,
playback will automatically start.
3. Some discs may start playback with a menu. Use
the cursor buttons on the remote control to select
menu options and press PLAY/ENTER to start. You
may also press the digit buttons to select a menu
option directly. Many DVDs will not allow this during
start-up.
1. Press PAUSE/STEP to pause playback (still mode).
The sound will be muted during still mode.
2. Press PLAY/ENTER to resume normal playback.
Pause playback
1. Press STOP button to go to sto p mode, the TV
screen will show the start logo.
the player can recall the location where stopped,
such as DVDs and audio CDs.
2. Press PLAY/ENTER to resume playback from the
location where playback was stopped or from the
beginning of the disc.
3. Press STOP twice to stop
For some types of
discs
disc playback and not
memorize the location where playback was stopped
so next time, playback will start from the beginning of
the disc.
Stop playback
Previous and Next
Fast forward and Fast reverse
1. Press FWD to fast forward through the disc.
Each time the FWD button is pressed, the
fast forward motion speed changes.
2. Press PLAY/ENTER to resume normal playback.
3. Press REV to fast reverse through the disc.
Each time the REV button is pressed, the
fast reverse motion speed changes.
4. Press PLAY/ENTER to resume normal playback.
Basic playback
1. When paused, press PAUSE/STEP
2. Press PLAY/ENTER to resume normal playback.
repeatedly to
advance a single frame.
Single step playback
Some discs do not start automatically. Press
PLAY/ENTER to start playback.
During Playback, pressing the PREV key will
restart the current chapter and skip chapters
backwards with each subsequent press until the
start of the disc is reached.
Each press of NEXT key during playback will
skip the current chapter and play the next one.
Preparations
Press the DVD/TV button on the remote control or
the TV to enter the DVD mode.
Pause playback
Stop playback
Previous and Next
Fast forward and Fast reverse
Basic playback
Single step playback
Some discs do not start automatically. Press
PLAY/ENTER to start playback.

Advanced PlaybackAdvanced Playback
PROGRAM
REPEAT
Press " REPEAT " and Chapter repeat will be
displayed on screen, the second press will display
Title repeat, the third press will display All repeat,
the fourth press will cancel this function.
CAPTION
Press " SUBTITLE ", the screen will display "SUBTI-
TLE 01/XX XXXXX", "01" indicates the ordinal
number of this language; "XX" indicates total number
of languages; "XXXXXX" indicates the language of
country. (the number of languages depends on disc
). content
A-B
Press " A-B " to begin start-point, press again
to set an end point and complete setting. The
selected section A-B will be repeated. The third
press will cancel this function.
SEARCH
SLOW
D.MENU
Press this key to menu. (This
function will work with a DVD a multi-layer
menu.)
display DVD root
containing
ANGLE
When enjoying sports, concert or theatre, press this
key to watch same actions different angles.
(Valid for discs possessing this function. Using a disc
recorded in multi-angle you can view the scene from
different angles,for example,front, side, whole view
and exterior scene).
from
Press
such as: Audio 1/2: AC 3 2 CH English
Audio 2/2: AC 3 5.1 CH English
Press this button to cycle between Mono Left, Mono
Right, Mix-Mono and
the "DVD AUDIO" button repeatedly to change
the audio mode
Stereo sound output.
AUDIO
TITLE/PBC
For some DVD discs pressing this key will display
the title menu. You can then use the
buttons to select the item you prefer.
number
D.CALL
Advanced Playback
PROGRAM
REPEAT
SUBTITLE
A-B
Press " A-B " to begin start-point, press again
to set an end point and complete setting. The
selected section A-B will be repeated. The third
press will cancel this function.
SEARCH
SLOW
Press SLOW to play a disc in slow Each
time the SLOW button is pressed, the slow
motion speed changes.
Press PLAY/ENTER to resume normal playback;
Note: This function dose not work for CD and MP3.
motion.
D.MENU
ANGLE
AUDIO
TITLE/PBC
Pressing this key will cycle through "Title Elapsed",
"Title Remain", "Chapter Elapsed", "Chapter Remain"
and "Display off" on-screen information.
D.CALL
DVD Features(Continued)
ALL DESCRIBED FUNCTIONS ARE FOR DVD DISCS. IF YOU PLAY OTHER DISC
FORMAT S, THE OPERATION AND ON SCREEN DISPLAY WILL DIFFER.
IMPORTANT NOTE:
When playing a disc, press the "PROGRAM"
button to enter programmed playback menu. This
function allows you to choose the order in which
chapters / tracks are played. Once you have
selected the chapters / tracks, highlight "START"
on screen and press "PLAY/ENTER" to start
programmed playback.
Press the "SEARCH" button once to display the
search menu. Press the "SEARCH" button again
to enter the playback time you want to search for.
Use the number buttons to enter the time. Press
" PLAY/ENTER" button to confirm time search.

Special Function Playback
JPEG DISC PLAYBACK
MP3 PLAYBACK
SCREEN SAVER FUNCTION
When playing an MP3 disc, a navigation menu will be displayed automatically. In the menu, use UP
or DOWN cursor buttons to choose the folder, then press PLAY/ENTER to enter the folder. Use the
UP and DOWN cursor buttons to select the file and press PLAY/ENTER. Pressing the LEFT cursor
button will take you to the previous screen/menu.
This unit employs a screen saver mode to help protect the tube during static video pictures. This can
be turned off in the GENERAL SETUP menu.
When a disc containing standard JPEG picture files is inserted into the player, a
navigation menu will be displayed automatically. Use the UP and DOWN cursor
buttons to select a file then press PLAY/ENTER. The slide show will commence.
Press PREVIOUS or NEXT to move between pictures. Press pause to stop on the
current picture. Press PLAY/ENTER to resume normal playback.
A JPEG disc contains JPEG (.jpg) format picture information that can be decoded
by micro-computer software and displayed through the video output interface or on
the television screen.
This function has many applications. For example one can save files from a scanner
or digital camera in JPEG format, record these on a CD-R disc and present them
to an audience through this player.
The JPEG format is a convienient method to store images in a small amount of
memory space, and is ideal for archiving information.

DVD System Setup
DVD System Setup
SETUP
Navigating the General Setup Menu
1.Press the SETUP button, the
General Setup Page,Preference
Page will be displayed in turn.
2.Press CH+/- b to select, the
item, then press to enter the
submenu.
3.Press to change the
setting, then press PLAY/ENTER
to confirm your selection.
4.Press SETUP repeatedly to
exit the set-up menus.
or
or
..General Setup Page..
TV Display LB
Angle Mark On
OSD Lang ENG
Spdif Output
Caption On
Screen Saver Off
4 3:Ps
4 3:Lb
16 9
.
.
Parental
Password
Default
..Preference Page..
General Setup Menu
When using the DVD with the internal TV,
select 4 3 LB.
The following information applies only
when the DVD output is connected to an
external TV.
4 3/PS (PS = Pan and Scan)
You may select if you have a normal aspect
ratio (4:3) TV, although the NORMAL/LB
(letter box) is a more common choice. In PS
mode, widescreen material will fill the screen, but at the expense of chopping
off extreme left and right edges of the original film picture. For this feature to
work, the disc must be specially coded. Such discs are uncommon.
4 3/LB (LB = Letter Box)
You may select this if you have a normal aspect ratio (4:3) TV. Widescreen
material will be shown in pure unaltered form, allowing the entire picture area
of the original film to be viewed without any side cropping. Black bars will
appear above and below the picture.
16 9
You may select this if you have a widescreen (16:9) TV. Back bars may still
appear above and below the picture even if using a widescreen TV. This is
because some film directors prefer to use ultra widescreen aspect ratios e.g.
2.35:1. This will normally be indicated on the DVD packaging.
ASPECT RATIO DESCRIPTION
..General Setup Page..
TV Display LB
Angle Mark On
OSD Lang ENG
Spdif Output
Caption On
Screen Saver Off
4 3:Ps
4 3:Lb
16 9
.
.
PLAY/ENTER
SETUP
PLAY/ENTER
1 Kid Saf
2 G
3 Pg
4 Pg 13
5 Pgr
6 R
7 Nc17
8 Adult
/