Coemar Testa 1200 W Instructions Manual
- Category
- Projector lamps
- Type
- Instructions Manual

testa 1200 MSR
serial number
date of purchase
retailer
address
suburb
capital city
state
tel./fax
Please note, in the space provided above, the relative service information of the model and the retailer
from whom you purchased your testa 1200 MSR; this information will assist us in providing spare
parts, repairs, or answering any technical enquires with the utmost speed and accuracy.
ENGLISH

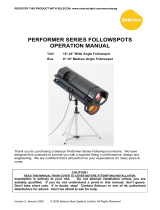
The testa 1200 MSR followspot is ideal for TV studios, concerts, theatres and discotheques. This leaflet is included
to give an advice on installation, use and maintenance to ensure the optimum performance for the life of the fol-
lowspot.
SPECIFICATION
The testa 1200 MSR is a compact followspot using the Philips 1200W MSR lamp and has a field angle of either
6°, 9° or 12° depending on the objective lens fitted. The testa 1200 MSR is suitable for throws from 15m up to
30m, and it is fitted with an iris and mechanical dimmer.
UNPACKING
* check for damage
Take care when unpacking that all the parts included in the box are undamaged. In case of tran-
sportation damage inform your forwarder in writing immediately.
* packing list
check that all of the following items are included in the box :
1 testa 1200 MSR
1 iris diaphragm
4 shutter blades
1 ballast testa 1200 MSR
* type of lamp
The testa 1200 MSR uses a new compact-arc discharge lamp produced by Philips. [MSR (Medium-Source Rare
earth) lamp base G22, 110000 lumens, 5600° K, 800 hrs, efficiency 91lm/w. Coemar code 105090)].
FITTING LAMP
iisolate luminaire from both poles of the main supply before opening
the surface temperature of the luminaire reaches 100° C after 5 minutes and has a
maximum steady-state temperature of 150° C.
Ensure the lamp is cold before attempting to remove it. The luminaire can only be opened 10 minutes
after mains supply disconnection.
* release the lamp tray
a captive screw fastener is fitted beneath the testa 1200 MSR to lock the lamp tray in position. Unscrew the knob
until is free, and gently pull it down to lower the lamp tray. As soon as the tray is released, the safety switch will
automatically disconnect both poles of the mains supply to the lamp.
* handle the lamp with care
Treat the MSR lamp with care: it operates with a high internal pressure and there is a slight risk of explosion if it is
used beyond its rated life of 800 hours. The lamp shouds be replaced after the period indicated. DO NOT touch the
quartz glass envelope of the lamp without using the protective cover provided.
* align the lamp correctly
The G22 lampholder is symmetrical which allows to easy fit the lamp. You may experience some difficulty in fitting
the lamp. Apply force on both sides of the lamp base evenly: never apply any force to the glass envelope of the
lamp.
* close the lamptray carefully
do not slam the lamptray when closing it: this can cause lamp filament damage.
* center the lamp
To center the lamp fix one of the M4 screws on the bottom of the lamp tray. (See figure)

ELECTRICAL CONNECTION
* prepare the cable with care
Heat and fire resistant mains cable, VDE approved which conforms to the latest international safety regula-
tion is fitted. Note: this cable may only be replaced with similar high-temperature cable (3x1,5 cable, 10
mm. external ø, voltage 300/500V, testing voltage 2KV, min/max temperature -40° +180°. Coemar stk.n.
CV5309).
* power requirements
The testa 1200 MSR requires a power supply capable of at least 15 Amps to accomodate the starting current.
After a few moments, this reduces to a steady-state current of 8.5 Amps. The power factor is 0.6
*wiring the ballast unit
The ballast unit is supplied with a fix mains cable, and this should be connected to the mains supply using a suitably-
rated plug. Ensure that the earth connection is correctly terminated. The testa 1200 MSR can be used only with
the ballast supplied.
* frequency switch
The ballast is fitted with a switch to select the frequency of the mains supply, and it should be checked to ensure the
correct setting. If the followspot is used with the switch in the wrong position, power to the lamp will be increased
or reduced by about 20%, and the lamp life will shorten considerably.
INSTALLATION
There are several operator-adjustable features which should be checked before the testa 1200
MSR is used.
* lamp
The beam quality is directly related to the position of the arc in the optical system. If the lamp is slightly off-centre, the
beam can appear patchy and discoloured, and the operation of the iris and dimmer is impeded. To adjust the
lamp, switch on the followspot to full power, and wait until the lamp has reached full brightness (about 5 minutes).
Direct the beam onto a flat surface about 8/10 metres from the spotlight. Move the lens to the rear, so that the
beam is completely out of focus. Reduce the iris to about half. The arc will be seen as a single bar, and this should
be in the centre of the beam. If this is not the case, adjust the position of the lampholder by loosening or tightening
each of the two M4 Allen screws under the lampholder pod until the arc is correctly centred.
* tilt friction
The stirrup is fitted with fixing screws on both sides. One of them is a large T-bar knob which used to lock the spotli-
ght in place. The corresponding screw on the other side is pre-set to give to the followspot the tilt movement of +/-
45°
* balance
The point of balance is variable on the testa 1200 MSR to take account of the addition of a colour change unit
on the front. To re-balance the spotlight, first ensure that the body is locked in a horizontal position by tightening
the T-bar knob and also the pan movement of the stand. Using a 17mm ring spanner, loosen the two pivot bolts
until the body is free to move in the guide slots. Take care that the spotlight is supported, as it may be necessary to
move the fixing across the gap at the gate between the two body sections, and if the spotlight is not properly sup-
ported it could prove too heavy to hold. Adjust the position of the pivot, slacken the tilt lock and check for balance.
Repeat the process until the best balance point is achieved. Re-tighten the pivot bolts, ensuring that they are both
fully tightened.
* pan movement
The friction for the pan movement is set by the main clamp beneath the height locking ring.
* mounting on tripod
The testa 1200 MSR is supplied with a spigot adaptor which is bolted onto the mounting stirrup. The stirrup is
designed to give a smooth and positive up/down movement. The pan movement (left/right) relies on the middle

joint of the tripod stand, and we therefore strongly recommend the use of the Coemar Followspot Stand (code n.
8002) which incorporates a neoprene collar to give a smooth pan movement.
Before to place the testa 1200 MSR on its stand, ensure that the tripod legs are fully extended, and locked into a
stable position. Then raise the central tube until it is at the height required by the followspot operator. Lock the collar
onto the tube so that the tube is free to rotate on the neoprene washer at the top of the main clamp block. The
testa 1200 MSR should be mounted on the tripod with the spigot locked into the first tube, so that the pan
movement is regulated by the friction provided by the main clamp block.
* eliminate fire hazard
please remember that any theatre luminaire produces heat, and therefore it must be located in a
well-ventilated position. Minimum distance from flammable materials: 0,5 m. Minimum distance
between light source and object: 4 m.
OPERATION
* switch on/standby
A three-position switch at the rear of the followspot selects full power, half power or off. Full
power should be selected only whilst the spotlight is in use; during dormant periods half
power is recommended to reduce internal temperatures and to extend the life of the iris and
dimmer. Between periods of use, close the dimmer fully, open the iris, and switch to the 50%
standby position. Switch back to full power just before the cue. The testa 1200 MSR boosts to full power istanta-
neously and silently. The cooling fan is powered directly from the ballast, so that whenever power is applied to the
ballast, the fan is running whether the lamp is ignited or not. It is advisable to keep the fan running for a short
period after the lamp has been extinguished to assist the cooling cycle.
* ballast
The ballast may be situated wherever it is convenient; providing there is sufficient ventilation, and that the cable
between the spotlight and ballast allows sufficient movement for the followspot.
* focus
Followspots are used either with a sharp or a soft edge. Adjust both knobs located at each side of the lens tube in
order to obtain a correct focus of the beam.
* iris
The iris is included to reduce the diameter of the spot whilst maintaining the same intensity of illumination. The iris is
fitted with a long lever for smooth variations in beam diameter whilst the spot is moving. The iris and dimmer con-
trols operate in the same direction, and can be used together for a subtle move-closedown-dim action. If the iris is
reduced to its smallest diameter at the end of a cue, close the dimmer fully (blackout) and re-open the iris to reduce
the risk of damage to the iris leaves through overheating.
* dimmer
The mechanical dimmer is a black-out iris placed in a non-focused point of the optical path. The dimmer provides a
smooth dim, with a constant colour temperature, from full power to blackout. The control is placed so that it can be
used in conjunction with the iris control.
* zoom lens
The testa 1200 MSR is fitted with two high definition lenses which allow to vary the beam angle from 6° to
11,5°. Loosen knobs located on the right side of the followspot and set the beam angle required.
* colour changer
An optional 5 colours colour change unit is fitted with a device which automatically releases the colour selected.
Before fitting it, make sure that the tilt lock is tight to prevent the extra weight of the colour unit from making the
balance unstable. Fit the colour unit into the guide slots located on the front part of the followspot and ensure that
it is locked by the fixing clips.
* filters
Each colour frame takes a circular piece of colour filter 150mm in diameter. A high temperature filter such as Rosco
4 m

SuperGel is recommended. Filter should be added or exchanged when the colour unit is removed from the spotli-
ght. Push all the frames into the housing except the one to be re-coloured. Taking a screwdriver, remove two of the
clips, and slacken the third clip. The piece of filter is then sandwiched between the two support rings, and the filter
and rings are replaced and held in position by three clips. Note: the rings can be used as templates to cut the filter
to the exact size.
* re-balancing
Depending on the position of the pivot point before and after the colour unit is fitted, the testa 1200 MSR will be
either balanced or front-heavy. To correct the balance point, refer to the notes on balancing given in these instruc-
tions leaflet.
ROUTINE MAINTENANCE
* safety
Every effort has been made to ensure the safe operation of the testa 1200 MSR followspot. However, it is always
important to observe safety precautions when using this equipment.
- Shields and lenses shall be changed if they have become visibly damaged to such an extent that their effectiveness
is impaired, for example by cracks or deep scratches
- Tha lamp shall be changed if it has become damaged or thermally deformed
- Check the movement of shutter blades (if fitted) and replace when necessary.
- Check the electrical connection regularly, in particular the earth connection
- Check for any damage. If needed, replace any damaged components
LAMP LIST
The testa 1200 MSR followspot will accept only a Philips 1200 MSR lamp with G22 base lamp (Coemar code
105090).
SPARE PARTS
All parts for the testa 1200 MSR are available on request.
Coemar reserves the right to effect modifications without notification.
instruction manual
testa 1200 MSR
-
 1
1
-
 2
2
-
 3
3
-
 4
4
-
 5
5


Coemar Testa 1200 W Instructions Manual
- Category
- Projector lamps
- Type
- Instructions Manual
Ask a question and I''ll find the answer in the document
Finding information in a document is now easier with AI
Related papers
-
Coemar Testa 2500 W Instructions Manual
-
-
-
-
-
-
-
-
-
Other documents
-
Chauvet Professional Followspot Quick start guide
-
Chauvet Professional 1200 User manual
-
-
 Simple Designs LF1014-WHT Operating instructions
-
 Simple Designs Home LF1014-BLK Installation guide
-
Martin MAC III Profile User manual
-
 BSS Audio MSR-602 Series User manual
-
Martin MAC III PERFORMANCE User manual
-
 Selecon rua Operating instructions
-
SHOWTEC Followspot LED 120W User manual


