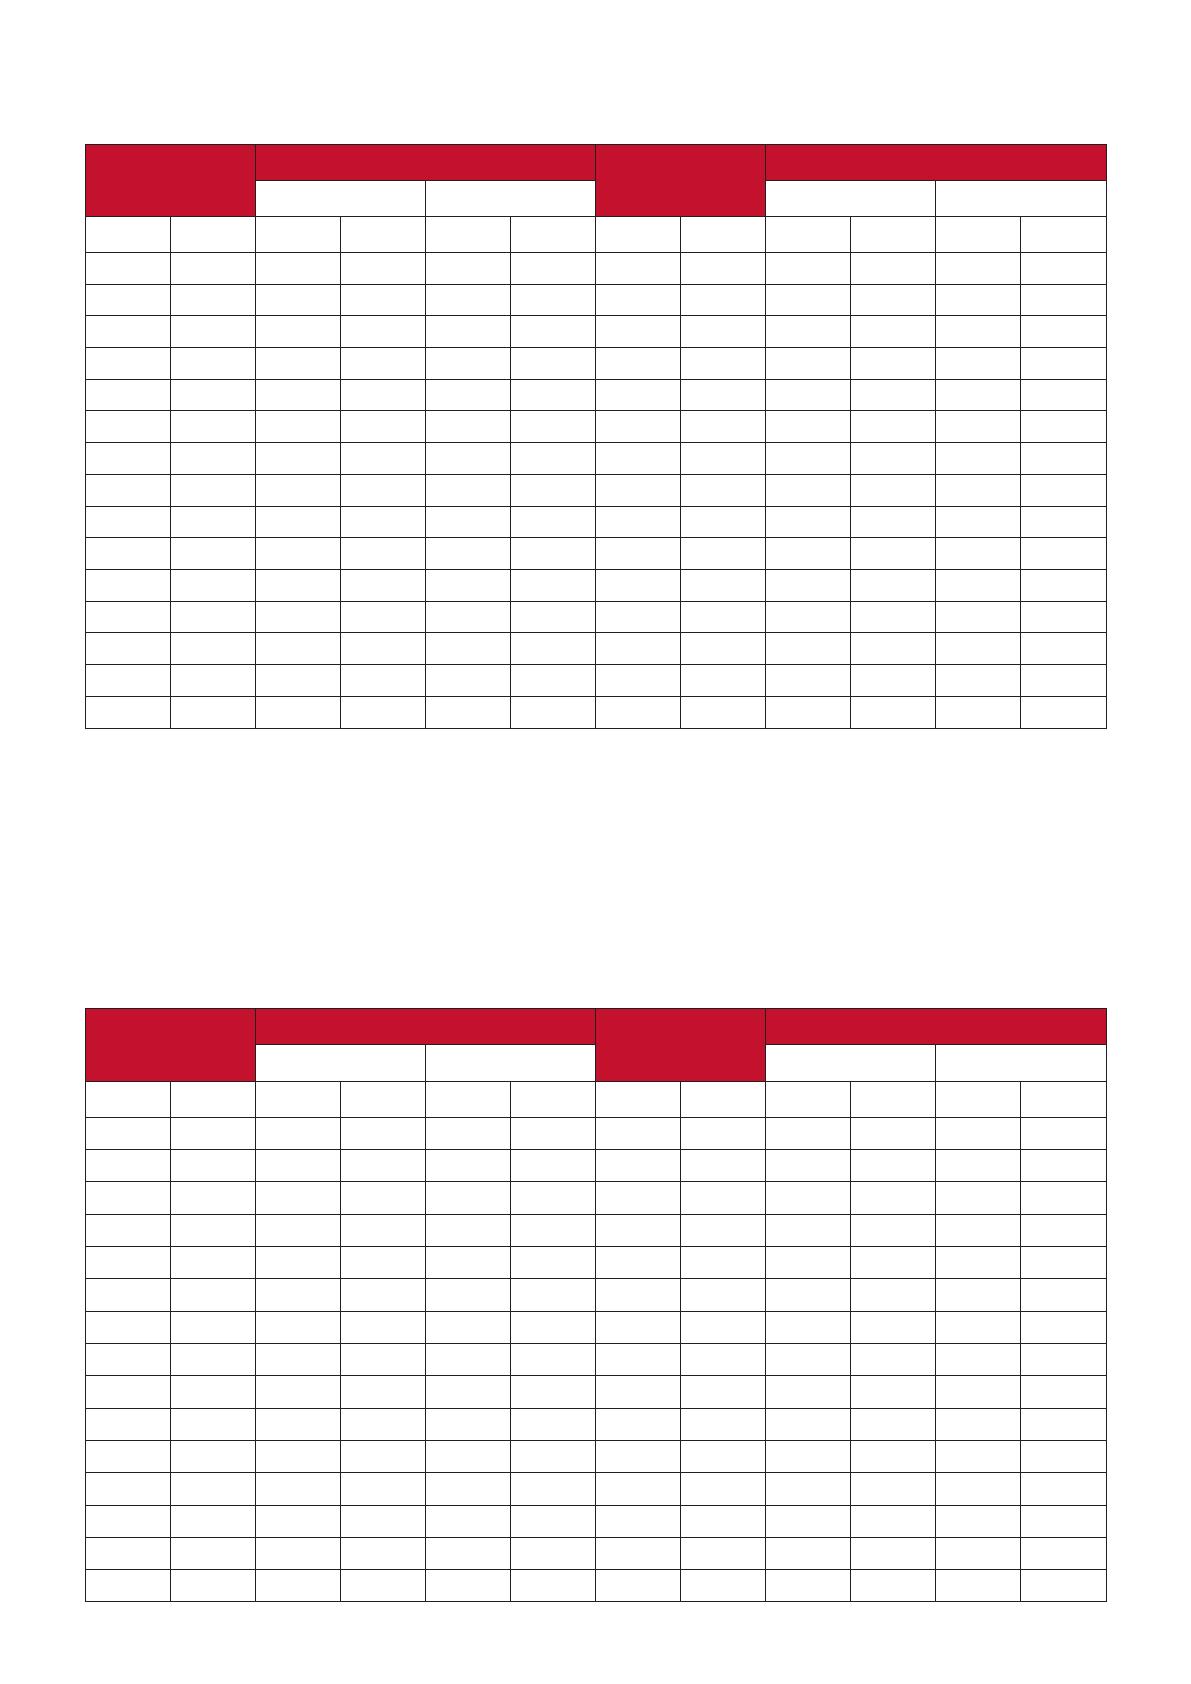
ViewSonic PX748-4K User manual

Category
Data projectors
Type
User manual

This manual is also suitable for

PX701-4K/PX728-4K/PX748-4K
Projector
User Guide
Model No. VS18244/VS18338/VS18339
Model Name: PX701-4K/PX728-4K/PX748-4K
IMPORTANT: Please read this User Guide to obtain important information on installing and using your product
in a safe manner, as well as registering your product for future service. Warranty information contained in this
User Guide will describe your limited coverage from ViewSonic Corporation, which is also found on our web site at
http://www.viewsonic.com in English, or in specific languages using the Regional selection box in the upper right
corner of our website. “Antes de operar su equipo lea cu idadosamente las instrucciones en este manual”
2
Thank you for choosing ViewSonic®
As a world-leading provider of visual solutions, ViewSonic® is dedicated to exceeding
the world’s expectations for technological evolution, innovation, and simplicity.
At ViewSonic®, we believe that our products have the potential to make a positive
impact in the world, and we are confident that the ViewSonic® product you have
chosen will serve you well.
Once again, thank you for choosing ViewSonic®!
3
Safety Precauons
Please read the following Safety Precautions before you start using the projector.
Keep this user guide in a safe place for later reference.
Read all warnings and follow all instrucons.
Allow at least 20“ (50 cm) clearance around the projector to ensure proper
venlaon.
Place the projector in a well-venlated area. Do not place anything on the
projector that prevents heat dissipaon.
Do not place the projector on an uneven or unstable surface. The projector may
fall over, causing personal injury or projector malfuncon.
Do not use if the projector is lted at an angle of more than 10° degrees le or
right, nor at an angle of more than 15° degrees forwards or backwards.
Do not look straight at the projector lens during operaon. The intense light
beam may damage your eyes.
Do not block the projecon lens with any objects when the projector is under
operaon as this could cause objects to become heated and deformed or even
cause a re.
Do not aempt to disassemble the projector. There are dangerous high voltages
inside which may cause death if you should come into contact with live parts.
When moving the projector, be careful not to drop or bump the projector on
anything.
Do not place any heavy objects on the projector or connecon cables.
Do not stand the projector on end vercally. Doing so may cause the projector to
fall over, causing personal injury or projector malfuncon.
Avoid exposing the projector to direct sunlight or other sources of sustained
heat. Do not install near any heat sources such as radiators, heat registers,
stoves, or other devices (including ampliers) that may increase the temperature
of the projector to dangerous levels.
Do not place liquids near or on the projector. Liquids spilled into the projector
may cause it to fail. If the projector does become wet, disconnect it from the
power supply and call your local service center to have the projector serviced.
When the projector is under operaon, you may sense some heated air and odor
from its venlaon grill. It is a normal operaon and not a defect.
4
Do not aempt to circumvent the safety provisions of the polarized or
grounding-type plug. A polarized plug has two blades with one wider than the
other. A grounding-type plug has two blades and a third grounding prong. The
wide and third blade are provided for your safety. If the plug does not t into
your outlet, obtain an adapter and do not aempt to force the plug into the
outlet.
When connecng to a power outlet, DO NOT remove the grounding prong.
Please ensure grounding prongs are NEVER REMOVED.
Protect the power cord from being treaded upon or pinched, parcularly at the
plug, and at the point where it emerges from the projector.
In some countries, the voltage is NOT stable. This projector is designed to
operate safely within a voltage between 100 to 240 volts AC, but could fail if
power cuts or surges of ±10 volts occur. In areas where voltage may uctuate
or cut out, it is recommended that you connect your projector through a power
stabilizer, surge protector, or uninterruptable power supply (UPS).
If smoke, an abnormal noise, or a strange odor is present, immediately switch
the projector o and call your dealer or ViewSonic®. It is dangerous to connue
using the projector.
Use only aachments/accessories specied by the manufacturer.
Disconnect the power cord from the AC outlet if the projector is not being used
for a long period of me.
Refer all servicing to qualied service personnel.
CAUTION: Possibly hazardous optical radiation is emitted from this product. As
with any bright light source, do not stare into the beam, RG2 IEC 62471-
5:2015
5
Contents
Introduction ................................................................ 6
Product Overview ............................................................................................ 7
Projector ........................................................................................................... 7
Controls and Functions ............................................................................................ 7
Connection Ports..................................................................................................... 8
Remote Control................................................................................................. 9
Controls and Functions ............................................................................................ 9
Remote Control Effective Range ............................................................................ 11
Replacing the Remote Control Batteries ................................................................ 11
Choosing a Location ........................................................................................12
Initial Setup ............................................................... 12
Projection Dimensions ....................................................................................13
PX701-4K .........................................................................................................13
16:9 Image on a 16:9 Screen .................................................................................. 13
16:9 Image on a 4:3 Screen .................................................................................... 14
PX728-4K/PX748-4K .........................................................................................14
16:9 Image on a 16:9 Screen .................................................................................. 14
16:9 Image on a 4:3 Screen .................................................................................... 15
Mounting the Projector ..................................................................................16
Preventing Unauthorized Use .........................................................................17
Using the Security Slot .....................................................................................17
Using the Password Function ...........................................................................18
Setting a Password ................................................................................................ 18
Changing the Password ......................................................................................... 19
Disabling the Password Function ........................................................................... 19
Forgetting the Password ....................................................................................... 20
Password Recall Procedure ................................................................................... 20
Locking the Control Keys ..................................................................................21
Connecting to Power ............................................................................................22
6
Making Connections .................................................. 22
Connecting to Video/Computer Sources ..............................................................23
HDMI Connection .................................................................................................. 23
Connecting to Audio .............................................................................................23
Turning the Projector On/Off ...............................................................................25
Starting Up the Projector ...................................................................................... 25
First Time Activation ................................................................................................... 25
Operation .................................................................. 25
Shutting Down the Projector ................................................................................. 26
Selecting an Input Source .....................................................................................27
Adjusting the Projected Image .............................................................................28
Adjusting the Projector's Height and Projection Angle ............................................... 28
Auto-Adjusting the Image ........................................................................................... 28
Fine-Tuning the Image Size and Clarity ................................................................. 28
Correcting Keystone .............................................................................................. 29
Adjusting 4 corners ............................................................................................... 30
Hiding the Image ..................................................................................................30
Controlling the Projector through a LAN Environment ........................................31
Configuring the LAN Control Settings .................................................................... 31
General On-Screen Display (OSD) Menu Operation .........................................33
Menu Functions ........................................................ 33
On-Screen Display (OSD) Menu Tree .................................................................... 34
DISPLAY Menu ......................................................................................................40
IMAGE Menu ........................................................................................................43
POWER MANAGEMENT Menu .............................................................................47
BASIC Menu ..........................................................................................................49
ADVANCED Menu .................................................................................................52
SYSTEM Menu .......................................................................................................57
INFORMATION Menu ...........................................................................................59
Specifications .................................................................... .................................... 60
7
Appendix ................................................................... 60
Projector Dimensions ............................................................................................ 61
Timing Chart .........................................................................................................61
HDMI (PC) .............................................................................................................. 61
HDMI (Video) ......................................................................................................... 62
Troubleshooting ...................................................................................................64
Common Problems ................................................................................................ 64
LED Indicators ........................................................................................................ 65
Maintenance.........................................................................................................66
General Precautions .............................................................................................. 66
Cleaning the Lens .................................................................................................. 66
Cleaning the Case .................................................................................................. 66
Storing the Projector ............................................................................................. 66
Disclaimer .............................................................................................................. 66
Light Source Information ......................................................................................67
Light Source Hour .................................................................................................. 67
Extending Light Source Life ................................................................................... 67
Light Source Replacement Timing ......................................................................... 68
Replacing the Light Source .................................................................................... 68
8
Package Contents
(For PX728-4K/PX748-4K)
NOTE: The power cord and video cables included in your package may vary depending
on your country. Please contact your local reseller for more informaon.
Introduction
9
Product Overview
Projector
Controls and Functions
EXIT
MENU
SOURCE
BLANK
MODE
COLOR
Power Indicator
Light
Temperature Indicator Light
Light Source Indicator Light
Focus Ring
Zoom Ring
Projection Lens
Vent (heated air
exhaust)
Remote IR sensor
Key Description
[ ] Power
Toggles the projector between standby mode and Power On.
[ / / / ] Keystone
Keys
Manually corrects distorted images resulting from an angled
projection.
[ / / / ]
Left/Right/Up/Down
Selects the desired menu items and makes adjustments
when the On-Screen Display (OSD) Menu is activated.
Menu/Exit Turns on or off the On-Screen Display (OSD) Menu.
Source Displays the input source selection bar.
Blank Hides the screen picture.
Enter Enacts the selected On-Screen Display (OSD) Menu item
when the OSD Menu is activated.
[ ] Corner Adjustment
Displays the Corner Adj. menu.
Color Mode Displays the color mode selection bar.
10
Connection Ports
PX701-4K
PX728-4K /
PX748-4K
HDMI 1
HDCP2.2
HDMI
2
HDCP2
.2
RS-232
AUDIO OUT
USB 5V/1.5A OUT
(Service)
HDMI 1
HDCP2.2
HDMI 2
HDCP2.2
RS-232 RJ45AUDIO OUT
USB-C
USB 5V/1.5A OUT
(Service)12V OUT
HDMI 1
HDCP2.2
HDMI 2
HDCP2.2
RS-232AUDIO OUT
USB 5V/1.5A OUT
(Service)
3
2 3 4
5
6 7 8
2
1
5
1
7
AC Power Cord Inlet
Ceiling Mount Holes
Security Slot
Security Bar
Adjuster Foot
Port Description
[1] AUDIO OUT Audio signal output socket.
[2] HDMI 1 HDMI port.
[3] HDMI 2 HDMI port.
[4] USB-C USB-C port.
[5] RS-232 RS-232 control port.
[6] 12V OUT 12V DC output terminal.
[7] USB 5V/1.5A OUT (Service) USB Type A port for power supply.
[8] RJ-45 LAN port.
11
Remote Control
Controls and Functions
PX701-4K
Button Description
On/ Off
Toggles between standby
mode and Power On.
COMP
Not available.
VIDEO
Not available.
HDMI
Selects the source from
the HDMI 1 or HDMI 2
port for display. Press this
button again to switch
between the two (2) ports.
Auto Sync
Automatically determines
the best picture timings
for the displayed image.
Source
Displays the source
selection bar.
[ / ]
Keystone Keys
Manually corrects
distorted images resulting
from an angled projection.
Enter
Enacts the selected OSD
Menu item.
Button Description
Left/ Right
Up/ Down
Selects the desired
menu items and makes
adjustments.
Menu
Turns on/off the On-
Screen Display (OSD)
Menu or goes back to
previous OSD Menu.
(INFORMATION)
Displays the
INFORMATION menu.
Exit
Exits and saves menu
settings.
Aspect
Displays the aspect ratio
selection bar.
Freeze
Freezes the projected
image.
Pattern
Displays embedded test
pattern.
Blank
Hides the screen picture.
PgUp (Page
Up)/
PgDn (Page
Down)
Operates your display
software program
(on a connected PC) which
responds to
page up/down commands
(like Microsoft
PowerPoint).
NOTE: Only available
when a PC input
signal is selected.
Eco Mode
Selects the Eco mode.
(Volume
Up)
Increases the volume level.
(Volume
Down)
Decreases the volume
level.
(Mute)
Toggles audio between on
and off.
Magnifies the projected
picture size.
Reduces the projected
picture size.
Color Mode
Displays the color mode
selection bar.
12
PX728-4K / PX748-4K
On Off
HDMI 1 HDMI 2COMP
Source
Pattern
Brightness
Contrast
Aspect
Color
Temp
Eco
Mode
StandardGaming Sports
MovieUser
Blank
3D
Auto
Sync
ID Set1 2
345
678
Button Description
On/ Off
Toggles between standby
mode and Power On.
COMP
Not available.
HDMI 1
Selects the source from the
HDMI 1 port for display.
HDMI 2
Selects the source from the
HDMI 2 port for display.
Auto Sync
Automatically determines
the best picture timings for
the displayed image.
Source
Displays the source
selection bar.
[ / / / ]
Keystone Keys
Manually corrects distorted
images resulting from an
angled projection.
Enter
Enacts the selected OSD
Menu item.
(Corner
Adjustment)
Displays the Corner Adj.
menu.
Button Description
Left/ Right
Up/ Down
Selects the desired
menu items and makes
adjustments.
Menu
Turns on/off the On-Screen
Display (OSD) Menu or
goes back to previous OSD
Menu.
(INFORMATION)
Displays the INFORMATION
menu.
Exit
Exits and saves menu
settings.
Aspect
Displays the aspect ratio
selection bar.
Pattern
Displays embedded test
pattern.
Blank
Hides the screen picture.
3D
Displays the 3D menu.
NOTE: Only available for
selected models.
(Volume Up)
Increases the volume level.
(Volume
Down)
Decreases the volume
level.
(Mute)
Toggles audio between on
and off.
Brightness
Displays the brightness
adjustment bar.
Contrast
Displays the contrast
adjustment bar.
Color Temp
Displays the color
temperature selection
menu.
Gaming Selects the Gaming mode.
Standard Selects the Standard
mode.
Sports Selects the Sports mode.
Eco Mode
Selects the Eco mode.
Movie
Selects the
Movie (Rec.709) mode.
User
Selects the User 1 or User 2
mode.
13
Remote Control Effective Range
To ensure proper function of the remote control
follow the steps below:
1. The remote control must be held at an angle
within 30° perpendicular to the projector’s IR
remote control sensor(s).
2. The distance between the remote control and
the sensor(s) should not exceed 8 m (26 ft.)
NOTE: Refer to the illustration for the location of
the infrared (IR) remote control sensor(s).
Approx. 30°
Replacing the Remote Control Batteries
1. Remove the battery cover from the rear of the remote control by pressing the
finger grip and sliding it down.
2. Remove any existing batteries (if necessary) and install two AAA batteries.
NOTE: Observe the battery’s polarities as indicated.
3. Replace the battery cover by aligning it with the base and pushing it back into
position.
NOTE:
Avoid leaving the remote control and batteries in excessive heat or a humid
environment.
Replace only with the same or equivalent type recommended by the battery
manufacturer.
Dispose of the used batteries according to the manufacturer’s instructions and
local environment regulations for your region.
If the batteries are drained or if you will not be using the remote control for an
extended period of time, remove the batteries to avoid damage to the remote
control.
14
Initial Setup
This section provides detailed instructions for setting up your projector.
Choosing a Location
Personal preference and room layout will decide the installation location. Consider
the following:
Size and Position of your screen.
Location of a suitable power outlet.
Location and Distance between the projector and other equipment.
The projector is designed to be installed in one of the following locations:
1. Front
The projector is placed near the floor in
front of the screen.
2. Front Ceiling
The projector is suspeneded upside-
down from the ceiling in front of the
screen.
3. Rear Ceiling
The projector is suspended upside-down
from the ceiling behind the screen.
NOTE: A special rear projection screen
is required.
4. Rear
The projector is placed near the floor
behind the screen.
NOTE: A special rear projection screen
is required.
15
Projection Dimensions
NOTE: See “Specifications” on page 62 for the native display resolution of this
projector.
16:9 Image on a 16:9 Screen
(a)
(d)
(c)
(b)
(e)
(f)
(a)
(c)
(b)
(e)
(f)
(d)
16:9 Image on a 4:3 Screen
(a)
(c)
(b)
(e)
(f)
(d)
(a)
(c)
(b)
(e)
(f)
(d)
NOTE: (e) = Screen / (f) = Center of Lens
PX701-4K
16:9 Image on a 16:9 Screen
(a) Screen
Size
(b) Projection Distance (c) Image
Height
(d) Vertical Offset
minimum maximum minimum maximum
in. mm in. mm in. mm in. mm in. mm in. mm
60 1524 79 1996 86 2195 29 747 35 897 35.3 897
70 1778 92 2328 101 2561 34 872 41 1046 41.2 1046
80 2032 105 2661 115 2927 39 996 47 1195 47.1 1195
90 2286 118 2994 130 3293 44 1121 53 1345 52.9 1345
100 2540 131 3326 144 3659 49 1245 59 1494 58.8 1494
110 2794 144 3659 158 4025 54 1370 65 1644 64.7 1644
120 3048 157 3992 173 4391 59 1494 71 1793 70.6 1793
130 3302 170 4324 187 4757 64 1619 76 1943 76.5 1943
140 3556 183 4657 202 5123 69 1743 82 2092 82.4 2092
150 3810 196 4989 216 5488 74 1868 88 2241 88.2 2241
160 4064 210 5322 230 5854 78 1992 94 2391 94.1 2391
170 4318 223 5655 245 6220 83 2117 100 2540 100.0 2540
180 4572 236 5987 259 6586 88 2241 106 2690 105.9 2690
190 4826 249 6320 274 6952 93 2366 112 2839 111.8 2839
200 5080 262 6653 288 7318 98 2491 118 2989 117.7 2989
16
16:9 Image on a 4:3 Screen
(a) Screen
Size
(b) Projection Distance (c) Image
Height
(d) Vertical Offset
minimum maximum minimum maximum
in. mm in. mm in. mm in. mm in. mm in. mm
60 1524 72 1832 79 2015 27 686 32 823 32 823
70 1778 84 2137 93 2351 32 800 38 960 38 960
80 2032 96 2443 106 2687 36 914 43 1097 43 1097
90 2286 108 2748 119 3023 41 1029 49 1234 49 1234
100 2540 120 3053 132 3358 45 1143 54 1372 54 1372
110 2794 132 3358 145 3694 50 1257 59 1509 59 1509
120 3048 144 3664 159 4030 54 1372 65 1646 65 1646
130 3302 156 3969 172 4366 59 1486 70 1783 70 1783
140 3556 168 4274 185 4702 63 1600 76 1920 76 1920
150 3810 180 4580 198 5038 68 1715 81 2057 81 2057
160 4064 192 4885 212 5374 72 1829 86 2195 86 2195
170 4318 204 5190 225 5709 77 1943 92 2332 92 2332
180 4572 216 5496 238 6045 81 2057 97 2469 97 2469
190 4826 228 5801 251 6381 86 2172 103 2606 103 2606
200 5080 240 6106 264 6717 90 2286 108 2743 108 2743
NOTE: There is a 3% tolerance among these numbers due to optical component
variations. It is recommended to physically test the projection size and
distance before permanently installing the projector.
PX728-4K/PX748-4K
16:9 Image on a 16:9 Screen
(a) Screen
Size
(b) Projection Distance (c) Image
Height
(d) Vertical Offset
minimum maximum minimum maximum
in. mm in. mm in. mm in. mm in. mm in. mm
60 1524 59 1497 77 1946 29 747 35 897 35.3 897
70 1778 69 1746 89 2270 34 872 41 1046 41.2 1046
80 2032 79 1996 102 2595 39 996 47 1195 47.1 1195
90 2286 88 2245 115 2919 44 1121 53 1345 52.9 1345
100 2540 98 2495 128 3243 49 1245 59 1494 58.8 1494
110 2794 108 2744 140 3567 54 1370 65 1644 64.7 1644
120 3048 118 2994 153 3892 59 1494 71 1793 70.6 1793
130 3302 128 3243 166 4216 64 1619 76 1943 76.5 1943
140 3556 138 3493 179 4540 69 1743 82 2092 82.4 2092
150 3810 147 3742 192 4865 74 1868 88 2241 88.2 2241
160 4064 157 3992 204 5189 78 1992 94 2391 94.1 2391
170 4318 167 4241 217 5513 83 2117 100 2540 100.0 2540
180 4572 177 4491 230 5838 88 2241 106 2690 105.9 2690
190 4826 187 4740 243 6162 93 2366 112 2839 111.8 2839
200 5080 196 4989 255 6486 98 2491 118 2989 117.7 2989
17
16:9 Image on a 4:3 Screen
(a) Screen
Size
(b) Projection Distance (c) Image
Height
(d) Vertical Offset
minimum maximum minimum maximum
in. mm in. mm in. mm in. mm in. mm in. mm
60 1524 54 1374 70 1786 27 686 32 823 32 823
70 1778 63 1603 82 2084 32 800 38 960 38 960
80 2032 72 1832 94 2381 36 914 43 1097 43 1097
90 2286 81 2061 105 2679 41 1029 49 1234 49 1234
100 2540 90 2290 117 2977 45 1143 54 1372 54 1372
110 2794 99 2519 129 3275 50 1257 59 1509 59 1509
120 3048 108 2748 141 3572 54 1372 65 1646 65 1646
130 3302 117 2977 152 3870 59 1486 70 1783 70 1783
140 3556 126 3206 164 4168 63 1600 76 1920 76 1920
150 3810 135 3435 176 4465 68 1715 81 2057 81 2057
160 4064 144 3664 188 4763 72 1829 86 2195 86 2195
170 4318 153 3893 199 5061 77 1943 92 2332 92 2332
180 4572 162 4122 211 5358 81 2057 97 2469 97 2469
190 4826 171 4351 223 5656 86 2172 103 2606 103 2606
200 5080 180 4580 234 5954 90 2286 108 2743 108 2743
NOTE: There is a 3% tolerance among these numbers due to optical component
variations. It is recommended to physically test the projection size and
distance before permanently installing the projector.
18
Mounting the Projector
NOTE: If you buy a third-party mount, please use the correct screw size. Screw size
can vary depending on the thickness of the mounting plate.
1. To ensure the most secure installation, please use a ViewSonic® wall or ceiling
mount.
2. Ensure the screws used to attach a mount to the projector meet the following
specifications:
Screw type: M4 x 8
Maximum Screw length: 8 mm
65.89
65.89
113.54 60.01
NOTE:
Avoid installing the projector near a heat source.
Keep at least a 10 cm gap between the ceiling and the bottom of the
projector.
19
Preventing Unauthorized Use
The projector has several built-in security features to prevent theft, access, or
accidental setting changes.
Using the Security Slot
To help prevent the projector from being stolen, use a security slot locking device
to secure the projector to a fixed object.
Below is an example of setting up a security slot locking device:
HDMI 1
HDC
P
2.2
HDMI 2
HDCP2.2
RS-232
AUDIO OUT
USB 5V/1.5A OUT
(Service)
NOTE: The security slot can also be used as a safety anchor if the projector is
mounted to the ceiling.
20
Using the Password Function
To help prevent unauthorized access or use, the projector offers a password
security option. The password can be set through the On-Screen Display (OSD)
Menu.
NOTE: Make note of your password, and keep it in a safe place.
Setting a Password
1. Press Menu to open the OSD Menu and go to: SYSTEM > Security Settings and
press Enter.
2. Highlight Power On Lock and select
On by pressing / .
3. As pictured to the right, the four
arrow keys ( , , , ) represent
4 digits (1, 2, 3, 4). Press the arrow
keys to enter a six digit password.
5. Confirm the new password by re-entering the new password. Once the password
is set, the OSD Menu will return to the Security Settings page.
6. Press Exit to leave the OSD Menu.
NOTE: Once set, the correct password must be entered every time the projector is
started.
  • Page 1 1
  • Page 2 2
  • Page 3 3
  • Page 4 4
  • Page 5 5
  • Page 6 6
  • Page 7 7
  • Page 8 8
  • Page 9 9
  • Page 10 10
  • Page 11 11
  • Page 12 12
  • Page 13 13
  • Page 14 14
  • Page 15 15
  • Page 16 16
  • Page 17 17
  • Page 18 18
  • Page 19 19
  • Page 20 20
  • Page 21 21
  • Page 22 22
  • Page 23 23
  • Page 24 24
  • Page 25 25
  • Page 26 26
  • Page 27 27
  • Page 28 28
  • Page 29 29
  • Page 30 30
  • Page 31 31
  • Page 32 32
  • Page 33 33
  • Page 34 34
  • Page 35 35
  • Page 36 36
  • Page 37 37
  • Page 38 38
  • Page 39 39
  • Page 40 40
  • Page 41 41
  • Page 42 42
  • Page 43 43
  • Page 44 44
  • Page 45 45
  • Page 46 46
  • Page 47 47
  • Page 48 48
  • Page 49 49
  • Page 50 50
  • Page 51 51
  • Page 52 52
  • Page 53 53
  • Page 54 54
  • Page 55 55
  • Page 56 56
  • Page 57 57
  • Page 58 58
  • Page 59 59
  • Page 60 60
  • Page 61 61
  • Page 62 62
  • Page 63 63
  • Page 64 64
  • Page 65 65
  • Page 66 66
  • Page 67 67
  • Page 68 68
  • Page 69 69
  • Page 70 70
  • Page 71 71
  • Page 72 72
  • Page 73 73
  • Page 74 74
  • Page 75 75
  • Page 76 76
  • Page 77 77
  • Page 78 78
  • Page 79 79
  • Page 80 80
  • Page 81 81
  • Page 82 82
  • Page 83 83
  • Page 84 84

ViewSonic PX748-4K User manual

Category
Data projectors
Type
User manual
This manual is also suitable for

Ask a question and I''ll find the answer in the document

Finding information in a document is now easier with AI