
KDV-7241
DVD-RECEIVER
INSTRUCTION MANUAL
DVD-RECEIVER
BEDIENUNGSANLEITUNG
RECEPTOR DVD
MANUAL DE INSTRUCCIONES
© B64-4221-08/03 LVT1912-001A (E)

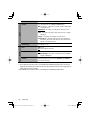
2 | KDV-7241
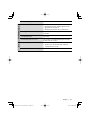
Before use 3
Playable disc type 6
Before operating the unit 7
Basic operations
— Control panel
9
Basic operations
— Remote controller 10
Main elements and features
Listening to the radio 12
When an FM stereo broadcast is hard to receive
Tuning in to stations with sufficient signal strength
FM station automatic presetting
—SSM (Strong-station Sequential Memory)
Manual presetting
Selecting preset stations
Searching for FM RDS programme
—PTY Search
Activating/deactivating TA/PTY Standby Reception
Tracing the same programme
—Network-Tracking Reception
Automatic station selection
—Programme Search
Disc operations 17
Selecting playback modes
Selecting tracks on the list
Prohibiting disc ejection
Operations using the remote controller
Operations using the on-screen bar
(DVD/VCD/DivX/MPEG1/MPEG2/JPEG)
Listening to other external
components 26
Sound equalization 27
Assigning titles to
the sources 28
Menu operations 29
More about this unit 37
Troubleshooting 42
Specifications 44
Contents

English | 3
Before use
2WARNING
To prevent injury or fire, take the
following precautions:
• To prevent a short circuit, never put or leave any
metallic objects (such as coins or metal tools) inside
the unit.
• Do not watch or fix your eyes on the unit’s display
when you are driving for any extended period.
• DO NOT operate the unit while driving. If you need
to operate the unit while driving, be sure to look
around carefully.
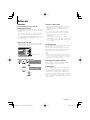
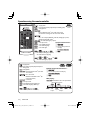
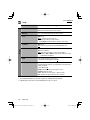
How to reset your unit
• If the unit fails to operate properly, press the Reset
button. The unit returns to factory settings when
the Reset button is pressed.
e
Set
o
urs/24Hours
Clock
Reset button
How to forcibly eject a disc
NO EJECT?
EMERGENCY EJECT?
NO EJECT?
EMERGENCY EJECT?
Cautions on the monitor
• The monitor built in this unit has been produced
with high precision, but it may have some
ineffective dots. This is inevitable and is not
malfunction.
• Do not expose the monitor to direct sunlight.
• When the temperature is very cold or very hot.
– Chemical changes occur inside, causing
malfunction.
– Pictures may not appear clearly or may move
slowly. Pictures may not be synchronized with
the sound or picture quality may decline in such
environments.
Cleaning the Unit
If the faceplate of this unit is stained, wipe it with a
dry soft cloth such as a silicon cloth.
If the faceplate is stained badly, wipe the stain off
with a cloth moistened with neutral cleaner, then
wipe it again with a clean soft dry cloth.
¤
• Applying spray cleaner directly to the unit may affect its
mechanical parts. Wiping the faceplate with a hard cloth
or using a volatile liquid such as thinner or alcohol may
scratch the surface or erases characters.
Cleaning the Faceplate Terminals
If the terminals on the unit or faceplate get dirty,
wipe them with a clean soft dry cloth.
Lens Fogging
When you turn on the car heater in cold weather,
dew or condensation may form on the lens in the
disc player of the unit. Called lens fogging, this
condensation on the lens may not allow discs to
play. In such a situation, remove the disc and wait
for the condensation to evaporate. If the unit still
does not operate normally after a while, consult your
Kenwood dealer.

4 | KDV-7241
Notes
• If you experience problems during installation,
consult your Kenwood dealer.
• When you purchase optional accessories, check
with your Kenwood dealer to make sure that they
work with your model and in your area.
• The illustrations of the display and the panel
appearing in this manual are examples used to
explain more clearly how the controls are used.
Therefore, what appears on the display in the
illustrations may differ from what appears on the
display on the actual equipment, and some of the
illustrations on the display may be inapplicable.
• If you have parked the car for a long time in hot or
cold weather, wait until the temperature in the car
becomes normal before operating the unit.
Handling discs
• Do not touch the recording surface of the disc.
• Do not stick tape etc. on the disc, or use a disc with
tape stuck on it.
• Do not use disc type accessories.
• Clean from the center of the disc and move
outward.
• When removing discs from this unit, pull them out
horizontally.
• If the disc center hole or outside rim has burrs,
use the disc only after removing the burrs with a
ballpoint pen etc.
Discs that cannot be used
• Discs that are not round cannot be used.
• Discs with coloring on the recording surface or
discs that are dirty cannot be used.
• This unit can only play the CDs with
.
This unit may not correctly play discs which do not
have the mark.
• You cannot play a CD-R or CD-RW that has not
been finalized. (For the finalization process refer to
your CD-R/CD-RW writing software, and your CD-
R/CD-RW recorder instruction manual.)
About DivX
DivX is a popular media technology created by DivX,
Inc. DivX media Files contain highly compressed
video with high visual quality that maintains a
relatively small file size. DivX files can also include
advanced media features like menus, subtitles, and
alternate audio tracks. Many DivX media files are
available for download online, and you can create
your own using your personal content and easy-to-
use tools from DivX.com.
About DivX Certified
DivX Certified products are officially tested by the
creators of DivX and guaranteed to play all versions
of DivX video, including DivX 6. Certified products
qualify for one of several DivX Profiles that designate
the type of video the product supports, from
compact portable video to high-definition video.
This product incorporates copyright protection
technology that is protected by U.S. patents and
other intellectual property rights. Use of this
copyright protection technology must be authorized
by Macrovision, and is intended for home and
other limited viewing uses only unless otherwise
authorized by Macrovision. Reverse engineering or
disassembly is prohibited.
Manufactured under license under U.S. Patent #:
5,451,942 & other U.S. and worldwide patents issued
& pending. DTS and DTS Digital Out are registered
trademarks and the DTS logos and Symbol are
trademarks of DTS, Inc. © 1996-2007 DTS, Inc. All
Rights Reserved.
is a trademark of DVD Format/Logo Licensing
Corporation registered in the U.S., Japan and other
countries.
Manufactured under license from Dolby Laboratories.
“Dolby” and the double-D symbol are trademarks of
Dolby Laboratories.
DivX, DivX Ultra Certified, and associated logos are
trademarks of DivX, inc. and are used under license.
Official DivX® Ultra Certified product
Plays all versions of DivX® video (including DivX® 6)
with enhanced playback of DivX® media files and the
DivX® Media Format
This Product is not installed by the manufacturer
of a vehicle on the production line, nor by the
professional importer of a vehicle into an EU Member
State.

English | 5
Microsoft and Windows Media are either registered
trademarks or trademarks of Microsoft Corporation in
the United States and/or other countries.
Information on Disposal of Old Electrical
and Electronic Equipment (applicable for
EU countries that have adopted separate
waste collection systems)
Products with the symbol (crossed-out
wheeled bin) cannot be disposed as
household waste.
Old electrical and electronic equipment
should be recycled at a facility capable
of handling these items and their waste
byproducts. Contact your local authority
for details in locating a recycle facility
nearest to you. Proper recycling and waste
disposal will help conserve resources
whilst preventing detrimental effects on
our health and the environment.
The marking of products using lasers
(Except for some areas)
CLASS 1
LASER PRODUCT
The label is attached to the chassis/case and says
that the component uses laser beams that have been
classified as Class 1. It means that the unit is utilizing
laser beams that are of a weaker class. There is no
danger of hazardous radiation outside the unit.
Declaration of Conformity with regard to
the EMC Directive 2004/108/EC
Manufacturer:
Kenwood Corporation
2967-3 Ishikawa-machi, Hachioji-shi, Tokyo, 192-8525 Japan
EU Representative's:
Kenwood Electronics Europe BV
Amsterdamseweg 37, 1422 AC UITHOORN, The Netherlands

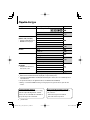
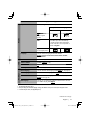
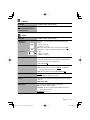
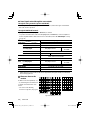
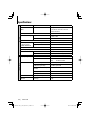
Playable disc type
Disc type Recording format, file type, etc. Playable
DVD DVD Video (Region Code: 2)*
1
DVD Audio
DVD-ROM
DVD Recordable/Rewritable
(DVD-R*
2
/-RW, +R/+RW*
3
)
• Compliant to UDF bridge format
• DVD-RAM cannot be played.
DVD Video
DivX/MPEG1/MPEG2
JPEG
MP3/WMA/WAV
MPEG4
DVD-VR, +VR
Dual Disc DVD side
Non-DVD side
CD/VCD Audio CD/CD Text (CD-DA)
VCD (Video CD)
DTS-CD*
4
CD-ROM
CD-I (CD-I Ready)
CD Recordable/Rewritable
(CD-R/-RW)
• Compliant to ISO 9660 level 1,
level 2, Romeo, Joliet
CD-DA
MP3/WMA/WAV
JPEG
DivX/MPEG1/MPEG2
MPEG4
*
1
If you insert a DVD Video disc of an incorrect Region Code, “Region code error” appears on the monitor.
*
2
DVD-R recorded in multi-border format is also playable (except for dual layer discs).
*
3
It is possible to play back finalized +R/+RW (Video format only) discs. However, the use of +R double layer disc is
not recommended.
*
4
To reproduce DTS sound, use the digital connection. (☞ Installation/Connection Manual)
• “DVD Logo” is a trademark of DVD Format/Logo Licensing Corporation registered in the US, Japan and other
countries.
Notes on reproduced sound (☞ page 40)
Through the analog terminals (Speaker out/LINE
OUT) of this unit...
• Multi-channel signals are downmixed.
• DTS sound cannot be reproduced.
Caution for DualDisc playback
The Non-DVD side of a “DualDisc” does not comply
with the “Compact Disc Digital Audio” standard.
Therefore, the use of Non-DVD side of a DualDisc on
this product may not be recommended.
6 | KDV-7241

AV Menu
Setup
Enter
ENT
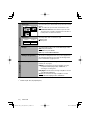
Before operating the unit
Cancel the display demonstration and set the clock. (☞ also pages 30 and 31)
Indication language: In this manual, English indications are used for purpose of explanation. You
can select the indication language on the monitor. (☞ page 31)
~ Turn on the power.
Ÿ Display <AV Menu>.
! Enter the <Setup> menu.
⁄ Select <Display> ] <Demonstration>, then activate the <Demonstration> screen.
@ Cancel the display demonstrations.
Select <Off>.
Continued on the next page
Demonstration
Display
Clock
Disc Setup 1
Disc Setup 2
Tuner
On
Demonstration
Wall Paper
Scroll
Tag Display
Dimmer
Off
On
Exit
ENT
Setup Display Demonstration
Setup menu icon
Off
On
Exit
ENT
Demonstration
Currently selected submenu Current setting
Currently selected menu
English | 7

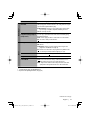
fi Select either the 12-hour or 24-hour
system.
^ Return to the <Clock> menu.
fl Select <Clock Adjust>.
& Activate the <Clock Adjust> screen.
‡ Select the <Clock Adjust> setting.
• Off: Cancels.
• Auto: Activate auto clock adjustment using
the clock time (CT) data from an FM RDS
station.
* Finish the procedure.
To display the clock time while playing back a
video source, select <Clock> =<OSD Clock>
=<On>.
¤ Return to the <Setup> menu.
# Select <Clock> ]<Time Set>, then
activate the <Time Set> screen.
‹ Set the clock time.
$ Return to the <Clock> menu.
› Select <12Hours/24Hours>.
% Activate the <12Hours/24Hours>
screen.
12Hours/24Hours
12 Hours
24 Hours
Exit
ENT
Time Set
Hours
18 : 00
Exit
ENT
Time Set
Minutes
18 : 35
Exit
ENT
18: 35
FLAT
AF
TUNER
FM1
Bayern Radio
87.5 MHz
DX
Clock
0:00
Time Set
12Hours/24Hours
OSD Clock
Clock Adjust
(twice)
8 | KDV-7241

English | 9
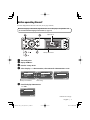
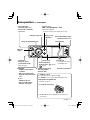
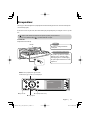
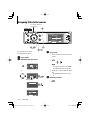
Basic operations — Control panel
• TUNER: Select the bands.
• DISC: Stop playback.
• On menus: Back.
Select the source.
TUNER = DISC (DVD/VCD/CD) = AV-IN
=(back to the beginning)
• You cannot select these sources if they are not ready.
Display window
• Eject the disc.
• Change the control
panel tilt (Tilt1 – Tilt4)
[Hold, then press].
*
1
<AV Menu> screens
You can use the menus to set up various settings.
The <AV Menu> screen consists of the following sub-menus—
Setup/Equalizer/Sound/Mode/List.
• For details, see page 29.
*
2
To attach the control panel
*
3
By holding 5 / ∞, you can display the list accessible for the
selected source.
• Turn on the power.
• Turn off the power [Hold].
• Attenuate the sound (if the
power is on).
Change the display information.
4 / ¢
• TUNER: Search for stations/
ensembles.
• DISC: Select chapters/tracks.
• On menus: Go to previous/next
step.
5 / ∞*
3
• TUNER: Select preset.
• DISC: Select titles/folders.
• On menus: Select items.
Activate TA Standby Reception.
Show PTY preset list [Hold].
Remote sensor
Adjust the
volume.
Reset the unit.
• Use only when the internal
system malfunctions.
Display or erase
<AV Menu>*
1
.
• DISC: Start playback.
• On menus: Enter. (
ENT
: [Press]/
ENT
: [Hold])
Change the aspect ratio.
Detach the control panel*
2
.

10 | KDV-7241
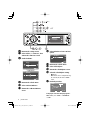
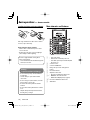
1 • Turns on the power.
• Attenuates the sound if the power is on.
• Turns off the power if pressed and held (while
the power is on).
2 Selects the source.
3 Selects the TUNER bands.
4 Changes the aspect ratio of the playback
pictures.
5 Not used for this unit.
6 Adjusts the volume level.
• Not used as 2nd VOL button for this unit.
7*
1
• DVD/DivX 6: Shows the disc menu.
• VCD: Resumes PBC playback (☞ page 23).
8*
1
Not used as SETUP button for this unit.
9 SHIFT button
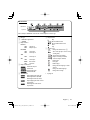
Basic operations — Remote controller
Installing the lithium coin battery (CR2025)
If the range of effectiveness of the remote controller
decreases, replace the battery.
Before using the remote controller:
• Aim the remote controller directly at the remote
sensor on the unit.
• DO NOT expose the remote sensor to bright light
(direct sunlight or artificial lighting).
The unit is equipped with the steering wheel
remote control function.
• See the Installation/Connection Manual (separate
volume) for connection.
Warning:
To prevent accidents and damage
• Do not install any battery other than CR2025 or
its equivalent.
• Store the battery in a place where children
cannot reach.
• Do not recharge, short, disassemble, or heat the
battery or dispose of it in a fire.
• Do not leave the battery with other metallic
materials.
• Do not poke the battery with tweezers or similar
tools.
• Wrap the battery with tape and insulate when
throwing away or saving it.
Main elements and features

English | 11
p 7 (stop)*
2
, 3 (play), 8 (pause)
• 3 (play) also functions as ZOOM button when
pressed with SHIFT button (☞ page 24).
q For advanced disc operations:
• 5 / ∞
DVD: Selects the titles.
Other discs except VCD/CD: Selects the folders.
• 4 / ¢:
Press briefly: reverse skip/forward skip
Press and hold: reverse search/forward search
• 1 / ¡: reverse search/forward search
For FM/AM operations:
• 5 / ∞: Changes the preset stations.
• 4 / ¢:
– Functions to search for stations.
Press briefly: Auto Search
Press and hold: Manual Search
w Shows the on-screen bar.
• Also functions as DIRECT button when pressed
with SHIFT button. (☞ pages 22 and 23)
e*
1
• DVD/DivX 6: Shows the disc menu.
• VCD: Resumes PBC playback. (☞ page 23)
r*
1
• Makes selection/settings.
• ~: Skips back or forward by 5 minutes for
DivX/MPEG1/MPEG2.
t*
1
RETURN button
y • DVD: Selects audio language ( ),
subtitles ( ), angle ( )*
2
.
• DivX: Selects audio language ( ),
subtitles ( ).
• VCD: Selects audio channel ( ).
*
1
Functions as number buttons when pressed with
SHIFT button.
–
TUNER: Selects preset station/service.
–
DISC: Selects chapter/title/folder/track.
*
2
Not used as SURROUND button for this unit.

15: 45
FLAT
DXMOAFTP
TUNER
FM1 Preset1
Bayern Radio
87.5 MHz
Pop M
POWER]ON
12 | KDV-7241
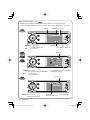
When an FM stereo broadcast is
hard to receive
1
2
Mode menu icon
3
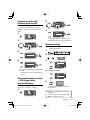
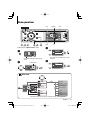
Listening to the radio
~
Select “TUNER”.
Ÿ Select the bands.
! Search for a station—Auto Search.
• Manual Search: Hold either 4 or ¢ until “Manual Search” appears on the display, then press it
repeatedly.
• The ST indicator lights up when receiving an FM stereo broadcast with sufficient signal strength.
4
Reception improves, but stereo effect will be lost.
• The MO indicator lights up.
To restore stereo effect, select <Off> in step 4.
PS (station name) for FM RDS. If no signal is
coming in, “No Name” appears.
Preset No.Band
☞ page 27
Tuner/Standby
Reception indicators
PTY code for FM RDS
AV Menu
Setup
Enter
ENT
Mode
Off
Mono
DX/Local
SSM
PTy Standby
Mono
Off
On
Exit
ENT
AV Menu
Mode
Enter
ENT

English | 13
2
3
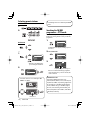
Local FM stations with the strongest signals are
searched and stored automatically in the FM band.
Manual presetting
Ex.: Storing FM station of 92.5 MHz into preset
number 4 of the FM1 band.
1
2 Tune in to a station you want to preset.
3
Preset list appears.*
4 Select a preset number.
5
The station selected in step 2 is now stored in
preset number 4.
* Each time you hold the button, you can change
the FM bands.
• Preset List can also be accessed through <AV
Menu> = <List>. (☞ page 14)
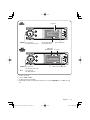
Tuning in to stations with
sufficient signal strength
This function works only for FM bands.
Once you have activated this function (selected
<Local>), it always works when searching for FM
stations.
1
2
Mode menu icon
3
4
Only stations with sufficient signal strength will be
detected.
• The DX indicator goes off, then the LO indicator
lights up.
FM station automatic presetting
—SSM (Strong-station
Sequential Memory)
This function works only for FM bands.
You can preset six stations for each band.
1
Mode
DX
Mono
DX/Local
SSM
PTy Standby
DX/Local
DX
Local
Exit
ENT
Mode
Mono
DX/Local
SSM
PTy Standby
Start
ENT
FM1 Store
87.5
89.9
97.9
105.9
108.0
107.9
ENT
1
2
3
4
5
6
ENT
FM1 Store
87.5
89.9
97.9
105.9
108.0
107.9
ENT
1
2
3
4
5
6
ENT
AV Menu
Setup
Enter
ENT
AV Menu
Mode
Enter
ENT
AV Menu
Setup
Enter
ENT
AV Menu
Mode
Enter
ENT
No Name
92.5 MHz
Mode menu icon
TUNER
FM1 Preset4
No Name
92.5 MHz

14 | KDV-7241
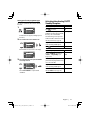
The following features are available only for FM RDS
stations.
Searching for FM RDS
programme—PTY Search
You can search for your favorite programmes being
broadcast by selecting the PTY code for your favorite
programmes.
1
Available PTY codes appear (including six preset
PTY codes).
2 Select a PTY code.
3
If there is a station broadcasting a programme
of the same PTY code as you have selected, that
station is tuned in.
Available PTY codes:
News, Current Affairs, Information, Sport,
Education, Drama, Cultures, Science, Varied Speech,
Pop Music, Rock Music, Easy Listening, Light Classics
M, Serious Classics, Other Music, Weather & Metr,
Finance, Children’s Progs, Social Affairs, Religion,
Phone In, Travel & Touring, Leisure & Hobby, Jazz
Music, Country Music, National Music, Oldies Music,
Folk Music, Documentary
Selecting preset stations
On the remote:
1
2
or
On the unit:
or
1
• Each time you hold the button,
you can change the FM bands.
2
• Preset List can also be accessed through <AV
Menu> = <List>.
FM1 Store
87.5
89.9
97.9
92.5
108.0
107.9
ENT
1
2
3
4
5
6
ENT
15: 45
FLAT
DXAF
TUNER
FM1
PTy Search
XX.X MHz
Science
AV Menu
List
Enter
ENT
List menu icon
123
456
Pop Music
Rock Music
Easy Listening
Serious Classics
Current Affairs
Varied Speech
ENT
1
2
3
4
5
6
PTy Search
Cultures
Science
Varied Speech
Pop Music
Rock Music
Easy Listening
ENT
PTy Search
FM1 Store
87.5
89.9
97.9
92.5
108.0
107.9
ENT
1
2
3
4
5
6
ENT
AV Menu
Setup
Enter
ENT
Frequency changes as search goes on.

English | 15
Storing your favorite programme types
You can store your favorite PTY codes into the PTY
Preset List.
1
Available PTY codes appear (including six preset
PTY codes).
2 Select a PTY code to store into the List.
Current PTY Preset List is shown on the display.
3 Select a listed code to be replaced with the
one newly selected.
Now <Current Affairs> is replaced with
<Science>.
Activating/deactivating TA/PTY
Standby Reception
TA Standby Reception Indicator
Press
to activate. TP
The unit will temporarily switch to
Traffic Announcement (TA), if available,
from any source other than AM.
The volume changes to the preset TA
volume level if the current level is lower
than the preset level (☞ page 33).
Lights up
Not yet activated. Tune in to another
station providing the RDS signals.
Flashes
Press to deactivate. Goes off
PTY Standby Reception Indicator
Activate <AV Menu>, then select
<Mode>, <PTy Standby> (☞
pages 16, 36).
PTY
The unit will temporarily switch to
your favorite PTY programme from any
source other than AM.
Lights up
Not yet activated. Tune in to another
station providing the RDS signals.
Flashes
To deactivate, select <Off> in step 4,
then press ENT once (☞ page 16).
Goes off
Pop Music
Rock Music
Easy Listening
Serious Classics
Current Affairs
Varied Speech
ENT
1
2
3
4
5
6
PTy Memory
Pop Music
Rock Music
Easy Listening
Serious Classics
Current Affairs
Varied Speech
ENT
1
2
3
4
5
6
PTy Memory
Pop Music
Rock Music
Easy Listening
Serious Classics
Current Affairs
Varied Speech
ENT
1
2
3
4
5
6
PTy Search
Cultures
Science
Varied Speech
Pop Music
Rock Music
Easy Listening
ENT
PTy Search

16 | KDV-7241
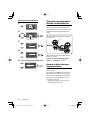
Tracing the same programme—
Network-Tracking Reception
When driving in an area where FM reception is not
sufficient enough, this unit automatically tunes in to
another FM RDS station of the same network, possibly
broadcasting the same programme with stronger
signals.
Programme A broadcasting on different frequency
areas (01 – 05)
When shipped from the factory, Network-Tracking
Reception is activated.
To change the Network-Tracking Reception
setting, see <AF Regional> on page 33.
Automatic station selection—
Programme Search
Usually when you select preset stations, the preset
station is tuned in.
If the signals from the FM RDS preset station are not
sufficient for good reception, this unit, using the AF
data, tunes in to another frequency broadcasting the
same programme as the original preset station is
broadcasting. (☞ page 33)
• The unit takes some time to tune in to another
station using programme search.
Activating PTY Standby Reception
1
2
Mode menu icon
3
4
5
Select a PTY code for PTY Standby Reception.
Off
News
PTy Standby
Mode
Off
Mono
DX/Local
SSM
PTy Standby
Drama
Cultures
Science
Varied Speech
Pop Music
PTy Standby
Exit
ENT
AV Menu
Setup
Enter
ENT
AV Menu
Mode
Enter
ENT
A

English | 17
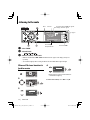
Disc operations
The disc type is automatically detected, and playback starts automatically (for some discs: automatic start depends
on its internal program).
If a disc does not have any disc menu, all tracks in it will be played repeatedly until you change the source or eject the
disc.
If “
” appears on the monitor, the unit cannot accept the operation you have tried to do.
• In some cases, without showing “ ”, operations will not be accepted.
Label side
DISP: Press if no playback picture appears, but disc
information (
☞ pages 18 and 19) screen is displayed.
Insert the disc.
Playback starts automatically.
Caution:
Do not place your finger behind the
control panel.
Caution on volume setting:
Discs produce very little noise compared
with other sources. Lower the volume
before playing a disc to avoid damaging
the speakers by the sudden increase of the
output level.
15: 45
DISC
Now Reading ...
0: Eject the disc. 3: Start playback if necessary.
7: Stop playback.

15: 45
FLAT
CHAP. RPT
DIGITALVIDEO
DVD
T 01 C 02 0:45:38
15: 45
FLAT
RPT
DivX
CD
T 01 C 02 0:45:38
Current Folder Name
Current File Name.avi
15: 45
FLATPBC
VCD
01 0:45:38
18 | KDV-7241
While playing the following discs, press
.
• Each time you press the button, playback picture and disc information screens appear alternately.
• For discs except DVD and VCD: The control screen appears on the connected external monitor. (☞ page 38)
Audio format
Title no./Chapter no./Playing time
Playback mode
For DivX/MPEG: Folder no./Track no./Playing time
For JPEG: Folder no./Track no.
Track no./Playing timePBC indicator
lights up when PBC is in use.
Disc type
4 ¢ Press: Select chapter
Hold: Reverse/forward search
*
1
5 ∞ Press: Select title
4 ¢ Press: Select track
Hold: Reverse/forward search for DivX/MPEG
*
2
5 ∞ Press: Select folder
Hold: Display Folder List
4 ¢ Press: Select track
Hold: Reverse/forward search
*
1
☞ page 27
☞ page 27
☞ page 27

15: 45
FLAT
RPT
CD
01 0:45:38
Disc Title
Artist Name
Current Track Title
01 0:45:38
15: 45
FLAT
RPT
MP3
CD
01 02 0:45:38
Current Folder Name
Current File Name.mp3
English | 19
Track no./Playing timeDisc title/Artist name/Track
title (only for CD Text)
*
3
Folder no./Track no./Playing time4 ¢ Press: Select track
Hold: Reverse/forward search
*
1
5 ∞ Press: Select folder
Hold: Display Folder List
Audio format
(MP3/WMA/WAV)
*
1
Search speed: x2 ] x10.
*
2
Search speed: ¡1 ] ¡2.
*
3
“No Name” appears for conventional CDs.
*
4
Tag data will be shown instead of folder/file names when they are recorded and <Tag Display> is set to <On>. (☞ page
30)
*
4
4 ¢ Press: Select track
Hold: Reverse/forward search
*
1
☞ page 27
☞ page 27

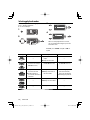
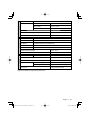
20 | KDV-7241
You can use only one of the following playback
modes—Intro/Repeat/Random.
Ex. To select Track Repeat
1
2
Mode menu icon
3
4
When one of the playback modes is selected,
the corresponding indicator lights up on the disc
information screen.
To cancel, select <All Off> in step 3 or <Off> in
step 4.
Selecting playback modes
Disc type Intro Repeat Random
—
Chapter: Repeats current
chapter
Title: Repeats current title
—
Track: Plays the first 15
seconds of each track (for
VCD: PBC not in use)
Track: Repeats current track
(for VCD: PBC not in use)
Disc: Randomly plays all tracks
(for VCD: PBC not in use)
Track: Plays the first 15
seconds of each track
Folder: Plays the first 15
seconds of the first track of
each folder
Track: Repeats current track
Folder: Repeats all tracks of
the current folder
Folder: Randomly plays all
tracks of current folder,
then tracks of next folders
Disc: Randomly plays all tracks
—
Track: Repeats current track
Folder: Repeats current folder
—
—
Folder: Repeats current folder
—
AV Menu
Setup
Enter
ENT
AV Menu
Mode
Enter
ENT
Mode
Off
All Off
Intro
Repeat
Random
Repeat
Off
Track
Folder
Set
ENT
Page is loading ...
Page is loading ...
Page is loading ...
Page is loading ...
Page is loading ...
Page is loading ...
Page is loading ...
Page is loading ...
Page is loading ...
Page is loading ...
Page is loading ...
Page is loading ...
Page is loading ...
Page is loading ...
Page is loading ...
Page is loading ...
Page is loading ...
Page is loading ...
Page is loading ...
Page is loading ...
Page is loading ...
Page is loading ...
Page is loading ...
Page is loading ...
Page is loading ...
-
 1
1
-
 2
2
-
 3
3
-
 4
4
-
 5
5
-
 6
6
-
 7
7
-
 8
8
-
 9
9
-
 10
10
-
 11
11
-
 12
12
-
 13
13
-
 14
14
-
 15
15
-
 16
16
-
 17
17
-
 18
18
-
 19
19
-
 20
20
-
 21
21
-
 22
22
-
 23
23
-
 24
24
-
 25
25
-
 26
26
-
 27
27
-
 28
28
-
 29
29
-
 30
30
-
 31
31
-
 32
32
-
 33
33
-
 34
34
-
 35
35
-
 36
36
-
 37
37
-
 38
38
-
 39
39
-
 40
40
-
 41
41
-
 42
42
-
 43
43
-
 44
44
-
 45
45


Kenwood KDV-7241 User manual
- Category
- Car media receivers
- Type
- User manual
Ask a question and I''ll find the answer in the document
Finding information in a document is now easier with AI
Related papers
Other documents
-
JVC KW-AVX848 Instructions Manual
-
Sony CFD-370 Operating instructions
-
JVC KD-AVX11 - EXAD - DVD Player Instructions Manual
-
JVC Exad KD-AVX33 Instructions Manual
-
JVC KD-DV4401 User manual
-
-
-
JVC KD-AV7100 User manual
-
-