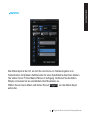
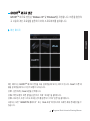
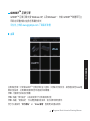
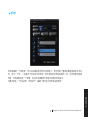
Gigabyte KRYPTON Installation guide
- Category
- Mice
- Type
- Installation guide
Page is loading ...

1
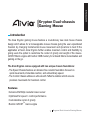
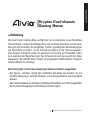
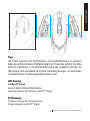
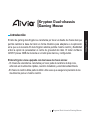
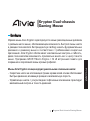
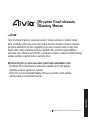
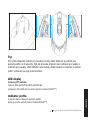
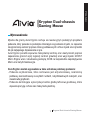
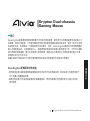
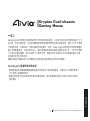
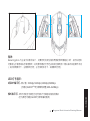
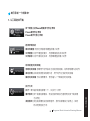
Krypton Dual-chassis Gaming Mouse
ENGLISH
Krypton Dual-chassis
Gaming Mouse
The Aivia Krypton gaming mouse features a revolutionary new dual mouse chassis
design which allows for a hot-swappable mouse chassis giving the user unparalleled
freedom by changing fundamental mouse movement and dynamics to best fit the
application at hand. Aivia Krypton further enables maximum control and exibility by
giving users the option to customize the center of gravity and weight of the mouse.
GHOST Macro engine with built-in 32KB memory for onboard Macro memorization and
gaming on the go.
The Aivia Krypton comes equipped with two unique chassis foundations:
- The Speed Chassis features an abrasion-free ceramic foundation focused on
quick movements, immediate reaction, and extraordinary speed.
- The Control Chassis utilizes an ultra smooth Teon foundation which ensures
precision movements for maximum control.
Introduction
Features
• Advanced 8200dpi resolution laser sensor
• Optimized for speed + control performance
• Customizable center of gravity
• Build-in GHOST
TM
macro engine

2
Krypton Dual-chassis Gaming Mouse
ENGLISH
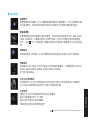
Windows® 98 / 2000/ XP / Windows7 Installation Instructions
1. Download the GHOST macro engine installer from GIGABYTE of cial website.
2. Run the installer and follow the onscreen instructions.
3. Plug Aivia Krypton into the USB port of your computer.
4. Execute the software and then the UI will automatically detect the Aivia Krypton Mouse.
5. Set up advanced assignments for your Aivia Krypton via GIGABYTE software.
Installation
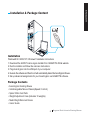
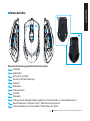
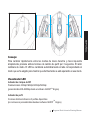
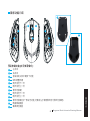
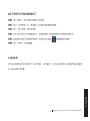
Package Contents
• Aivia Krypton Gaming Mouse
• Interchangeable Mouse Chassis(Speed / Control)
• Spare Te on Feet Pads
• Weight Adjustment Case (Includes 10 weights)
• Metal Weight Removal Device
• Users’ Guide
Installation & Package Content

3
Krypton Dual-chassis Gaming Mouse
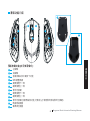
ENGLISH
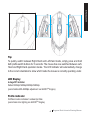
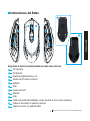
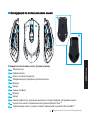
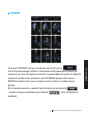
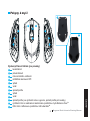
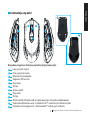
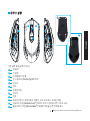
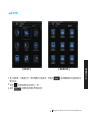
Left Click
Right Click
Scroll Click and wheel
On-the- y DPI adjustment
Forward
Backward
Pro le Switch
Forward
Backward
Pro le Switch (Disabled on default, Pro le Switch under Left-Hand mode)
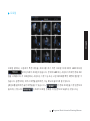
Speed Chassis with Abrasion-free
TM
ceramic mouse feet
Control Chassis with Ultra-durable
TM
te on feet
Default button assignments (right-hand mode):
A
A
G
G
D
D
J
J
B
B
H
H
E
E
K
C
C
I
I
F
F
L
Mouse Instructions
K
L

4
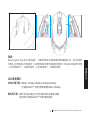
Krypton Dual-chassis Gaming Mouse
ENGLISH
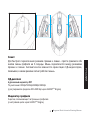
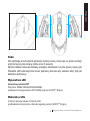
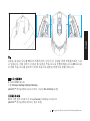
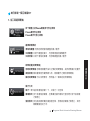
LED Display
4-stage DPI indicator
Default: 800dpi/1600dpi/3200dpi/5600dpi
(customizable 400~8200dpi adjustment via GHOST
TM
Engine)
Profi le indicator
5 different colors indicates 5 onboard pro les
(customized color lighting via GHOST
TM
Engine)
Tip:
To quickly switch between Right-Hand and Left-Hand mode, simply press and hold
both pro le switch buttons for 3 seconds. The mouse has now switched between Left-
Hand and Right-Hand operation modes. The LED indicator will automatically change
to the correct orientation to show which mode the mouse is currently operating under.

5
Krypton Dual-chassis Gaming Mouse
ENGLISH
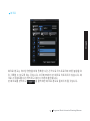
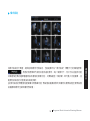
GHOST
TM
Macro Engine supports Windows XP, and Windows7. Install the software
to assign buttons and set up your personal proles.
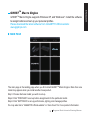
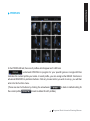
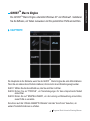
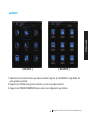
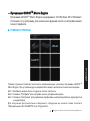
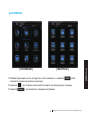
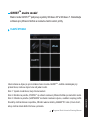
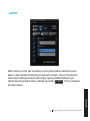
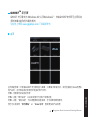
MAIN PAGE
The main page is the landing page when you rst install GHOST
TM
Macro Engine. More than one
model may appear when you install another Aivia product.
Step1. Choose the Aivia model you wish to set up.
Step2. Click “PROFILES” to set up button assignments for the particular model.
Step3. Click “SETTINGS” to set up performance, lighting, and manage proles.
You may also link to “GIGABYTE ofcial website” or “Aivia forum” for more product information.
GHOST
TM
Macro Engine
Please download the latest software from GIGABYTE ofcial website:
www.gigabyte.com

6
Krypton Dual-chassis Gaming Mouse
ENGLISH
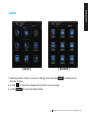
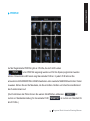
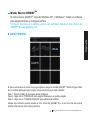
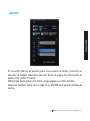
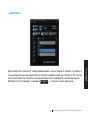
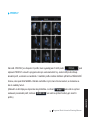
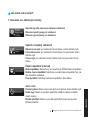
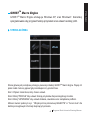
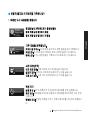
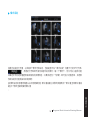
In the PROFILES tab, there are 5 pro les which appear as 5 LED bars
underneath PROFILE to program for your speci c games. A single LED bar
indicates the current pro le you locate. In each pro le, you can assign either BASIC functions or
advanced MACROS to particular buttons. Click any mouse button you wish to set up, you will then
enter into the function menu.
(There are also hid buttons by clicking the arrowhead-
is back to default setting for
the current pro le; is back to default for all 5 pro les.)
the current pro le; is back to default for all 5 pro les.)
PROFILES

7
Krypton Dual-chassis Gaming Mouse
ENGLISH
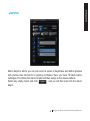
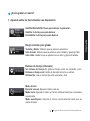
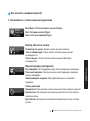
1. Select any button function you wish to change, and click either or double-click to
save the change.
2. or click to ignore the change and go back to previous page.
3. or click to return the default setting.
1. Select any button function you wish to change, and click either or double-click to
2. or click to ignore the change and go back to previous page.
3. or click to return the default setting.
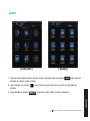
[ BASIC ] [ MACROS ]
BASIC

8
Krypton Dual-chassis Gaming Mouse
ENGLISH
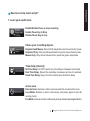
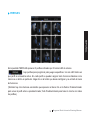
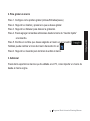
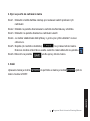
Macro depot is where you can pre-record a series of keystrokes and button presses
with precise time interval for a gaming command. Here you have 70 blank macro
cartridges. Pre-de ne the macro scripts and then assign to the mouse buttons.
Select any empty macro and click , and you will then enter into the macro
depot.
Select any empty macro and click , and you will then enter into the macro
MACROS

9
Krypton Dual-chassis Gaming Mouse
ENGLISH
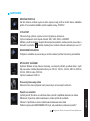
1. Learn your useful tools
Enable Pause Key to Stop
Disable Pause Key to stop
Chose your recording objects
Keyboard and Mouse: Record both keystrokes and mouse button press.
Keyboard Only: Only record keystrokes but ignore mouse button press.
Mouse Only: Only record mouse button press but ignore keystrokes.
Time delay (interval)
No Time Delay: Do NOT record any time delay in-between commands.
Real Time Delay: Record the real delay in-between as how it is entered.
Fixed Time Delay: Key-in the time interval as a xed time delay.
Action mode
Execute Once: Execute a macro once as press the mouse button once.
Loop Mode: Execute a macro continuously, and press again to stop the
running macro.
Fire Mode: Execute a macro continuously until you release the assigned button.
How to record a macro script?
Enable/Disable Pause to stop recording

10
Krypton Dual-chassis Gaming Mouse
ENGLISH
2. Now begin to record a macro
3. More
Step1. Clicking change the tool buttons to set up your recording preference.
Step2. Click Record and start keying in keystrokes or button presses.
Step3. Click Stop to end up recording
Step4. You may also insert additional commands from the “Quick-insert bar”
at the left screen.
Step5. Type on (the blue oblong) to rename this macro. Moreover, you
may also change icon of your personal macro by clicking
Step6. Click to save the editing of this macro.
You may the macros you’d edited to the PC, and also a macro
back to GHOST macro engine.
Step5. Type on (the blue oblong) to rename this macro. Moreover, you
Step6. Click to save the editing of this macro.
You may the macros you’d edited to the PC, and also a macro
You may the macros you’d edited to the PC, and also a macro

11
Krypton Dual-chassis Gaming Mouse
ENGLISH
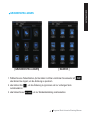
MANAGE PROFILES
You may either disable or enable a whole pro le and also change the color of the
pro le indicator in this page. Type on the characters “PROFILE” to mark each pro le.
SETTINGS
SENSITIVITY
Sensitivity is how fast the mouse cursor travels across the screen.
Default setting has 4 sensitivity stages: 800, 1600, 3200, and 5600DPI.
You can create 4 preferred sensitivity stages by moving the single adjusting slider,
and click to set different sensitivity value of X-Y axis independently.
REPORT RATE
The report rate determines the time intervals that your PC retrieves data from your
mouse. You can switch between to 125Hz, 142Hz, 166Hz, 200Hz, 250Hz, 333Hz,
500Hz, or 1000Hz on the slider.
Default setting: 500Hz
Right/Left hand mode
Clicking change this icon to change between right hand mode and left hand mode.
Memory Storage
Clean memory: Erase all data on memory, such as settings and macros
Back up: Back up the pro le settings or macros to your PC
Restore: Restore the backed up the settings or data from your PC
*Please DO NOT remove the mouse during processing in case memory damages.*
WHEEL SETTINGS
You can adjust the scrolling speed and also the wheel brightness by moving the knob
on the slider.
Page is loading ...
Page is loading ...
Page is loading ...
Page is loading ...
Page is loading ...
Page is loading ...
Page is loading ...
Page is loading ...
Page is loading ...
Page is loading ...
Page is loading ...
Page is loading ...
Page is loading ...
Page is loading ...
Page is loading ...
Page is loading ...
Page is loading ...
Page is loading ...
Page is loading ...
Page is loading ...
Page is loading ...
Page is loading ...
Page is loading ...
Page is loading ...
Page is loading ...
Page is loading ...
Page is loading ...
Page is loading ...
Page is loading ...
Page is loading ...
Page is loading ...
Page is loading ...
Page is loading ...
Page is loading ...
Page is loading ...
Page is loading ...
Page is loading ...
Page is loading ...
Page is loading ...
Page is loading ...
Page is loading ...
Page is loading ...
Page is loading ...
Page is loading ...
Page is loading ...
Page is loading ...
Page is loading ...
Page is loading ...
Page is loading ...
Page is loading ...
Page is loading ...
Page is loading ...
Page is loading ...
Page is loading ...
Page is loading ...
Page is loading ...
Page is loading ...
Page is loading ...
Page is loading ...
Page is loading ...
Page is loading ...
Page is loading ...
Page is loading ...
Page is loading ...
Page is loading ...
Page is loading ...
Page is loading ...
Page is loading ...
Page is loading ...
Page is loading ...
Page is loading ...
Page is loading ...
Page is loading ...
Page is loading ...
Page is loading ...
Page is loading ...
Page is loading ...
Page is loading ...
Page is loading ...
Page is loading ...
-
 1
1
-
 2
2
-
 3
3
-
 4
4
-
 5
5
-
 6
6
-
 7
7
-
 8
8
-
 9
9
-
 10
10
-
 11
11
-
 12
12
-
 13
13
-
 14
14
-
 15
15
-
 16
16
-
 17
17
-
 18
18
-
 19
19
-
 20
20
-
 21
21
-
 22
22
-
 23
23
-
 24
24
-
 25
25
-
 26
26
-
 27
27
-
 28
28
-
 29
29
-
 30
30
-
 31
31
-
 32
32
-
 33
33
-
 34
34
-
 35
35
-
 36
36
-
 37
37
-
 38
38
-
 39
39
-
 40
40
-
 41
41
-
 42
42
-
 43
43
-
 44
44
-
 45
45
-
 46
46
-
 47
47
-
 48
48
-
 49
49
-
 50
50
-
 51
51
-
 52
52
-
 53
53
-
 54
54
-
 55
55
-
 56
56
-
 57
57
-
 58
58
-
 59
59
-
 60
60
-
 61
61
-
 62
62
-
 63
63
-
 64
64
-
 65
65
-
 66
66
-
 67
67
-
 68
68
-
 69
69
-
 70
70
-
 71
71
-
 72
72
-
 73
73
-
 74
74
-
 75
75
-
 76
76
-
 77
77
-
 78
78
-
 79
79
-
 80
80
-
 81
81
-
 82
82
-
 83
83
-
 84
84
-
 85
85
-
 86
86
-
 87
87
-
 88
88
-
 89
89
-
 90
90
-
 91
91
-
 92
92


Gigabyte KRYPTON Installation guide
- Category
- Mice
- Type
- Installation guide
Ask a question and I''ll find the answer in the document
Finding information in a document is now easier with AI
in other languages
- español: Gigabyte KRYPTON Guía de instalación
- Deutsch: Gigabyte KRYPTON Installationsanleitung
- русский: Gigabyte KRYPTON Инструкция по установке
- polski: Gigabyte KRYPTON Instrukcja instalacji
- čeština: Gigabyte KRYPTON instalační příručka
Related papers
-
Gigabyte GM-M8000 Owner's manual
-
-
Gigabyte Aivia Uranium User manual
-
-
Gigabyte AIVIA M8600AIVIA M8600 User manual
-
Gigabyte FORCE M63(raptor) Quick start guide
-
Gigabyte Raptor Quick Manual
-
-
Gigabyte K8100V2 User manual
-
Gigabyte Aivia K8100 V2 User manual
