Philips HQ8255/18 User manual

Category
Men's shavers
Type
User manual
6
Introduction
Congratulations on your purchase and welcome
to Philips! To fully benet from the support that
Philips offers, register your product at www.philips.
com/welcome.
Please read this user manual, as it contains
information about the wonderful features of this
shaver as well as some tips to make shaving easier
and more enjoyable.
Important
Read this user manual carefully before you use the
appliance. Save the user manual for future reference.
Danger
- Make sure the adapter does not get wet.
Warning
- Be careful with hot water. Always check if the
water is not too hot, to prevent your hands from
getting burnt.
- The adapter contains a transformer. Do not cut
off the adapter to replace it with another plug, as
this causes a hazardous situation.
- This appliance is not intended for use by persons
(including children) with reduced physical, sensory
or mental capabilities, or lack of experience
and knowledge, unless they have been given
supervision or instruction concerning use of the
appliance by a person responsible for their safety.
- Children should be supervised to ensure that they
do not play with the appliance.
ENGLISH
Caution
- Never immerse the shaver in water.
- Charge (all types except HQ8200), use and store
the shaver at a temperature between 10°C and
35°C.
- Always put the protection cap on the shaver
to protect the shaving heads when you are
travelling.
- The shaver and the other accessories are not
dishwasher-proof.
- Never use water hotter than 80°C to rinse the
shaver.
- Do not use the shaver in the bath or in the
shower.
- Only use the adapter supplied.
- Do not use the shaver or the adapter if it is
damaged.
- If the adapter is damaged, always have it replaced
with one of the original type in order to avoid a
hazard.
Compliance with standards
- The shaver complies with the internationally
approved IEC safety regulations and can be safely
cleaned under the tap.
- This Philips appliance complies with all standards
regarding electromagnetic elds (EMF). If handled
properly and according to the instructions in this
user manual, the appliance is safe to use based on
scientic evidence available today.
General
- The adapter transforms 100-240 volts to a safe
low voltage of less than 24 volts.
- Noise level: Lc = 64 dB [A]
ENGLISH 7
Overview (Fig. 4)
Protection cap
B Shaving unit
C Shaving unit release button
D Shaver on/off button with power-on symbol
E Display (all types except HQ8200)
F Trimmer
G Cleaning brush
H Storage pouch (your pouch may differ from the
one shown in the gure)
I Adapter
J Small plug
Bathroom stand (HQ8251/HQ8250 only)

The HQ8251, HQ8250, HQ8241 and
HQ8240 have different displays, which are shown in
the gures below.
- HQ8251/HQ8250
- HQ8241/HQ8240
Charging indication
Charging takes approx. 60 minutes.
A fully charged shaver provides up to 17 cordless
shaves.
ENGLISH8
- When the shaver is charging, the CHARGE light is
on continuously.

- When the battery is fully charged, the CHARGE
light starts ashing.
Note: When you disconnect the shaver from the mains,
the CHARGE light stops ashing.


Note: If the rechargeable battery runs low during
shaving, you can connect the shaver to the mains to
nish the shave.
- When the battery is almost empty (when there
are only 5 or fewer shaving minutes left), the
LOW light goes on.
- When you switch off the shaver, the LOW light
ashes a few seconds.

Note: The HQ8200 is not rechargeable.
HQ8251/HQ8250: Charge the shaver when the
LOW light goes on.
HQ8241/HQ8240: Charge the shaver when the
motor stops or starts running slower.
ENGLISH 9
It takes approx. 60 minutes to fully charge the
battery.
When you charge the shaver for the rst time or
after a long period of disuse, let it charge for 12
hours.
Tip: To optimise the battery capacity, fully charge the
shaver and then use it normally until the battery is
completely empty. Repeat this process three times in a
row. If you optimise the battery capacity in this way, you
can also charge the shaver in between shaves, even if
the battery is not completely empty yet.
A fully charged shaver provides up to 17 cordless
shaves.
If you have a heavy beard, the shaver may provide
less than 17 cordless shaves. The shaving time may
also vary over time, depending on your shaving
behaviour, cleaning habits and beard type.
Charging the shaver
Do not charge the shaver in a closed pouch.
1 Put the small plug in the shaver.
2 Put the adapter in the wall socket.
, The CHARGE light goes on.

Note: The HQ8200 can only be used directly from the
mains.
Note for all types except HQ8200: You can also use
the appliance without charging. Simply connect the
appliance to the mains.
ENGLISH10
Shaving
1 HQ8200: Put the small plug in the shaver and
put the adapter in the wall socket.
2 Press the on/off button once to switch on the
shaver.
, The power-on symbol in the on/off button lights
up.
3 Move the shaving heads over your skin. Make
both straight and circular movements.
- Shaving on a dry face gives the best results.
- Your skin may need 2 or 3 weeks to get
accustomed to the Philips shaving system.
4 Press the on/off button once to switch off the
shaver.
5 HQ8200: Remove the adapter from the wall
socket and pull the small plug out of the shaver.
6 Clean the shaver (see chapter ‘Cleaning and
maintenance’).

You can use the trimmer to groom your sideburns
and moustache.
1 HQ8200: Put the small plug in the shaver and
put the adapter in the wall socket.
2 Press the on/off button once to switch on the
shaver.
, The power-on symbol in the on/off button lights
up.
ENGLISH 11
3 Push the trimmer slide downwards to open
the trimmer.
, You can now start trimming.
4 After trimming, close the trimmer (‘click’) and
switch off the shaver.
5 HQ8200: Remove the adapter from the wall
socket and pull the small plug out of the shaver.
Cleaning and maintenance
Never use scouring pads, abrasive cleaning agents
or aggressive liquids such as petrol or acetone to
clean the appliance.
- Clean the shaver after every shave for optimal
shaving performance.
- Be careful with hot water. Always check if the
water is not too hot, to prevent your hands from
getting burnt.
- You can clean the bathroom stand (HQ8251/
HQ8250 only) and the outside of the shaver with
a damp cloth.
Note: Water may leak from the socket at the bottom of
the appliance when you rinse it. This is normal and not
dangerous.
Cleaning the shaving unit under the tap
1 Switch off the shaver and disconnect it from
the mains.
ENGLISH12
2 Press the release button to open the shaving
unit.
3 Rinse the shaving unit and hair chamber under
a hot tap for some time.
- Make sure that you clean the inside as well as the
outside of the shaving unit.
Be careful with hot water. Always check if the
water is not too hot, to prevent your hands from
getting burnt.
4 Close the shaving unit and shake off excess
water.
Never dry the shaving unit and the hair chamber
with a towel or tissue, as this may damage the
shaving heads and the coupling spindles.
5 Open the shaving unit again and leave it open
to let the shaver dry completely.
Cleaning the shaving unit with the brush
supplied
1 Switch off the shaver and disconnect it from
the mains.
ENGLISH 13
2 Press the release button to open the shaving
unit.
3 Turn the lock anticlockwise (1) and remove the
retaining frame (2).
4 Clean the shaving heads with the brush
supplied. Each shaving head consists of a cutter
and a guard.
Do not clean more than one cutter and guard
at a time, since they are all matching sets. If you
accidentally mix up the cutters and guards, it
may take several weeks before optimal shaving
performance is restored.
5 Put the shaving heads back into the shaving
unit.
6 Put the retaining frame back into the shaving
unit and turn the lock clockwise.
7 Close the shaving unit.
Note: If the shaving unit does not close smoothly, check
if you have positioned the shaving heads properly and
if the retaining frame is locked.
ENGLISH14
Cleaning the trimmer with the brush
supplied
Clean the trimmer every time you have used it.
1 Switch off the shaver and disconnect it from
the mains.
2 Push the trimmer slide downwards to open
the trimmer.
3 Clean the trimmer with the short-bristled side
of the cleaning brush. Brush up and down along
the trimmer teeth.
4 Close the trimmer (‘click’).
Tip: For optimal trimming performance, lubricate the
trimmer teeth with a drop of sewing machine oil every
six months.
Storage
There are several ways to store the shaver or to
take it with you when you travel:
- put the protection cap on the shaver to prevent
damage.
- store the appliance in the pouch supplied.
- HQ8251/HQ8250: store the shaver in the
bathroom stand.
ENGLISH 15
Replacement
For maximum shaving performance, we advise
you to replace the shaving heads every two years.
Replace damaged shaving heads right away.
Only replace the shaving heads with original HQ9
Philips Shaving Heads.
1 Switch off the shaver and disconnect it from
the mains.
2 Press the release button to open the shaving
unit.
3 Turn the lock anticlockwise (1) and remove the
retaining frame (2).
4 Remove the shaving heads and place new ones
in the shaving unit.
Make sure that the projections of the shaving
heads t exactly into the recesses.
5 Put the retaining frame back into the shaving
unit and turn the lock clockwise.
6 Close the shaving unit.
Note: If the shaving unit does not close smoothly, check
if you have positioned the shaving heads properly and
if the retaining frame is locked.

The following accessories are available:
- HQ9 Philips Shaving heads
- HQ110 Philips Shaving Head Cleaning Spray (not
available in some countries)
- HQ8010 car cord.
ENGLISH16
Environment
- Do not throw away the appliance with the normal
household waste at the end of its life, but hand
it in at an ofcial collection point for recycling. By
doing this, you help to preserve the environment.
- All types except HQ8200: The built-in
rechargeable shaver battery contains substances
that may pollute the environment. Always remove
the battery before you discard or hand in the
shaver at an ofcial collection point. Dispose
of the battery at an ofcial collection point for
batteries. If you have trouble removing the battery,
you can also take the appliance to a Philips
service centre. The staff of this centre will remove
the battery for you and will dispose of it in an
environmentally safe way.


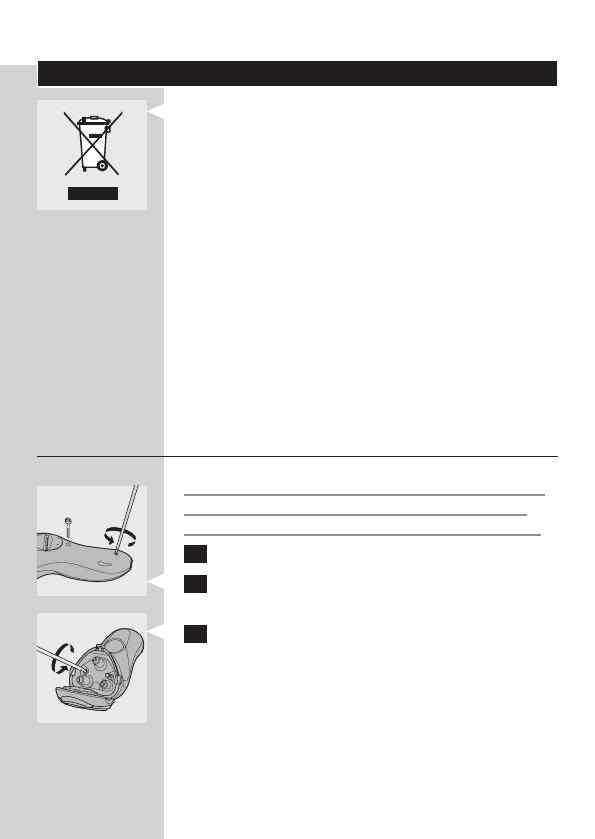
Only remove the rechargeable battery when you
discard the shaver. Make sure the rechargeable
battery is completely empty when you remove it.
1 Disconnect the shaver from the mains.
2 Let the shaver run until it stops and undo the
two screws in the back of the shaver.
3 Undo the two screws in the hair chamber.
ENGLISH 17
4 Remove the back panel.
5 Remove the two side panels.
6 Bend the 4 hooks aside and take out the
power unit.
Be careful, the hooks are sharp.
7 Undo the three screws in the power unit.
8 Remove the power unit cover with a
screwdriver.
9 Remove the battery.
Be careful, the battery strips are sharp.
Do not connect the shaver to the mains again after
you have removed the rechargeable battery.
ENGLISH18
Guarantee & service
If you need service or information or if you have a
problem, please visit the Philips website at
www.philips.com or contact the Philips Consumer
Care Centre in your country (you nd its phone
number in the worldwide guarantee leaet). If there
is no Consumer Care Centre in your country, go to
your local Philips dealer.
Guarantee restrictions
The shaving heads (cutters and guards) are not
covered by the terms of the international guarantee
because they are subject to wear.

1 The shaver does not shave as well as it used to.
- The shaving heads may be damaged or worn.
Replace the shaving heads (see chapter
‘Replacement’).
- Long hairs may be obstructing the shaving heads.
Clean the cutters and guards with the brush
supplied (see chapter ‘Cleaning and maintenance’).
2 The shaver does not work when I press the
on/off button.
- All types except HQ8200: The battery may
be empty. Recharge the battery (see chapter
‘Charging’) or connect the shaver to the mains.
- HQ8200: The shaver is not connected to the
mains. Put the small plug in the shaver, put the
adapter in the wall socket and press the on/off
button again.
ENGLISH 19
- The temperature of the shaver may be too high.
In this case, the shaver does not work. As soon
as the temperature of the shaver has dropped
sufciently, you can switch on the shaver again.
ENGLISH20
  • Page 1 1
  • Page 2 2
  • Page 3 3
  • Page 4 4
  • Page 5 5
  • Page 6 6
  • Page 7 7
  • Page 8 8
  • Page 9 9
  • Page 10 10
  • Page 11 11
  • Page 12 12
  • Page 13 13
  • Page 14 14
  • Page 15 15
  • Page 16 16
  • Page 17 17
  • Page 18 18
  • Page 19 19
  • Page 20 20
  • Page 21 21
  • Page 22 22
  • Page 23 23
  • Page 24 24
  • Page 25 25
  • Page 26 26
  • Page 27 27
  • Page 28 28
  • Page 29 29
  • Page 30 30
  • Page 31 31
  • Page 32 32
  • Page 33 33
  • Page 34 34
  • Page 35 35
  • Page 36 36
  • Page 37 37
  • Page 38 38
  • Page 39 39
  • Page 40 40
  • Page 41 41
  • Page 42 42
  • Page 43 43
  • Page 44 44
  • Page 45 45
  • Page 46 46
  • Page 47 47
  • Page 48 48
  • Page 49 49
  • Page 50 50
  • Page 51 51
  • Page 52 52
  • Page 53 53
  • Page 54 54
  • Page 55 55
  • Page 56 56
  • Page 57 57
  • Page 58 58
  • Page 59 59
  • Page 60 60
  • Page 61 61
  • Page 62 62
  • Page 63 63
  • Page 64 64
  • Page 65 65
  • Page 66 66
  • Page 67 67
  • Page 68 68
  • Page 69 69
  • Page 70 70
  • Page 71 71
  • Page 72 72
  • Page 73 73
  • Page 74 74
  • Page 75 75
  • Page 76 76
  • Page 77 77
  • Page 78 78
  • Page 79 79
  • Page 80 80
  • Page 81 81
  • Page 82 82
  • Page 83 83
  • Page 84 84
  • Page 85 85
  • Page 86 86
  • Page 87 87
  • Page 88 88
  • Page 89 89
  • Page 90 90
  • Page 91 91
  • Page 92 92
  • Page 93 93
  • Page 94 94
  • Page 95 95
  • Page 96 96
  • Page 97 97
  • Page 98 98
  • Page 99 99
  • Page 100 100
  • Page 101 101
  • Page 102 102
  • Page 103 103
  • Page 104 104
  • Page 105 105
  • Page 106 106
  • Page 107 107
  • Page 108 108
  • Page 109 109
  • Page 110 110
  • Page 111 111
  • Page 112 112
  • Page 113 113
  • Page 114 114
  • Page 115 115
  • Page 116 116
  • Page 117 117
  • Page 118 118
  • Page 119 119
  • Page 120 120
  • Page 121 121
  • Page 122 122
  • Page 123 123
  • Page 124 124
  • Page 125 125
  • Page 126 126
  • Page 127 127
  • Page 128 128
  • Page 129 129
  • Page 130 130
  • Page 131 131
  • Page 132 132
  • Page 133 133
  • Page 134 134
  • Page 135 135
  • Page 136 136
  • Page 137 137
  • Page 138 138
  • Page 139 139
  • Page 140 140
  • Page 141 141
  • Page 142 142
  • Page 143 143
  • Page 144 144
  • Page 145 145
  • Page 146 146
  • Page 147 147
  • Page 148 148
  • Page 149 149
  • Page 150 150
  • Page 151 151
  • Page 152 152
  • Page 153 153
  • Page 154 154
  • Page 155 155
  • Page 156 156
  • Page 157 157
  • Page 158 158
  • Page 159 159
  • Page 160 160
  • Page 161 161
  • Page 162 162
  • Page 163 163
  • Page 164 164
  • Page 165 165
  • Page 166 166
  • Page 167 167
  • Page 168 168
  • Page 169 169
  • Page 170 170
  • Page 171 171
  • Page 172 172
  • Page 173 173
  • Page 174 174
  • Page 175 175
  • Page 176 176
  • Page 177 177
  • Page 178 178
  • Page 179 179
  • Page 180 180
  • Page 181 181
  • Page 182 182
  • Page 183 183
  • Page 184 184
  • Page 185 185
  • Page 186 186
  • Page 187 187
  • Page 188 188
  • Page 189 189
  • Page 190 190
  • Page 191 191
  • Page 192 192
  • Page 193 193
  • Page 194 194
  • Page 195 195
  • Page 196 196
  • Page 197 197
  • Page 198 198
  • Page 199 199
  • Page 200 200
  • Page 201 201
  • Page 202 202
  • Page 203 203
  • Page 204 204
  • Page 205 205
  • Page 206 206
  • Page 207 207
  • Page 208 208
  • Page 209 209
  • Page 210 210
  • Page 211 211
  • Page 212 212
  • Page 213 213
  • Page 214 214
  • Page 215 215
  • Page 216 216
  • Page 217 217
  • Page 218 218
  • Page 219 219
  • Page 220 220
  • Page 221 221
  • Page 222 222
  • Page 223 223
  • Page 224 224
  • Page 225 225
  • Page 226 226
  • Page 227 227
  • Page 228 228
  • Page 229 229
  • Page 230 230
  • Page 231 231
  • Page 232 232
  • Page 233 233
  • Page 234 234
  • Page 235 235
  • Page 236 236
  • Page 237 237
  • Page 238 238
  • Page 239 239
  • Page 240 240

Philips HQ8255/18 User manual

Category
Men's shavers
Type
User manual

Ask a question and I''ll find the answer in the document

Finding information in a document is now easier with AI