Philips PT717/16 User manual

Category
Men's shavers
Type
User manual

This manual is also suitable for

6
Introduction
Congratulations on your purchase and welcome to Philips! To fully benet
from the support that Philips offers, register your product at
www.philips.com/welcome.
Please read this user manual, as it contains information about the wonderful
features of this shaver as well as some tips to make shaving easier
and more enjoyable.
General description (Fig. 1)
1 Protection cap
2 Shaving unit
3 Shaving unit release button
4 Shaver on/off button
5 Adapter
6 Cleaning brush
Note: You can nd the type number on the back of the shaver.
Important
Read this user manual carefully before you use the appliance and save it for
future reference.
Danger
- Keep the adapter dry.
- Forbidden to clean the adapter under a running tap.
Warning
- The adapter contains a transformer. Do not cut off the adapter to
replace it with another plug, as this causes a hazardous situation.
- The appliance is not intended for use by persons (including children)
with reduced physical, sensory or mental capabilities, or lack of
experience and knowledge, unless they have been given supervision or
instruction concerning use of the appliance by a person responsible for
their safety.
- Children should be supervised to ensure that they do not play with
the appliance.
- Always unplug the shaver before you clean it under the tap.
- Forbidden to use in the shower.
- Do not use this appliance close to a bathtub, shower or other
containers lled with water.
Caution
- Do not immerse the shaver in water or any other liquid.
- Do not use water hotter than 80°C to rinse the shaver.
- Be careful with hot water. Always check if the water is not too hot, to
prevent your hands from getting burnt.
- The shaver is not dishwasher-proof.
- Warning: Remove the detachable cord from the handheld part before
cleaning this part in water.
- Water may leak from the socket at the bottom of the shaver when you
rinse it. This is normal and not dangerous because all electronics are
enclosed in a sealed power unit inside the shaver.
ENGLISH
- Do not use the shaver or the adapter if it is damaged, as this may cause
injury. Always replace a damaged adapter with one of the original type.
- Use and store the appliance at a temperature between 10°C and
35°C.
- Always place and use the shaver on a surface that is uid-resistant.
- Only use the adapter and accessories supplied.
- Always put the protection cap on the shaver to protect the shaving
heads when you are travelling.
Compliance with standards
- This Philips appliance complies with all applicable standards and
regulations regarding electromagnetic elds (EMF).
General
- This shaver is suitable to be cleaned under a running tap.
- The adapter is equipped with an automatic voltage selector and is
suitable for mains voltages ranging from 100 to 240 volts.
- The adapter transforms 100-240 volts to a safe low voltage of less than
24 volts.
Using the shaver
Note: This shaver is not rechargeable and can only be used from the mains.
1 Put the small plug in the shaver.
2 Put the adapter in the wall socket.
3 Press the on/off button once to switch on the shaver.
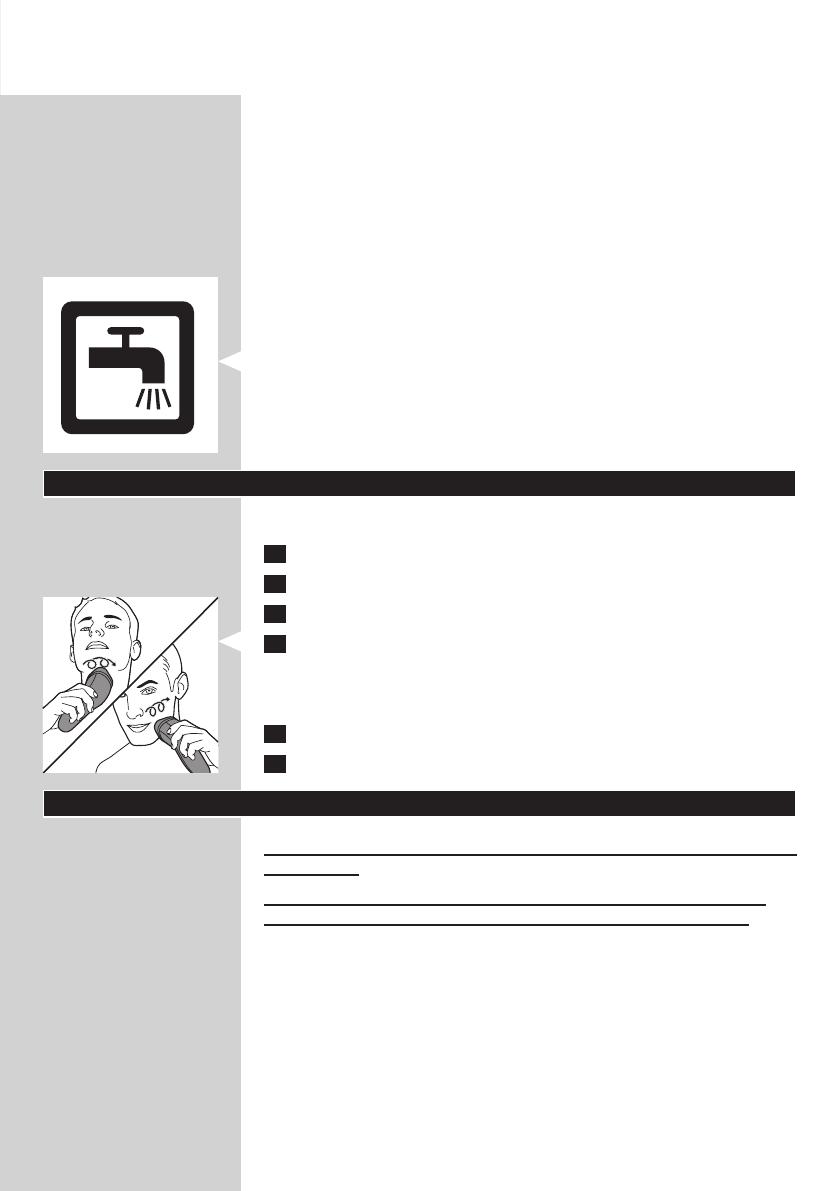
4 Move the shaving heads over your skin. Make circular movements.
- Do not make straight movements.
- Your skin may need 2 or 3 weeks to get accustomed to the Philips
shaving system.
5 Press the on/off button once to switch off the shaver.
6 Clean the shaver (see chapter ‘Cleaning and maintenance’).
Cleaning and maintenance
Remove the detachable cord from the handheld part before cleaning this
part in water.
Never use compressed air, scouring pads, abrasive cleaning agents or
aggressive liquids such as petrol or acetone to clean the appliance.
- Clean the shaver after every shave for optimal shaving performance.
- Regular cleaning guarantees better shaving performance.
- For the best cleaning results, we advise you to use the Philips Cleaning
spray (HQ110).
- Be careful with hot water. Always check if the water is not too hot, to
prevent your hands from getting burnt.
Note: Water may leak from the socket at the bottom of the shaver when you
rinse it. This is normal and not dangerous because all electronics are enclosed
in a sealed power unit inside the shaver.
ENGLISH 7
Cleaning the shaving unit under the tap
1 Switch off the shaver and disconnect it from the mains.
2 Press the release button to open the shaving unit.
3 Rinse the shaving unit and hair chamber under a hot tap for
30 seconds.
Be careful with hot water. Always check if the water is not too hot, to
prevent your hands from getting burnt.
- Rinse the hair chamber and the inside of the shaving unit.
- Rinse the outside of the shaving unit.
4 Close the shaving unit and shake off excess water.
Be careful not to hit the shaving unit against anything while shaking off
excess water.
Never dry the shaving unit and the hair chamber with a towel or tissue,
as this may damage the shaving heads and the coupling spindles.
5 Open the shaving unit again and leave it open to let the shaver dry
completely.
Cleaning the shaving unit with the cleaning brush
1 Switch off the shaver and disconnect it from the mains.
2 Press the release button to open the shaving unit.
3 Pull the shaving unit off the shaver.
ENGLISH8
4 Turn the lock anticlockwise (A) and remove the retaining frame (B).
5 Remove and clean one shaving head at a time. Each shaving head
consists of a cutter and a guard.
Note: Do not clean more than one cutter and guard at a time, since they are
all matching sets. If you accidentally mix up the cutters and guards, it may take
several weeks before optimal shaving performance is restored.
- Remove the cutter from the shaving guard and clean it with the brush.
- Clean the inside and outside of the shaving guard with the brush.
6 Put the shaving heads back into the shaving unit.
Note: Make sure that the projections of the shaving heads t exactly into the
recesses.
ENGLISH 9
7 Put the retaining frame back into the shaving unit (A) and turn the
lock clockwise (B).
8 Insert the lug of the shaving unit into the slot in the top of the shaver.
Then close the shaving unit.
Note: If the shaving unit does not close smoothly, check if you have inserted
the shaving heads properly and if the retaining frame is locked.
Storage
- Put the protection cap on the shaver every time you have used it, to
prevent damage.
Replacement
For maximum shaving performance, we advise you to replace the shaving
heads every two years.
Only replace the shaving heads with original HQ8 Philips Shaving Heads.
1 Switch off the shaver. Disconnect the shaver from the mains.
2 Press the release button to open the shaving unit.
3 Pull the shaving unit off the shaver.
4 Turn the lock anticlockwise (A) and remove the retaining frame (B).
ENGLISH10
5 Remove the shaving heads and place new ones in the shaving unit.
Note: Make sure that the projections of the shaving heads t exactly into the
recesses.
6 Put the retaining frame back into the shaving unit (A) and turn the
lock clockwise (B).
7 Insert the lug of the new shaving unit into the slot in the top of the
shaver. Then close the shaving unit.
Note: If the shaving unit does not close smoothly, check if you have inserted
the shaving heads properly and if the retaining frame is locked.
ENGLISH 11
Ordering accessories
To retain the top performance of your shaver, make sure you clean it
regularly and replace its shaving heads at the recommended time.
Shaving heads
- We advise you to replace your shaving heads every two years. Always
replace with HQ8 shaving heads.
Cleaning
- Use Cleaning spray (HQ110) to clean the shaving heads thoroughly.
Environment
- Do not throw away the appliance with the normal household waste at
the end of their life, but hand them in at an ofcial collection point for
recycling. By doing this, you help to preserve the environment.
Guarantee and support
If you need information or support, please visit www.philips.com/
support or read the separate worldwide guarantee leaet.
Guarantee restrictions
The shaving heads (cutters and guards) are not covered by the terms of
the international guarantee because they are subject to wear.
Troubleshooting
This chapter summarises the most common problems you could
encounter with the appliance. If you are unable to solve the problem with
the information below, visit www.philips.com/support for a list of
frequently asked questions or contact the Consumer Care Centre in your
country.
ENGLISH12
Problem Possible cause Solution
The shaver does
not shave as well
as it used to.
The shaving heads are damaged
or worn.
Replace the shaving heads (see chapter
‘Replacement’).
Long hairs obstruct the shaving
heads.
Clean the shaving heads one by one
(see chapter ‘Cleaning and maintenance’).
You have not inserted the shaving
heads properly.
Make sure that the projections of the shaving
heads t exactly into the recesses (see
chapter ‘Replacement’).
The shaver does
not work when I
press the on/off
button.
The temperature of the shaver is
too high. In this case, the shaver
does not work.
As soon as the temperature of the shaver has
dropped sufciently, you can switch on the
shaver again.
You have not connected the
shaver to the mains. This shaver
can only be used directly from the
mains.
Put the small plug in the shaver, put the
adapter in the wall socket and press the
on/off button again.
ENGLISH 13
  • Page 1 1
  • Page 2 2
  • Page 3 3
  • Page 4 4
  • Page 5 5
  • Page 6 6
  • Page 7 7
  • Page 8 8
  • Page 9 9
  • Page 10 10
  • Page 11 11
  • Page 12 12
  • Page 13 13
  • Page 14 14
  • Page 15 15
  • Page 16 16
  • Page 17 17
  • Page 18 18
  • Page 19 19
  • Page 20 20
  • Page 21 21
  • Page 22 22
  • Page 23 23
  • Page 24 24
  • Page 25 25
  • Page 26 26
  • Page 27 27
  • Page 28 28
  • Page 29 29
  • Page 30 30
  • Page 31 31
  • Page 32 32
  • Page 33 33
  • Page 34 34
  • Page 35 35
  • Page 36 36
  • Page 37 37
  • Page 38 38
  • Page 39 39
  • Page 40 40
  • Page 41 41
  • Page 42 42
  • Page 43 43
  • Page 44 44
  • Page 45 45
  • Page 46 46
  • Page 47 47
  • Page 48 48
  • Page 49 49
  • Page 50 50
  • Page 51 51
  • Page 52 52
  • Page 53 53
  • Page 54 54
  • Page 55 55
  • Page 56 56
  • Page 57 57
  • Page 58 58
  • Page 59 59
  • Page 60 60
  • Page 61 61
  • Page 62 62
  • Page 63 63
  • Page 64 64
  • Page 65 65
  • Page 66 66
  • Page 67 67
  • Page 68 68
  • Page 69 69
  • Page 70 70
  • Page 71 71
  • Page 72 72
  • Page 73 73
  • Page 74 74
  • Page 75 75
  • Page 76 76
  • Page 77 77
  • Page 78 78
  • Page 79 79
  • Page 80 80
  • Page 81 81
  • Page 82 82
  • Page 83 83
  • Page 84 84
  • Page 85 85
  • Page 86 86
  • Page 87 87
  • Page 88 88
  • Page 89 89
  • Page 90 90
  • Page 91 91
  • Page 92 92
  • Page 93 93
  • Page 94 94
  • Page 95 95
  • Page 96 96
  • Page 97 97
  • Page 98 98
  • Page 99 99
  • Page 100 100
  • Page 101 101
  • Page 102 102
  • Page 103 103
  • Page 104 104
  • Page 105 105
  • Page 106 106
  • Page 107 107
  • Page 108 108
  • Page 109 109
  • Page 110 110
  • Page 111 111
  • Page 112 112
  • Page 113 113
  • Page 114 114
  • Page 115 115
  • Page 116 116
  • Page 117 117
  • Page 118 118
  • Page 119 119
  • Page 120 120
  • Page 121 121
  • Page 122 122
  • Page 123 123
  • Page 124 124
  • Page 125 125
  • Page 126 126
  • Page 127 127
  • Page 128 128
  • Page 129 129
  • Page 130 130
  • Page 131 131
  • Page 132 132
  • Page 133 133
  • Page 134 134

Philips PT717/16 User manual

Category
Men's shavers
Type
User manual
This manual is also suitable for

Ask a question and I''ll find the answer in the document

Finding information in a document is now easier with AI