Page is loading ...

For series /
Para la serie /
Pour la série
For series /
Para la serie /
Pour la série
CAM4002
EN
Snapp™ Digital Camcorder
Instruction Manual ...........................................................................Page 2
ES
Snapp™ Videocámara Digital
Manual de Instrucciones ..........................................................Pagina 44
FR
Snapp™ Caméscope Numérique
Manuel D’instruction .................................................................... Page 90
Please read carefully before use • Léa el manual antes de usar • Veuillez lire ce livret avant utilisation

Page 2 Table Of Contents
English
PACKAGE CONTENTS .................................... 4
CAMERA AT A GLANCE ................................. 5
Front View ....................................................... 5
Front View ....................................................... 6
Left View ..........................................................7
Rear View ........................................................8
Bottom View ...................................................8
GETTING STARTED ........................................... 9
Install the Batteries .........................................9
Insert a Memory Card ...................................9
Turning the Camera On/Off ....................... 10
Changing Camera Modes ......................... 10
RECORD MODE (PHOTOS & MOVIES) ...........11
To Record a Movie ........................................11
To Take a Photo .............................................11
Movie and Photo Adjustments ....................11
Zoom ....................................................11
Using the Low-Light Assist Lamp .......12
Changing the Movie Size ..................12
Changing the Photo Size ...................13
Changing the Photo Quality.............13
PLAYBACK MODE ..........................................14
Playback Controls .........................................14
To Browse Files .....................................14
To Browse Files as Thumbnails ...........14
Deleting Files ..................................................15
To delete the current le
(delete one): .......................................15
To delete all les (delete all): .............15
OPTIONS MENU .............................................16
To adjust the Record options: ......................16
To adjust the Playback options: ................. 18
To adjust the System options: ......................20
Table of Contents
Â

Table Of Contents Page 3
English
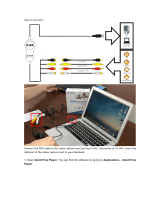
CONNECTING TO A TV ................................ 23
TRANSFERRING FILES TO A COMPUTER ....... 24
USING THE INCLUDED SOFTWARE ................ 26
Installing muvee™ autoProducer ............... 27
Using muvee™ autoProducer ......................31
Making a muvee™ ...........................32
SPECIFICATIONS ........................................... 36
TROUBLESHOOTING & SUPPORT ....................37
IMPORTANT INFORMATION ..........................39
FCC Statement .............................................40
Important Safety Instructions .......................41
Maintenance and Care ..............................43

Page 4 Package Contents
English
Thank you for purchasing a Coby Snapp™ CAM
Digital Video Camera. Please read these instructions
before using your camcorder, and retain them for
future reference. This package includes:
CAM camera
A/V Cable
USB cable
Three “AAA” batteries
Installation CD
Pouch
Should any of the above items be missing, please
contact the dealer from whom you purchased this
product.
This package may contain plastic bags or
other materials that pose a hazard to chil-
dren. Be sure to safely dispose of all packing
materials after opening.
Package Contents
Â

Camera At A Glance Page 5
English
Camera At A Glance Page 5
English
Front View
1
Press to take a photo when the camera is in Record
mode.
2
Press to shoot video when the camera is in Record
mode.
3
Press the joystick to enter a selected option (OK).
Push the joystick up, left, down, or right to trigger buttons
(4) to (8) below.
4 Push the joystick up to increase the zoom level.
5
Push the joystick left to change the photo resolution.
Higher resolution photos will use more memory.
6 Push the joystick down to decrease the zoom level.
7
Push the joystick right to toggle the low-light assist
lamp.
8
Press to change between Playback and Record
modes.
9 Press to delete a le.
1
3
2
7
9
4
6
5
8
Camera at a Glance
Â

Page 6 Camera At A Glance
English
Front View
10
Display screen. Flip the screen up to open it, then rotate the
screen to face you.
(The POWER and MENU buttons are protected behind the
display screen when it is closed.)
11
A/V output jack. Use with the included A/V cable to connect
the camera to a TV or other display.
(The A/V output jack is protected by a rubber ap. Lift the ap
up to reveal the A/V output jack.)
12
USB port. Use with the included USB cable to connect the
camera to a computer.
(The USB port is protected by a rubber ap. Lift the ap up to
reveal the USB port.)
11
12
10

Camera At A Glance Page 7
English
Left View
13
Press and hold to turn the camera on or o.
(The POWER button is protected behind the display
screen. Flip open the screen to access this button.)
14
Press to access the option menu.
(The MENU button is protected behind the display
screen. Flip open the screen to access this button.)
13
14

Page 8 Camera At A Glance
English
Rear View
Camera lens.
Point the lens towards the subject that you
want to capture
Low-light assist lamp.
Improves picture quality in low light situa-
tions.
Microphone.
Captures audio during movie recording
Battery cover.
Slide the cover down to install or replace the
batteries.
Bottom View
Tripod mount
SD/SDHC card slot. Load SD or SDHC memory
cards into the slot. The metal contacts of the
card should face down.
15
16
17
18
2019

Getting Started Page 9
English
Getting Started Page 9
English
Please read and complete the following steps to
begin using your digital video camera.
Install the Batteries
Remove the battery compartment door by slid-1.
ing it toward the base of the camera.
Load three “AAA” batteries into the compart-2.
ment as shown in the diagram.
Replace the battery compartment door.3.
The battery used in this device may present
a re or chemical hazard if mistreated. Do
not recharge, disassemble, incinerate, or
heat the batteries. Used batteries should be
disposed of safely.
Replace all batteries at the same time. Do
not mix old with new batteries. Do not mix
dierent types of batteries.
Keep batteries out of the reach of children.
Insert a Memory Card
This camera records to SD or SDHC memory cards.
The maximum supported card size is GB.
Make sure that the write protection switch on the
memory card is set to the “unlocked” position.
Getting Started
Â

Page 10 Getting Started
English
Install the memory card by inserting it gently
into the card slot on the bottom of the video
camera. Push the card until it clicks into place.
Make sure the card is properly aligned as indi-
cated by the marking next to the card slot.
To release and remove the card, press the card in;
it will spring out of the slot. Grasp the card by its
edge to remove it.
To avoid data corruption, turn o the digital
video camera before inserting or removing
a memory card.
Avoid touching the gold contacts of the
memory card.
Do not attempt to insert objects other than
an SD or SDHC memory card into the card
slot. A compatible memory card should t
easily into the card slot; if you encounter
resistance, check the alignment of the card.
Do not attempt to force the card in.
Turning the Camera On/O
Press and hold to turn the camera on. Press
to turn the camera o.
To save power, the camera will turn itself
o automatically after one minute when
not in use.
Changing Camera Modes
Your video camera has two modes: Record and
Playback. Press to toggle between them.
Icon
Camera
Mode
Function
Record
Take photos and record
movies.
Playback
Review movie and photo
les.

Record Mode (photos & Movies) Page 11
English
Record Mode (photos & Movies) Page 11
English
Â
Place the camera in Record mode to take photos
and record movies. When the camera is in Record
mode, simply press to take a photo or press
to record a movie.
When you turn on your camera, it will enter
Record mode automatically.
To Record a Movie
Press to begin recording.
Press to stop recording.
When the camera is recording, the elapsed
recording time is displayed on the upper
right corner of the screen. When the camera
is not recording, the estimated available re-
cording time is displayed instead.
Recording will stop automatically when the
memory card is full.
To Take a Photo
Press to take a photo.
The estimated number of available photos
on the memory card is displayed on the up-
per left corner of the screen.
Movie and Photo Adjustments
Additional adjustments are available through the
Options menu. Please refer to the Options Menu
section for more information.
Zoom
To use the camera’s digital zoom function:
Press
to zoom in.
Press to zoom out.
Record Mode (Photos & Movies)
Â

Page 12 Record Mode (photos & Movies)
English
The magnication level is displayed on the
lower right of the screen.
Using the Low-Light Assist Lamp
The low-light assist lamp may help to increase
photo or movie quality in dark environments where
proper lighting is not possible. For best results,
subjects should be well lit. The assist lamp cannot
substitute for proper lighting.
Press to turn the lamp on or o.
Using the low-light assist lamp will decrease
battery life.
Changing the Movie Size
The camera can record at a maximum movie size
of x pixels. To increase recording time, you
may wish to record movies at a lower resolution.
The movie size is displayed on the upper right of
the screen.
Movie Size Resolution
[] VGA ( x )
[] QVGA ( x )
To change the movie size:
Press 1.
to access the options menu.
Press 2. to select the Movie Size option and
then press .
Press 3. or to select a movie size. Press the
joystick to set the movie size.
Press 4. to exit the options menu.
Recording must be stopped to change the
movie size.

Record Mode (photos & Movies) Page 13
English
Changing the Photo Size
The camera can record at a maximum photo size
of . MP ( x ). To increase the amount of
photos you can take, you may wish to take photos
at a lower resolution.
The photo size is displayed on the upper left of the
screen:
Photo Size Resolution
[M] . MP ( x )*
[M] . MP ( x )
* Based on interpolation.
To change the photo size:
Press
to change the photo size.
Changing the Photo Quality
You can change the quality that photos are re-
corded at in order to conserve memory. To increase
the amount of photos you can take, you may wish
to take photos with a lower quality setting.
The photo quality is displayed on the left side of the
screen:
Photo
Quality
Resolution
Super Fine (highest quality)
Fine (higher quailty)
Normal (normal quality)
To change the photo quality:
Press 1.
to access the options menu.
Press 2.
to select the Quality option and then
press .
Press 3. or to select a quality setting. Press
the joystick to set the movie size.
Press 4. to exit the options menu.

Page 14 Playback Mode
English
Place the camera in Playback mode to review or
delete movies and photos on the camera.
Press to place the camera in playback mode.
Playback Controls
To Browse Files
Press or to browse the les on the
camera.
If a movie le is selected, the movie icon will
be displayed on the lower left of the screen.
If a photo le is selected, the [JPG] icon will
be displayed on the lower left of the screen.
Press the joystick to play a movie le. When
playing a movie le:
Press
to pause movie playback. Press
again to resume playback.
Press the joystick to quit playback and
return to browsing les.
When viewing a photo le:
Press
or to increase or decrease the
magnication level of the photo le.
When a photo is magnied, press the joy-
stick to enter Pan mode. Press / /
/ to move around the magnied
photo.
Press the joystick again to exit Pan mode
and return to a normal view.
To Browse Files as Thumbnails
When the camera is in Playback mode, press to
browse les as thumbnails. This allows you to see
up to nine les on one screen.
Press
/ / / to select a le. Movie
les are marked with a “V”.
Press the joystick to expand the le to ll the
screen.
Press again to return to the thumbnail view.
Playback Mode
Â

Playback Mode Page 15
English
Playback Mode Page 15
English
Deleting Files
To delete the current le (delete one):
Press 1. . A “Delete this File?” prompt will ap-
pear.
To delete the le, press or to select
“Yes”, then press the joystick to nish.
To cancel without deleting les, press or
to select “No”, then press the joystick.
To delete all les (delete all):
Press 1. to access the Options menu.
Press 2. or to select “Delete”, then press
the joystick to continue.
Press 3. or to select “All”, then press the
joystick to continue.
To delete all les, press
/ to select
“Yes”, then press the joystick to nish.
To cancel without deleting les, press or
to select “No”, then press the joystick.
(Press to exit the Options menu.)

Page 16 Options Menu
English
Page 16 Options Menu
English
Options Menu
Â
Access the Options menu to adjust the camera’s
internal options.
Some setup options are related to Movie or
Photo mode only. To access to these spe-
cic options, place the camera in Movie or
Photo mode before entering the Options
menu, respectively.
To adjust the Record options:
Press . to place the camera in Record mode.
When the camera is in Record mode, you will
see the Photo [ ] and Movie [ ] icons at
the top of the screen.
Press 2. to access the Options menu. The
Record options tab will be selected.
Press
or to select an option.
Press the joystick to enter the selected op-
tion.
Press
or to adjust the option. Press
the joystick to set the option.
Press to return to the previous screen
and to exit the Options menu.
Menu Item Function
Resolution
Change the photo resolution.
2048 x 1944*: 3.1 MP resolution.•
1280 x 1024: 1.3 MP resolution.•
640 x 480: 0.3 MP resolution.•
Note: Higher resolutions will result in a larger
le size.
Movie Size
Change the movie resolution.
640 x 480: VGA resolution.•
320 x 240: QVGA resolution.•
Note: Shooting at VGA resolution will result in
a larger le size.

Options Menu Page 17
English
Menu Item Function
Frame Rate
Change the movie frame rate.
High: 30 frames per second.•
Low: 15 frames per second.•
Note: Movies recorded with a higher frame
rate will be smoother but will result in a larger
le size.
Quality
Change the photo quality.
Super Fine•
Fine•
Normal•
Note: A higher photo quality will result in a
larger le size.
Menu Item Function
Metering
Adjust the exposure of the image by designat-
ing a reference area within the frame.
Center: The exposure will be calculated based
on light in the central area of the frame.
This option is suitable for general use.
Multi: The exposure will be calculated based
on the average light throughout the
frame.
Spot: The exposure will be calculated based
on the light in the very center of the
frame.
White Balance
Adjust the white balance to current light condi-
tions.
Exposure
Set the exposure value manually to compen-
sate for unusual lighting conditions such as
indirect indoor lighting, dark backgrounds, or
strong backlighting.
Note: Use a lower exposure value to compen-
sate for bright lighting conditions; use a higher
exposure value for dark conditions.

Page 18 Options Menu
English
Menu Item Function
Driver Mode
Set the self-timer mode for photos.
O: The photo will be taken immediately •
after
is pressed.
Self-timer 2S: The photo will be taken 2 •
seconds after is pressed.
Self-timer 10S: The photo will be taken 10 •
seconds after is pressed.
Burst: Press • to take 3 photos in rapid
succession.
Eect
Select an eect to apply fun and creative lters
to your photos.
To adjust the Playback options:
Press . to place the camera in Playback mode.
When the camera is in Playback mode, you will
see the Playback icon [ ] at the top of the
screen.
Press 2. to access the Options menu. The
Record options tab will be selected.
Press or to select an option.
Press the joystick to enter the selected op-
tion.
Press or to adjust the option. Press
the joystick to set the option.
Press to return to the previous screen
and to exit the Options menu.
If a movie le is selected, the only options
available will be Lock and Delete. Select
a photo le before accessing the Options
menu to view photo-specic options.

Options Menu Page 19
English
Menu Item Function
Lock
Lock les on the camera to protect them from
being deleted. You can also unlock les that
are locked.
Lock/Unlock One: Lock or unlock the current •
le.
Lock All: Lock all les.•
Unlock All: Unlock all les.•
Note: Locked les are marked with a “key” icon
when viewed in Playback mode.
Delete
Delete les from the camera.
One: Delete the current le.•
All: Delete all les.•
Note: Locked les will not be deleted until they
are unlocked.
Menu Item Function
Slide Show (photo
only)
View a slide show of all photos on the camera.
You can also set the slide show options here.
Start: Start the slide show. During the slide •
show, press
to pause, or press any other
button to quit the slide show.
Interval: Set the display duration for each •
photo in the slide show.
Repeat: Have the slide show repeat in a loop.•
Eect (photo
only)
Apply a fun and creative lter to the current
photo. A copy of the photo le will be created;
the original photo will not be altered when an
eect is applied.
Rotate (photo
only)
Rotate the current photo.
Rotate: Rotate the photo clockwise 90 •
degrees.
Save: Save the rotated photo.•
Back: Cancel and return to the previous •
screen without saving the rotated photo.
Note: Locked les cannot be rotated.

Page 20 Options Menu
English
Menu Item Function
Start-up Image
(photo only)
Use the current photo as the start-up image.
The start-up image will need to be changed in
the System options menu.
To adjust the System options:
Press to access the Options menu, then press
once to select the System options tab.
Press or to select an option.
Press the joystick to enter the selected option.
Press or to adjust the option. Press the
joystick to set the option.
Press to return to the previous screen and
to exit the Options menu.
Menu Item Function
Sounds
Change the alert tone options.
Shutter: Play a tone when you take a photo.•
Start-up: Change the melody you hear when •
the camera turns on.
Beep: Sound a tone when you press a but-•
ton.
Volume: Adjust the loudness of the alert •
tones.
/