Page is loading ...

Installation Instructions
Trektop Halftop Kit
Vehicle Application:
Jeep® Wrangler JL 2018-Current
Part Number 80101
P1 - 80101 Rev. D 0721 Installation Instructions - Trektop Halftop Kit © 2021 Bestop, Inc.
Before you begin installing your new Trektop Halftop Kit,
please read all the instructions thoroughly.
Do not rely in any way on the components of this
product to protect against injury or death in the event of an accident.
Never operate the vehicle in excess of manufacturer’s specifications.
Read and follow, precisely, all installation instructions provided when
installing this product. Failure to do so may result in a poor fit and could
place occupants of the vehicle in a potentially dangerous situation.
WEAR SEAT BELTS AT ALL TIMES
Installation TimeTools
Skill Level
Safety glasses should be worn at all times
when installing this product.
WARNING
Installation Tips
Safety
Glasses
Support
We’re here to help! Go to:
https://www.bestop.com
and click on Need Help?
https://www.bestop.com/video-library
4mm and 5mm
Hex Key
2 - Moderatly Easy
1 00
1 Hour
For easier installation, the top should be installed at a temprature above
72° F.
Below this temprature, the fabric may contract making it difficult to fit the
vehicle.
10mm
Wrench

Installation Instructions
Trektop Halftop Kit
Vehicle Application:
Jeep® Wrangler JL 2018-Current
Part Number 80101
P2 - 80101 Rev. D 0721 Installation Instructions - Trektop Halftop Kit © 2021 Bestop, Inc.
P1B - 54823 Rev. G 0416 Installation Instructions - Supertop NX Twill © 2016 Bestop, Inc.
Installation Instructions
Supertop NX Twill
Vehicle Application:
Jeep Wrangler Unlimited
2007-current
Part Number 54823

Installation Instructions
Trektop Halftop Kit
Vehicle Application:
Jeep® Wrangler JL 2018-Current
Part Number 80101
P3 - 80101 Rev. D 0721 Installation Instructions - Trektop Halftop Kit © 2021 Bestop, Inc.
Washer, Flat M6
Part #515.81
Qty. 4
Nut, M6X1 Lock Blk
Part #515.82
Qty. 6
Aluminum Bow
Part # 609.30
Qty. 1
Bow D Pillar
Part #610.90
Qty. 2
Windjammer
retainer
Part #614.46
Qty. 1
Button Head Screw
M6X1X14
Part #517.63
Qty. 6
Plastic End Cap (Right)
Part # 592.66
Qty. 1
Plastic End Cap (Left)
Part # 593.71
Qty. 1
Duster Assembly
Windjammer Assembly
Sportbar Sleeve Left
x
x
x
x
x
x
x
x
x
x
x
x
x
x
x
x
x
x
x
x
x
x
x
x
x
x
x
x
x
x
x
x
x
x
x
x
x
x
x
x
x
x
x
x
x
xx
xx
x
x
x
x
x
x
x
x
x
x
x
x
x
x
x
x
x
x
x
x
x
x
x
x
x
x
x
x
x
x
x
x
x
x
x
x
x
x
x
x
x
x
x
x
x
x
x
x
x
x
x
x
x
x
x
x
x
x
x
x
x
x
x
x
x
x
x
x
x
x
x
x
x
x
x
x
x
x
x
x
x
x
x
x
x
x
x
x
x
x
x
x
x
x
x
x
x
x
x
x
x
x
x
x
x
x
x
x
x
x
x
x
x
x
x
x
x
x
x
x
x
x
x
x
x
x
x
x
x
x
x
x
x
x
x
x
x
x
x
x
x
x
xxxxxx
x
xx
x
x
x
x
x
x
x
x
x
x
x
x
x
x
x
x
x
x
x
x
x
x
x
x
x
x
x
x
x
x
x
x
x
x
x
x
x
x
x
x
x
x
x
x
x
x
x
x
x
x
x
x
x
x
x
x
x
x
x
x
x
x
x
x
x
x
x
x
x
x
x
x
x
x
x
x
x
x
x
x
x
x
x
x
x
x
x
x
x
x
x
x
x
x
x
x
x
x
x
x
x
x
x
x
x
x
x
x
x
x
x
x
x
x
x
x
x
x
x
x
x
x
x
x
x
x
x
x
x
x
x
x
x
x
xx
xx
xx
x
x
xx
x
xxxxxxx
x
x
x
x
x
x
x
x
x
x
x
x
x
x
x
x
x
x
x
x
x
x
x
x
x
x
x
x
x
x
x
x
x
x
x
x
x
x
x
x
x
x
x
x
x
xxxxx
x
x
x
x
x
x
x
x
x
x
x
x
x
x
x
x
x
x
x
x
x
x
x
x
x
x
x
x
x
x
x
x
x
x
x
x
x
x
x
x
x
x
x
x
x
x
x
x
x
x
x
x
x
x
x
x
x
x
x
x
x
x
x
x
x
x
x
x
x
x
x
x
x
x
x
x
x
x
x
x
x
x
x
x
x
x
x
x
x
x
x
x
x
x
x
x
x
x
x
x
x
x
x
x
x
x
x
x
x
x
x
x
x
x
x
x
x
x
x
x
x
x
x
x
x
x
x
x
x
x
x
x
x
x
x
x
x
x
x
x
x
xxxxx
x
x
xx
x
x
x
x
x
x
x
x
x
x
x
x
x
x
x
x
x
x
x
x
x
x
x
x
x
x
x
x
x
x
x
x
x
x
x
x
x
x
x
x
x
x
x
x
x
x
x
x
x
x
x
x
x
x
x
x
x
x
x
x
x
x
x
x
x
x
x
x
x
x
x
x
x
x
x
x
x
x
x
x
x
x
x
x
x
x
x
x
x
x
x
x
x
x
x
x
x
x
x
x
x
x
x
x
x
x
x
x
x
x
x
x
x
x
x
x
x
x
x
x
x
x
x
x
x
x
x
x
x
x
x
xx
x
xx
x
xxxx
x
xxxxxxxxxx
Sportbar Sleeve Right
Upper Bracket
Part #610.76
Qty. 2
Lower Bracket
M6X1X14
Part #610.75
Qty. 2

P4 - 80101 Rev. D 0721 © 2021 Bestop, Inc.
Page 4
Installation Instructions - Trektop Halftop Kit
Remove Rear Window
Section 1
Flip Fabric Up
Step 1
Fold back the rear corners of the top
then open the tailgate.
Step 1
Step 2
Step 2
Pull the plastic retainer (Sewn to the lower corner
of the Rear Window) out of the Tailgate Clip.
Repeat this on the left side of the window.

P5 - 80101 Rev. D 0721 © 2021 Bestop, Inc.
Page 5
Installation Instructions - Trektop Halftop Kit
Remove Rear Window (Cont)
Section 1
Step 1
Step 1 Step 2
Step 2
With Tailgate open, Pull the Tailgate
bar fron the Tailgate Clips on both
sides.
Un-zip both sides of the rear window.
Step 3
Step 3
Slide the top of the window to the left
to remove it from the vehicle.

P6 - 80101 Rev. D 0721 © 2021 Bestop, Inc.
Page 6
Installation Instructions - Trektop Halftop Kit
Remove Side Panels
Section 2
Step 1
Step 1 Step 2
Step 2
Remove the plastic retainers located along
the bottom and front edge of the Side
Panel from the body of the vehicle.
Unsnap the strap that connects the
side panel to the Tailgate Bar Retainer.
Repeat this step on the left side of the
vehicle.
Step 3
Step 3
Slide the top of the window to the rear
to remove it from the vehicle.
Repeat these three steps on the left
side of the vehicle.

P7 - 80101 Rev. D 0721 © 2021 Bestop, Inc.
Page 7
Installation Instructions - Trektop Halftop Kit
Partially Remove Top From Bows
Section 3
Step 1
Open the top into the “Sunrider” position.
Step 1
Peel the velcro flap off of the #3 bow.
Step 1
Step 1

P8 - 80101 Rev. D 0721 © 2021 Bestop, Inc.
Page 8
Installation Instructions - Trektop Halftop Kit
Remove Z-Clip
Section 4
Locate the Z-Clips, which extend out from
the edge of the top fabric just above the
Door Rail on each side of the Jeep.
Detach the Z-Clips to the Door Rails. Be
careful not to damage the Cable or the
Z-Clip itself.

P9 - 80101 Rev. D 0721 © 2021 Bestop, Inc.
Page 9
Installation Instructions - Trektop Halftop Kit
Partially Remove Top From Bows (cont.)
Section 4
Fold header forward then fold fabric
forward.
Unsnap the flaps from the #4 bow.
Step 4
Step 3
Step 3
Step 4
1
1
1
2

P10 - 80101 Rev. D 0721 © 2021 Bestop, Inc.
Page 10
Installation Instructions - Trektop Halftop Kit
Attach Brackets
Section 5
Step 1
Remove two (2) screws that mount the
#3 Bow.
Step 1 Step 2
Step 2
Place Lower Bracket (Part #610.75) on top of
the #3 Bow mounting flange then replace the
two (2) screws that were removed in step 1.
Tools
4mm Hex Key
Hardware
Lower Bracket
M6X1X14
Part #610.75
Qty. 2

P11 - 80101 Rev. D 0721 © 2021 Bestop, Inc.
Page 11
Installation Instructions - Trektop Halftop Kit
Attach Brackets (cont.)
Section 5
Step 3
Attach the Upper Bracket (Part # 610.76)
to the Lower Bracket using two (2) of each
Button Head Screw (Part # 517.63), Washers
(Part # 515.81) and M6 Nuts (Part # 515.82)
Repeat these steps on the right side of the
vehicle.
Step 3
Tools
4mm Hex Key
Hardware
Upper Bracket
Part #610.76
Qty. 2
Button Head Screw
M6X1X14
Part #517.63
Qty. 4
Nut, M6X1 Lock Blk
Part #515.82
Qty. 4
Washer, Flat M6
Part #515.81
Qty. 4
10mm
Wrench

P12 - 80101 Rev. D 0721 © 2021 Bestop, Inc.
Page 12
Installation Instructions - Trektop Halftop Kit
Attach Windjammer Retainer
Section 6
Step 3
Attach the Windjammer Retainer
(Part # 614.46) to the Upper Brackets using
two (2) Button Head Screws and two (2) M6
Lock Nuts. (one (1) per side)
Step 1
Tools
4mm Hex Key
10mm
Wrench
Hardware
Windjammer
retainer
Part #614.46
Qty. 1
Button Head Screw
M6X1X14
Part #517.63
Qty. 2
Nut, M6X1 Lock Blk
Part #515.82
Qty. 2

P13 - 80101 Rev. D 0721 © 2021 Bestop, Inc.
Page 13
Installation Instructions - Trektop Halftop Kit
Roll Up Duster; Slide Duster P-Extrusion onto Top of Extruded Aluminum Bow
Section 7
Roll Duster Up
Starting at This Side
Step 1 Step 2
Hardware
Duster
Qty. 1
Aluminum Extrusion
Part Number 609.30
Qty. 1
Pull Tabs
Step 1
Starting on the side of the duster
without the pull tabs, roll the Duster
up loosely.
The side of the Duster with the pull
tabs is the front edge.
Step 2
With the Duster loosely rolled up, slide
the P-Extrusion along the exposed
front edge of the Duster into the top
slot of the Extruded Aluminum Bow,
using the slot in the Bow that is on top
of the arch and facing up.
Aluminium Extrusion has arch.
The Duster should be in the top part
of the arch.
NOTE:
Top of Arch

P14 - 80101 Rev. D 0721 © 2021 Bestop, Inc.
Page 14
Installation Instructions - Trektop Halftop Kit
Attach Windjammer to the Extruded Aluminium Bow
Section 8
Step 1
Step 1
Hardware
Aluminum Extrusion
Part Number 609.30
Qty. 1
Slide the sewn in P-extrusion into the front channel of
the Aluminium Extrusion (Part #609.30).
Duster Windjammer
Duster
Windjammer
Front of Vehicle

P15 - 80101 Rev. D 0721 © 2021 Bestop, Inc.
Page 15
Installation Instructions - Trektop Halftop Kit
Attach End Caps to Extruded Aluminum Bow
Section 9
Hardware
Plastic End Cap - Left
Bestop Part #593.71
Qty. 1
Plastic End Cap - Right
Bestop Part #592.66
Qty. 1
Step 1
Step 1
Place the Plastic End Caps (Part # 592.66) on the passenger
side of the Aluminium Extrusion and (Part # 593.71) on the
driver side.
The internal ribs inside the round opening of each end cap will
slide into the slots on the top and bottom of the aluminum
extrusion.
The Wing must go towards
the front of the vehicle with the Tab
pointing up.
NOTE:

P16 - 80101 Rev. D 0721 © 2021 Bestop, Inc.
Page 16
Installation Instructions - Trektop Halftop Kit
Place Bow with Attached End Caps and fabric assemblies onto the Jeep Belt Rail
Section 10
Step 1 Step 2
Step 1
Fold the rear seat down. (Refer to
Owners Manual)
Set End Cap as far rearward on the passen-
ger side then set the other end cap as far
forward as possible on the Driver side.
Step 2
Slide the Bow End Rearward (Driver Side)
and Foreward (Passenger Side) until you
reach the 16 1/4 inch dimension from the
front of the Extrusion to the front edge of
the Rubber Seal at the top and rear of the
door opening.
16 1/4 inches
Fabric not shown for illustration
purpose only.

P17 - 80101 Rev. D 0721 © 2021 Bestop, Inc.
Page 17
Installation Instructions - Trektop Halftop Kit
Install Rear Door Rail Assemblies
Section 11
Hardware
Insert the top of the D Pillar Bow (Part #
610.90) onto the Bow Support Bracket and
push it all of the way up.
Step 1
Step 1 Align the D Pillar Bow with the tab on the
End Cap then pull the D Pillar bow down
onto the tab.
Repeat the steps on the passenger side of
the vehicle.
Step 1
Step 1
Bow D Pillar
Part #610.90
Qty. 2

P18 - 80101 Rev. D 0721 © 2021 Bestop, Inc.
Page 18
Installation Instructions - Trektop Halftop Kit
Attach the Tailgate Bar
Section 12
Step 1
Sewn-in P-Extrusion on under-
side of rear of Duster slides
into this receiver on the back
side of the Tailgate Bar.
Duster attached
to Tailgate Bar
Attach the Tailgate Bar to the sewn-in
P-Extrusion rail on the underside of
the rear of the Duster.
Slide the Tailgate Bar all the way
across.
Step 1
Secure the Tailgate Bar with attached Duster
to the Tailgate Bar Retainers.
Press the Tailgate Bar into the receiver on each
Tailgate Bar Retainer.
The bulb seal on the Tailgate bar must
hang below the bar and face rearward for the
tailgate to touch it.
Step 2
Hardware
Step 2
Duster
Tailgate Bar

P19 - 80101 Rev. D 0721 © 2021 Bestop, Inc.
Page 19
Installation Instructions - Trektop Halftop Kit
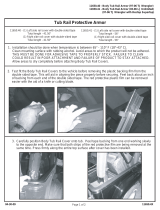
Tuck Plastic Tabs under Jeep Belt Rail
Section 13
Step 1
Tuck the plastic tabs along the left and
right edges of the Duster underneath the
Jeep belt rail, working from back to front.
Make sure to tuck the straight tabs as well
as the semi-circular tabs under the belt
rail.
Tuck the plastic tabs at the rear corners
under the belt rail. Next, Tuck all side
plastic tabs under the belt rail, from back
to front.
Step 1
Step 2
Wrap the hook-&-loop sleeves
around the sport bar downtubes,
and attach hook-&-loop strips
together snugly.
Press the Hook and Loop together
along the side of the Duster cover
Step 2
1
1
2
2
Loop
Hook

P20 - 80101 Rev. D 0721 © 2021 Bestop, Inc.
Page 20
Installation Instructions - Trektop Halftop Kit
Install Sportbar Sleeves
Section 14
Step 1
Remove the M8 X 20mm screw from the
#3, #4 Bow Mounting Bracket.
Step 1
Tools
T40 Torx Driver
x
x
x
x
x
x
x
x
x
x
x
x
x
x
x
x
x
x
x
x
x
x
x
x
x
x
x
x
xx
x
xx
x
x
x
xxx
x
x
x
x
x
x
x
x
x
x
x
x
x
x
x
x
x
x
x
x
x
x
x
x
x
x
x
x
x
x
x
x
x
x
x
x
x
x
x
x
x
x
x
x
x
x
x
x
x
x
x
x
x
x
x
x
x
x
x
x
x
x
x
x
x
x
x
x
x
x
x
x
x
x
x
x
x
x
x
x
x
x
x
x
x
x
x
x
x
x
x
x
x
x
x
x
x
x
x
x
x
x
x
x
x
x
x
x
x
x
x
x
x
x
x
x
x
x
x
x
x
x
x
x
x
x
x
x
x
x
x
x
x
x
x
x
x
x
x
x
x
x
x
x
x
x
x
x
x
x
x
x
x
x
x
x
x
x
x
x
x
xx
x
x
x
x
x
x
x
x
x
x
x
Lift up on the #3,#4 Bow Mounting
Bracket, Align the hole in the Sleeve
with the hole that the M8 X 20mm was
removed from.Then Replace the M8 X
20mm that was removed in step 1.
Step 2
Step 2
Sportbar Sleeve Right Sportbar Sleeve Left
Hardware
x
x
x
x
x
x
x
x
x
x
x
x
x
x
x
x
x
x
x
x
x
x
x
x
x
x
x
x
x
x
x
x
x
x
x
x
x
x
x
x
x
x
x
x
x
xx
xx
x
x
x
x
x
x
x
x
x
x
x
x
x
x
x
x
x
x
x
x
x
x
x
x
x
x
x
x
x
x
x
x
x
x
x
x
x
x
x
x
x
x
x
x
x
x
x
x
x
x
x
x
x
x
x
x
x
x
x
x
x
x
x
x
x
x
x
x
x
x
x
x
x
x
x
x
x
x
x
x
x
x
x
x
x
x
x
x
x
x
x
x
x
x
x
x
x
x
x
x
x
x
x
x
x
x
x
x
x
x
x
x
x
x
x
x
x
x
x
x
x
x
x
x
x
x
x
x
x
x
x
x
x
x
x
x
x
x
x
x
x
x
xxxxxx
x
xx
x
x
x
x
x
x
x
x
x
x
x
x
x
x
x
x
x
x
x
x
x
x
x
x
x
x
x
x
x
x
x
x
x
x
x
x
x
x
x
x
x
x
x
x
x
x
x
x
x
x
x
x
x
x
x
x
x
x
x
x
x
x
x
x
x
x
x
x
x
x
x
x
x
x
x
x
x
x
x
x
x
x
x
x
x
x
x
x
x
x
x
x
x
x
x
x
x
x
x
x
x
x
x
x
x
x
x
x
x
x
x
x
x
x
x
x
x
x
x
x
x
x
x
x
x
x
x
x
x
x
x
x
x
x
xx
xx
xx
x
x
xx
x
xxxxxxx
x
x
x
x
x
x
x
x
x
x
x
x
x
x
x
x
x
x
x
x
x
x
x
x
x
x
x
x
x
x
x
x
x
x
x
x
x
x
x
x
x
x
x
x
x
xxxxx
x
x
x
x
x
x
x
x
x
x
x
x
x
x
x
x
x
x
x
x
x
x
x
x
x
x
x
x
x
x
x
x
x
x
x
x
x
x
x
x
x
x
x
x
x
x
x
x
x
x
x
x
x
x
x
x
x
x
x
x
x
x
x
x
x
x
x
x
x
x
x
x
x
x
x
x
x
x
x
x
x
x
x
x
x
x
x
x
x
x
x
x
x
x
x
x
x
x
x
x
x
x
x
x
x
x
x
x
x
x
x
x
x
x
x
x
x
x
x
x
x
x
x
x
x
x
x
x
x
x
x
x
x
x
x
x
x
x
x
x
x
xx
xxxx
x
xx
x
x
x
x
x
x
x
x
x
x
x
x
x
x
x
x
x
x
x
x
x
x
x
x
x
x
x
x
x
x
x
x
x
x
x
x
x
x
x
x
x
x
x
x
x
x
x
x
x
x
x
x
x
x
x
x
x
x
x
x
x
x
x
x
x
x
x
x
x
x
x
x
x
x
x
x
x
x
x
x
x
x
x
x
x
x
x
x
x
x
x
x
x
x
x
x
x
x
x
x
x
x
x
x
x
x
x
x
x
x
x
x
x
x
x
x
x
x
x
x
x
x
x
x
x
x
x
x
x
x
x
xx
x
xx
x
xxxx
x
xxxxxxxxxx
/