Page is loading ...

INSTALL INSTRUCTIONS
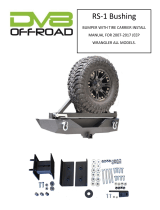
Applicaon : 2007-2018 Jeep Wrangler JK
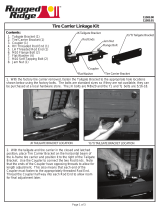
JK Rear Mid-Width Bumper & Carrier: 5072R1B-TC

2007-2018 JK REAR BUMPER & TIRE CARRIER Page ( 2 of 9)
www.ROADARMOR.com
INSTALL INSTRUCTIONS
SAFETY FIRST!
• FOLLOW ALL INSTRUCTIONS, YOUR SAFETY AND THE SAFETY OF OTHERS IS MOST IMPORTANT.
• WEAR APPROPRIATE EYE PROTECTION AND EXERCISE CAUTION WHEN DRILLING / CUTTING
REQUIRED TOOLS
INCLUDED HARDWARE & TIRE CARRIER PARTS
I WARNING
Read the instrucons completely before beginning installaon. Before ghtening bolts,
drilling or cung where required, check to make sure there are no obstrucons such as
brake, fuel or electrical lines which may be damaged. Also keep in mind this is an aer-
market product and MAY require minor shimming and/or trimming, reaming, etc. for
proper t. Road Armor is not responsible for any damages to vehicle.
IMPORTANT NOTICE
• Be sure to inspect and test t your product to ensure proper tment before having it coated, painted, bed
lined, etc.
• Road Armor will not be responsible for the cost of coang your unit if any problems with t or nish are not
noted and addressed beforehand.
Metric and SAE Socket Sets and Wrenches 36mm Socket (Spindle Nut)
Bearing / Race Driver Set Grease Gun / Grease (Packing Bearings)
(6) 1/2” x 1.5” Bolt Tabs (2) 5/16” x 1.5” Bolts (1) 1” Large Washer & Nut
(2) 1/2” x 3” Bolts (2) 5/16” Nut (1) Large O-RING
(4) 1/2” x 1.5” Bolts (4) 5/16” USS Washers (1) Timken Seal
(15) 1/2” Nuts (3) 3/8” x 1” Bolts (2) Timken Bearing & Race Set
(31) 1/2” Large Washers (3) 3/8” Nut (1) ROAD ARMOR Logo Cap
(19) 1/2” Lock Washers (6) 3/8” USS Washers (1) Tailgate Isolator
(13) 1/2” Keeper Washers (3) 1/2”-20 Wheel Studs (1) Main Carrier Frame
(7) 1/2” x 1.5” Carriage Bolts (4) #10-24 Bolts (1) PSG Side Spindle Mount
(1) 1/2” Right & Le Hand Jam Nuts (4) #10-24 Nut (1) Tailgate Mount
(1) 1/2” Right & Le Hand HEIM Joints (2) 8” Zip Ties (1) STD Length Wheel Mount (2 Pcs.)
(1) 1/2”-20 Right & Le Hand Rod End (1) ROAD ARMOR Logo (Bumper) (1) Isolator Bracket
(2) 9/16”x1” Spacer Sleeves (2) 1/2” Double Nut Plate (Bumper Bracket) (1) Main Bumper & DVR Frame Bracket

2007-2018 JK REAR BUMPER & TIRE CARRIER Page ( 3 of 9)
www.ROADARMOR.com
INSTALL INSTRUCTIONS
1 Main Carrier Frame
2 PSG Spindle/Frame Bracket
3 Tailgate Mount
4 Wheel Bracket
1 1
8
7
4
5
3
2
6
5 Wheel Bracket Base
6 Isolator Bracket
7 Main Bumper
8 DVR Frame Bracket
**40 INCH TIRES MAXIMUM**
1 Using a 16mm socket, remove the bolts securing the inner mounng brackets to the rear cross member.
2 Now remove the 2 bolts securing the rear bumper outer mounng brackets. Set aside these bolts as they will be reused.
3 Remove factory recovery hook if equipped. One bolt on the boom and two through the frame. Discard the nut plate.

2007-2018 JK REAR BUMPER & TIRE CARRIER Page ( 4 of 9)
www.ROADARMOR.com
INSTALL INSTRUCTIONS
KEEP BOLTS
4 Pull o factory bumper and set aside.
5 **Install Road Armor Logo with included #10 Stainless Buon Head Bolts and Keps Nuts.**
6 **Install SRM lights as this is not possible aer Road Armor bumper has been installed. **
7 Fit up and install included frame brackets to outside of frame as shown. Included
nut plate goes inside frame. Re-use factory bolts from Step 2 where circled.
Spindle mount bracket installs on PSG side.
8 Remove the spare re from tail gate and set it aside.
9 Using a 13mm socket, remove the 8 bolts securing the spare re carrier mount to the tailgate and allow to hang.
10 On the inside of the tailgate near the latch, pop out the vented plasc piece to gain access to wiring.
11 Press down on the plasc clip and then unplug the 3rd brake light wiring harness and remove along with the pass
through grommet . You can nd many creave ways to re-purpose this light if you search online if you like.
1 2 3

2007-2018 JK REAR BUMPER & TIRE CARRIER Page ( 5 of 9)
www.ROADARMOR.com
INSTALL INSTRUCTIONS
12
12 Install TAILGATE MOUNT using OEM bolt previously removed as shown:
13 Install TAILGATE ISOLATOR using 2 - 5/16” HARDWARE.
14 Feed both OE wire harness through TAILGATE MOUNT.
13
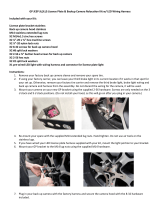
15 Using race driver tool, Install 2 - BEARING RACES into CARRIER FRAME.
16 Using grease gun, pack 2 - BEARINGS with grease. **Lightly Grease SPINDLE & HOUSING as well**
PREPARING REAR TIRE CARRIER
15
16

2007-2018 JK REAR BUMPER & TIRE CARRIER Page ( 6 of 9)
www.ROADARMOR.com
INSTALL INSTRUCTIONS
17 Fit up your new Road
Armor Bumper and start a
washer, lock washer and
nut over each bolt.
Once all nuts are nger
ght, check tment and
ghten them all down.
Check that all the bracket
bolts are fully ght as well.
IF YOU HAVE ANY INTERFERENCE ISSUES WITH THE FACTORY TOW HITCH RECEIVER
18 Pull the wiring harness straight down and out of it’s mount and zip e it out of the way.
19 Remove the 4 bolts securing the tow hitch receiver to the rear cross member using an 18mm socket.
20 If the tow hitch receiver is dicult to remove, use a pry bar to assist in removal.
21 Now install bumper as in STEP 18, then using a oor jack and a block of wood, re-install the tow hitch.
TIRE CARRIER ASSEMBLED—CONTINUE FROM HERE
16 Install the Bolt Tabs through bumper using the included keeper washers. Use a 3/4” deep socket to push the washers
over the threads.

2007-2018 JK REAR BUMPER & TIRE CARRIER Page ( 7 of 9)
www.ROADARMOR.com
INSTALL INSTRUCTIONS
22
23
22 Install 1 - BEARING into boom part of SPINDLE HOUSING followed by 1 - BEARING SEAL.
*Use seal driver to prevent damage*
23 Install 1 - BEARING, WASHER and NUT into SPINDLE BRACKET as shown below . Use 36mm socket to secure the SPINDLE
NUT. **DO NOT OVER TIGHTEN SPINDLE NUT**
24 Install 5” WHEEL BRACKET BASE onto CARRIER
using 4 - 1/2” CARRIAGE BOLTS & HARDWARE.
25 Install ISOLATOR BRACKET onto CARRIER FRAME
using 3 - 3/8” BOLTS, NUTS & WASHERS.
NOTE Adjust ISOLATOR BRACKET approximately 1/4” to
5/16” HIGHER than the ISOLATOR as shown for
proper re Pre-LOAD and proper “isolaon”.
24
25

2007-2018 JK REAR BUMPER & TIRE CARRIER Page ( 8 of 9)
www.ROADARMOR.com
INSTALL INSTRUCTIONS
26 Install 3 - M14 Stud into kit WHEEL BRACKET. 5x5 | 5x5.5 | 8x6.5 paerns are provided above.
27 Install WHEEL BRACKET onto WHEEL BRACKET BASE using 3 - 1/2” CARRIAGE BOLTS, NUTS & WASHERS.
*Adjust to proper “back-space” measurement*
NOTE MEASURE “back-spacing” from wheel mount surface to end of the re bulk.
27
26
*TIRE MUST COMPRESS AGAINST KIT CARRIER FRAME*
29
28
28 Assemble and Install 2 - 1/2” HEIM JOINT, ROD
END, 5/8” SPACER and SHIMS onto CARRIER
FRAME and TAILGATE MOUNT.
29 Secure 1/2” HEIM ASSEMBLY using 2 - 1/2”x3”
hardware. *Adjustment Required*
NOTE Aer re is installed (Pre-LOADED Carrier), 1/2”
HEIM ASSEMBLY can be “adjusted snug” to
tailgate by opening tailgate, adjusng 1/2” HEIM
ASSEMBLY to desired ISOLATOR Pre-LOAD
pressure and ghten both 1/2” JAM NUTS. Doing
so will isolate any vibraon or noise occurring
from rear re carrier assembly during use.
**DO NOT OVER TIGTHEN HEIM**

2007-2018 JK REAR BUMPER & TIRE CARRIER Page ( 9 of 9)
www.ROADARMOR.com
INSTALL INSTRUCTIONS
INSTALL TIRE CARRIER ACCESSORIES AT THIS TIME
STOP STOP
4 GAL ROTOPAX MOUNT
HiLi JACK MOUNT
4-GAL ROTOPAX MOUNT — 518RTC-RPMB
HiLi JACK MOUNT — 518RTC-HLMB
EXTENDED 8.5” MOUNT — 518RTC-8RM
JK LICENSE PLATE MOUNT — 507RTCLPMB
EXTENDED 8.5” MOUNT
30 Install wheel and re assembly using OEM lug nuts or aermarket wheel locks at this me.
NOTE **BE SURE TIRE COMPRESSES AGAINST CARRIER FRAME TO ELIMINATE VIBRATIONS**
NOTE **Road Armor recommends using ORO
LITEPLATE with harness to reconnect
license light**
oroadonly.com/shop/led-lighng/o-road-only-
litedot-liteplate-license-plate-led-light-with-6-
disconnectable-harness/
31 Once all weight has been added to carrier, check
spindle nut torque, apply light amount of grease to
inside of housing and threads to prevent rusng or
moisture build-up. **Secure RA-LOGO-CAP**
ENJOY YOUR NEW ROAD ARMOR STEALTH TIRE CARRIER
**Check and reghten all mounng bolts aer 150 miles and periodically aer**
/