Attop X-PACK 10 User manual

Category
Toys & accessories
Type
User manual

Attop X-PACK 10 is a compact and agile drone suitable for indoor and outdoor flying, equipped with features like headless mode, altitude hold, and 360-degree flips for enhanced flight control and maneuverability.

Attop X-PACK 10 is a compact and agile drone suitable for indoor and outdoor flying, equipped with features like headless mode, altitude hold, and 360-degree flips for enhanced flight control and maneuverability.

5. Remote Controller
2
3
4
5
6
7
9
10
11
12
13
14
8
1
Phone Clamp
Left Control Stick
ON/OFF
One Key Take-Off/Landing
Circle Fly
Headless Mode (short press)
One Key Return (long press)
High-Speed Rotation
LED Indicator
Right Control Stick
Drone's LED Indicators
Forward Trim
Rightward Trim
Backward Trim
Leftward Trim
2
3
4
5
6
1
7
8
10
11
12
13
14
9
1
2
3
4
Photo
Speed Switch (short press)
Emergency Stop (long press)
2
1Video
360° Flip
4
3
Drone X1 Battery X3Controller X1
3. Package Contents
4. Charging
13
31
2
2
5V
Note: Please fully charge the battery before flying.
Screw Driver X1USB Cable X1 Blades Protector X4 Backup Propellers X2
Charging: Red light
Fully charged: Green light
* When the drone's battery is low, there are continuous beeps from the controller
and the drone's LEDs keep flashing.
* Please use the original battery and USB cable provided.
* Keep the battery away from any sharp objects that could puncture into the battery
to avoid risks of explosion and fire.
* It's not recommended to charge the battery from the USB port of PC.
* Flight time may be reduced when flying in low-temperature environments.
(Suitable for wide indoor environments operation)
Suitable for 14 years old and above
1
32
Length of main wing: 83mm
Aircraft: 98X120X33mm
Total weight: 54g±2g
Battery: 3.7V 380mAh
Charging time: About 50 mins
Flight time: 7-8 mins
Gyroscope: built-in
Working temperature: 14°F to 104°F
Remote controller: 2.4G
Motor: 7*16 4pcs
Wifi Transmission Range : 30-40 meters
(in a wide open area with no electromagnetic interference)
Working frequency: 2.4G
Battery: 3xAAA
1. Aircraft Parameters
2. Remote Controller Parameters
Get 24/7 assistance at
Use camera or QR scanner to scan
Or Visit: https://attop.afterservice.vip
Customer Service Email : attop@afterservice.vip
www.attoptoys.com
X-PACK 10 User Manual
4
(1) Open up all 4 blades for the drone.
(5) Install the controller batteries.
(6) Unfold the phone clamp to place your mobile device.
6. Installation
(2) Blades Protector Installing.
(3) Replace the propellers when it's needed. (Optional)
This aircraft is a folding structure, please make sure to open all four blades before
taking off.
Expand the buckle of the protector, and install it onto the drone wings.
7. How to Fly
(1) Switch on the power.
First power on the drone.
(Keep pressing for 2 seconds
and place it on a flat ground
or surface.)
(3) Compasses calibration.
Move both control sticks to lower left at 45°,
you'll hear a beep from the remote. Calibration
completes when the LEDs of the drone turn
to solid on from flashing.
Press and hold the ON/OFF
button to turn on the controller,
you will hear a beep from the
controller and its LED indicator
starts flashing.
1
(2) Frequency matching.
2
After turning on the drone, both indicator lights
on the drone and controller will flash, then
push the left throttle to the top, then down to
the lowest, after 2 seconds, the indicators will
go steady, which means the frequency
matched successfully.
1
2
Note:
Please do not overtighten the screws. Gently rotate the propellers by
hand after installation to check whether they are rotatable, if not, please
loosen the screw and check again.
(4) Install the battery into the drone after it's fully charged.
3 x 1.5V AAA (Batteries are not included.)
DC 1.5V
AM4.LR03 SIZE AAA
DC 1.5V
AM4.LR03 SIZE AAA
DC 1.5V
AM4.LR03 SIZE AAA
DC 1.5V
AM4.LR03 SIZE AAA
DC 1.5V
AM4.LR03 SIZE AAA
DC 1.5V
AM4.LR03 SIZE AAA
DC 1.5V
AM4.LR03 SIZE AAA
DC 1.5V
AM4.LR03 SIZE AAA
DC 1.5V
AM4.LR03 SIZE AAA
B
A
A1
A1
a. Loosen the screws, then remove the cap.
b. Take out the propellers.
c. Fit the spare propellers into the drone according to the mark (A/B) on them.
d. Install the cap and tighten the screws.
When the controller's battery is low, there are continuous beeps from
the remote and its LED indicator keeps flashing.
2
1
(4) Flight Instructions
Option 2:
Simultaneously push the Left Control Stick to lower left at 45° and the
Right Control Stick to lower right at 45° (or push the Left Control Stick to
lower right at 45° and the Right Control Stick to lower left at 45°) until
the four propellers start rotating, then slowly push the Left Control Stick
forward to take off.
Option 1:
Press the button to take off.
OR
After frequency matching and calibration
finished, you can hold the aircraft in your
hand, and then horizontally throw it out.
The aircraft will automatically unlock the
blades and fly in the air.
Note: It is better to operate the calibration
step again after operating throw-to-fly for
several times. The function will be more
stable.
Option 3:
Throw-to-fly function
4 5
6 7
8 9
10 11
9. Aircraft Functions
(1)
Speed Switch
The drone is set to low speed by default.
Press the button once for medium speed and there are two
beeps from the controller. Press it again for high speed and there are
three beeps from the controller.
Press it the third time to get back to low speed and there is one beep
from the controller.
Press the same button to exit this mode; LEDs on the drone turn to
solid on.
Headless ModeStandard Mode
Head
Tail
Backward
Forward
Head Tail
(2) Headless Mode
Short press the button to activate Headless Mode; LEDs on the
drone start flashing.
In this mode, the drone will fly following the direction of the Right Control
Stick regardless of the position of your drone's head or tail.
Note:
(3) 360° Flip
Fly the drone to a height over 2m, then press the button to
activate 360° Flip function. Next, move the Right Control Stick to flip
the drone accordingly.
* There are continuous beeps from the remote when you activate this
function. If you do not move the Right Control Stick about 5s after
you press the button, the function will be cancelled and the
remote will stop beeping.
* This function can't be activated when the battery of the drone is low.
1
2
FLIGHT OPERATION GUIDE
* Make sure that you power on your drone first, and then turn on the
controller before each flight.
* Please repeat the pairing and calibration procedure each time while the
drone or controller is restarted.
* For all flight functions and modes, the operator and tail of the drone
must be aligned.
IMPORTANT
8.Using the Remote Controller
Push the Left Control
Stick forward, the
drone will ascend;
pull it backward and
the drone will descend.
Left Control Stick
Pull the Left Control
Stick leftward, the
drone will rotate to the
left; pull it rightward
,the drone will
rotate to the right.
Head
Tail
Right Control Stick
Push the Right Control
Stick forward, the
drone will fly forward;
pull it backward,
the drone will fly
backward.
Pull the Right Control
Stick leftward , the
drone will fly leftward;
pull it rightward ,
the drone will fly
rightward.
Flight Trimming
If the drone drifts
forward or backward
when hovering, press
the Backward Trim
button or the Forward
Trim button to adjust.
If the drone drifts
leftward or rightward
when hovering, press
the Rightward Trim
button or the Leftward
Trim button to adjust.
Note:
Note:
Note:
(7) Photo / Video
Please connect the drone to your mobile device first, then go to the ‘Media’
in app Home Page or your album file of the device to check your photos
and videos.
Press the button to take a photo.
Press the button to start recording a video; press it again to stop
recording and save the video.
It's NOT recommended to use this function during normal flight for landing,
which may result in serious damage for your drone.
10. FAQ
ISSUES CAUSE SUGGESTIONS
1
2
3
4
After the battery is
inserted in the drone,
indicator lights on
drone keep flashing,
and does not respond
to operation.
No response after
battery is inserted in
the drone.
Motor does not run
when operating the
throttle stick and the
indicator lights on
drone keep flashing.
Main motor blades
spin but the drone
won’t fly.
1. Some of the blades
have been deformed.
2. Battery power is
not enough.
1. Replace the main
blade.
2. Charge the battery or
replace it with a fully
charged battery.
Power for the Li-Poly
battery is not enough.
Charge the battery or
replace it with a
full charged battery.
1.Check whther the
power for controller
and drone is fully
charged.
2.Connection of the
poles are not good.
1.Open the remote
battery case and make
sure the battery is
inserted in right position.
2. Use a fully charged
battery.
3. Reinstall the battery
and confirm whether it is
of good connection with
the poles.
Frequency matching
between controller
and receiver is not
successful.
Reoperate the frequency
matching for controller
and drone. (please refer
to P.6 for details).
(4) One Key Return
a. Press and hold the button, then the drone will fly toward its back
following a path parallel to its original take-off path. The LEDs on the
drone keep flashing when the drone is returning.
b. Press and hold the button again or move the Right Control Stick
forward to cancel this mode, or the drone will keep flying back.
(5) High-Speed Rotation
Press the button to make the drone rotate at high speed.
Press the button again or move the Right Control Stick to any direction
to exit this mode.
This function can't be activated when the battery of the drone is low.
(6) Circle Fly
In the case of barrier-free within 5m radius around the drone, press
the button to fly the drone in a circle.
Press the button again or move the Right Control Stick to any direction
to exit this mode.
This function can't be activated when the battery of the drone is low.
This is one of the default settings of the drone. When you release the Left
Control Stick after an ascent/descent action, the drone will hover at the
current flight height. For a stable flight, press the trim buttons to adjust
accordingly.
(8) Altitude Hold/Hover
(9) Emergency Stop
Press and hold the button, then the drone will stop in the air
and fall.
12 13
14 15
16 17
18 19
11.Battery Using Attention
The aircraft is mostly made of PA fiber or
polyethylene as well as other main materials for
electronic products. Therefore, it must be kept
from the source of heat and exposure to sunlight
so as to avoid possible damage of deformation or
even meltdown due to high temperatures.
This product is suitable for users over 14 years
old. Since the remote-control quadcopter may pose
a certain degree of difficulty for learners at the
beginning, it is recommended for it to be operated
under the guidance of experienced people for the
sake of safe flight.
Safe usage of the battery
Keep away from
source of heat
Never operate the
product alone
CAUTION
WARNING
FORBIDDEN
Batteries are to be inserted with the correct
polarity. The supply terminals are not to be
short-circuited. Different types of batteries or new
and used batteries are not to be mixed.
The exhausted batteries are to be removed from
the toy. For long time storage, please take them
out to prevent battery leakage. Please dispose
abandoned batteries in accordance to the laws and
regulations of the corresponding region to prevent
pollution to the environment.
Remote-control models of quadcopter are dangerous merchandise. Their flight must be
operated away from the crowd. Such factors as man-made improper assembly or mechanical
damage, poor control of the electronic equipment, as well as the unfamiliar manipulation may
lead to unexpected flight accidents, such as uncontrolled flight and aircraft damage. Users are
advised to pay attention to the flight safety and understand that they are held responsible for
any accident caused by negligence.
CAUTION
Special drone for indoor and
outdoor should stay away from
barriers
This product is a remote-control drone, which is suitable for in indoor using
and outdoor environments (the outdoor wind power less than Force 2).
To fly this drone, please choose appropriate obstacle-free indoor and
outdoor sites with proper distance kept from the crowd or pet animals.
Please don’t operate the product in any unsafe environments, such as
places of heat, wires, power supply, etc., so as to prevent the quadcopter
from the risks of fire and electric shock resulting from collision, ditching,
and entangling of the drone.
FORBIDDEN
FORBIDDEN
FORBIDDEN
FORBIDDEN
Safe usage of the lithium battery
Away from moist environments
Never misuse the product
The interior of the aircraft is also composed of many sophisticated electronic
components so it must absolutely be kept away from moisture or water vapor.
Don’t operate the aircraft in the bathroom or on rainy days; otherwise water
vapor may get inside of the aircraft and cause mechanical parts and
electronic components to malfunction leading to expected accidents.
Please do not disassemble or modify the product. For any upgrade, repair
or maintenance, please use the parts specified in our catalog to ensure the
safety of the structure. Please make sure the product is used within the
limits of operation. Don’t overload the product, and don’t use it in any other
illegal ways than prescribed by safety concerns and laws.
Lithium batteries are more dangerous than others. Be sure to read carefully
and follow the following precautions before using it. We will not be held
responsible for any damages caused by any improper use of the battery.
To avoid the danger of explosion or fires, it is forbidden to use other
chargers than the one made by our factory. Such actions done to the
battery as impact, dismantling, reverse connection of the positive and
negative poles, and burning are forbidden. Avoid metal objects from
contacting the positive and negative poles of the battery, which may cause
short circuit. Please prevent sharp items from piercing the battery, and
avoid the risk of battery fire. Please be careful when charging the battery.
Make sure that the battery is charging within your sight. Keep it out of the
reach of young children so as to avoid dangers. Don’t charge the battery
when the battery is heated after use. Otherwise, it may cause the battery to
expand, change, explode or even catch fire, threatening the safety of life
and property. To dispose of the battery, please recycle the battery in strict
compliance with the waste disposal laws and regulations of local countries
or regions in order not to pollute the environment.
SAFETY AND PRECAUSTIONS
Matters needing attention
(1) Rechargeable batteries are to be removed from the toy before being charged.
(2) Non-rechargeable batteries are not to be recharged.
(3) Rechargeable batteries are only to be charged under adult supervision.
(4) Only used to charging 2S Li-ion or Li-polymer battery pack. if not, the charger or battery may
be damaged.
(5) During charging, the charger should be put in the dry and ventilated place and far away from
heat source and inflammable and explosive substance.
(6) Never immediately charge your battery pack as soon as the flight is finished, or when its
temperature doesn’t cool down. Otherwise the battery will take a risk in swelling, even a fire.
(7) Ensure the correctness of polarity before connecting the battery to charger.
(8) Avoid drop and violence during the process of charging. Drop and violence will result in internal
short circuit of the battery.
(9) For the sake of safety, please use original charging equipment and battery pack.
Please change new one in time when the flying time is becoming shorter due to long time usage.
(10) If it is retained in the charger for a long time after saturated, the battery may automatically
discharge. When the charger detects that the voltage of individual cells is lower than the
rated voltage, it will re-charge until saturated. Frequently charging and discharging will
shorten the lifetime of your battery pack. It is advised that please cut off the power and take
off the battery after the charging is saturated.
Maintenance of battery pack
(1) The battery pack should be put in the dry and ventilated place. The storage temperature of
environment is ranged from 64.4°F to 77°F.
(2) Please avoid frequent charging and excessive discharging the battery pack in order to
prolong its life cycle.
(3) It is a must to maintain the battery pack before long-term storage. That is to charge the
battery to the level of 50-60% saturation.
(4) If the storage term is over 1 month, it is advised to monthly check the voltage of every cell
of the battery pack. The voltage of every cell should be not less than 3V. Otherwise, please
refer to the above article 3 .
(5) From the view point of protection, new battery pack should be motivated before usage.
That is to charge and discharge 3-5 times, but discharge is not less than the level of 70%
saturation. This process will make the battery lifetime longer and voltage more stable.
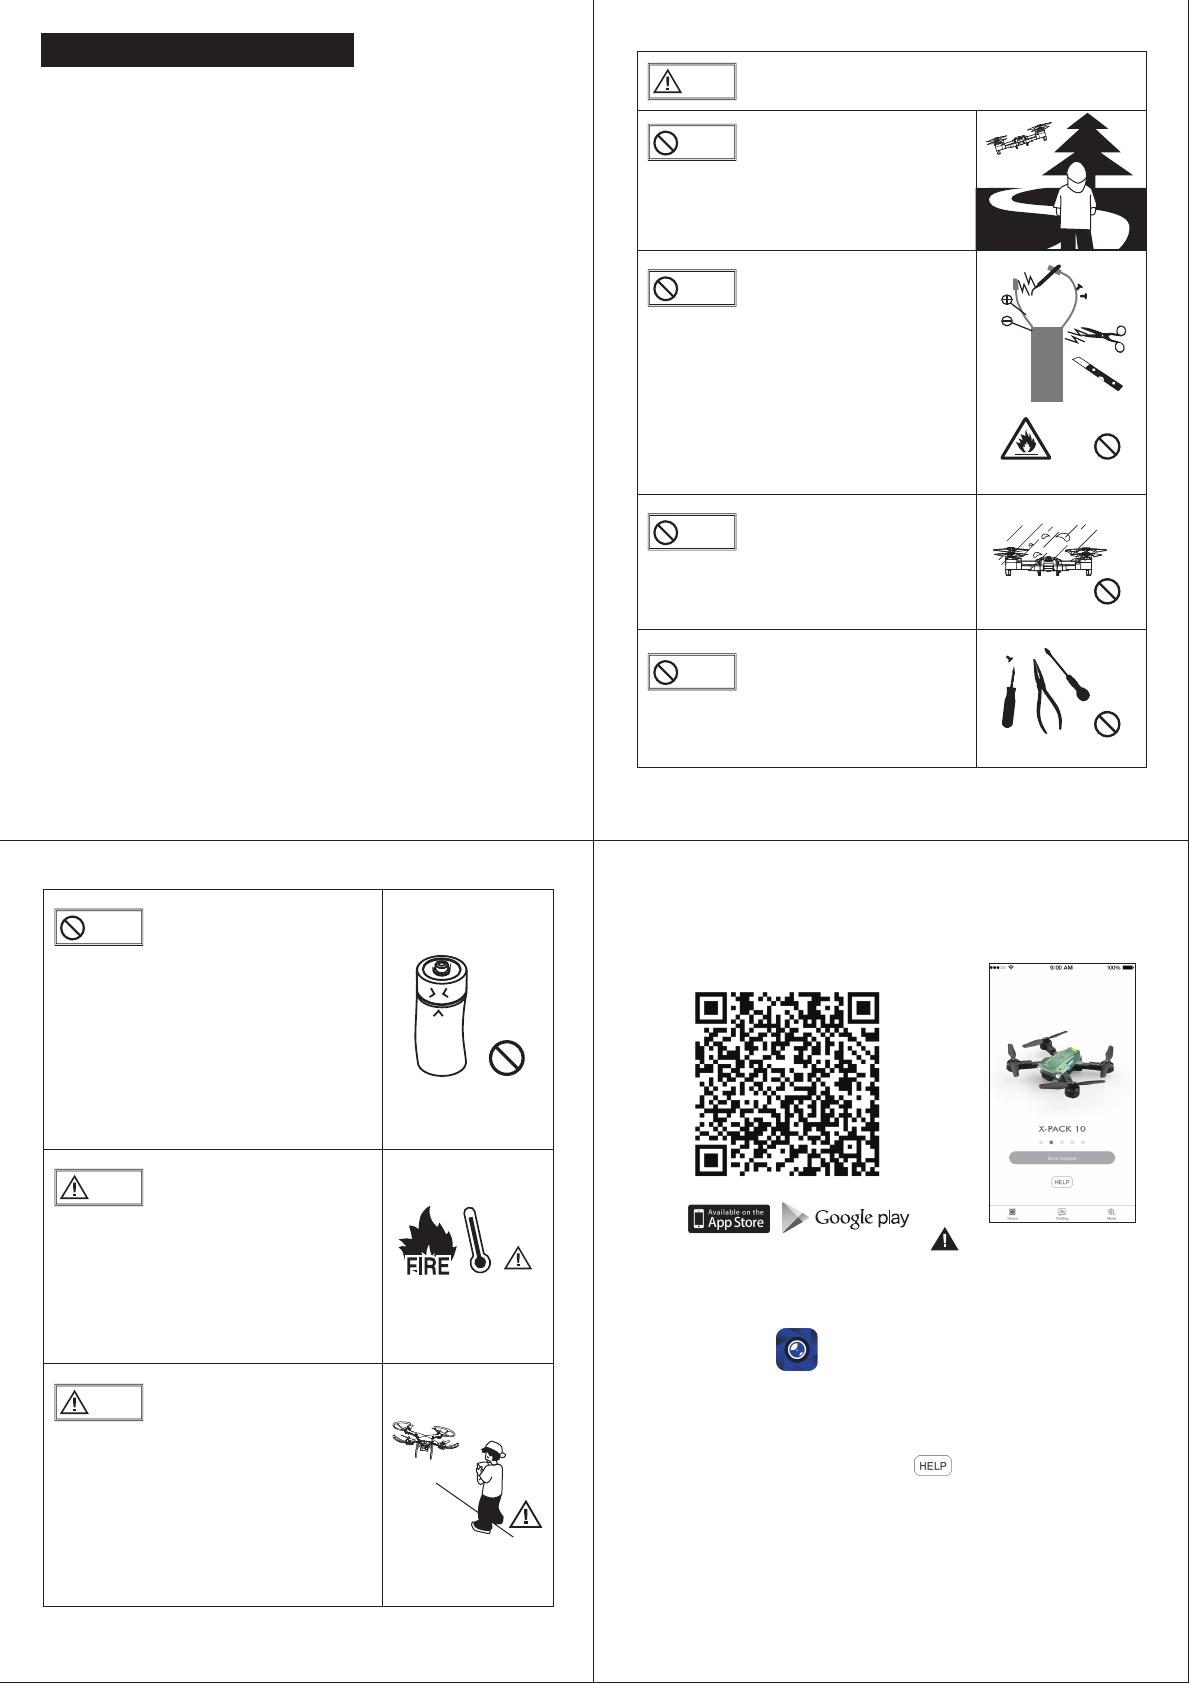
Description of WIFI Live Stream Camera Version
1. Download the app: “Attop Nano” from App Store / Google Play.
2. Power on the drone.
3. Go to the WIFI setting on the phone/device, choose the WIFI signal
of the drone (X-PACK-xxxxxx) , and connect it.
4. Select the item and click “Go to Connect”.
5. If you have any question, please click “ ” to or scan the QR code or
the email to leave message to customer service.
Attention: When it is low power of the drone, it might be unable to be connected
successfully.
How to connect the WIFI signal
Please confrim you chose
the X-PACK 10 item,
otherwise the app will not
work.
20 21
30-Day Whole Unit Warranty For Quality-Related Issue
For 30 days after the date of purchase, we take care of all quality-related
issues with a REPLACEMENT.
Reminder : Be sure to operate your drone as directed.
90-Day Accessories Warranty For Any Reason
For 90 days after the date of purchase, we take care of all accessories
quality-related issues with an ACCESSORY REPLACEMENT.
Reminder: Be sure to maintain your drone as directed.
Guangdong Attop Technology Co., Ltd.
Linghai Industry Zone, Laimei Road, Chenghai District, Shantou,
Guangdong, China.
Website: www.attoptoys.com
Customer Service Email : [email protected]
1 2 3 4 5 6 7 8 9
10 11 12
13
14
17
18
19 21 27
20
23
24
25
22
28
29
30
31
2615
16
1 2 3 4 5 6 7 8 9
10 11 12
13
14
17
18
19 21 27
20
23
24
25
22
28
29
30
31
2615
16
1.Home page
2.Gesture to take pictures
3.Up down mirror
4.Speed mode: 30%,60%,100%
5.360° Stunt
6.Headless mode
7.Gravity control
8.Path plan
9.Voice control
10.VR mode
11.Battery
12.Wifi signal
13.On/Off for interface
14.One key take off
15.One key landing
16.Calibration
17.Ascend
18.Descend
19.Turn left
20.Turn right
21.Left joystick
22.Forward/Backward trimming
23.Forward
24.Backward
25.Left sideward
26.Right sideward
27.Right joystick
28.Sideward trimming
29.Emergency stop
30.Take video
31.Take picture
Name of App Attop Nano
13
16
14
31
30
15
Apply to IOS \ Android system
(Note: Apply to Android 2.3 or above such as SAMSUNG, SONY,
HUAWEI and etc. But it cannot guarantee the phone of other brands
with Android system could operate stably.)
Operation ways
A. Control with your device.
You can fly the drone separately with your device or your controller.
B. Control with the remote controller.
1. Power on the drone and power on the controller, after pairing
between the controller and drone (the lights of the drone and
controller are turning solid), then connect the WIFI signal between
your device and the drone.
2. Put the device to the clamp of the controller, then click “Go to connect”.
3. Press the ‘picture’ button at the app interface or on the controller to take
pictures.
4. Press the ‘Video’ button at the app interface or on the controller to take
video. After shooting, you can review the files by the ‘Media’ in Home Page
or by your album file of your device.
There’s no need to use your device to connect the WIFI, if you don’t use the
drone for shooting.
1. After connecting the WIFI signal and entering to the app interface, click
the ‘on/off button’ to open it.
2. Wait for 2 seconds until the drone lights flashing, then click the
‘Calibration button’ to calibrate the drone.
3. Simultaneously control the app by pushing the Left Control Stick to lower
left at 45°and the Right Control Stick to lower right at 45° until four
propellers start rotating.
4. Click the ‘One key take off’ to fly the drone, or you could slowly push
the Left Control Stick forward at the app to take off.
Click the ‘One key landing’ (or keep pushing down the throttle directly)
to land the drone.
5. Click the ‘Video’ button to take video.
Click the ‘Picture’ button to take pictures.
After shooting, you can review the files by the ‘Media’ in Home Page or by
your album file of your device.
  • Page 1 1
  • Page 2 2
  • Page 3 3
  • Page 4 4
  • Page 5 5
  • Page 6 6

Attop X-PACK 10 User manual

Category
Toys & accessories
Type
User manual

Attop X-PACK 10 is a compact and agile drone suitable for indoor and outdoor flying, equipped with features like headless mode, altitude hold, and 360-degree flips for enhanced flight control and maneuverability.

Ask a question and I''ll find the answer in the document

Finding information in a document is now easier with AI