Page is loading ...

INSTALLATION INSTRUCTIONS
LED Step Light
Models: 12650/CP300385 (dimmable), 12600/CP300473 (non-dimmable)
12652/CP300481 (dimmable), 12602/CP300387 (non-dimmable)
WARNING: Turn off power.
IMPORTANT: Before you start, NEVER attempt any work without shutting
off the electricity until the work is done.
a) Go to the main fuse or circuit breaker box in your home. Place the
main power switch in the “OFF” position.
b) Unscrew the fuse(s), or switch “OFF” the circuit breaker switch(s),
that control the power to the fixture or room that you are working in.
NOTES:
Installation must comply with all local code and NEC requirements. If
you are not familiar with code requirements, installation by a
certified electrician is recommended.
electronic low voltage dimmers.
switch box (not supplied).
The box capacity must be 14 cubic inches or larger. Metal or plastic
boxes are acceptable.
INSTALLATION:
1. At the desired fixture location, mount the receptacle box. If wall mounting,
the box should be mounted horizontally.
2. For optimum light output when wall mounted, the receptacle box
centerline should be 18” above the floor.
3. Install 120 VAC 15 or 20 amp branch circuit electrical power into the
receptacle box.
4. For new construction, the drywall or wall surface must be in place and
preferably finished before the fixture can be installed.
connectors provided. These connectors are suitable for solid or stranded
copper conductors, #12 AWG to #20 AWG. Branch circuit wires must
have 1/2” of insulation cleanly removed from the ends. Grip wire firmly
and push each exposed conductor into an available port on each
connector until they are fully inserted. Match insulation color from
branch circuit wires to colors on fixture wires. Join black wire to black,
white to white, and green or bare conductor to green.
6. Verify that each branch circuit wire is fully inserted to the back of the
connector.
7. Carefully push all wire and connectors into the back of the receptacle box.
8. Place the fixture into the box and secure with the screws provided. If
wall mounting, note the fixture label that indicates which side of the
fixture must face up.
9. Place the trim plate over the fixture and secure with the two screws
provided.
INSTRUCTIONS D’INSTALLATION
Éclairage de marche DEL
Modèles : 12650/CP300385 (à intensité variable), 12600/CP300473
(à intensité non variable) 12652/CP300481 (à intensité variable),
12602/CP300387 (à intensité non variable)
AVERTISSEMENT : Couper le courant.
IMPORTANT:
et ne le remettre que lorsque le travail est terminé.
a) Localiser le coffret à fusibles ou le disjoncteur du domicile. Placer
l’interrupteur principal en position d’Arrêt (Off).
disjoncteur sur Arrêt, qui contrôlent l’alimentation au luminaire ou
dans la salle dans laquelle vous travaillez.
REMARQUES :
uniquement. Ne pas utiliser à l’extérieur.
conditions du code, l’installation doit être effectuée par un électricien
qualifié.
dérivation uniquement.
gradateurs électroniques à basse tension ou incandescents (triac).
ou une boîte de commande (non fourni).
La capacité de la boîte doit être de 14 po cubiques ou plus. Les boîtes
métalliques ou plastiques sont acceptables.
INSTALLATION :
cas d’une installation murale, la boîte doit être installée horizontalement.
2. Pour garantir un éclairage optimal dans une installation murale, la ligne
centrale de la boîte de prise de courant doit se trouver à 45 cm
3. Installer une alimentation électrique d’un circuit de dérivation de 120
VCA, 15 à 20 A dans la boîte de prises de courant.
mur doit être en place et de préférence terminée avant l’installation du
luminaire.
5. Les connexions des fils au luminaire doivent être effectuées à l’aide des
connecteurs à 3 fils (fournis). Ces connecteurs peuvent être utilisés
pour des conducteurs en cuivre centraux ou torsadés, réf. 12 AWG à 20
AWG. Les fils du circuit en dérivation doivent disposer de 1,3 cm
d’isolation enlevée correctement aux extrémités. Bien tenir le fil et
pousser chaque conducteur exposé dans un port disponible sur chaque
connecteur jusqu’à ce qu’il soit totalement inséré. Faire correspondre la
couleur de l’isolation des fils du circuit en dérivation à celles des fils du
luminaire. Connecter le fil noir au noir, blanc au blanc et vert ou le
conducteur dénudé au vert.
6. Vérifier que chaque fil du circuit de dérivation soit bien introduit à
7. Pousser soigneusement tous les fils et les connecteurs dans la partie
cas d’une installation murale, prendre note des informations sur
l’étiquette du luminaire qui indiquent quel côté le luminaire doit se
trouver vers le haut.
9. Placer la plaque de garniture sur le luminaire et fixer avec les deux vis
fournies.
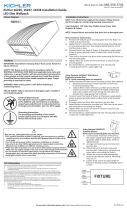
GREEN WIRE
FIL VERT
BLACK WIRE
FIL NOIR
WHITE WIRE
FIL BLANC
RECEPTACLE BOX
FIXTURE
LUMINAIRE
TRIM PLATE
Limited 10 Year Warranty. For more details, visit www.kichler.com
Garantie limitée de 10 ans. Pour de plus amples informations, visitez notre site www.kichler.com
INSTRUCTIONS
For Assembling and Installing Fixtures in Canada
Pour L’assemblage et L’installation Au Canada
/