
1
JUNO-DS Supplementary Manual
Functions Added in JUNO-DS Ver.2
Favorite
Program change and bank select MIDI messages can now be transmitted when you
recall a favorite, as described below. This is a convenient way to select sounds or
switch programs on a MIDI-connected external sound module.
Content registered in a favorite MSB LSB PC
Patch
DS/PRST/GM/
EXP Bank
Values for each sound
(refer to the parameter guide and sound list)
USER Bank:
0501–0628
87
0
1–128
USER Bank:
0629–0756
1
Drum Kit
DS/PRST/GM/
EXP Bank
Values for each sound
(refer to the parameter guide and sound list)
USER Bank:
R501–R508
86 0 1–8
Performance
PRST Bank
85
64 1–64
USER Bank 0 1–128
Phrase Pads
MIDI note messages can now be transmitted when you press a pad. This lets you
use the pads to play drums or phrases. The messages to be transmitted can be
individually specied for each pad.
1.
Press the [MENU] button.
2.
Move the cursor to “SYSTEM,” and press the [ENTER] button.
3.
Move the cursor to the tab, and use the [C] [A] buttons to select the “PAD
NOTE” tab.
4.
Move the cursor to the parameter that you want to edit, and use the value
dial to edit the value.
5.
Press the [EXIT] button to exit the screen.
MEMO
MIDI note messages are transmitted only if you’ve selected the patch or
performance top screen, or in the SYSTEM screen when the PAD NOTE tab is
selected.
Parameter Values/Explanation
Pad Note Switch
Species the mode in which MIDI note messages are transmitted.
OFF Messages are not transmitted.
PATCH Only in patch mode.
PERFORM Only in performance mode.
BOTH In patch mode and in performance mode.
Pad 1–8
Note Number
Species the note that is transmitted.
C-–G9
Pad 1–8 Velocity
Species the velocity of the note that is transmitted.
OFF, 1–127
Pad 1–8 Channel
Species the MIDI channel of the note that is transmitted.
1–16
Holding MIDI Note Messages (Hold)
You can specify that the MIDI note message is held even after you release your hand
from the pad (Hold). This is convenient when you want to play a sustained note or a
phrase.
1.
Press the [LOOP] button while pressing the pad.
Note is held even after you release your hand from the pad.
MEMO
5
If you’re pressing more than one pad, all of them are held.
5
Notes are also held if you rst hold down the [LOOP] button and then press
each pad.
2.
If you press a pad while a note is being held, the hold function is cancelled
for that pad.
If you press the [LOOP] button by itself while notes are being held, the hold function
is cancelled for all pads.
Patch Edit / Drum Kit Edit
For the Wave Group parameter, you can now select SAMP (user sample) or MSAM
(user multisample).
SAMP
Select a wave (user sample) that you imported via sample import. The name of the
le that was imported is shown as the wave name.
MSAM
Select a user multisample that you created by combining multiple user samples.
User multisamples can be created using the “JUNO-DS Tone Manager” PC software.
DAW Control
In DAW control mode, octave shift (OCTAVE [DOWN] / [UP] buttons) is now available.
You can change the octave of the note messages that are transmitted via MIDI.
Level Meter
The display conditions have changed for the level meter shown by the pad
illumination.
(Before change): In patch mode, the meter indicates the level of the sound played
by the keyboard.
(After change): The meter indicates the level of the sound played in the mode for
which Pad Note Switch is available.
Support for JUNO-DS Tone Manager
Now it supports for “JUNO-DS Tone Manager” which is a Computer software to
manage and edit the patches/performances/samples. It lets you eciently handle
large numbers of contents on your computer.
Sample Import
5
The amount of user memory has increased, allowing you to import more samples.
5
The Original Key and Loop Switch values of a WAV le that you create using the
“JUNO-DS Tone Manager” software are automatically applied when importing the
sample.
Sample Edit
The Start/Loop/End Point of a WAV le that you create using the “JUNO-DS Tone
Manager” software are automatically applied as the default values when you edit
each sample.
© 2018 Roland Corporation
01

2
JUNO-DS Supplementary Manual
Functions Added in JUNO-DS Ver.1.04
PATCH LIST (CAT) Screen
Move the cursor to the category number of the patch and press the [ENTER] button
to access the PATCH LIST (CAT) screen.
[ENTER]
(Example 1) Patch mode
[ENTER]
(Example 2) Performance mode
You can also use the category buttons ([DRUMS/PERCUSSION]–[SAMPLE]) to switch
tabs.
Function in Ver.1.03 and earlier: Access the PATCH LIST screen
Patch mode Move the cursor to the bank number, and press the [ENTER] button.
Performance mode
In the PERFORM EDIT screen, move the cursor to “Number,” and
press the [ENTER] button.
Favorite
Now you can use favorites even when the AUDIO PLAYER screen is displayed.
Sample Cleanup (SAMPLE CLEANUP)
Cleanup is a function that deletes unused sample waveform data. For example, if
a patch number containing a sample created by sample import is overwritten by a
dierent patch, the sample’s waveform data remains by itself.
The cleanup function deletes this type of unused sample waveform data in a single
operation. This makes it a useful way to obtain the free memory that is needed
when importing new samples.
1.
Press the [SAMPLE IMPORT] button to make it light.
The SAMPLE MENU screen appears.
2.
Move the cursor to “SAMPLE CLEANUP,” and press the [ENTER] button.
The SAMPLE CLEANUP screen appears.
USED BLOCK Waveform data of samples that are being used
UNUSED BLOCK Waveform data of samples that are not being used
EMPTY BLOCK Free memory
3.
Press the [ENTER] button.
A conrmation message appears.
If you decide to cancel, press the [EXIT] button.
4.
Move the cursor to “OK,” and press the [ENTER] button.
Cleanup is complete when the screen indicates “Completed!”
Arpeggio
By long-pressing the [ARPEGGIO] button, you can move to the ARPEGGIO screen
from any screen without changing the arpeggio status.
Vocoder/Auto Pitch
5
The “Part Level” parameter has been added to the VOCODER/AUTO-PITCH screen.
* Part Level is memorized when you save vocoder / auto pitch settings.
Parameter Value/Explanation
Mode: Vocoder
Part Level
Adjusts the level at which the selected Carrier sound is input to the
vocoder.
0–127
Mode: Auto-Pitch
Part Level
Adjusts the volume of the sound played on the keyboard when using
auto-pitch.
0–127
5
In the VOCODER/AUTO-PITCH screen, moving the [UPPER] slider adjusts the Part
Level.
* This is a change from Ver.1.03 and earlier, in which this slider adjusted “Patch
Level.”
5
In the VOCODER/AUTO-PITCH screen, moving the [LOWER] slider adjusts the
vocoder/auto pitch’s Level.

3
JUNO-DS Supplementary Manual
Pattern Sequencer
In the PATTERN SEQUENCER screen you can now edit the patch that is used to play
or record the track.
In the PATTERN SEQUENCER screen, press the [SAMPLE IMPORT] and [DAW CONTROL]
buttons simultaneously, and then choose “PATCH EDIT.”
System Settings
The “Patch Remain” parameter has been added to the “SOUND” tab of the SYSTEM
screen.
Parameter Value/Explanation
Patch Remain
Species whether currently sounding notes will continue sounding when
another patch or drum kit is selected (ON), or not (OFF).
When this is “ON,” changes produced by incoming MIDI messages such
as Volume or Pan (CC 5, 7, 10, 65, 68, 71–74, RPN 0, 1, 2, MONO ON, POLY
ON), as well as tonal quality and volume changes produced by the various
controllers will be inherited.
* Eects settings change as soon as you switch to a new patch or drum
kit, without being inuenced by the Patch Remain setting. Because
of this, certain eects settings can cause notes that were until then
sounding to no longer be heard, even though Patch Remain has been
set to “ON.”
* When using the pattern sequencer, Patch Remain is always OFF.
OFF, ON
Shortcut
The following shortcuts have been added.
Shortcut Explanation
Common section
[SHIFT] + each control knob
Displays the “KNOB” tab of the SYSTEM screen; the setting
of the control knob you operated is selected.
[SHIFT] + [4] Turns the MFX (MFX1) on (lit)/o (unlit)
[SHIFT] + [5]
Turns the MFX2 on (lit)/o (unlit)
* Only in Performance mode.
[SHIFT] + [6]
Turns the MFX3 on (lit)/o (unlit)
* Only in Performance mode.
[SHIFT] + [7] Turns the chorus on (lit)/o (unlit)
[SHIFT] + [8] Turns the reverb on (lit)/o (unlit)
Operations using [SHIFT] + ([0]–[3], [9])
In Ver.1.04, the button lit/blink status when the [SHIFT] button is pressed has been
changed as follows.
Shortcut Explanation
[SHIFT] + [0]
PATCH EDIT screen
or
DRUM KIT EDIT screen
When the shortcut is available:
Button blinks when the [SHIFT] button is held
down
When the shortcut is unavailable:
Button is unlit when the [SHIFT] button is held
down
[SHIFT] + [1] MFX (MFX1) screen
[SHIFT] + [2] CHORUS screen
[SHIFT] + [3] REVERB screen
[SHIFT] + [9] SAMPLE EDIT screen
Sample Edit
5
When you press the [MENU] button in the SAMPLE EDIT screen, the INIT MENU
window appears. Choose “SAMPLE” and press the [ENTER] button to initialize the
parameters other than that of the “SAMPLE” tab.
5
The “COMMON” tab and “SAMPLE WAVE” tab have been added to the SAMPLE EDIT
screen.
COMMON
Parameter Value/Explanation
Patch Level
Species the volume of the patch.
0–127
Patch Pan
Species the pan of the patch.
“L64” is far left, “0” is center, and “63R” is far right.
L64–0–63R
Patch Priority
This determines how notes will be managed when the maximum
polyphony is exceeded (128 voices).
LAST
The last-played voices will be given priority, and currently
sounding notes will be turned o in order, beginning with the
rst-played note.
LOUDEST
The voices with the loudest volume will be given priority, and
currently sounding notes will be turned o, beginning with
the lowest-volume voice.
Octave Shift
Adjusts the pitch of the patch’s sound up or down in units of an octave (±3
octaves).
-3–3
Patch Coarse Tune
Adjusts the pitch of the patch’s sound up or down in semitone steps (±4
octaves).
-48–48
Patch Fine Tune
Adjusts the pitch of the patch’s sound up or down in 1-cent steps (±50
cents).
-50–50
Stretch Tune
Depth
Stretched tuning (a system by which acoustic pianos are normally tuned,
causing the lower range to be lower and the higher range to be higher
than the mathematical tuning ratios would otherwise dictate)
OFF Equal temperament
1–3
Higher settings will produce the greater dierence in the
pitch of the low and high ranges.
Pitch dierence from
equal temperament
Parameter value
Low note range High note range
Analog Feel
Species the depth of 1/f modulation that is to be applied to the patch.
By adding this “1/f modulation,” you can simulate the natural instability
characteristic of an analog synthesizer.
0–127
Cuto Oset
Osets the Cuto Frequency value.
-63–+63
Resonance Oset
Osets the Resonance value.
-63–+63
Attack Time Oset
Osets the TVA-Env Time 1 and TVF-Env Time 1 values.
-63–+63
Release Time
Oset
Osets the TVA-Env Time 4 and TVF-Env Time 4 values.
-63–+63
Velocity Sens
Oset
Osets the Cuto V-Sens and Level V-Sens values.
-63–+63
Mono/Poly
Species whether the patch will play polyphonically (POLY) or
monophonically (MONO).
The “MONO” setting is eective when playing a solo instrument patch such
as sax or ute.
MONO Only the last-played note will sound.
POLY Two or more notes can be played simultaneously.
Legato Switch
Species whether the Legato Switch will be used (ON) or not (OFF).
With the Legato Switch parameter “ON,” pressing a key while continuing
to press a previous key causes the note to change pitch to the pitch of the
most recently pressed key, sounding all the while. This creates a smooth
transition between notes, which is eective when you wish to simulate the
hammering-on and pulling-o techniques used by a guitarist.
* Legato Switch is valid when the Mono/Poly is set to “MONO.”
OFF, ON

4
JUNO-DS Supplementary Manual
Parameter Value/Explanation
Legato Retrigger
Species whether sounds are replayed (ON) or not (OFF) when performing
legato. Normally you will leave this parameter “ON.”
When “OFF,” when one key is held down and another key is then pressed,
only the pitch changes, without the attack of the latter key being played.
Set this to “OFF” when performing wind and string phrases or when
simulating the mono synth keyboard sound.
* Legato Retrigger is valid when the Mono/Poly is set to “MONO” and the
Legato Switch is set to “ON.”
OFF, ON
MEMO
Let’s say you have the Legato Switch set to “ON,” and the Legato Retrigger set to “OFF.” When
you try to sound a legato (by pressing a higher key while a lower key is held down), the pitch
may sometimes not be able to rise all the way to the intended pitch (stopping instead at an
intermediate pitch). This can occur because the limit of pitch rise, as determined at the wave
level, has been exceeded. Additionally, if diering upper pitch limits are used for the waves of
a Patch that uses multiple tones, it may stop being heard in MONO. When making large pitch
changes, set the Legato Retrigger to “ON.”
Portamento
Switch
Species whether the portamento eect will be applied (ON) or not (OFF).
OFF, ON
Portamento Mode
Species the performance conditions for which portamento will be applied.
NORMAL Portamento will always be applied.
LEGATO
Portamento will be applied only when you play legato (i.e.,
when you press the next key before releasing the previous
key).
Portamento Type
Species the type of portamento eect.
RATE
The time it takes will depend on the distance between the
two pitches.
TIME
The time it takes will be constant, regardless of how far apart
in pitch the notes are.
Portamento Start
When another key is pressed during a pitch change produced by
portamento, a new pitch change will begin. This setting species the pitch
at which the change will begin.
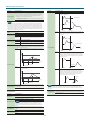
PITCH
Starts a new portamento when another key is pressed while
the pitch is changing.
Pitch
Time
press C4 key
press C5 key
press D4 key
NOTE
Portamento will begin anew from the pitch where the current
change would end.
Pitch
Time
press C4 key
press C5 key
press D4 key
Portamento Time
When portamento is used, this species the time over which the pitch will
change. Higher settings will cause the pitch change to the next note to
take more time.
0–127
SAMPLE WAVE
Parameter Value/Explanation
Wave Gain
Sets the gain (amplication) of the waveform. The value changes in 6 dB
(decibel) steps—an increase of 6 dB doubles the waveform’s gain.
-6, 0, +6, +12
Wave FXM Switch
Sets whether FXM will be used (ON) or not (OFF).
OFF, ON
MEMO
FXM (Frequency Cross Modulation) uses a specied waveform to apply
frequency modulation to the currently selected waveform, creating
complex overtones. This is useful for creating dramatic sounds or sound
eects.
Wave FXM Color
Species how FXM will perform frequency modulation. Higher settings
result in a grainier sound, while lower settings result in a more metallic
sound.
1–4
Wave FXM Depth
Species the depth of the modulation produced by FXM.
0–16
Parameter Value/Explanation
Tone Delay Mode
Selects the type of tone delay.
NORM
The tone begins to play after the time specied in the Tone
Delay Time has elapsed.
Note on
No Tone Delay
Delay time
Note o
HOLD Although the tone begins to play after the time specied in the
Tone Delay Time has elapsed, if the key is released before the
time specied in the Tone Delay Time has elapsed, the tone is
not played.
Note on Note o
No sound played
OFF-N
Rather than being played while the key is pressed, the tone
begins to play once the period of time specied in the Tone
Delay Time has elapsed after release of the key. This is eective
in situations such as when simulating noises from guitars and
other instruments.
Note on Note o
Delay time
OFF-D
Rather than being played while the key is pressed, the tone
begins to play once the period of time specied in the Tone
Delay Time has elapsed after release of the key. Here, however,
changes in the TVA Envelope begin while the key is pressed,
which in many cases means that only the sound from the
release portion of the envelope is heard.
Note on Note o
Delay time
MEMO
If you have selected a waveform that is a decay-type sound (i.e., a sound that fades away
naturally even if the key is not released), selecting “OFF-N” or “OFF-D” may result in no sound
being heard.
Tone Delay Time
Species the time from when the key is pressed (or if the Delay Mode is set
to “OFF-N” or “OFF-D,” the time from when the key is released) until when
the tone will sound.
0–127, note
-
 1
1
-
 2
2
-
 3
3
-
 4
4


