Page is loading ...


IDAC
http://www.zennio.com
Technical Support: http://support.zennio.com
2
CONTENTS
Contents ........................................................................................................................................ 2
Document Updates ....................................................................................................................... 3
1 Introduction ............................................................................................................................ 4
1.1 IDAC .................................................................................................................................. 4
1.2 Access Control System ..................................................................................................... 5
1.3 Installation ........................................................................................................................ 8
1.4 Start-Up and bus KNX power failure or open door .......................................................... 9
2 Configuration ........................................................................................................................ 10
2.1 General ........................................................................................................................... 10
2.2 Indoor Module ............................................................................................................... 13
2.2.1 Configuration ........................................................................................................... 13
2.2.2 Backlight .................................................................................................................. 15
2.2.3 Room State Buttons ................................................................................................. 15
2.2.4 Touch Locking .......................................................................................................... 16
2.2.5 Sounds ..................................................................................................................... 17
2.2.6 Ambient Luminosity Sensor ..................................................................................... 19
2.3 Outdoor Module ............................................................................................................ 20
2.3.1 Configuration ........................................................................................................... 20
2.3.2 Access Control ......................................................................................................... 22
2.3.3 Backlight .................................................................................................................. 24
2.3.4 Doorbell button ....................................................................................................... 27
2.3.5 Touch Locking .......................................................................................................... 28
2.3.6 Sounds ..................................................................................................................... 28
2.3.7 Ambient Luminosity Sensor ..................................................................................... 29
ANNEX I. Communication Objects............................................................................................... 30


IDAC
http://www.zennio.com
Technical Support: http://support.zennio.com
4
1 INTRODUCTION
1.1 IDAC
IDAC from Zennio is a KNX interface presented as an access control system to rooms
or other parts of the installation through reading ID cards.
The most notable features of this device are:
Product consisting of:
➢ Two Access modules installed in door.
➢ Lock that will make possible the opening and closing of the door and the
power supply of the modules.
➢ Metal element installed in the door frame that will receive direct power
from KNX bus.
Battery charging system and power supply to KNX bus by means of
retractable metal contacts.
Outdoor module with rooms access control functionality using cards with
NFC (Near Field Communication) technology of MIFARE DESFire and
MIFARE Classic types.
Buzzer for an audible acknowledgement of user actions (with the possibility
of disabling it by object).
Communication with Z-Access for the management and monitoring of
accesses.
Buttons and LED indicators on both modules.
Possibility of locking / unlocking the buttons of both modules.
Possibility of setting a press detection delay.
Heartbeat.

IDAC
http://www.zennio.com
Technical Support: http://support.zennio.com
5
1.2 ACCESS CONTROL SYSTEM
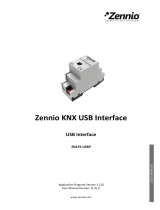
The following figure shows the main elements involved in an access control system
and the interactions between them:
Figure 1. Access control system elements
IDAC – Outdoor Module: part installed on the outside of the door. It has an
NFC reader for access controlling to the room, with a button with bell
functionality and three LED indicators. For further information see section 2.3.
IDAC – Indoor Module: part installed on the inside of the door. It has one or
two pushbuttons (depending on the model) that allow changing the state of
the room. For further information see section 2.2.
Lock: together with the handle, enables the door to be opened and closed.
When the door is open, it provides power to the IDAC through a rechargeable
battery.
Door Frame Plate: element installed in the door frame and to which the KNX
bus is connected, which in turn is connected to the lock through the bales.
Please note, therefore, that when opening the door, the IDAC will not has
KNX bus connection.
Z-Access: application that allows employees to record access cards.
KNX-IP
Interface
KNX Bus
Ethernet
Z-Access
NFC
Card
Outdoor Module
Indoor module
Door Frame
Plate
Lock

IDAC
http://www.zennio.com
Technical Support: http://support.zennio.com
6
NFC card: passive element for accessing to certain rooms. IDAC supports
two types of cards: MIFARE DESFire and MIFARE Classic.
The data used by the system to allow or deny the access are:
Groups: sets of users or cards with the same access level. The groups
available are:
➢ Guest
➢ Visitor
➢ Staff
➢ Management
➢ Service
➢ Cleaning
➢ Maintenance
➢ Security
➢ Custom
Card Identifier: unique NFC card identifier.
IDAC Identifier: unique IDAC identifier.
When recording data access to a card, the Z-Access application offers two alternatives
to the employee:
Associate the card with a specific group: the identifier of the selected
group will be recorded in the card. This option only supports DESFire cards.
Associate the card with a specific IDAC: the identifier of the IDAC will be
recorded in the card (see section 2.3.2). Any card associated with a specific
IDAC will be also associated with the group “Guest”.
Any IDAC has a unique identifier set by parameter. And it will gran or deny the
accesses according to its lists:
White list: groups with access granted. This list is set by parameter (see
section 2.3.2). In addition, IDAC allows access to all the cards associated
with its identifier.
Black list: groups or cards with access denied. This list is set in Z-Access
and transmitted to IDAC through the KNX bus.

IDAC
http://www.zennio.com
Technical Support: http://support.zennio.com
7
The black list takes precedent over the white list (see examples below).
Note: an IDAC that has the "Guest" group in its white list will allow access to any card
associated with any specific IDAC, so it is a configuration intended for access control of
common areas.
Examples:
Card 1
IDAC 124
Group “Guest”
IDAC 124
White list:
Black list:
IDAC 245
White list: Cleaning
Black list:
IDAC Gym
White list: Guest, Staff
Black list: Card 2
Card 2
IDAC 245
Group “Guest”
Card 3
Group “Cleaning”
Card 4
Group “Staff”
Card 1 Access granted
Card 2 Access denied
Card 3 Access denied
Card 4 Access denied
Card 1 Access denied
Card 2 Access granted
Card 3 Access granted
Card 4 Access denied
Card 1 Access granted
Card 2 Access denied
Card 3 Access denied
Card 4 Access granted
The spa is temporarily restricted to
guests by putting the group on the
black list:
Card 1 Access denied
Card 2 Access denied
Card 3 Access granted
Card 4 Access denied
IDAC Spa
White list: Guest, Cleaning
Black list: Guest
IDAC Swiming pool
White list: Guest, Cleaning
Black list:
Card 1 Access granted
Card 2 Access granted
Card 3 Access granted
Card 4 Access denied

IDAC
http://www.zennio.com
Technical Support: http://support.zennio.com
8
1.3 INSTALLATION
IWAC Display v2 connects to the KNX bus through the on-board KNX connector. This
device requires an external 24V DC power supply.
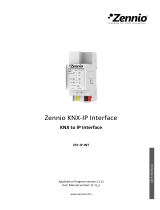
Figure 2. IDAC.
A short press on the Prog. /Test button (8) will make the device enter the
programming mode. The Prog. /Test LED (9) will then light in red. On the contrary, if
this button is held while the device gets connected to the bus, the device will enter the
safe mode. In such case, the programming LED will blink in red colour.
For detailed information about the technical features of the device and about the
installation process, please refer to the corresponding Datasheet bundled with the
original package of the device and the installation manual available at
www.zennio.com.
1. Access LED indicator.
2. Luminosity and proximity sensor.
3. Touch area.
4. NFC card reader.
5. Tamper switch.
6. 15-pin connector.
7. 12-pin connector.
8. Programming/Test button.
9. Programming/Test LED.
10. Interconnection cable (15-pin).
11. Screws and metal plate for flush
mounting on door.
12. Security screw.
13. Touch areas.
14. Luminosity and proximity sensor.
3
2
7
5
4
6
1
8
9
10
12
11
13
14
External view
Internal view

IDAC
http://www.zennio.com
Technical Support: http://support.zennio.com
9
1.4 START-UP AND BUS KNX POWER FAILURE OR OPEN DOOR
After the device start-up (due to a device reset or programming), it requests date and
time through the object “[General] Request Date and Time”. The group address of
this object is the one that must be indicated in Z-Access to respond to the request.
For proper operation of the buttons of both modules, it is recommended not to be
pressing them during the initialization, either after programming or after connecting the
external power supply.
On the other hand, in the event of a KNX bus power failure or door opening the
device will continue operating normally since it has power supply through a
rechargeable battery, although, of course, there will be no communication with the KNX
bus. Nevertheless, note that, to reduce the battery consumption:
All LED are turn off after 5 minutes of the KNX bus power failure or door
opening. They are only turn on after a presence detection, press or card
reading.
The NFC reader on the external module is turned off when the door opens (in
the event of KNX bus power failure with the door closed it remains active,
allowing accessing to the room).
Important: If the battery is drained out, it is essential that, when the device is restarted
during the charging process, the time is correctly received as a response to the object
request "[General] Request Date and Time". A clock offset caused by the absence of a
battery can be critical for user access, as it depends on the date/time specified on their
cards.

IDAC
http://www.zennio.com
Technical Support: http://support.zennio.com
10
2 CONFIGURATION
After importing the corresponding database in ETS and adding the device into the
topology of the desired project, the configuration process begins by entering
Parameters tab of the device.
2.1 GENERAL
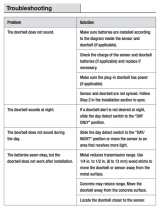
The "General" tab contains general settings, those that are independent of the internal
and external modules.
ETS PARAMETERIZATION
Figure 3. General Configuration.
Heartbeat (Periodical Alive Notification) [disabled/enabled]
1
: incorporates a
one-bit object to the project (“[Heartbeat] Object to Send ‘1’”) that will be
sent periodically with a value of “1” to notify that the device is still working (still
alive).
Note: The first sending after download or bus failure takes place with a delay
of up to 255 seconds, to prevent bus overload. The following sendings match
the period set.
Update Objects: enables the sending of read requests to update status
objects. There are four options available, some of them with a configurable
delay:
➢ [Disabled]: no read request, therefore objects are not updated.
1
The default values of each parameter will be highlighted in blue in this document, as follows:
[default/rest of options].

IDAC
http://www.zennio.com
Technical Support: http://support.zennio.com
11
➢ [After Programming/Reset]: read requests are sent after the parameterised
delay [1…10…65535] [s/min/h] when a restart (after battery depletion or
change), a download or a reset device from ETS occurs.
➢ [After Reconnect]: read request are sent when the connection to the bus is
recovered, after the parameterised delay [1…10…65535] [s/min/h].
➢ [After Programming/Reset and Reconnect]: combination of the two above
options.
Sound Type [Sound 1 / Sound 2]: determines the range of sounds the device
will incorporate for button, doorbell, and alarm acoustic signals.
The project topology always shows the following objects:
“[General] Presence: Occupancy State”: 1-bit object that will set whether
the room is occupied.
“[General] Request Date and Time”: object to request time and date
update.
Important: time setting must be done through the bus, by means of an
external reference.
“[General] Access Log”: 14-byte object which is sent to the bus every time
there is access attempt. The information that is transmitted is different
according to the following cases:
➢ The card does not belong to the system: the card read has not been
recorded with our Access control system. The following fixed message is
transmitted: “Invalid Card”.
➢ The card belongs to the system: the card is valid. The following information
is transmitted: UUID of the card in ASCII format and, also, the most
significant bit of the first character of the object is used to indicate whether
the access has been granted or denied, where 0 = Access Denied and 1 =
Access Granted.

IDAC
http://www.zennio.com
Technical Support: http://support.zennio.com
12
Example
The following are possible log messages for an attempt to access a room
with a card with UUID '04 FB 10 8A 00 00 C7 ':
Invalid card: “Invalid Card”
Access Granted: “°4FB108A0000C7”. The degree symbol corresponds
to the transformation of the most significant bit: 0 (ASCII)
0x30 (Hex)
00110000 (binary)
10110000 (MSB = 1)
° (ASCII).
Access Denied: “04FB108A0000C7”.
“[General] Scene: Receive” and “[General] Scene: Send”: objects for
respectively receiving and sending scene values from/to the KNX bus
whenever it is necessary.
“[General] Bolt – Alarm”: object which will report a mechanical trouble in
the bolt for revision.
“[General] Servomotor – Alarm”: object which will report a problem in the
servomotor that makes it possible to open the door. When this happens, it
must be checked.
“[General] Tampering – Alarm”: object which will notify that the enveloping
has been removed.
“[General] Tampering – Date and Time”: 8-byte object that is sent when
the enveloping is removed, informing the date and time of the action.
“[General] Date and Time”: 8-byte object that allows knowing the current
date and time of the device.
"[General] Language": 2-byte object to be sent to the bus every time a
correct reading of the data of a card belonging to the system is carried out.
The information transmitted will be the language recorded on the card, using
the codes corresponding to the ISO 639-1 standard.

IDAC
http://www.zennio.com
Technical Support: http://support.zennio.com
13
2.2 INDOOR MODULE
This module is installed inside the room, embedded in the door.
It consists of a pair of pushbuttons or an individual pushbutton (depending on the
model) to control the state of the room.
In addition, it has a proximity sensor and an ambient luminosity sensor that will
allow the device to react to different situations of presence or illumination.
2.2.1 CONFIGURATION
In the "Configuration" tab of the Indoor Module, the general configurable parameters of
the module are displayed. Most of them are checkboxes to activate other
functionalities.
ETS PARAMETERIZATION
Figure 4. Indoor Module Configuration
Room State Buttons [disabled/enabled]: enables or disables the “Room
State Buttons” tab in the tree on the left. See section 2.2.3 for details.
Touch Locking [disabled/enabled]: enables or disables the “Touch Locking”
tab in the tree on the left. See section 2.2.4 for details.
Customize Sounds [disabled/enabled]: enables or disables the “Sounds” tab
in the tree on the left. See section 2.2.5 for details.

IDAC
http://www.zennio.com
Technical Support: http://support.zennio.com
14
Proximity Sensor [disabled/enabled]: enables the proximity sensor. This
functionality permits “waking up” the device when detecting presence through
the proximity sensor
Please refer to the user manual “Proximity and Luminosity Sensor”
(available in the IDAC product section at the Zennio homepage,
www.zennio.com) for detailed information about the functionality and the
configuration of the related parameters.
Ambient Luminosity Sensor [disabled/enabled]: enables or disables the
“Ambient Luminosity Sensor” tab in the tree on the left. See section 2.2.6 for
details.
Inactivity
➢ Initial State (After Download) [Inactivity / Activity]: determines whether
the internal module should be started in activity state after a download.
➢ Time to Consider Inactivity [1…65535] [s/min/h]: time that must elapse
since the last press and/or proximity detection to consider inactivity state
and to set the configured brightness level. See section 2.2.2.
The project topology always shows the following objects:
“[In] Activity”: 1-bit object to force activity/inactivity state on the device. For
further information, please refer to the user manual “Proximity and
Luminosity Sensor” and “Brightness” (available in the IDAC product
section at the Zennio homepage, www.zennio.com).
“[In] Proximity Sensor”, “[In] External Proximity Detection” and “[In]
Proximity Detection”: 1-bit object whose functionality is tied to the proximity
sensor. For further information, please refer to the user manual “Proximity
and Luminosity Sensor” (available in the IDAC product section at the
Zennio homepage, www.zennio.com).

IDAC
http://www.zennio.com
Technical Support: http://support.zennio.com
15
2.2.2 BACKLIGHT
The Indoor Module allows the brightness of its LED to be managed according to two
operating modes: normal and night mode.
Please refer to the specific manual “Brightness” (available in the IDAC product section
at the Zennio website, www.zennio.com) for detailed information about the functionality
and the configuration of the related parameters.
2.2.3 ROOM STATE BUTTONS
The buttons of the Indoor Module are intended to control the state of the room (normal,
do not disturb and make-up request).
Two types of control are available:
Do Not Disturb: a single button that switches between Normal and Do Not
Disturb.
➢ If the current state of the room is Normal or Make-Up Request and the
button is pressed, it is activated Do Not Disturb.
➢ If the current state of the room is Do Not Disturb and the button is pressed,
it is activated Normal.
Double: two buttons of which the right switches between Do Not Disturb and
Normal and the left between Make-Up Request and Normal.
Note: Please, note that the type of control must be selected according to the product
design.
ETS PARAMETERIZATION
When the function Room State Buttons in “Configuration” tab, in Indoor Module, a
new tab will be available in the left tree. In addition, three objects will appear and will
allow to monitor and control the state of the room:
“[General] Room State: Control” and “[General] Room State: Status”:
allow setting and monitor the room status. The values available are: 0 =
Normal, 1 = Make Up, 2 = Do Not Disturb.

IDAC
http://www.zennio.com
Technical Support: http://support.zennio.com
16
“[General] Room State: Make Up Room (Status)” and “[General] Room
State: Do Not Disturb (Status)”: indicate whether the room is in Make Up or
Do Not Disturb status (‘1’) respectively, or not (‘0’).
Figure 5. Room State Buttons
Control Type [Do Not Disturb / Double]: depending on the type of control
selected, one or two buttons will be enabled, located in the central area or on
both sides, respectively.
Press Detection Delay [1…2…255] [x 1 ds]: during this time, no press will be
considered.
LED Color: color of the LED associated to the button when the
corresponding state is selected.
2.2.4 TOUCH LOCKING
Buttons can optionally be locked or unlocked at any time by receiving a binary value
(configurable) addressed to the object provided for this purpose. It can also be done
through scene values.
ETS PARAMETERIZATION
After enabling Touch Locking from “Configuration” screen (see section 2.2.1), a new
tab will be incorporated into the tree on the left.

IDAC
http://www.zennio.com
Technical Support: http://support.zennio.com
17
Figure 6. Touch Locking
1-Bit Object [disabled/enabled]: enables the 1-bit object “[In] Touch
Locking” to trigger the touch lock.
➢ Value [0 = Unlock, 1 = Lock / 0 = Lock, 1 = Unlock]: parameter to select
which value should trigger which action when received through the
indicated object.
Scene Object [disabled/enabled]: enables the touch locking and unlocking
when receiving the configured scene value through the object (“[General]
Scene: receive”).
➢ Lock: Scene Number (0 = Disabled) [0/1…64]: scene number that locks
the buttons.
➢ Unlock: Scene Number (0 = Disabled) [0/1…64]: scene number that
unlocks the buttons.
2.2.5 SOUNDS
The Indoor Module of IDAC emits two types of sounds, depending on the action
performed:
Sending Confirmation: a short and sharper beep that indicates the sending of
an object to the bus as a result of a press.
Alarm: sharp and longer beep than the previous one, high intensity, which is
typically used as alarm or doorbell.
The range of sounds emitted when these actions are performing will be different
depending on the sound type selected (see section 2.1).

IDAC
http://www.zennio.com
Technical Support: http://support.zennio.com
18
Enabling and disabling the button sounds can be done in parameters or through an
object, being also possible to set in parameters whether the button sounds should be
initially enabled or not.
Note: Under no circumstances the alarm or the ring tone will be muted.
ETS PARAMETERIZATION
After enabling the Customize Sounds in “Configuration” screen, in Indoor Module,
(see section 2.2.1), a new tab will be incorporated into the tree on the left.
Figure 7. Indoor Module Sounds
Disable Button Sounds [disabled/enabled]: enables or disables acoustic
signals when actions derived from button presses are executed.
➢ Enable/Disable Button Sound Through a 1-bit Object
[disabled/enabled]: makes it possible to disable / resume the button
beeping function in runtime by writing to a specific object (“[In] Sounds –
Disabling Button Sound”).
• Button Sound (After Download) [enabled/disabled]: sets whether
the button beeping function should start up enabled or disabled after
an ETS download.
• Value [0 = Disabled; 1 = Enabled / 0 = Enabled; 1 = Disabled]:
parameter to select which value should trigger which action when
received through the indicated object.

IDAC
http://www.zennio.com
Technical Support: http://support.zennio.com
19
Object for Doorbell [disabled/enabled]: enables or disables the doorbell
function. If enabled, a specific object (“[In] Sounds - Doorbell”) will be
included into the project topology.
➢ Value [0 = No Action; 1 = Doorbell / 0 = Doorbell; 1 = No Action]:
parameter to select which value should trigger which action when received
through the indicated object
Object for Alarm [disabled/enabled]: enables or disables the alarm function.
If enabled, a specific object (“[In] Sounds - Alarm”) will be included into the
project topology.
➢ Value [0 = No Alarm; 1 = Alarm / 0 = Alarm; 1 = No Alarm]: parameter to
select which value should trigger which action when received through the
indicated object
2.2.6 AMBIENT LUMINOSITY SENSOR
Indoor Module includes a sensor to measure the ambient luminosity level, so that the
brightness of the LEDs can be adjusted according to the current luminosity of the room.
Please refer to the specific manual “Luminosity and Proximity Sensor” (available in
the IDAC product section at the Zennio homepage, www.zennio.com) for detailed
information about the functionality and the configuration of the related parameters.

IDAC
http://www.zennio.com
Technical Support: http://support.zennio.com
20
2.3 OUTDOOR MODULE
This module will be installed outside the room, embedded in the door, to allow access
to authorized persons. For this purpose, it has an NFC reader for reading the access
cards of the users.
It also has a button for doorbell functionality and, as in the case of the indoor module,
it is equipped with a proximity sensor and an ambient luminosity sensor that will
allow to adjust the backlight according to to different situations of presence or
illumination.
This module does not have the activity functionality; its LEDs will be always on
(provided that there is KNX bus connection).
2.3.1 CONFIGURATION
In the "Configuration" tab of the Outdoor Module, the general configurable parameters
of the module are displayed. Most of them are checkboxes to activate other
functionalities.
ETS PARAMETERIZATION
Figure 8. Indoor Module Configuration
/