Page is loading ...

Lift controller for machine room-less installations
Manual
X.
+
J2
J120
J110
J90
J131
J133
J135
J136
X2
X3
X1
X4
X5
X6
X14 X15
X12
X11
X43
X9
X30
X20 X21
X16
X13
X32
X17
K0 K1 K2 K3 K4 K5 K6 K7 K8 K9 K10 K11 K12 K13
K23
K22
K21
K20
230 V AC
24 V DC
24 V DC
24 V DC
24 V DC
24 V DC
24 V DC
24 V DC
24 V DC
24 V DC
24 V DC
24 V DC
24 V DC
24 V DC
X18 X19
JS
X41
J1
X42
X40
CAN
SKZU
SPB
SPA
TKA
TKB
TKC
NH
FKNH
01 14:03:02
>A< '''@'''
GESCHLOSSEN
FST
STATUS
ERROR
USB-Host
USB-Slave
Drive
Enter
Shift
Select
Func

FST-2XT MRL Manual
Manufacturer NEW LIFT Steuerungsbau GmbH
Lochhamer Schlag 8
82166 Graefelfing
Tel +49 89 – 898 66 – 0
Fax +49 89 – 898 66 – 300
Mail [email protected]
www.newlift.de
Service line Tel +49 89 – 898 66 – 110
Mail [email protected]
Date of issue 03.07.2013
Author TB / AL
Release 14.06.2013 AL
Hardware version
Software version
Doc. No. hb_fst2xtmrl_2013-07_en
Copyright © NEW LIFT Steuerungsbau GmbH, 2014.
This manual is protected by copyright. All rights, including those of copying, of
reproduction, of translation and of modification, in whole or in part, are reserved by
the publisher.
No part of this description may be reproduced in any form or copied with an
electronic replication system without written permission.
Although great care has been taken in the production of texts and figures, we
cannot be held legally liable for possible mistakes and their consequences.

FST-2XT MRL Manual I
Inhalt
1 General 1
1.1 Abbreviations, characters and symbols used 1
1.2 Further information 1
1.3 How to contact us 2
1.4 General safety regulations 2
1.4.1 Applicable standards and guidelines 2
1.4.2 Electromagnetic compatibility (EMC) 2
1.4.3 Handling electronic assemblies 2
2 FST-2XT MRL 3
2.1 Technical data 3
2.2 LIFT Guard Panel 5
2.2.1 Emergency status monitor 5
2.2.2 Socket 230 V AC / 10 A 5
2.2.3 Control switch and fuses 6
2.3 Frequency inverter remote control with FST-2XT keypad 7
2.3.1 Basic settings of the FST-2XT 7
2.3.2 Connection and operation with DCP 03 8
2.4 UPS emergency power supply 9
3 FST-2XT MRL in practice 11
3.1 Freeing of persons 11
3.2 Checking the dual-circuit drive brake system 12
3.3 Checking traction with counterweight applied 12
3.3.1 Procedure for incremental positioning 12
3.3.2 Procedure for absolute positioning 13
3.4 Checking the brake release monitoring system 13

II FST-2XT MRL Manual

General
Abbreviations, characters and symbols used
FST-2XT MRL Manual 1
1 General
Control cabinet FST-2XT MRL is designed for machine room-less lifts and is available with a wide variety of
drive packages. The lockable control cabinet is usually located close to the entrance of one of the shaft access
areas, preferably near the drive located in the shaft. The integrated LIFT Guard Panel contains all switching ele-
ments and components needed for the freeing of persons.
This manual provides further information only on the special features of control cabinet FST-2XT MRL. Further
information on the FST-2XT controller can be found in the FST-2XT Manual and the FST-2XT Installation &
Commissioning Manual.
This document only describes the assemblies of the system delivered by NEW LIFT.
For information on components of control cabinet FST-2XT MRL that were not manufactured and supplied by
NEW LIFT, please refer to the respective user information supplied by the manufacturer or supplier.
1.1 Abbreviations, characters and symbols used
Delivery condition
Settings that are supplied as standard are marked with an asterisk .
System stop
Marks settings requiring a system stop in case a change becomes necessary. The FST-2XT controller displays
the text Um Wert zu aendern muss Aufzug gestoppt werden. OK? If you wish to change the value,
conrm with YES, if you do not wish to change the value or wish to change it later, then conrm with NO.
○ Re-start
Marks settings that only become active after a re-start of the FST-2XT or of the components.
► Activity symbol:
Activities described after this symbol must be carried out in the given order.
+ Key combination:
Press the linked keys simultaneously.
Abbreviations for technical details concerning terminals
P Power
I Input
O Output
L Low active
H High active
Safety-relevant information
This symbol is located in front of safety-relevant information.
Information notice
This symbol is located in front of relevant information.
1.2 Further information
The following documents, among others, are available for the FST-2XT controller and its components:
› FST-2XT Installation & Commissioning
› FST-2XT manual
› ADM manual
› FPM manual
› SAM manual
› Fire recall manual
› UCM-A3 manual
These and other up to date manuals can be found in the download area of our website unter Service
http://www.newlift.de/service/download

General
How to contact us
2 FST-2XT MRL Manual
1.3 How to contact us
If, after referring to this manual, you still require assistance, our service line is there for you:
Tel +49 89 – 898 66 – 110
E-mail [email protected]
Mon. - Thurs.: 8:00 a.m. – 12:00 p.m. and 1:00 p.m. – 5:00 p.m.
Fr: 8:00 a.m. – 3:00 p.m.
1.4 General safety regulations
The FST-2XT MRL control cabinet must only be operated in perfect working condition in a proper manner, safely
and in compliance with the instructions, the valid accident prevention regulations and the guidelines of the local
power company.
This manual is a supplement to the FST-2XT manual and the FST-2XT Installation and Commissioning manual
whose safety guidelines must always be observed.
1.4.1 Applicable standards and guidelines
The FST-2XT MRL fulls:
› the safety guidelines for the construction and installation of passenger and goods passenger lifts (DIN EN 81
Part 1 and 2).
› the conditions for the erection of high voltage installations with nominal voltages up to 1 kV (DIN VDE 0100).
› the contact protection measures in the machine room (VDE 0106).
› the data sheet on safety measures for the installation, maintenance and commissioning of lift systems (ZH
1/312).
1.4.2 Electromagnetic compatibility (EMC)
An accredited inspection authority has inspected the FST-2XT control system and its components in accordance
with the standards, thresholds and severity levels named in EN12015/1995 and EN12016/1995.
The FST-2XT control system and its components are:
› immune to electrostatic discharge (EN 61000-4-2/1995)
› immune to electrostatic elds (EN 61000-4-3/1997)
› immune to fast transient disturbances (EN 61000-4-4/1995)
The electromagnetic disturbance eld strengths created by the FST-2XT control system and its components do
not exceed the permissible thresholds. (EN 55011/1997).
1.4.3 Handling electronic assemblies
› Keep the electronic assembly in its original packaging until installation.
› Before opening the original packaging, a static discharge must be performed. To do this, touch a grounded
piece of metal.
› During work on electronic assemblies, periodically perform this discharge procedure.
› All bus inputs and outputs not in use must be equipped with a terminal resistor (terminator).

FST-2XT MRL
Technical data
FST-2XT MRL Manual 3
2 FST-2XT MRL
The machine room-less design of the controller and drive concept results in the following special features:
Control cabinet
› The control cabinet is designed as a lockable control cabinet for assembly in the entrance of one of the shaft
access areas, preferably near the drive located in the shaft
› The width of 400 mm makes it possible to install it in the entrance recess in the sliding doors to the right or left
of the door
› Can also be delivered as a re-proof variant as an option (F30/I30, without functional integrity, see appendix A)
› Area for lift attendants and area for authorised specialists, protected by lockable Plexiglas cover
› Activation and operation of the frequency inverter is done from the control cabinet via the DCP serial protocol.
For this reason, the frequency inverter does not have an operation unit.
› In order to optimise the drive curve, the frequency inverter can be also be operated and congured from the car
using the HHT hand-held terminal.
LIFT Guard Panel
› Integrated emergency status monitor
› Main switch
› Auxiliary control
› Fuses
Emergency status monitor
› Replaces the optical monitoring of the drives during the return drive (EN81-1 14.2.1.4) or freeing of persons
› Connected to LON bus of the FST-2XT controller and displays drive speed, car position, levelness and direction
of travel (even in the event of a power failure)
› No additional devices such as a video camera or viewing window are necessary
2.1 Technical data
Description Value
Supply voltage 400 V AC / 230 V AC ±10%
50 - 60 Hz
Outputs Short circuit-proof
Protection type IP52
Colour RAL 7035
Height x width x depth, Standard IP52 RAL7032 2000 x 400 x 200 mm
Base height 100 mm or 200 mm
Height x width x depth, F30 IP52 RAL7032 2204 x 517 x 282 mm
Base height 100 mm, pre-assembled
Temperature range: Storage & transport / operation -20 – +70 °C / ±0 – +60 °C
Relative humidity: Storage & transport / operation
(non-condensing)
+5 – +95 % / +15 – +85 %
Other control cabinet colours as well as stainless steel variants available for the control cabinet on request.

FST-2XT MRL
Technical data
4 FST-2XT MRL Manual
Aufzügswärter-Bedienpaneel
Zone
bündig
Richtung
Schachtlichttaster
USV - Ein/Aus
Fahrkorblichtschalter
Bremse öffnen
Notbetrieb
Schachtlicht
Bremse öffnen
Notbetrieb
Steuerung
Türantrieb
USV
Fahrkorblicht
Rückholsteuerung
K72
Q1 F4S14 S141 S140S1000 F9F5 F21 F1000 S21
Etage
V = m/s
Notbetrieb-Monitor
Hauptschalter
Achtung!
Bei ausgeschaltetem
Hauptschalter Q1
X1, X5, X70,
Steckdose X110
und alle orangen
Leitungen
unter Spannung!
Q1 K72 F4.1
F4 F5 F9 F21 F1000 S21
S14 S1000 S141 S105
X110 S140
Hauptschalter
r
e
ts
a
Tg
n
ut
h
cueleb
th
c
a
hc
S
s
i
er
k
stie
hr
e
h
ci
S
g
nu
r
e
u
e
tS
g
n
u
thc
uel
eb
t
hc
ah
c
S
g
nuthc
u
e
l
eb
b
ro
kr
h
aF
V
SU
g
n
u
tl
a
h
csba
n
r
e
Fgn
u
t
h
c
u
e
l
e
bbr
ok
r
h
a
F
b
e
ir
t
e
bt
o
NN
I
E
/
S
U
A
be
i
rte
bt
o
N
b
e
i
r
t
eb
t
o
N
z
tu
h
c
s
kn
i
s
bA b
e
irte
bto
N
edi
rrevO
-
MC
Ub
e
ir
t
e
bt
o
N
LIFT Guard Panel
230 VAC / 10A
S25
Notbetrieb-Monitor
v = m/s
Etage
Zone
Richtung
Achtung!
Bei ausgeschaltetem
Hauptschalter Q1
sind die Klemmleisten
X1, X5, X70, die Steckdosen
und alle orangenen Leitungen
unter Spannung!
Zum kompletten Freischalten
der Anlage, ausgenommen der
die USV ausgeschaltet werden!
N O T B E T R I E B
X.
+
J2
J120
J110
J90
J131
J133
J135
J136
X2
X3
X1
X4
X5
X6
X14 X15
X12
X11
X43
X9
X30
X20 X21
X16
X13
X32
X17
K0 K1 K2 K3 K4 K5 K6 K7 K8 K9 K10 K11 K12 K13
K23
K22
K21
K20
230 V AC
24 V DC
24 V DC
24 V DC
24 V DC
24 V DC
24 V DC
24 V DC
24 V DC
24 V DC
24 V DC
24 V DC
24 V DC
24 V DC
X18 X19
JS
X41
J1
X42
X40
NA
C
SKZU
SPB
SPA
TKA
TKB
TKC
NH
FKNH
01 14:03:02
>A< '''@'''
GESCHLOSSEN
FST
STATUS
ERROR
USB-Host
USB-Slave
Drive
Enter
Shift
Select
Func
400 Depth = 200
Base 100 mm or 200 mm
with levelling feet
Swivel handle lock in acc. with EN81,
self-locking
UPS 230 VAC
LIFT Guard Panel
Plexiglas cover
2000
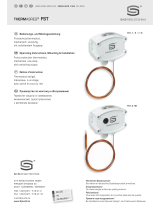
Area for authorised personnel (covered with Plexiglas) Area for lift attendants
Fig. 2.1: Illustration of control cabinet FST-2XL MRL

FST-2XT MRL
LIFT Guard Panel
FST-2XT MRL Manual 5
2.2 LIFT Guard Panel
Q1 K72 F4.1
F4 F5 F9 F21 F1000 S21
S14 S1000 S141 S105
X110 S140
main switch
shaft light
toggle
safety circuit
controller
door drive
shaft light
car light
UPS
auxiliary control
remote shutdown
carlight
emergency operation
OFF / ON
manuel brake release A
emergency operation
manuel brake release B
emergency operation
anti-creep device
emergency operation
UCM-Override
emergency operation
liftguard - operation panel
230 VAC / 10A
S25
emergency status monitor
v = m/s
floor
zone
level
direction
Danger!
If the main switch is in
OFF position, the following
terminals are live:
X1, X5, X70, sockets
and all orange wires!
To completely isolate the
installation, the UPS must
also be turned off!
EMERGENCY OPERATION
Fig. 2.2: Operating elements of the LIFT Guard Panel
2.2.1 Emergency status monitor
The emergency status monitor replaces the optical monitoring of the drives during the return drive (EN81-1
14.2.1.4) or freeing of persons. It is connected to the LON bus of the FST controller and displays the following
information (even in the event of a power failure):
› Drive speed in m/s.
› Floor position of the car
› Levelness of the car
› Direction of travel of the drive
2.2.2 Socket 230 V AC / 10 A
The operating device socket makes it possible to connect 230VAC devices for assembly or maintenance pur-
poses. The socket is located in the shaft light circuit and is protected by the RCBO (combined residual current
device (RCD) with circuit breaker) of shaft light F9 (B 10A).
When the shaft light is switched on,the maximum possible current load of the socket is reduced by the respec-
tive power consumption of the shaft light. Only when the shaft light is switched off are 10A available on the
socket. If the power consumption is higher, fuse F9 trips.

FST-2XT MRL
LIFT Guard Panel
6 FST-2XT MRL Manual
2.2.3 Control switch and fuses
Main switch Q1
The main switch is used to switch the entire lift system (including the frequency inverter) on and off.
The UPS emergency power supply features its own internal power source (batteries). That is why the FST con-
troller, emergency current monitor and brake control components can be live even if the main switch is switched
off.
To switch off power to the entire installation, excluding the feed terminals and an optional UPS if necessary,
control switch S1000 must be switched off in addition to the main switch.
Shaft light K72
Surge relay K72 is used to control the shaft light via shaft light button S72 (on the car and in the shaft pit).
Switching the shaft light from the control unit is done by actuating the control button directly on relay K72.
Car light S14
Control switch S14 is used to switch off the car light and shut down the installation.
After control switch S14 is switched off, shut down occurs as follows:
› FST display shows REMOTE SHUTDOWN
› Car is sent to a adjustable remote shutdown oor (setting under HAUPTMENUE / Konfig / Fernabsch.
Etage)
› Car door opens for the set open hold time (setting under HAUPTMENUE / Tueren / Tueren Selektiv /
Offenhaltezeit) and then closes
› Car lighting is switched off and the installation remains shut down until S14 is switched on again
S1000 UPS ON/OFF
Control switch S1000 is used to switch the emergency power supply on and off.
The UPS features its own internal power source (batteries). To prevent the batteries from discharging during
normal operation, the following must be observed:
Only switch on emergency power supply via control switch S1000 when needed. Before leaving the installation,
switch off the emergency power supply via control switch S1000 without fail.
Opening brake S140/S141
Control buttons S140/S141 are used to manually release brake circuits A and B of the drive. They can be used
to implement the "freeing of persons", "checking the dual-circuit" and "checking the brake release monitoring
system" functions.
More information can be found in chapter 3.1 "Freeing of persons", 3.2 "Checking the dual-circuit drive brake
system" and 3.4 "Checking the brake release monitoring system".
F4 controller
The RCBO of controller F4 secures the entire safety circuit as well as power supply G1 for the FST circuit board
with 6A by default.
F4.1 safety circuit
The wiring protection of the safety circuit is performed by circuit breaker F4.1 as well as the RCBO F4. This is
2A by default.
F5 door drive
The circuit breaker of door drive F5 secures the door drive with 6A by default.
F9 shaft light
The RCBO of shaft light F9 secures the shaft light with 10A by default.

FST-2XT MRL
Frequency inverter remote control with FST-2XT keypad
FST-2XT MRL Manual 7
F21 car lighting
The RCBO of car lighting F21 secures entire lighting circuit L4 with 10A by default.
Lighting circuit L4 supplies the following components:
› Car lighting
› Car ventilation
› Socket on the car roof
› Auxiliary power supply G2
F1000 UPS
Control fuse F1000 secures the UPS of the emergency power supply with 10A by default.
The internal batteries of the UPS can only be charged with control fuse F1000 switched on. Always leave con-
trol fuse F1000 switched on in normal operation.
Auxiliary control
The auxiliary mode control makes it possible to move the car with dead man control in accordance with EN81-1:
1998 / section 14.2.1.4. This enables car movement in the upward and downward directions.
During a drive with auxiliary mode control, the drive movements must be monitored using the emergency status
monitor.
Switch positions
The following switch positions are recommended:
Switch / fuse Normal operation Auxiliary mode Freeing of persons
Q1 main switch ON ON OFF
K21 shaft light OFF - -
S14 car light ON - -
S1000 emergency
current
OFF OFF ON
F4 controller ON ON ON
F4.1 safety circuit ON ON
F5 door drive ON ON -
F9 shaft light ON - -
F21 car light ON - -
F1000 UPS ON ON -
Note: Positions labelled with "-" are not relevant for these switch positions.
2.3 Frequency inverter remote control with FST-2XT keypad
The frequency inverter installed in the shaft can be controlled remotely using the keypad of the FST-2XT via the
DCP 03 interface protocol.
The following frequency inverters are controlled as standard by NEW LIFT. You will nd the settings for these in
the course of this chapter.
› Fuji FRENIC Lift
› Ziehl-Abegg ZETADYN 3BF and ZETADYN 3CA/3CS
› Loher DYNAVERT L
› Liftequip MFC 20/21 and MFC 30/31
› CT Unidrive SP
› Brunner & Fecher FB-10, FBS-10, FB-11, FB-12
2.3.1 Basic settings of the FST-2XT

FST-2XT MRL
Frequency inverter remote control with FST-2XT keypad
8 FST-2XT MRL Manual
Please check the values pre-set by NEW LIFT before the rst assembly drive and change them if necessary.
If the values are not correct, communication with the frequency inverter is not possible.
2.3.2 Connection and operation with DCP 03
DCP 03 is a serial interface protocol which allows communication between the FST-2XT control and the fre-
quency inverter.
Benets of connection to DCP 03:
› Reduction of wiring effort
› Optimisation of data security
› Elimination of the operating device of the frequency inverter, as operation occurs via the FST-2XT controller
› Conguration of the frequency inverter via hand-held terminal HHT from any place on the LON bus as well as
optional remote control via RDT.
Connection of the DCP cable
The DCP cable must be connected before the rst assembly drive! If the DC cable is not connected, communi-
cation with the FST-2XT controller is not possible.
Ensure that the pre-sets of the frequency inverter are congured to the DCP03. If necessary, confer with
the manufacturer of the frequency inverter.
The DCP cable has a connector on one side. It is to be plugged into the FST-2XT X12 according to the wiring
diagram and connected to the frequency inverter (RS485).
Terminal assignment
Wire
colour
Signal Fuji Ziehl-
Abegg
Loher Liftequip CT Brunner &
Fecher
Pin FST-2
X12
br DATA + RS485.1 DA 7.4
(bridged)
90.2 3/5 2 4, 7
wh DATA - RS485.2 DB 8.9
(bridged)
90.1 2/4 3 8, 9
gr GND RS485.3 OVD 5 90.3 1 8 5
gr/yl PE RS485.4 Shield / / Shield / Housing
Operation with DCP 03
Operation of the installation with DCP03 is very comfortable for the user. It makes setting and conguring the
frequency inverter possible not only from the control cabinet, but also from the car with hand-held terminal HHT
(FST-IRT).
In the event of errors during data transmission of the DCP interface, an S is displayed in the FST display in line
D, column 1:
Display Meaning
Communication is running smoothly
S No connection between FST-2 XT control and frequency inverter
s Disrupted communication

FST-2XT MRL
UPS emergency power supply
FST-2XT MRL Manual 9
Frequency inverter remote control with DCP 03
To start the operation of the frequency inverter, press the button on the FST-2XT or go through HAUPT-
MENUE / Antrieb / Antriebsmennü.
The display of the frequency inverter is simulated on the FST display and the FST-2XT buttons receive the fol-
lowing functions:
FST-2 Fuji Ziehl-Abegg Loher Liftequip Brunner &
Fecher
+ UP
- DOWN
RESET
-
PRG
Cursor QUIT
FUNC
DATA
Parameter
Value
ENTER
SHIFT Move cursor
right
Save -
To return to the FST-2 operating mode, press the button on the FST-2 again or use key combination +
+ on the FST.
2.4 UPS emergency power supply
The UPS emergency power supply is assembled in the area for lift attendants in the control cabinet and already
electrically connected. It is connected via control switch S1000 and protected on the supply side via control fuse
F1000 and on the output side via micro-fuse F1001.
In the event of a power failure, the UPS provides 230 V AC power to enable the controlled freeing of persons by
the lift attendant.
The following components are supplied with emergency current:
› FST controller
› Emergency status monitor
› Brake rectier V7 for manual brake release via control switches S140 and S141
The UPS features its own internal power source (batteries) which is why the components listed above can be
live in the event of a power failure.
Only switch on the emergency power supply via control switch S1000 if necessary and switch off the emergency
power supply via control switch S1000 without fail before leaving the installation.

FST-2XT MRL
UPS emergency power supply
10 FST-2XT MRL Manual
First switch-on
Follow this procedure when switching on the UPS for the rst time:
► Read the operating instructions of the UPS carefully
► Switch on control fuse F1000
► Switch off control switch S1000
► Switch the UPS on by pressing the "ON/OFF" switch directly on the UPS housing
The UPS acknowledges the switching-on procedure with a whistle tone and both LEDs on the front of the
device light up for 2 seconds. The UPS is ready for operation when only the green LED is illuminated after the
switching-on procedure.
The UPS is not ready for use if the whistle tone does not stop after a short period of time or the green LED does
not illuminate.
Check control fuse F1000 or read chapters on rectifying faults in the operating instructions of the UPS if
necessary.
First charging process
The batteries of the UPS must be charged for at least 24 hours after they are switched on for the rst time.
Keep control switch S1000 switched off during the charging process so that no power is taken from the UPS.
Important information for storage and installation!
This package contains an UPS!
UPS – uninterruptible power supply utilising rechargeable batteries
To ensure proper function of the UPS please observe the following handling instructions!
Depending on storage temperature, the UPS must be charged for at least 8 hrs after being stored in a switched off condition for
more than 6 months at 25°C
more than 4 months at 30°C
more than 2 months at 40°C
Otherwise warranty claims will not be accepted!
Hinweis _USV_EN_V1.0_AL_281010
Maintenance of batteries
The UPS batteries are maintenance-free and are permanently monitored by the UPS electronics. A battery mal-
function is displayed by the UPS via an acoustic signal (3 whistle tones every 2 seconds).
The batteries are to be changed by personnel with battery expertise and knowledge of the required precaution-
ary measures. Keep unauthorised persons away from the batteries.
You can nd more information in the operating instructions of the UPS.

FST-2XT MRL in practice
Freeing of persons
FST-2XT MRL Manual 11
3 FST-2XT MRL in practice
3.1 Freeing of persons
The following steps may only be taken by trained lift attendants:
Evacuation instructions
Freeing of persons may only be done by trained and authorised
personnel!
Only evacuate the car in EMERGENCY SITUATIONS!
Only evacuate to the nearest floor!
NEVER bridge the safety circuit!
Step 1: Calm down affected persons
Calm down trapped persons by the car intercom (if present) or by
acclamation and announce that they will be rescued. Request the trapped
persons to hold a distance to the car door(s).
Step 2: Localise the car
With the help of the zone display, read whether the car is already in the
door zone (±200 mm):
Within the door zone; illuminates three LED
›Read off car position on display (00 = bottom floor),
Set main switch Q1 to „0“ and go on with Step 5
Outside the door zone; does not illuminate
›Go on with Step 3
Step 3: Drive car into door zone with auxiliary control
Move car up/down with S21 until zone display illuminates three LED (car
movement is displayed by directional arrows)
Read off car position, Set main switch Q1 to „0“ and go on with Step 5
Car cannot be moved using auxiliary control:
›Set main switch Q1 to „0“ an go on with Step 4
Step 4: Move car into door zone with brake release button
Switch on evacuation switch S1000
Press the optional switches S25 and / or S105 if available.
Press brake release buttons S140/S141 simultaneously and hold them
down until the speed indicator illuminates „v=m/s“ 0,2.
Let the S140/S141 go and do not press them again until the speed
indicator extinguishes.
Repeat the process until zone display illuminates three LED, read off car
position, Switch off S1000 and optionally switch of S25 and/or S105.
Step 5: Evacuate car
Go to the floor in which the car is located. Only open doors here! Unlock
shaft doors with emergency key, Open shaft & car door.
Caution! Possible risk of tripping!
Free trapped persons.
Step 6: Completing evacuation
Close car and shaft doors and lock securely.
Check to see that all shaft doors are locked!
If locking is not possible:
Block access to the shaft.
Immediately notify the responsible lift company.
If the trapped persons cannot be rescued, the breakdown service must be notified!
Inform the responsible lift company when further operation is not possible.
emergency status monitor
v = m/s
floor
zone
level
direction
S21
Q1
S1000 S141 S105
S140 S25
emergency operation
OFF / ON
manuel brake release A
emergency operation
manuel brake release B
emergency operation
anti-creep device
emergency operation
UCM-Override
emergency operation
EMERGENCY OPERATION
main switch
auxiliary control
Evak_MRL_Seil_2012_07_en 57-99169
LED‘s

FST-2XT MRL in practice
Checking the dual-circuit drive brake system
12 FST-2XT MRL Manual
3.2 Checking the dual-circuit drive brake system
For the following activities, access to the control cabinet area for authorised personnel (persons who are able
to identify and rectify all irregularities and faults that might occur during installation and operation of a lift system
and who have sufcient knowledge of the relevant provisions - German accident prevention regulations (UVV),
German occupational-insurance-association rules (BGV) section A2) is required. This must be done by two
people.
► Remove Plexiglas cover from the area for authorised personnel.
► Switch the installation into normal operation and make sure that no persons are located in the car, lock the
doors and switch the exterior controller OFF.
► Give the UP or DOWN call command
► Press button S143 during the drive and keep it pressed.
► At the same time, press one of the S140 or S141 buttons and keep it pressed; you may press S25 as an
option (if it is actuated during the drive, an emergency stop is performed by the contacts of S140 and S141
located in the safety circuit, keeping S143 and S140 or S141 pressed keeps one of the two brake circuits
released); see wiring diagram.
The car must stop with only one brake circuit.
► Repeat the process with the second brake release button
► Put the Plexiglas cover back on.
► If necessary, reset the DRM contactor monitoring error since button S143 is integrated in the contactor moni-
toring system for monitoring purposes.
3.3 Checking traction with counterweight applied
The procedure for checking traction is dependent on the type of shaft positioning system.
3.3.1 Procedure for incremental positioning
The following steps are taken to check the traction:
► Level the car in the top oor.
► Lock the exterior controller with the button.
The car door opens
► Switch on the auxiliary mode control when the car door is open.
► Fasten test aid on the car door frame (several self-adhesive strips are attached to the test aid)
► Move the car upwards using the auxiliary control.
Close shaft and car door, test aid is visible from the oor through the shaft door slot, car moves upwards
► Observe test aid and emergency status monitor during the drive
If the test aid comes to a stop after the permissible movement past a oor and the emergency status monitor
displays a speed of v > 0 m/s, the traction check was successful, i.e. the empty car is not pulled to the ceiling
and the bearer cables glide.
If the test aid moves upwards farther than the permissible movement past a oor and does not come to a stop,
the traction is too high!
► Move the car downwards away from the upper emergency end switch using the auxiliary control and level it
in the highest oor.
► Switch off auxiliary control
Car door open
► Remove test aid
► Give test command
► Enable the exterior controller with the button
The installation is once again operating normally

FST-2XT MRL in practice
Checking the brake release monitoring system
FST-2XT MRL Manual 13
3.3.2 Procedure for absolute positioning
The following steps are taken to check the traction:
► Level the car in the top oor
► Switch on auxiliary mode control
► Call up the following display in the FST menu:
MAIN MENU -> Drive-> Controller menu -> ACTUAL speed parameter
Since the menu trees are dependent on the manufacturers of the frequency inverters and they are therefore
different, these parameters can be found in the documentation of the frequency inverter.
The FST display shows the current drive speed.
The emergency status monitor shows the current car speed.
► Move the car using the auxiliary control. Observe both the FST display and the emergency status monitor.
If the car comes to a standstill after a short time when the drive is rotating (the car speed on the emergency
status monitor is 0 m\s and the drive speed on the FST display is greater than 0 min-1), the traction test was
successful.
If the car does not come to a standstill after a short time (the car speed on the emergency status monitor is
greater than 0 m\s), the traction is too high!
► Move the car downwards away from the upper emergency end switch using the auxiliary control.
► Switch off auxiliary control
► Give test command
The installation is once again operating normally
3.4 Checking the brake release monitoring system
The brake release contacts are monitored during a standstill, when starting up and during a drive. A brake
malfunction leads to error messages in the frequency inverter and in the FST-2XT which cause the installation
to shut down:
The error messages are transmitted to the FST controller via the DCP03 and lead to the "DRM brake error"
message. They are stored in the error list of the FST controller along with the time and date.
Procedure for checks as well as for UCM-A3 execution for the "UCM-A3 drive error":
Resetting is done via the "Error reset" test menu; select UCM-A3 error reset for the UCM-A3 drive error.
Note:
Switching the controller power supply on/off does not reset the UCM-A3 drive error; this is only possi-
ble with the UCM-A3 error reset!
Further information on commissioning as well as checking the UCM-A3 function can be found in the
UCM-A3 Manual.

FST-2XT MRL in practice
Checking the brake release monitoring system
14 FST-2XT MRL Manual
The following steps are taken to check the brake release monitoring system by disconnecting one of the two
brake magnets:
Note:
For the following activities, access to the control cabinet area for authorised personnel is required.
The following activities may only be performed by authorised personnel who:
› Are able to identify and rectify all irregularities and faults that might occur during installation and operation of a
lift system,
› Have sufcient knowledge of the relevant provisions (German accident prevention regulations (UVV), Germany
directives and statutes of trade associations (VGB))
Note:
Laws, regulations, guidelines and standards that apply in the country of operation must be followed in
addition to the safety regulations mentioned in this manual.
► Remove Plexiglas cover from the area for authorised personnel.
► Switch on auxiliary mode control.
► Disconnect supply to brake release monitoring contact A, see wiring diagram.
This causes a response only from brake circuit B during start-up.
► Switch off auxiliary control and give command.
► For the test, simultaneously actuate brake buttons S143, S140 and S25 if necessary (optional) for approx. 3
seconds.
► The DRM brake monitoring error message appears in the display during "emergency stop" actuation after
both buttons have been released.
► Reset this error under service error reset.
The FST detects that a brake circuit is not de-energised in standstill and shuts down the installation.
The FST controller outputs the "DRM brake error“ message immediately after start-up.
The drive is cancelled.
► Execute the test in the same way with brake release button S141 for brake circuit B.
For more tests for putting the lift system into operation, please read chapters 6.6.2 and 6.7.4 in the Installation
and Commissioning Manual.

FST-2XT MRL Manual 15

NEW LIFT Steuerungsbau GmbH
Lochhamer Schlag 8
82166 Graefelfing
Tel +49 89 – 898 66 – 0
Fax +49 89 – 898 66 – 300
Mail [email protected]
Service line
Tel +49 89 – 898 66 – 110
Mail [email protected]
www.newlift.de
/