Page is loading ...

3-076-559-16(1)
Digital Still Camera
Operating Instructions
Before operating the unit, please read this manual thoroughly, and
retain it for future reference.
Owner’s Record
The model and serial numbers are located on the bottom. Record
the serial number in the space provided below.
Refer to these numbers whenever you call upon your Sony dealer
regarding this product.
Model No. DSC-U10
Serial No.
DSC-U10
© 2002 Sony Corporation
Getting started _________________________
Shooting still images ___________________
Viewing still images ____________________
Enjoying movies _______________________
Deleting images________________________
Copying images _____________________
Troubleshooting _______________________
Additional information__________________
Index

2
To prevent fire or shock hazard, do not expose
the unit to rain or moisture.
WARNING
For the Customers in the U.S.A.
This symbol is intended to alert the user to
the presence of uninsulated “dangerous
voltage” within the product’s enclosure
that may be of sufficient magnitude to
constitute a risk of electric shock to
persons.
This symbol is intended to alert the user to
the presence of important operating and
maintenance (servicing) instructions in the
literature accompanying the appliance.

3
If you have any questions about this product, you may call:
Sony Customer Information Services Center
1-800-222-SONY (7669)
The number below is for the FCC related matters only.
CAUTION
You are cautioned that any changes or modifications not
expressly approved in this manual could void your
authority to operate this equipment.
Note:
This equipment has been tested and found to comply with
the limits for a Class B digital device, pursuant to Part 15
of the FCC Rules. These limits are designed to provide
reasonable protection against harmful interference in a
residential installation. This equipment generates, uses,
and can radiate radio frequency energy and, if not installed
and used in accordance with the instructions, may cause
harmful interference to radio communications. However,
there is no guarantee that interference will not occur in a
particular installation. If this equipment does cause
harmful interference to radio or television reception,
which can be determined by turning the equipment off and
on, the user is encouraged to try to correct the interference
by one or more of the following measures:
– Reorient or relocate the receiving antenna.
– Increase the separation between the equipment and
receiver.
– Connect the equipment into an outlet on a circuit
different from that to which the receiver is connected.
– Consult the dealer or an experienced radio/TV
technician for help.
The supplied interface cable must be used with the
equipment in order to comply with the limits for a digital
device pursuant to Subpart B of Part 15 of FCC Rules.
Declaration of Conformity
Trade Name: SONY
Model No.: DSC-U10
Responsible Party:Sony Electronics Inc.
Address: 680 Kinderkamack Road, Oradell,
NJ 07649 USA
Telephone No.: 201-930-6972
This device complies with Part 15 of the FCC Rules.
Operation is subject to the following two conditions: (1)
This device may not cause harmful interference, and
(2) this device must accept any interference received,
including interference that may cause undesired
operation.

4
CAUTION
TO PREVENT ELECTRIC SHOCK, DO NOT USE THIS
POLARIZED AC PLUG WITH AN EXTENSION CORD,
RECEPTACLE OR OTHER OUTLET UNLESS THE
BLADES CAN BE FULLY INSERTED TO PREVENT
BLADE EXPOSURE.
A moulded plug complying with BS 1363 is fitted to this
equipment for your safety and convenience.
Should the fuse in the plug supplied need to be replaced, a 5
AMP fuse approved by ASTA or BSI to BS 1362, (i.e., marked
with or mark) must be used.
If the plug supplied with this equipment has a detachable fuse
cover, be sure to attach the fuse cover after you change the
fuse. Never use the plug without the fuse cover. If you should
lose the fuse cover, please contact your nearest Sony service
station.
For the Customers in the U.S.A. and
Canada
RECYCLING NICKEL METAL HYDRIDE
BATTERIES
Nickel Metal Hydride batteries are
recyclable.
You can help preserve our environment by
returning your used rechargeable batteries
to the collection and recycling location
nearest you.
For more information regarding recycling of
rechargeable batteries, call toll free
1-800-822-8837, or visit http://www.rbrc.org/
CAUTION:
Do not handle damaged or leaking Nickel Metal
Hydride batteries.
Notice for the customers in the United
Kingdom

5
Directive: EMC Directive 89/336/EEC, 92/31/EEC
This equipment complies with the EMC regulations when
used under the following circumstances:
• Residential area
• Business district
• Light-industry district
(This equipment complies with the EMC standard
regulations EN55022 Class B.)
This product has been tested and found compliant with the
limits sets out on the EMC Directive for using connection
cables shorter than 3 meters.
The electromagnetic fields at the specific frequencies may
influence the picture and sound of this camera.
If static electricity or electromagnetism causes data transfer
to discontinue midway (fail), restart the application or
disconnect and connect the USB cable again.
Certain countries may regulate disposal of the battery used to
power this product. Please consult with your local authority.
For the Customers in the U.S.A. and
Canada
THIS DEVICE COMPLIES WITH PART 15 OF THE
FCC RULES. OPERATION IS SUBJECT TO THE
FOLLOWING TWO CONDITIONS:
(1) THIS DEVICE MAY NOT CAUSE HARMFUL
INTERFERENCE, AND (2) THIS DEVICE MUST
ACCEPT ANY INTERFERENCE RECEIVED,
INCLUDING INTERFERENCE THAT MAY CAUSE
UNDESIRED OPERATION.
THIS CLASS B DIGITAL APPARATUS COMPLIES
WITH CANADIAN ICES-003.
For the Customers in Germany
Attention for the Customers in Europe
Attention
Notice
“Memory Stick”

6
Before using your camera
Trial recording
Before you record one-time events, you may want to make a
trial recording to make sure that the camera is working
correctly.
No compensation for contents of the recording
Contents of the recording cannot be compensated for if
recording or playback is not possible due to a malfunction of
your camera or recording media, etc.
Notes on image data compatibility
• This camera conforms with the Design rule for Camera File
system universal standard established by the JEITA (Japan
Electronics and Information Technology Industries
Association).
• Playback of images recorded with your camera on other
equipment and playback of images recorded or edited with
other equipment on your camera are not guaranteed.
Note on “Memory Stick”
This camera turns off whenever you remove the batteries or the
“Memory Stick.” Do not open the battery/“Memory Stick”
cover while the access lamp is on.
Precaution on copyright
Television programs, films, video tapes, and other materials
may be copyrighted. Unauthorized recording of such materials
may be contrary to the provision of the copyright laws.
Do not shake or strike the camera
In addition to malfunctions and inability to record images, this
may render the “Memory Stick” unusable or image data
breakdown, damage or loss may occur.
LCD screen, LCD finder (only models with a
finder) and lens
• The LCD screen and the LCD finder are manufactured using
extremely high-precision technology so over 99.99% of the
pixels are operational for effective use. However, there may
be some tiny black points and/or bright points (white, red,
blue or green in color) that constantly appear on the LCD
screen and the LCD finder. These points are normal in the
manufacturing process and do not affect the recording in any
way.
• Be careful when placing the camera near a window or
outdoors. Exposing the LCD screen, the LCD
finder or the
lens to direct sunlight for long periods may cause
malfunctions.
Do not get the camera wet
When taking pictures outdoors in the rain or under similar
conditions, be careful not to get the camera wet. If moisture
condensation occurs, see page 91 and follow the instructions
on how to remove it before using the camera.
Back up recommendation
To avoid the potential risk of data loss, always copy (back up)
data to a disk.

7
The pictures used in this manual
The photographs used as examples of pictures in this manual
are reproduced images, and are not actual images shot using
this camera.
Trademarks
• “Memory Stick,” , “MagicGate Memory Stick,” and
, are trademarks of Sony Corporation.
• “MagicGate” and are trademarks of
Sony Corporation.
• Microsoft and Windows are registered trademarks of the
U.S. Microsoft Corporation in the United States and other
countries.
• Macintosh, Mac OS, and QuickTime, are trademarks or
registered trademarks of Apple Computer, Inc.
• In addition, system and product names used in this manual
are, in general, trademarks or registered trademarks of their
respective developers or manufacturers. However, the
™
or ®
marks are not used in all cases in this manual.
How to hold the camera
When shooting an image with the camera, be careful
not to obstruct the flash or the lens with your fingers.

8
Table of contents
How to hold the camera ..............................................7
Identifying the parts ..................................................10
Preparing batteries.....................................................12
Charging the batteries................................................12
Inserting the batteries ................................................16
Turning on/off your camera ......................................19
Setting the date and time...........................................20
Inserting and removing a “Memory Stick” ...............22
Setting the still image size.........................................23
Basic still image shooting (using auto adjustment
mode) ................................................................26
Using the self-timer...............................................29
Selecting a flash mode ..........................................32
Shooting according to scene conditions – Scene
Selection............................................................34
Setting the distance to the subject – Focus preset.....36
Shooting five images continuously – Burst...............38
Adding special effects – Picture Effect.....................40
Viewing still images on the LCD screen .................. 42
Viewing single images.......................................... 43
Viewing an index screen (four-image)................. 44
Choosing images to print – Print mark..................... 46
Shooting movies ....................................................... 48
Viewing movies on the LCD screen......................... 50
Deleting images ........................................................ 52
Formatting a “Memory Stick” .................................. 54
Copying images to your computer............................ 56
1 Installing the USB driver and application .......... 58
2 Preparing your camera ........................................ 67
3 Connecting your camera to your computer ........ 68
4 Copying images .................................................. 70
5 Viewing the images on your computer................ 75
For Macintosh users.................................................. 76
Getting started
Shooting still images
Viewing still images
Enjoying movies
Deleting images
Copying images

9
Troubleshooting........................................................ 78
Warnings and messages............................................ 85
Self-diagnostics display ............................................ 86
Menu items................................................................ 87
Using your camera abroad ........................................ 90
Precautions................................................................ 90
On “Memory Stick”.................................................. 92
On Nickel Metal Hydride batteries........................... 93
Specifications............................................................ 94
LCD screen displays ................................................. 96
Index ......................................................................... 99
Troubleshooting
Additional information


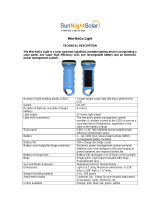
11
A LCD screen
B Flash charge lamp (orange) (33)
C MENU button
D Control button
Menu on: v/V
Menu off: /SCENE (32, 35)
E EXEC button
F Hook for neck strap
G Battery/“Memory Stick” cover
H OPEN button (16)
I Access lamp (23)
J USB jack (68)
K USB jack cover
L RESET button (bottom surface) (78)
1
2
3
5
4
0
qa
9
7
6
8
qs
Attaching the
neck strap
How to use the control button and EXEC button
To change the current settings of the camera,
bring up the menu, and use the control button
to make the changes.
For each item, press MENU and press v/V
on the control button to select the desired
value, then press EXEC to make the setting.
Press MENU, then the menu disappears
from the LCD screen.

12
Preparing batteries
Use the following batteries in this camera.
Acceptable batteries
Size AAA Nickel Metal Hydride batteries (2)
– NH-AAA-DI (2) (supplied)
– NH-AAA-2DI twin-pack (not supplied)
Batteries that cannot be used*
Manganese batteries, lithium batteries, Ni-Cd batteries,
alkaline batteries
* When the above batteries are used, operation is not
guaranteed due to possible voltage drops or other
characteristics of the batteries. In addition, the battery
remaining indicator is not displayed correctly.
Charging the batteries
, Insert Nickel Metal Hydride batteries into
the charger (supplied).
1
BC-CS1
(supplied)
Insert with the correct polarity +/–
Getting started

13
Getting started
• Be sure to charge the Nickel Metal Hydride batteries
supplied with your camera before using them.
• We recommend charging the batteries in an ambient
temperature of between 10°C to 30°C (50°F to 86°F). If the
batteries are charged in an environment where the temperature
is outside that range, the batteries may not charge efficiently.
• Connect the battery charger to an easily accessible wall outlet
(wall socket) close by. Note that the battery charger is not
isolated from the power source (mains) even if the CHARGE
lamp is off. If some trouble occurs while using the charger,
immediately shut off the power by disconnecting the plug out
of the wall outlet (wall socket).
, Connect the charger to a wall outlet (wall
socket) using the power cord (mains
lead).
The CHARGE lamp lights up when charging begins,
and goes off when charging is completed. It takes about
13 hours to completely charge the batteries.
• When charging is finished, disconnect the power cord (mains
lead) from the wall outlet (wall socket), and remove the
Nickel Metal Hydride batteries from the charger.
• Always use the case supplied when transporting the Nickel
Metal Hydride batteries. If the positive and negative
terminals come into contact with metallic material and are
shorted, the batteries could overheat or catch fire.
2
To the wall outlet
(wall socket)
Power cord
(mains lead)
CHARGE lamp

14
Charging the Nickel Metal Hydride
batteries
• If the poles of the Nickel Metal Hydride batteries are dirty,
the batteries may not charge properly. Occasionally clean
the poles of the batteries and the terminals of the charger
by wiping them with a dry cloth.
• At the time of purchase, or when the Nickel Metal
Hydride batteries haven’t been used for a long time, they
may not fully charge. This is typical of this type of battery,
and is not a malfunction. If this happens, several cycles of
using the battery until it is completely drained and then
charging the battery fully should correct the problem.
• Even when Nickel Metal Hydride batteries are not being
used they lose their charge naturally over time. It is
recommended that you recharge the batteries just before
using them.
• If you recharge Nickel Metal Hydride batteries before
fully using up the existing charge, the low battery warning
may be displayed sooner than expected. This is called the
“memory effect.”* If this problem occurs, charging the
batteries only after using up the existing charge will
correct it.
* The “memory effect” – the situation in which the
capacity of the battery is temporarily lowered.
Precautions to be observed when
charging the batteries
• Do not charge any other batteries except Sony Nickel
Metal Hydride batteries in the charger supplied with your
camera. If you try to charge any other type of battery (e.g.,
manganese batteries, alkaline dry cells, or one-time
lithium batteries) than the batteries specified, those
batteries may leak, overheat, or explode, causing the
danger of burns or other injuries.
• Be sure to charge both Nickel Metal Hydride batteries at
the same time.
• When the batteries are charged, use them only in an
environment where the temperature range is 10°C to 30°C
(50°F to 86°F). Otherwise, there is a danger of leaks,
explosions, excessive heat, fire, or electric shock.
• Do not charge fully charged Nickel Metal Hydride
batteries again. Otherwise, there is a danger of leaks,
explosions, excessive heat, fire, or electric shock.
• Do not peel off the external seals or damage the batteries.
Never use batteries from which the seals have been
partially or completely removed, or batteries that have
been split in any way.

15
Getting started
Charging time
This represents the time required to charge fully
depleted Nickel Metal Hydride batteries using the
supplied BC-CS1 charger in an environment where
the ambient temperature is 25°C (77°F).
• It takes about 13 hours to completely charge the batteries.
The CHARGE lamp may remain lit longer than 13 hours,
but this is not a malfunction.
• Do not remove the batteries while charging is still in
progress. If you remove the batteries while charging is
still in progress and then re-insert the batteries, the
charging process will start over from the beginning.
• If you use the ACC-UNQ STAMINA “Super Quick
charge” kit (not supplied), the batteries will charge faster.
Charging time
Size AAA Nickel Metal Hydride batteries
2 batteries: Approx. 1 hour 15 minutes
4 batteries: Approx. 2 hours 30 minutes
Battery remaining indicator (when
using Nickel Metal Hydride batteries)
As the battery power decreases with use, the battery
remaining indicator displays the amount of power
remaining using the following symbols.
• If the LCD screen display is off, set [DISPLAY] in [ ]
to [ON] with MENU and v/V on the control button to turn
it on.
• Based on the conditions under which the camera is being
used and the state of the charge, or on the environment,
this information may not be correctly indicated.
• The battery remaining indicator is not displayed in USB
connecting.
Nickel Metal Hydride
battery
Charging time
NH-AAA-DI × 2 (supplied) Approx. 13 hours
Battery
remaining
indicator
Battery remaining guidelines
Sufficient power remaining
Battery half full
Battery low, recording/playback will
stop soon.
Change the batteries for fully charged
ones, or charge these batteries.
(Battery remaining indicator flashes.)

16
Inserting the batteries
, Open the battery/“Memory Stick” cover.
Slide the cover in the direction of the arrow 1 while
pressing OPEN. The battery/“Memory Stick” cover
opens in the direction the arrow 2.
, Insert the batteries.
Match the +/– poles of the batteries to the +/– marks
inside the battery case.
• From time to time, use a dry cloth to wipe any dirt off of the
battery terminals and the contacts inside the battery/
“Memory Stick” cover. Skin oil and other dirt on the battery
terminals and contacts can significantly shorten the operating
time provided by the batteries.
1
2

17
Getting started
, Close the battery/“Memory Stick” cover.
Close the battery/“Memory Stick” cover while holding
the batteries in. Make sure the cover is closed securely.
To remove the batteries
Hold the camera with the battery/“Memory Stick”
cover facing upward, open the cover, and remove the
batteries.
• Be careful not to drop the batteries when opening or closing
the battery/“Memory Stick” cover.
3
Battery life and number of images
that can be recorded/viewed
The tables show the approximate battery life and the
number of images that can be recorded/viewed with
a fully charged batteries at a temperature of 25°C
(77°F) in auto adjustment mode. The numbers of
images that can be recorded or viewed take into
account changing the supplied “Memory Stick” as
necessary. Note that the actual numbers may be less
than indicated depending on the conditions of use.
Shooting still images
Under the average conditions*
1)
*1) Shooting in the following situations:
– [LCD LIGHT] is set to [ON]
– Shooting one time every 30 seconds
– The flash strobes once every two times
– The power turns on and off once every ten times.
* SXGA: Abbreviation of Super eXtended Graphics
Array; indicates an image size of 1280×960
Image size
NH-AAA-DI (2) (supplied)
No. of images Battery life
(min.)
1280×960
(SXGA)*
Approx. 120 Approx. 60

18
Shooting continuously*
2)
*2) Shooting in the following situations:
– The flash mode is set to (no flash)
– Continuous shooting approximately every 2.5
seconds
* SXGA: Abbreviation of Super eXtended Graphics
Array; indicates an image size of 1280×960
** VGA: Abbreviation of Video Graphics Array;
indicates an image size of 640×480
Viewing still images*
3)
*3) Viewing single images in order at about 3-second
intervals with LCD LIGHT ON
Image size
NH-AAA-DI (2) (supplied)
LCD
LIGHT
No. of
images
Battery life
(min.)
1280×960
(SXGA)*
ON Approx. 1600 Approx. 60
OFF Approx. 1800 Approx. 70
640×480
(VGA)**
ON Approx. 1600 Approx. 60
OFF Approx. 1800 Approx. 70
Image size NH-AAA-DI (2) (supplied)
No. of images Battery life (min.)
1280×960 Approx. 2400 Approx. 120
640×480 Approx. 2400 Approx. 120
Shooting movies*
4)
*4) The maximum shooting time is 15 seconds
The remaining indicator will decrease in the
following situations:
– The surrounding temperature is low
– The flash is used
– The camera has been turned on and off many times
– [LCD LIGHT] is set to [ON]
– The battery power is low
– The battery capacity decreases as you use it more and
more and as time passes (page 93).
NH-AAA-DI (2) (supplied)
LCD LIGHT Battery life
(min.)
Continuous
shooting
ON Approx. 60
OFF Approx. 70

19
Getting started
Turning on/off your camera
, Slide the lens cover in the direction of
the arrow or press the POWER button.
When you open the lens cover or press the POWER
button, the power is automatically on. The POWER
lamp (green) lights up. When you turn on your camera
for the first time, the DATE NOTATION screen
appears on the LCD screen (page 20).
To turn off the power
Slide the lens cover in the opposite direction of the
arrow or press the POWER button again. The POWER
lamp goes out, and the camera turns off.
• If you open the lens cover too quickly, the camera might not
turn on. If this happens, close the cover and then open it
again more slowly.
POWER
POWER button
POWER lamp
Auto power-off function
If you do not operate the camera for about
3 minutes during shooting or viewing or when
performing setup, the camera turns off
automatically to prevent wearing down the battery.
The auto power-off function also will not operate
when a connector is plugged into the USB jack.

20
Setting the date and time
, Slide the lens cover in the direction of
the arrow or press the POWER button to
turn on the power.
The POWER lamp (green) lights up and the DATE
NOTATION screen appears on the LCD screen.
• This operation is available no matter what position the mode
switch is in.
• To change the date and time, press MENU and select
[DATE&TIME SET] in [CLOCK SET] under [ ]
(page 89), then perform the procedure from step 3.
, Select the desired date display format
with v/V on the control button, then
press EXEC.
Select from [Y/M/D] (year/month/day), [M/D/Y]
(month/day/year) or [D/M/Y] (day/month/year). Then
DATE&TIME SET screen appears on the LCD screen.
• If the rechargeable button battery, which provides the power
for saving the time data, is ever fully discharged (page 91),
the DATE NOTATION screen will appear again. When this
happens, reset the date and time, by starting from step 2.
POWER
1
M/D/Y
D/M/Y
2002
12:00:00
AM
DATE NOTATION
11
Y/M/D
POWER
button
2
Y/M/D
12:00
AM
DATE&TIME SET
1 12002
EXEC
/